> For the complete documentation index, see [llms.txt](https://docs.samita.io/llms.txt). Markdown versions of documentation pages are available by appending `.md` to page URLs; this page is available as [Markdown](https://docs.samita.io/badges-and-labels/upload-badge-image.md).

# Upload your own badge image

Use your own artwork on an image badge by uploading a file from your computer or importing it from a direct image link.

Besides the built-in image library, Sami Product Labels lets you use your own artwork on an image badge. You can **upload a file from your computer** or **import an image from a URL**. Uploaded images are saved in your own image list, so you can reuse them on other badges later.

## Before you start

Prepare an image that matches the recommendations shown in the badge editor:

| Requirement  | Recommended value |
| ------------ | ----------------- |
| File formats | PNG, JPG, SVG     |
| Maximum size | 5 MB              |
| Dimensions   | 512 × 512 px      |

{% hint style="info" %}
A square **PNG with a transparent background** looks best, because the badge sits on top of the product image.
{% endhint %}

## Open the image picker

{% stepper %}
{% step %}

## Open Badges & Labels

In Shopify admin, open **Sami Product Labels > Badges & Labels**.
{% endstep %}

{% step %}

## Create an image badge

Click **Create badge**, then in **Choose badge type** click **Create** on the **Image badge** card.

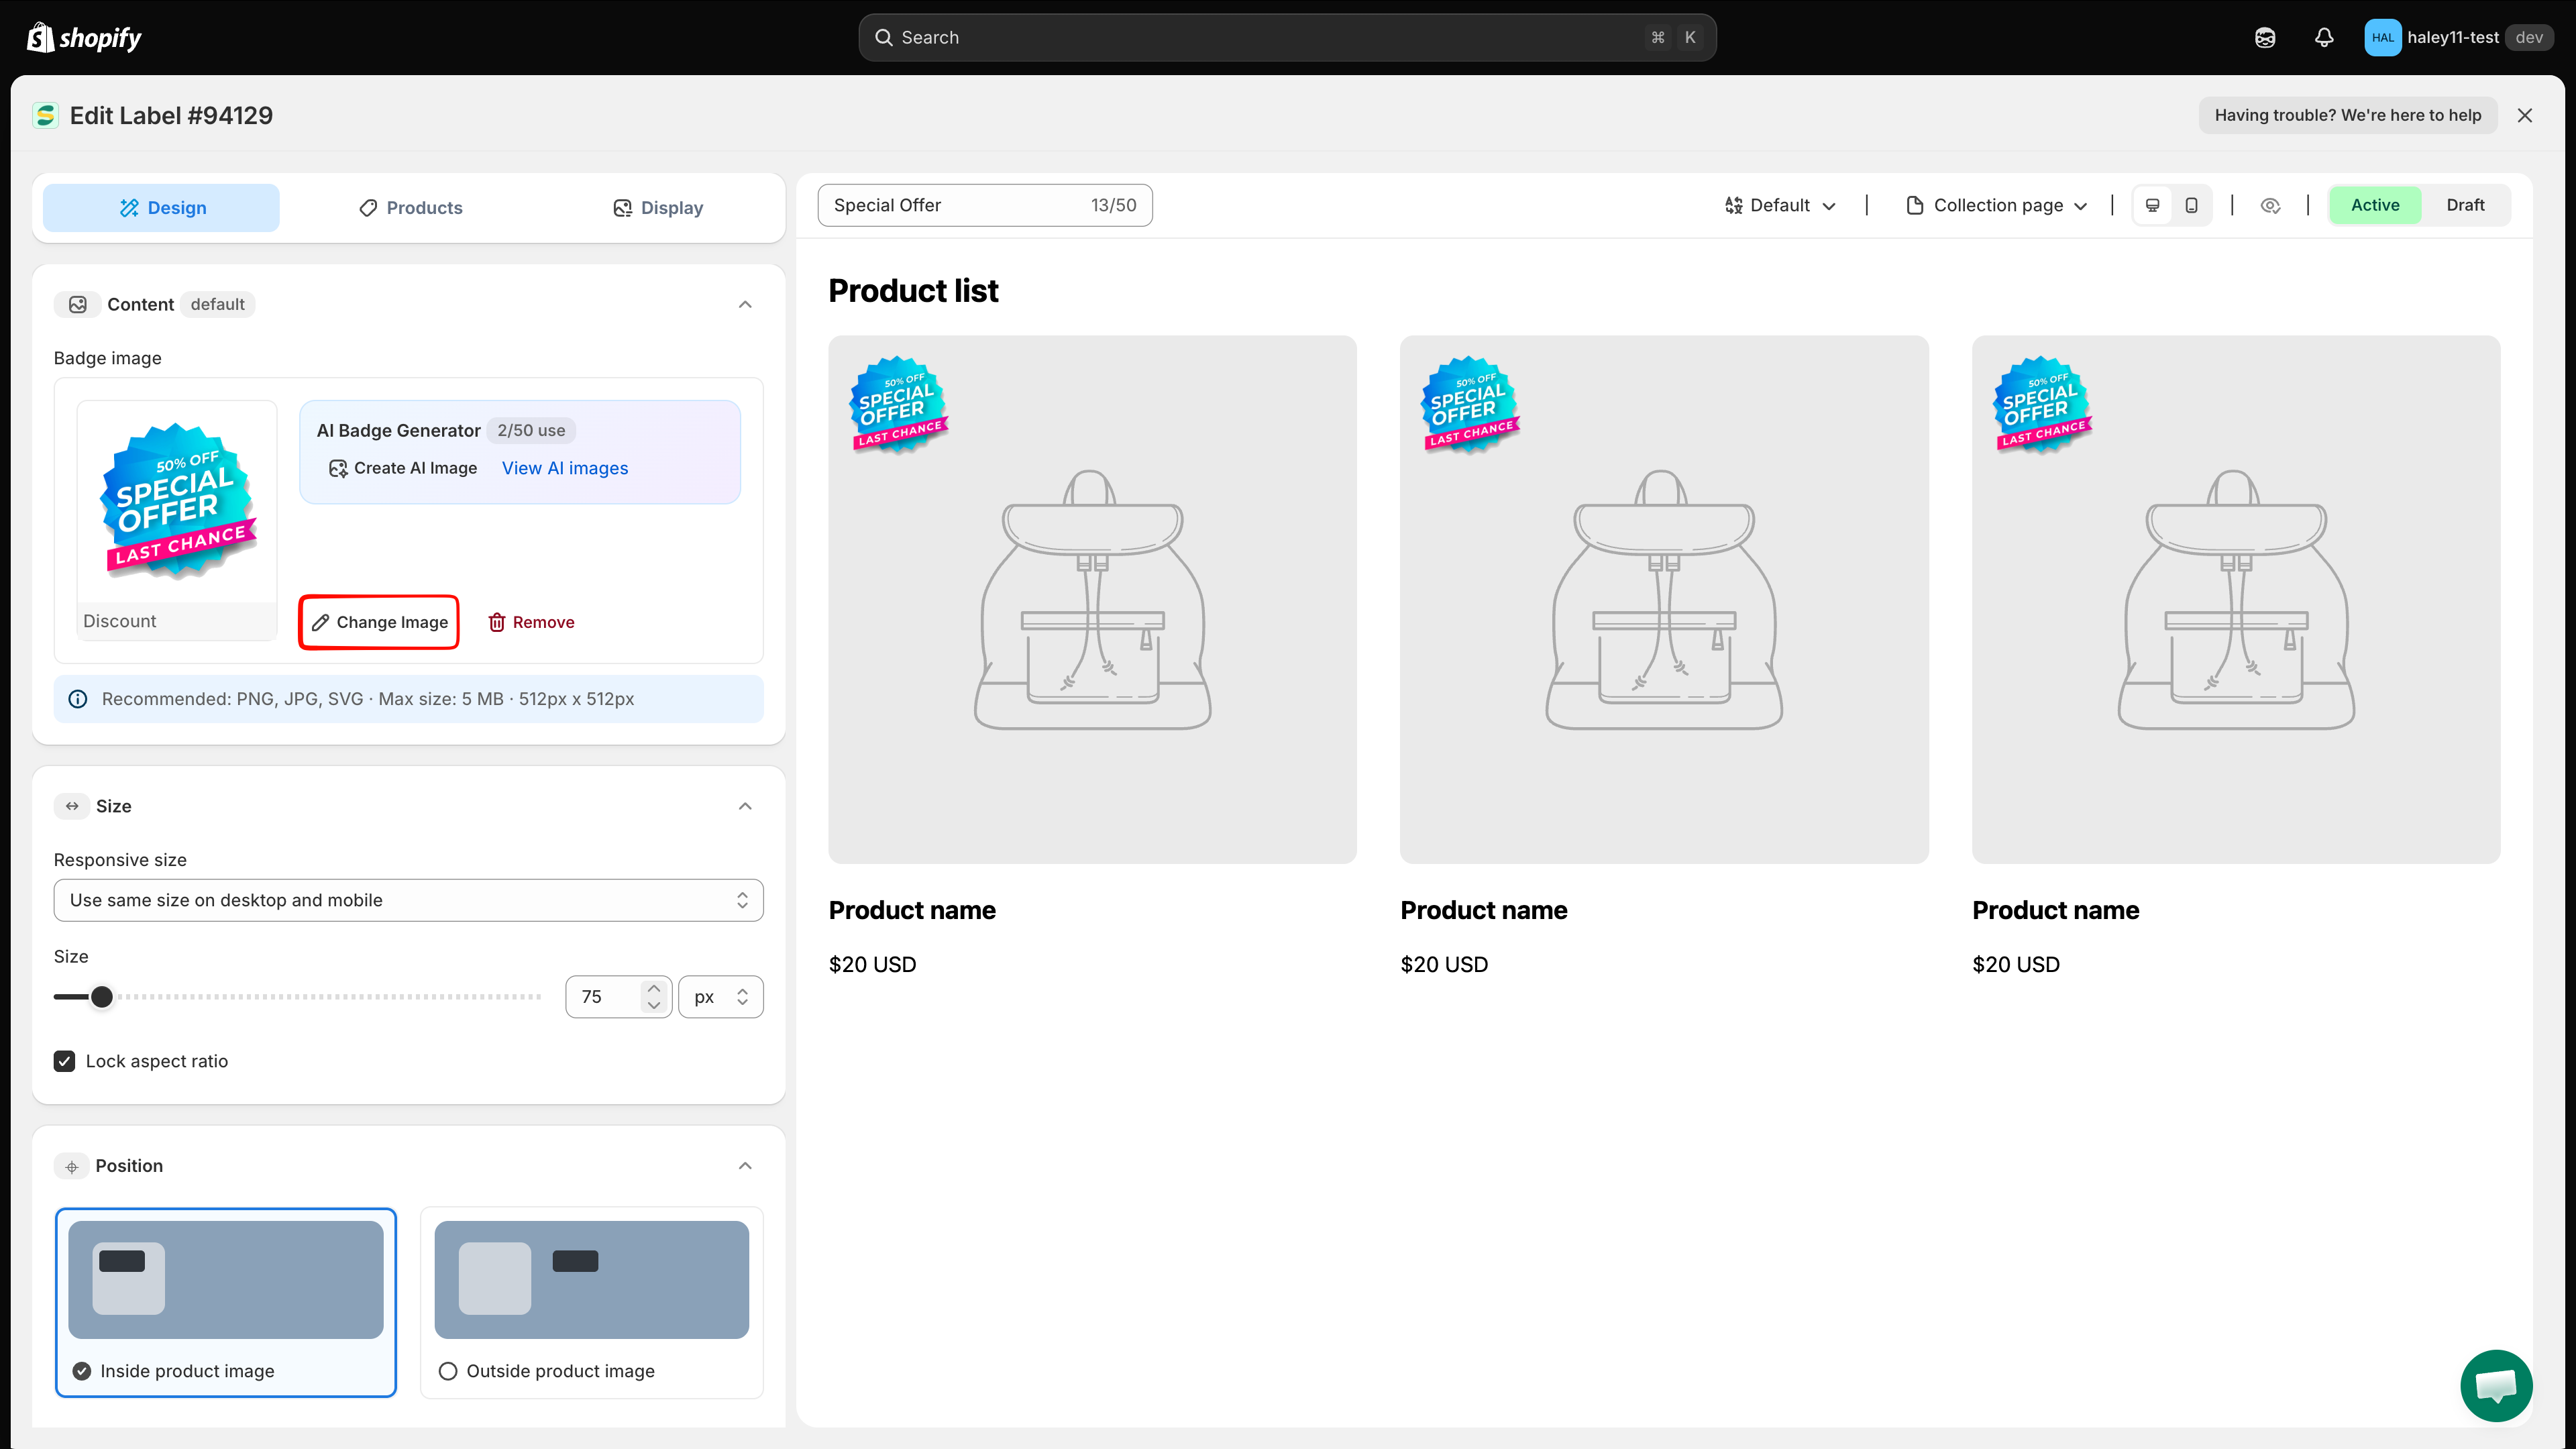
To change the image of an existing badge instead, click the pencil icon in that badge's row, then click **Change Image** in the **Content** section.

<figure><img src="https://1598842017-files.gitbook.io/~/files/v0/b/gitbook-x-prod.appspot.com/o/spaces%2F1WRTlT5AcaLSAedbCJyZ%2Fuploads%2Fgit-blob-04417857ec11feef24e735cfbaa5cdb9021fc01e%2Fimage_78.png?alt=media" alt="Choose badge type dialog with the Image badge option"><figcaption><p>Select Image badge to start a badge that uses a graphic.</p></figcaption></figure>
{% endstep %}

{% step %}

## Switch to "Design your Images"

The **Select Image** panel opens on the right with a default image already applied. Next to **Source**, click **Design your Images**.

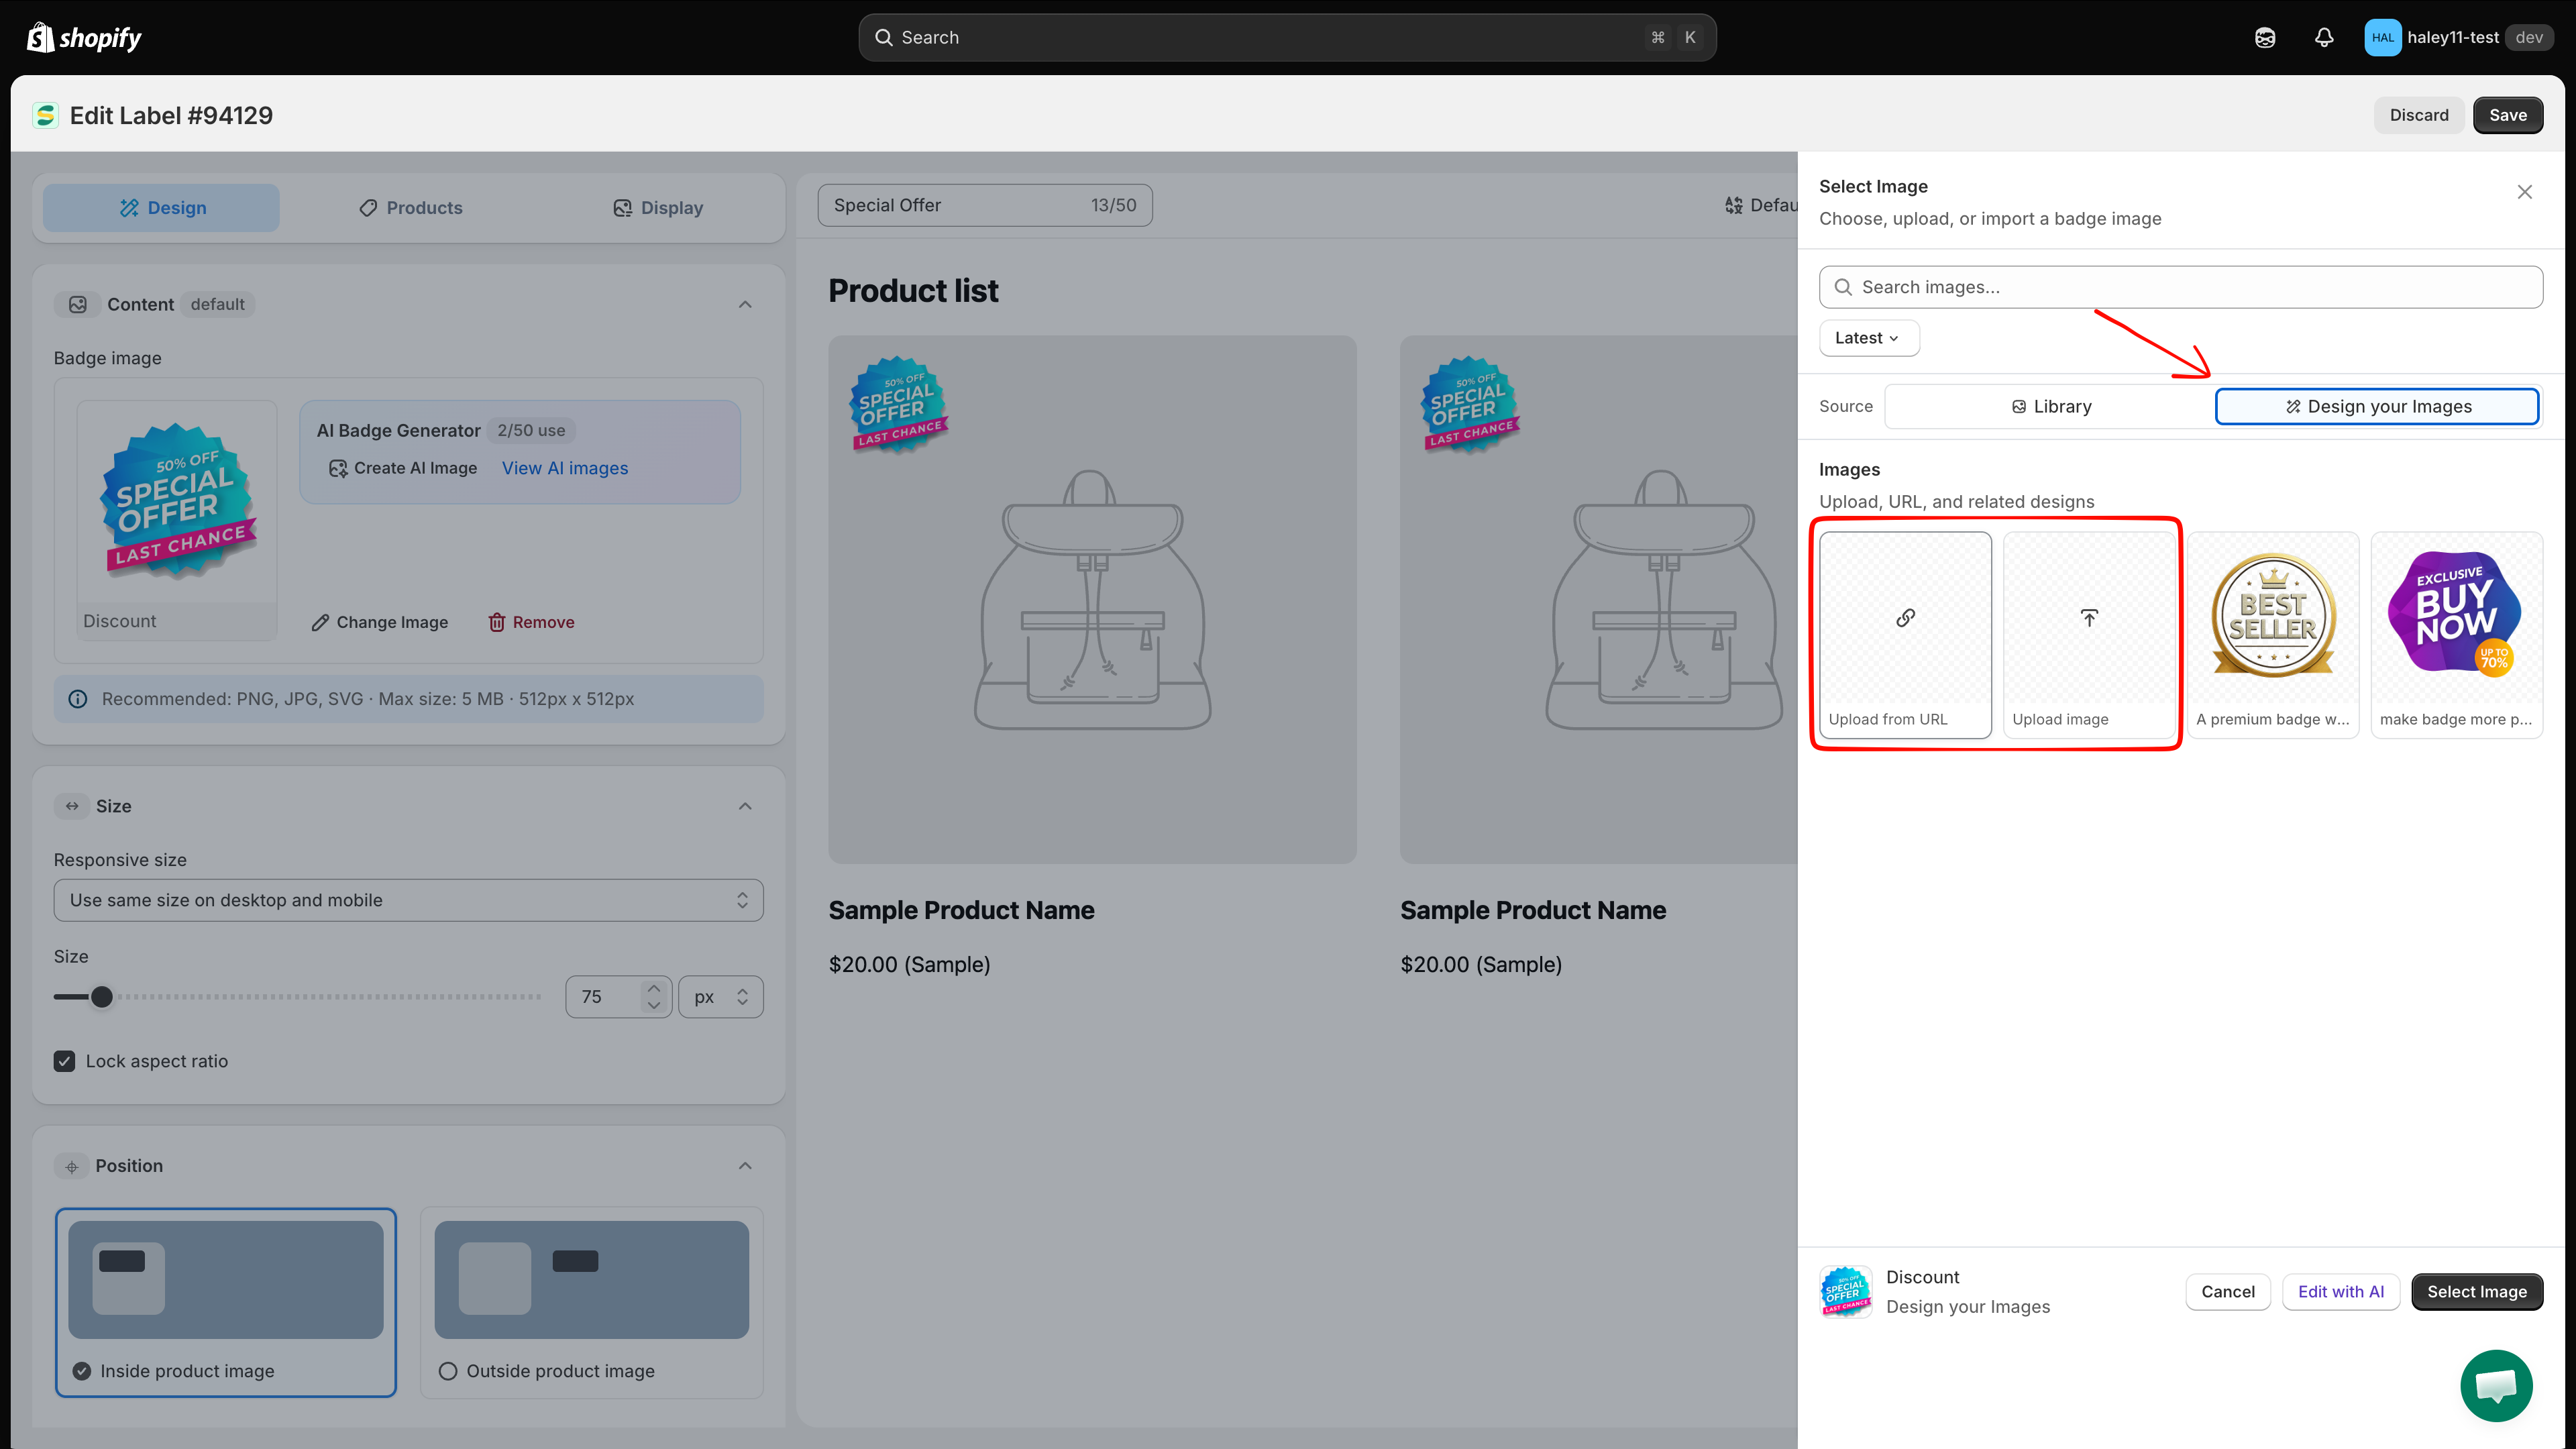
This tab holds everything that belongs to your store: images you uploaded, images imported from a URL, and AI-generated images. The first two tiles are the actions **Upload from URL** and **Upload image**.

<figure><img src="https://1598842017-files.gitbook.io/~/files/v0/b/gitbook-x-prod.appspot.com/o/spaces%2F1WRTlT5AcaLSAedbCJyZ%2Fuploads%2Fgit-blob-f0fd0907a5bf91f27749db8040f865b0bcc33e56%2Fimage_79.png?alt=media" alt="Select Image panel with the Library and Design your Images source tabs"><figcaption><p>Design your Images contains your own artwork, plus the Upload from URL and Upload image actions.</p></figcaption></figure>
{% endstep %}
{% endstepper %}

## Add your image

Choose the way that fits your artwork.

{% tabs %}
{% tab title="Upload from your computer" %}
{% stepper %}
{% step %}

## Click "Upload image"

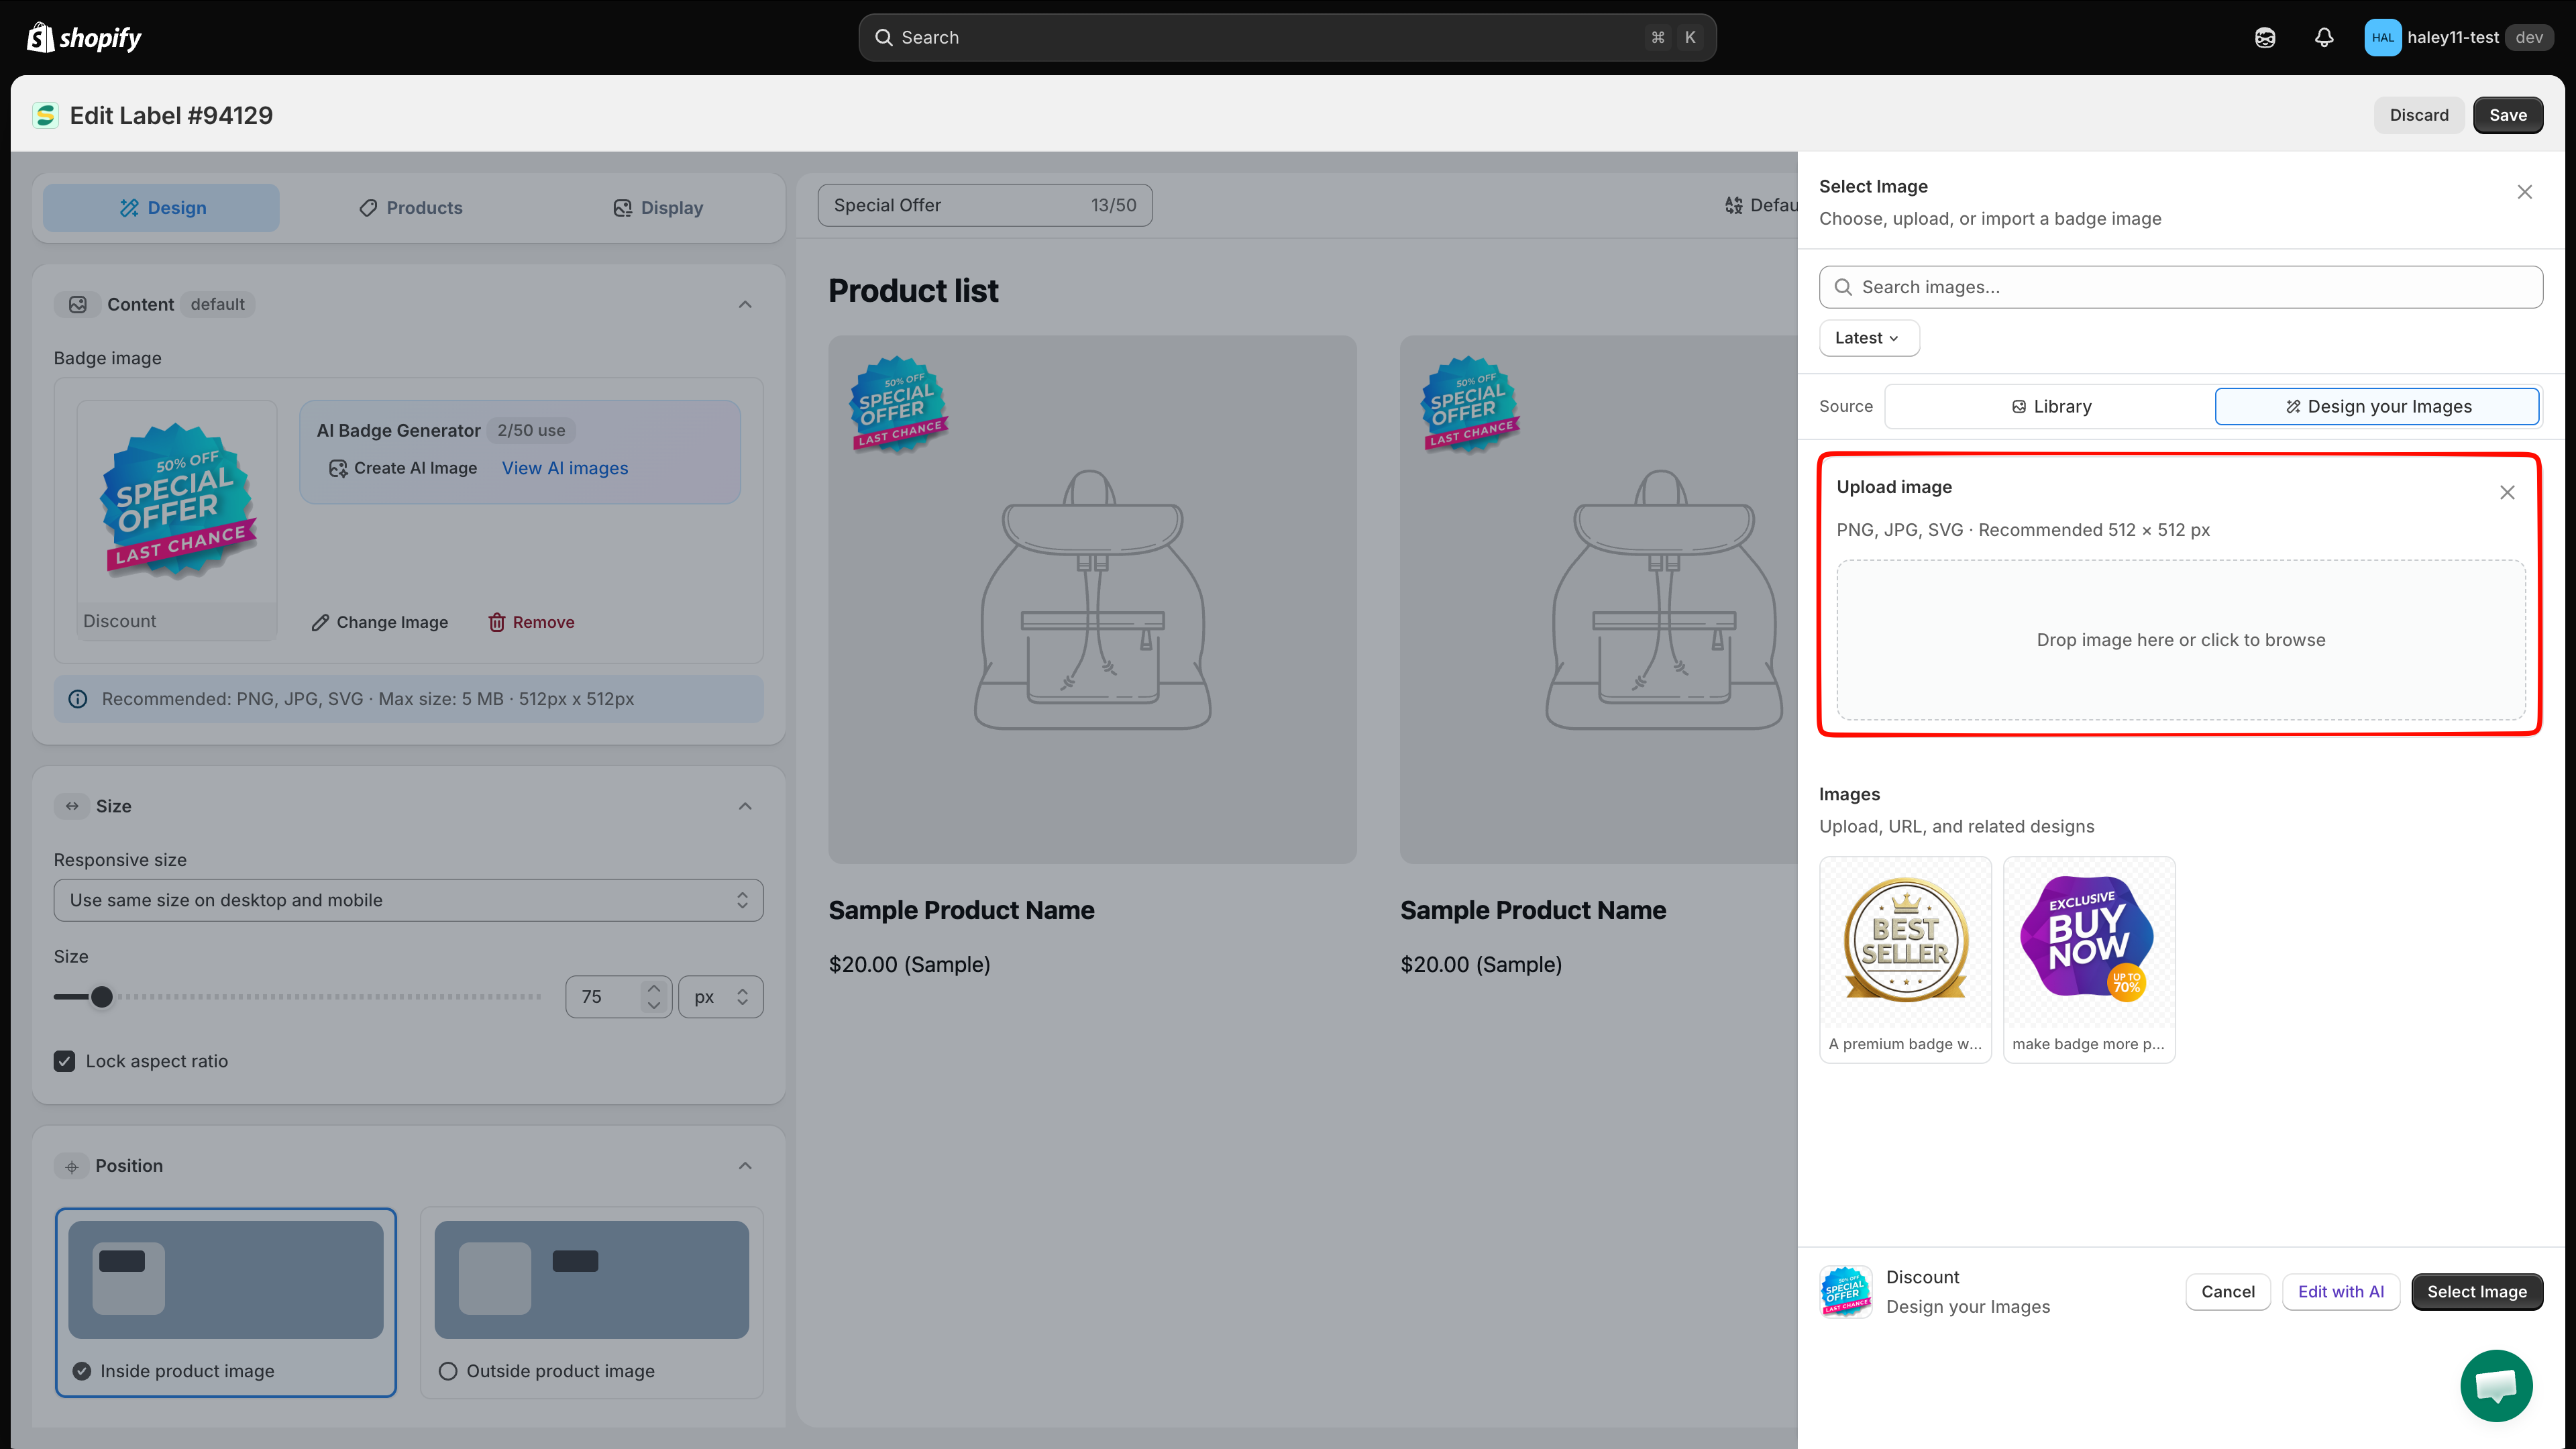
Click the **Upload image** tile. Your computer's file picker opens.

<figure><img src="https://1598842017-files.gitbook.io/~/files/v0/b/gitbook-x-prod.appspot.com/o/spaces%2F1WRTlT5AcaLSAedbCJyZ%2Fuploads%2Fgit-blob-148af7bb4009bbf0a1a247687c0a3e8a2022fc3b%2Fimage_80.png?alt=media" alt="Upload image tile in the Design your Images tab"><figcaption><p>Click Upload image to browse files on your computer.</p></figcaption></figure>
{% endstep %}

{% step %}

## Choose the file

Select a PNG, JPG, or SVG file up to 5 MB, then confirm in the file picker. The image is uploaded and appears as a new tile in **Design your Images**.
{% endstep %}

{% step %}

## Apply the image

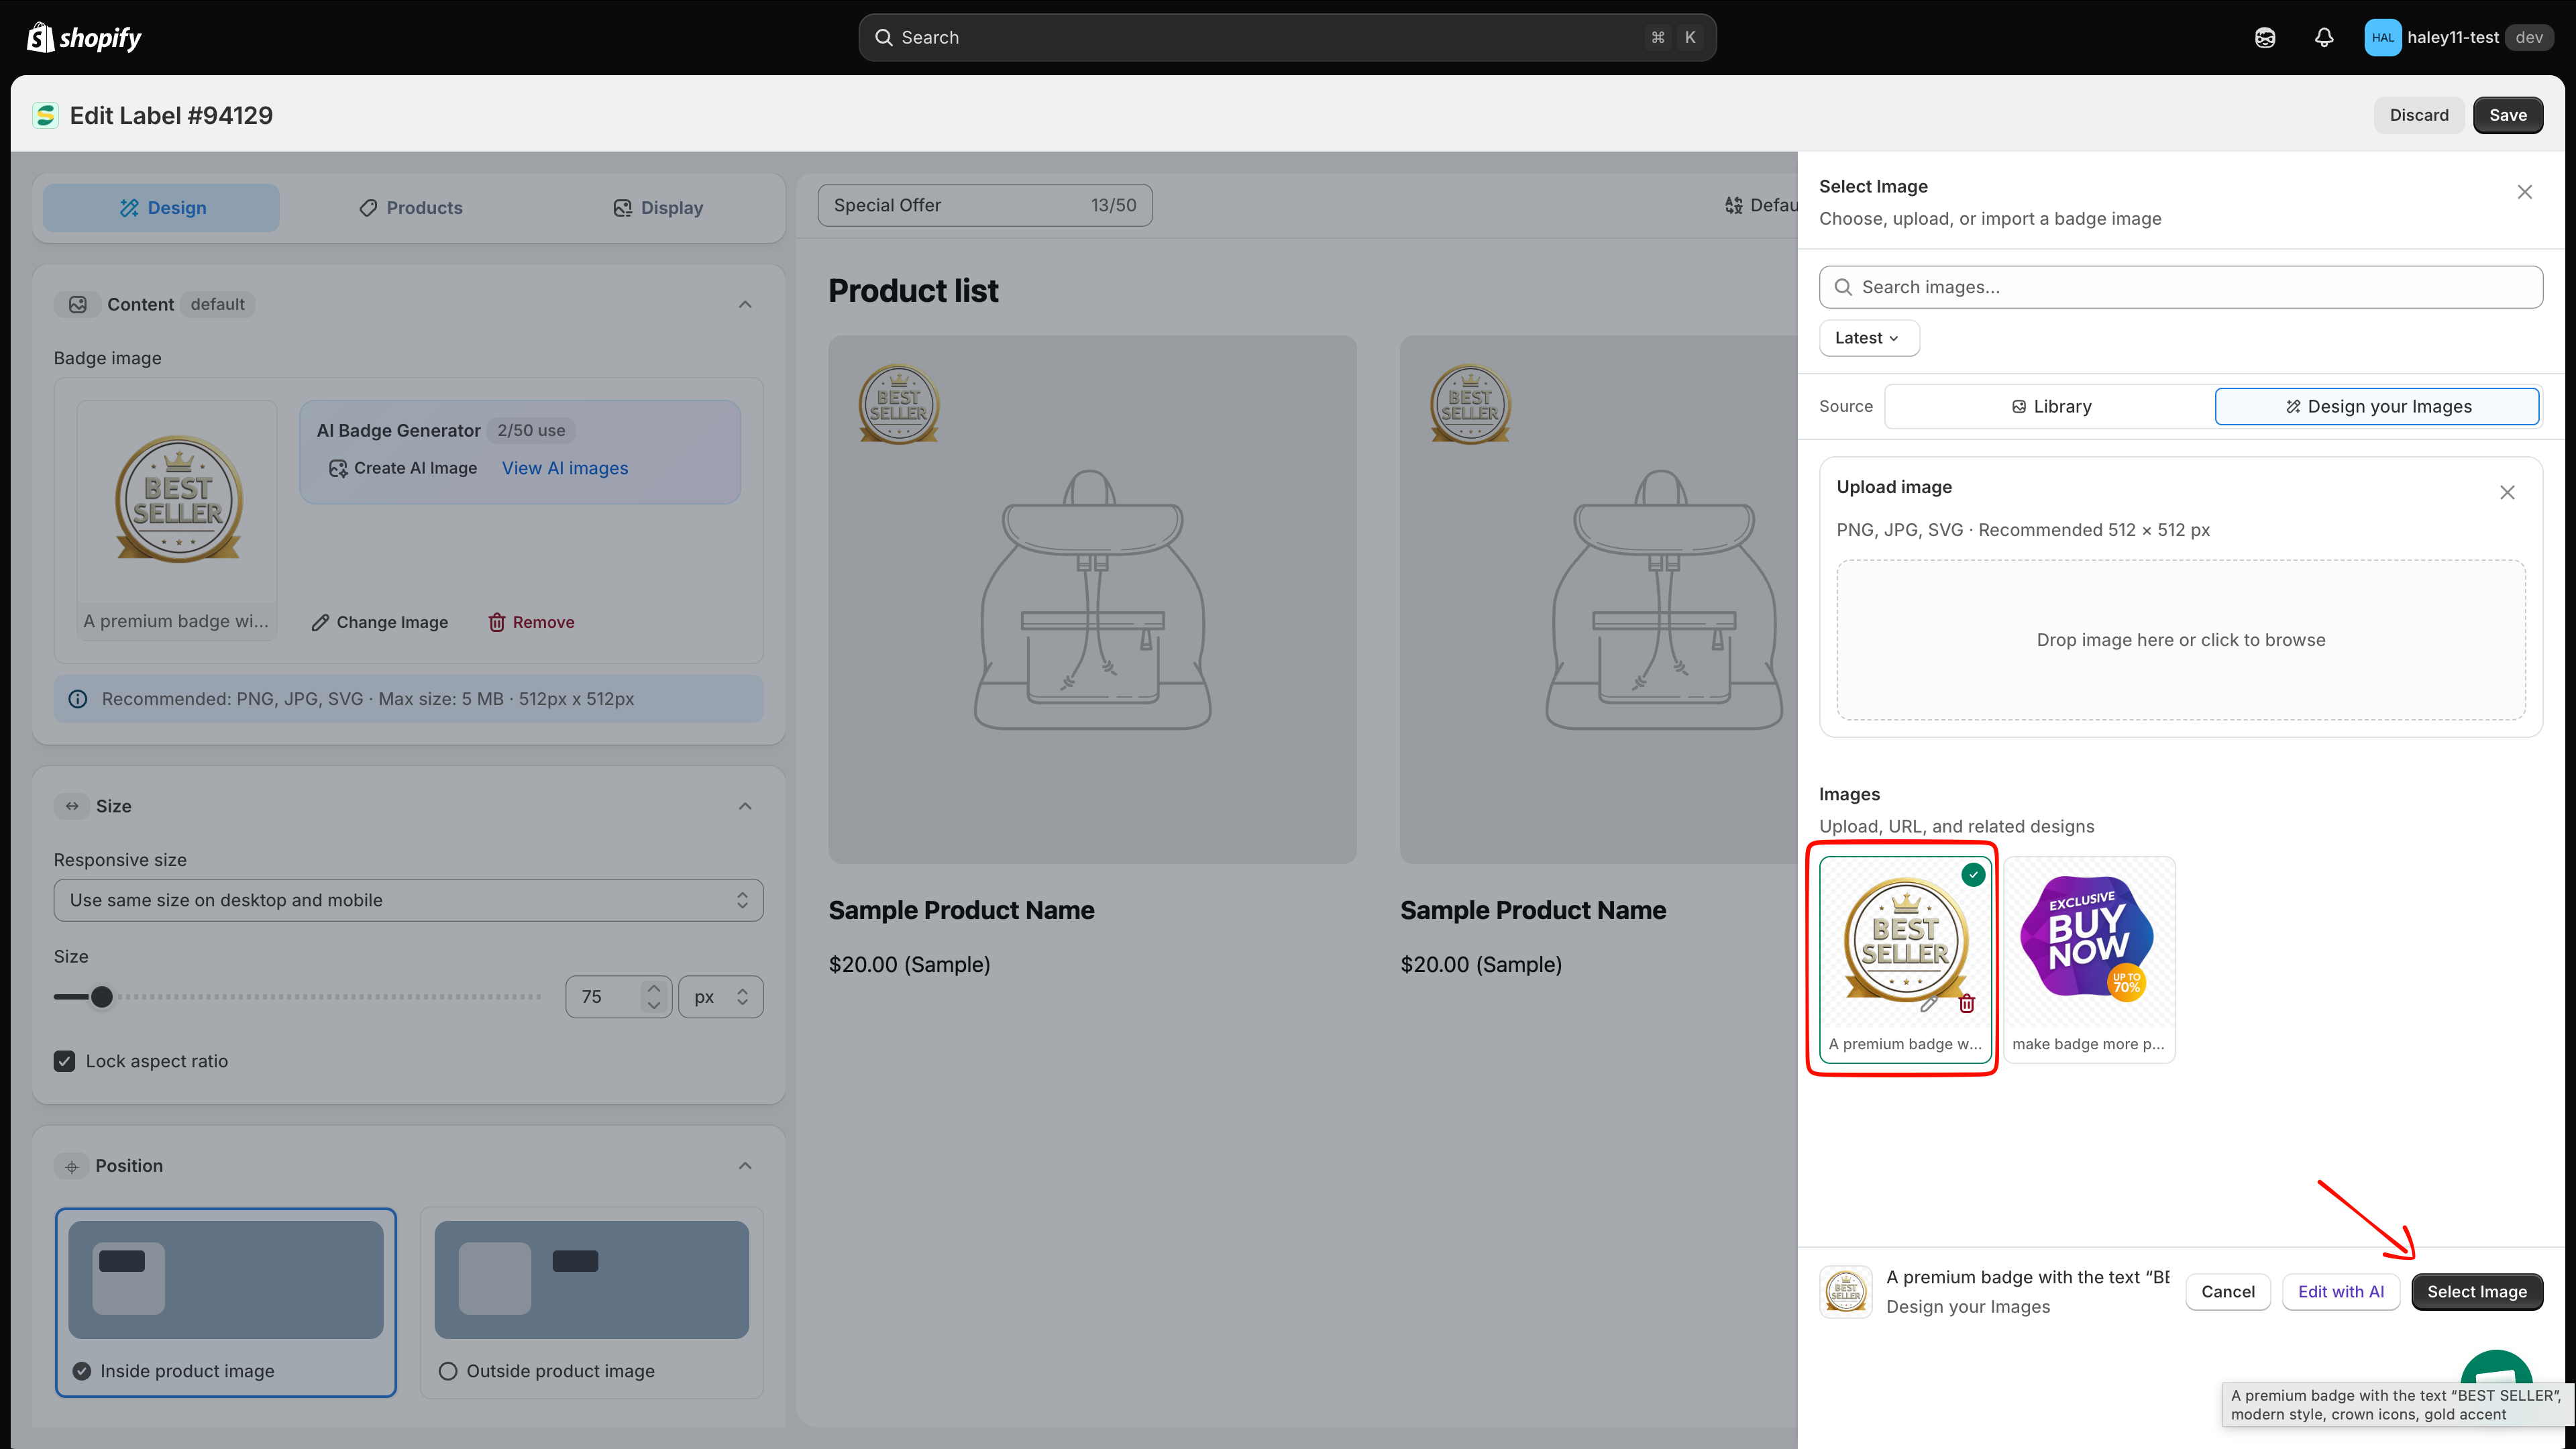
Click the new tile — a green check mark appears on it and the badge preview updates immediately. Click **Select Image** at the bottom of the panel to confirm and close it.

<figure><img src="https://1598842017-files.gitbook.io/~/files/v0/b/gitbook-x-prod.appspot.com/o/spaces%2F1WRTlT5AcaLSAedbCJyZ%2Fuploads%2Fgit-blob-01cd90237226a09a0986c89f9214e3952a27a7a2%2Fimage_81.png?alt=media" alt="Selected image tile with a green check mark and the Select Image button"><figcaption><p>Click the tile, then click Select Image to apply it to the badge.</p></figcaption></figure>
{% endstep %}
{% endstepper %}
{% endtab %}

{% tab title="Import from a URL" %}
Use this when your artwork is already online, for example in your Shopify **Content > Files** library.

{% stepper %}
{% step %}

## Click "Upload from URL"

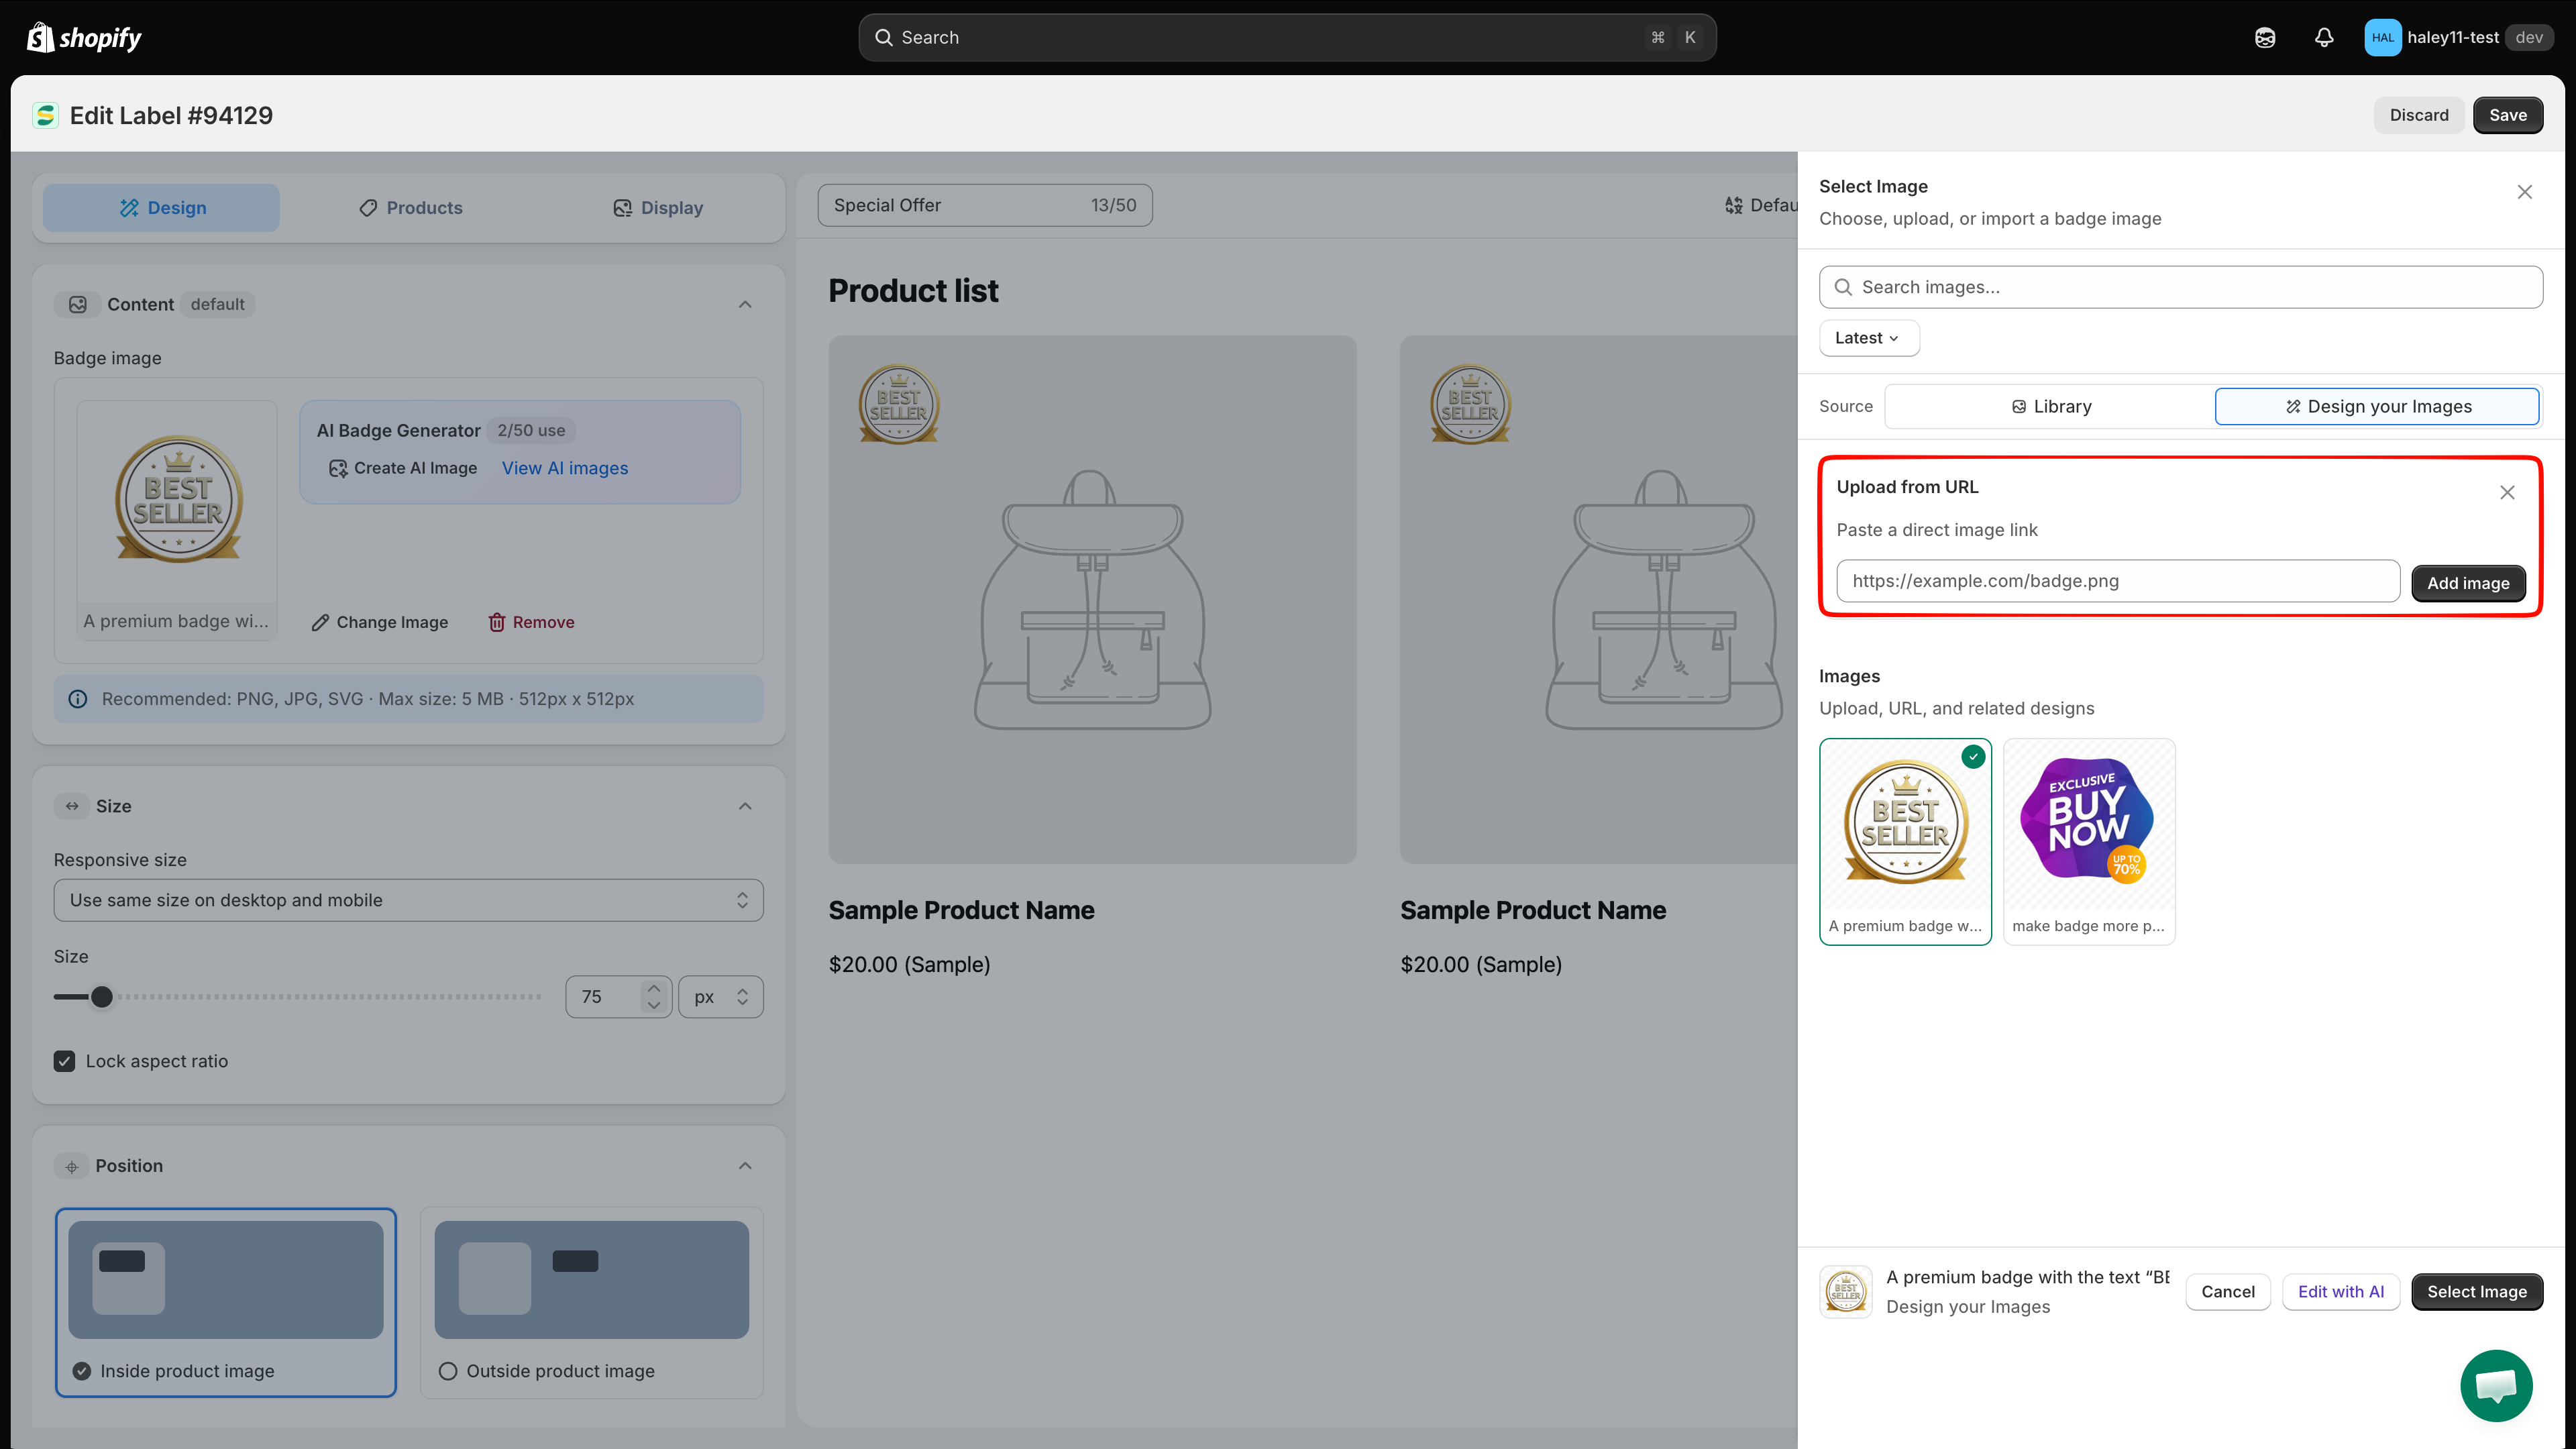
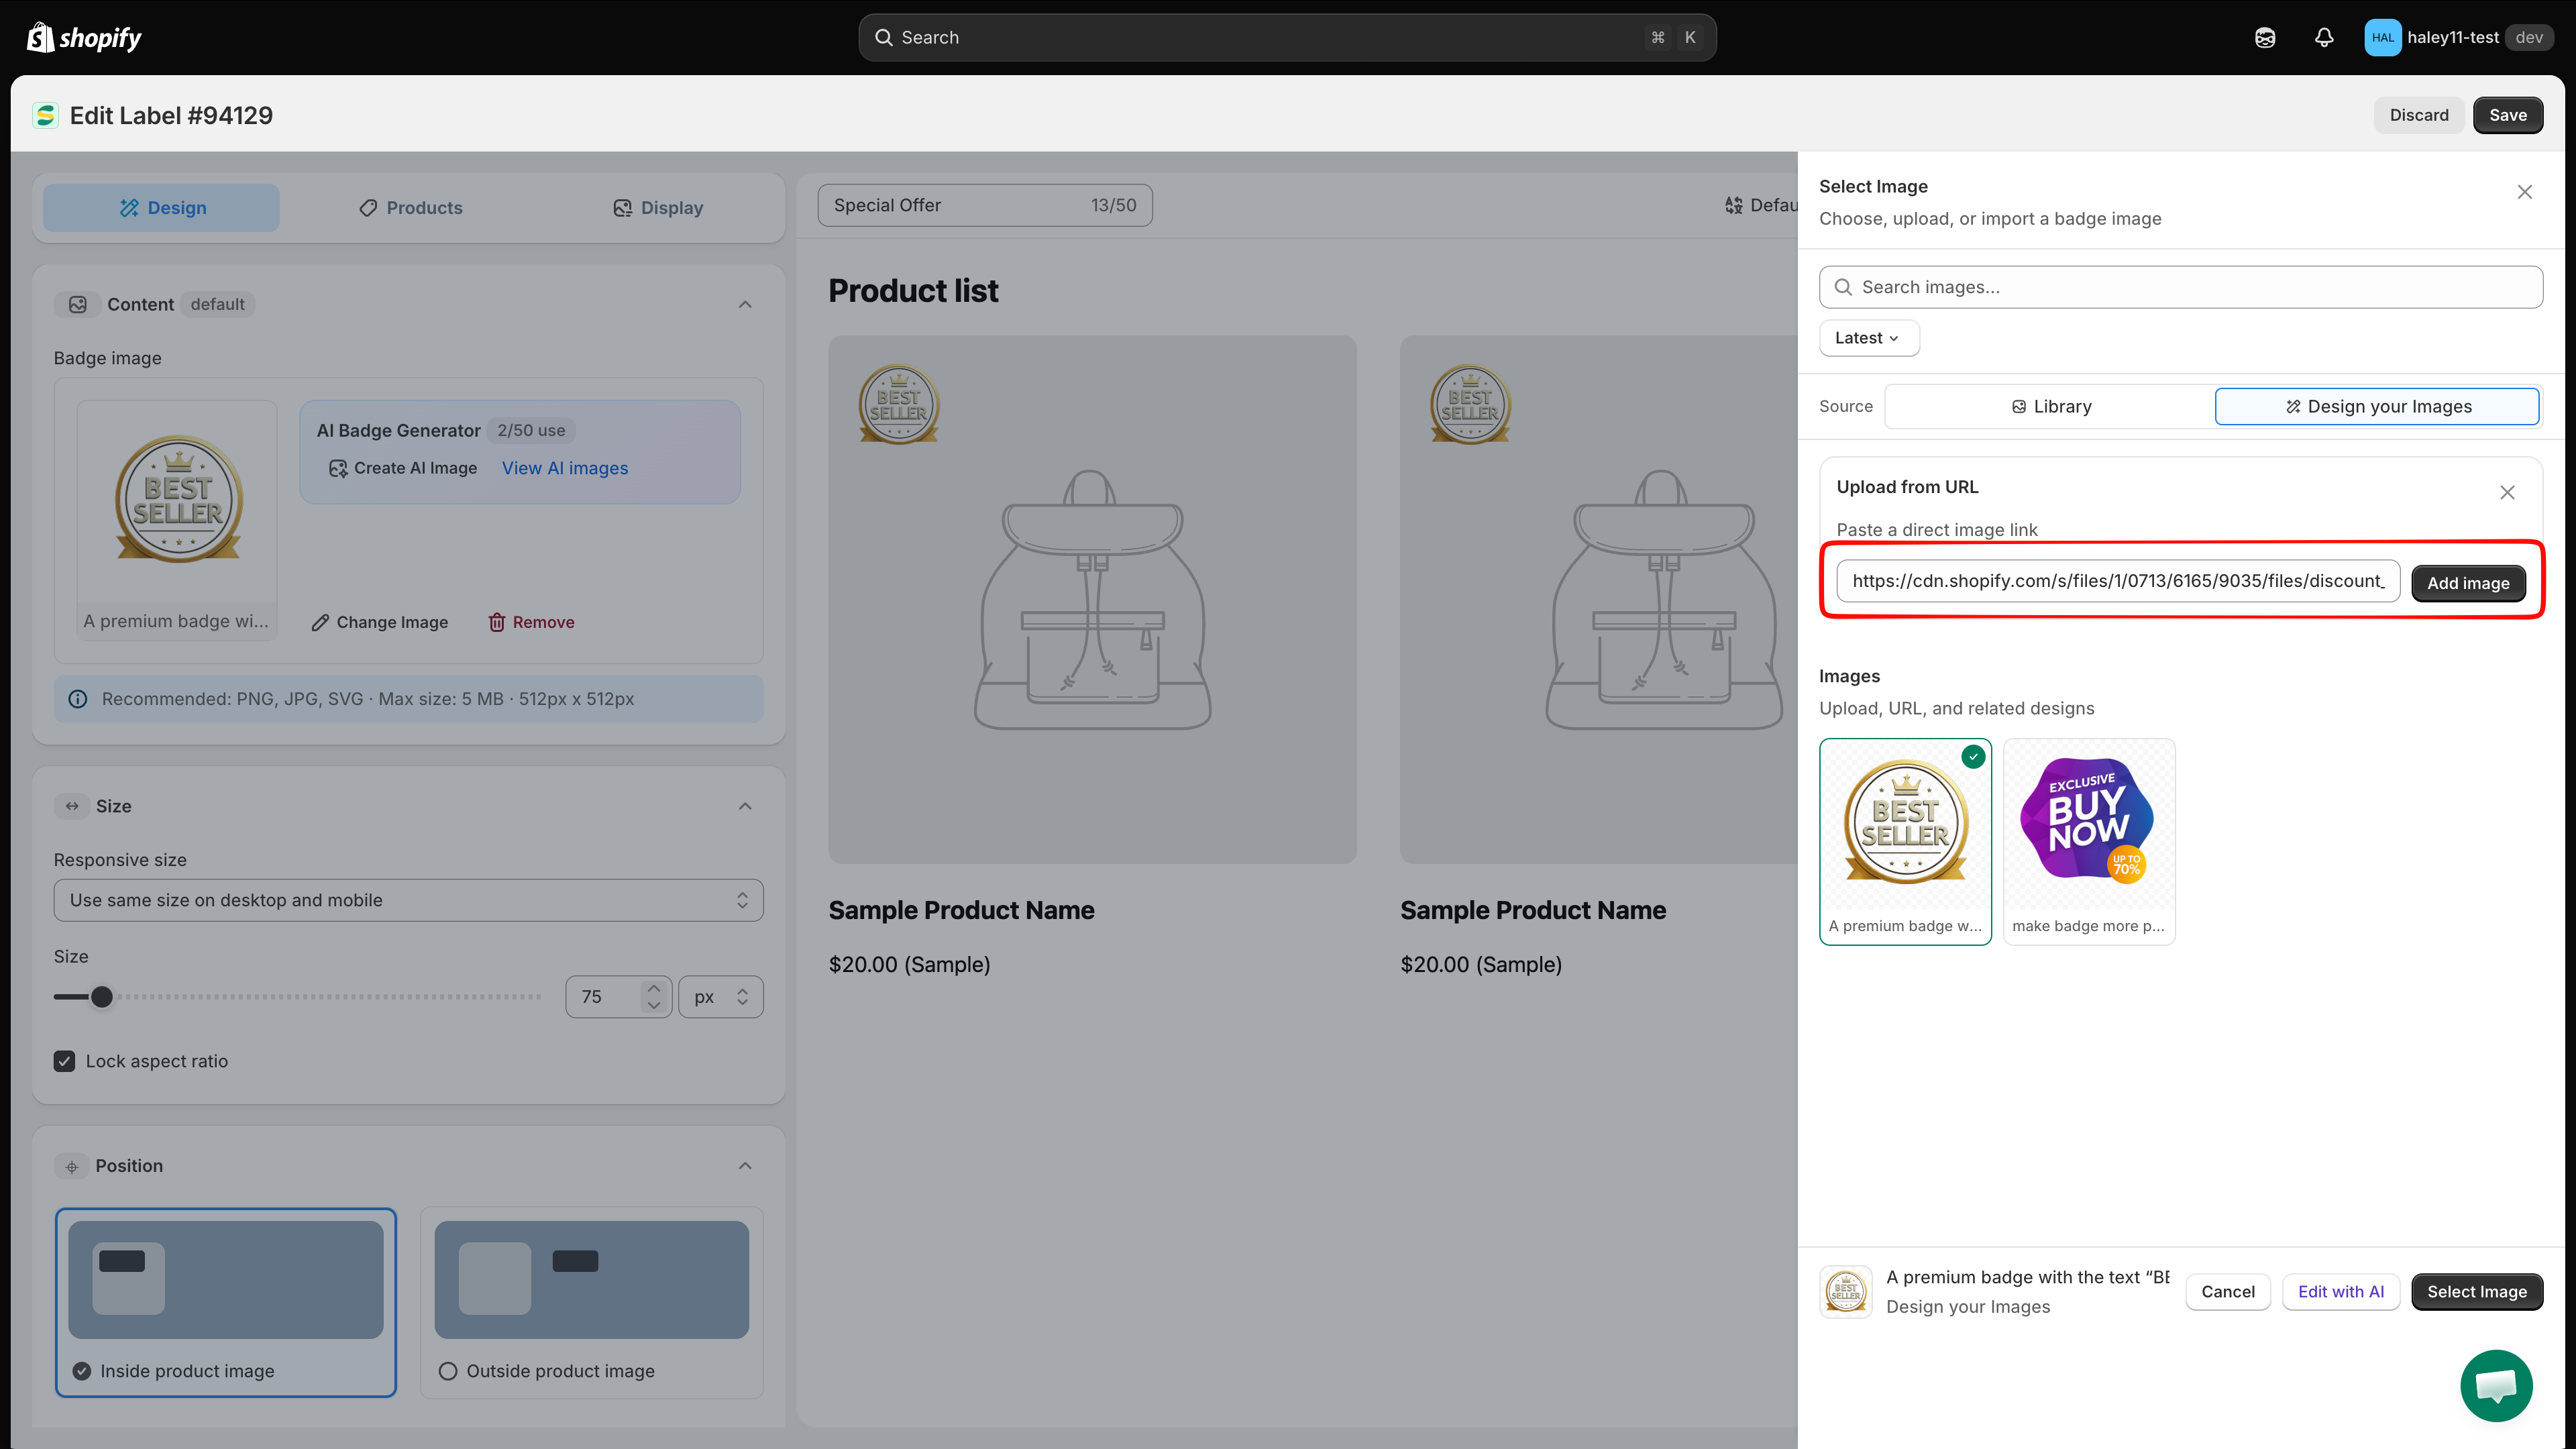
Click the **Upload from URL** tile. A small **Upload from URL** panel opens with the field **Paste a direct image link**.

<figure><img src="https://1598842017-files.gitbook.io/~/files/v0/b/gitbook-x-prod.appspot.com/o/spaces%2F1WRTlT5AcaLSAedbCJyZ%2Fuploads%2Fgit-blob-2445efd0b49ada2017ce4d71ea5bd2bbd642f191%2Fimage_82.png?alt=media" alt="Upload from URL panel with the image link field and the Add image button"><figcaption><p>Paste a direct image link, then click Add image.</p></figcaption></figure>
{% endstep %}

{% step %}

## Paste a direct image link

Paste a link that ends with the image file itself, such as `https://example.com/badge.png`. A link to a web page that merely *shows* the image does not work.

{% hint style="info" %}
To get a direct link from Shopify, go to **Content > Files**, upload your image, then copy its link.
{% endhint %}
{% endstep %}

{% step %}

## Click "Add image"

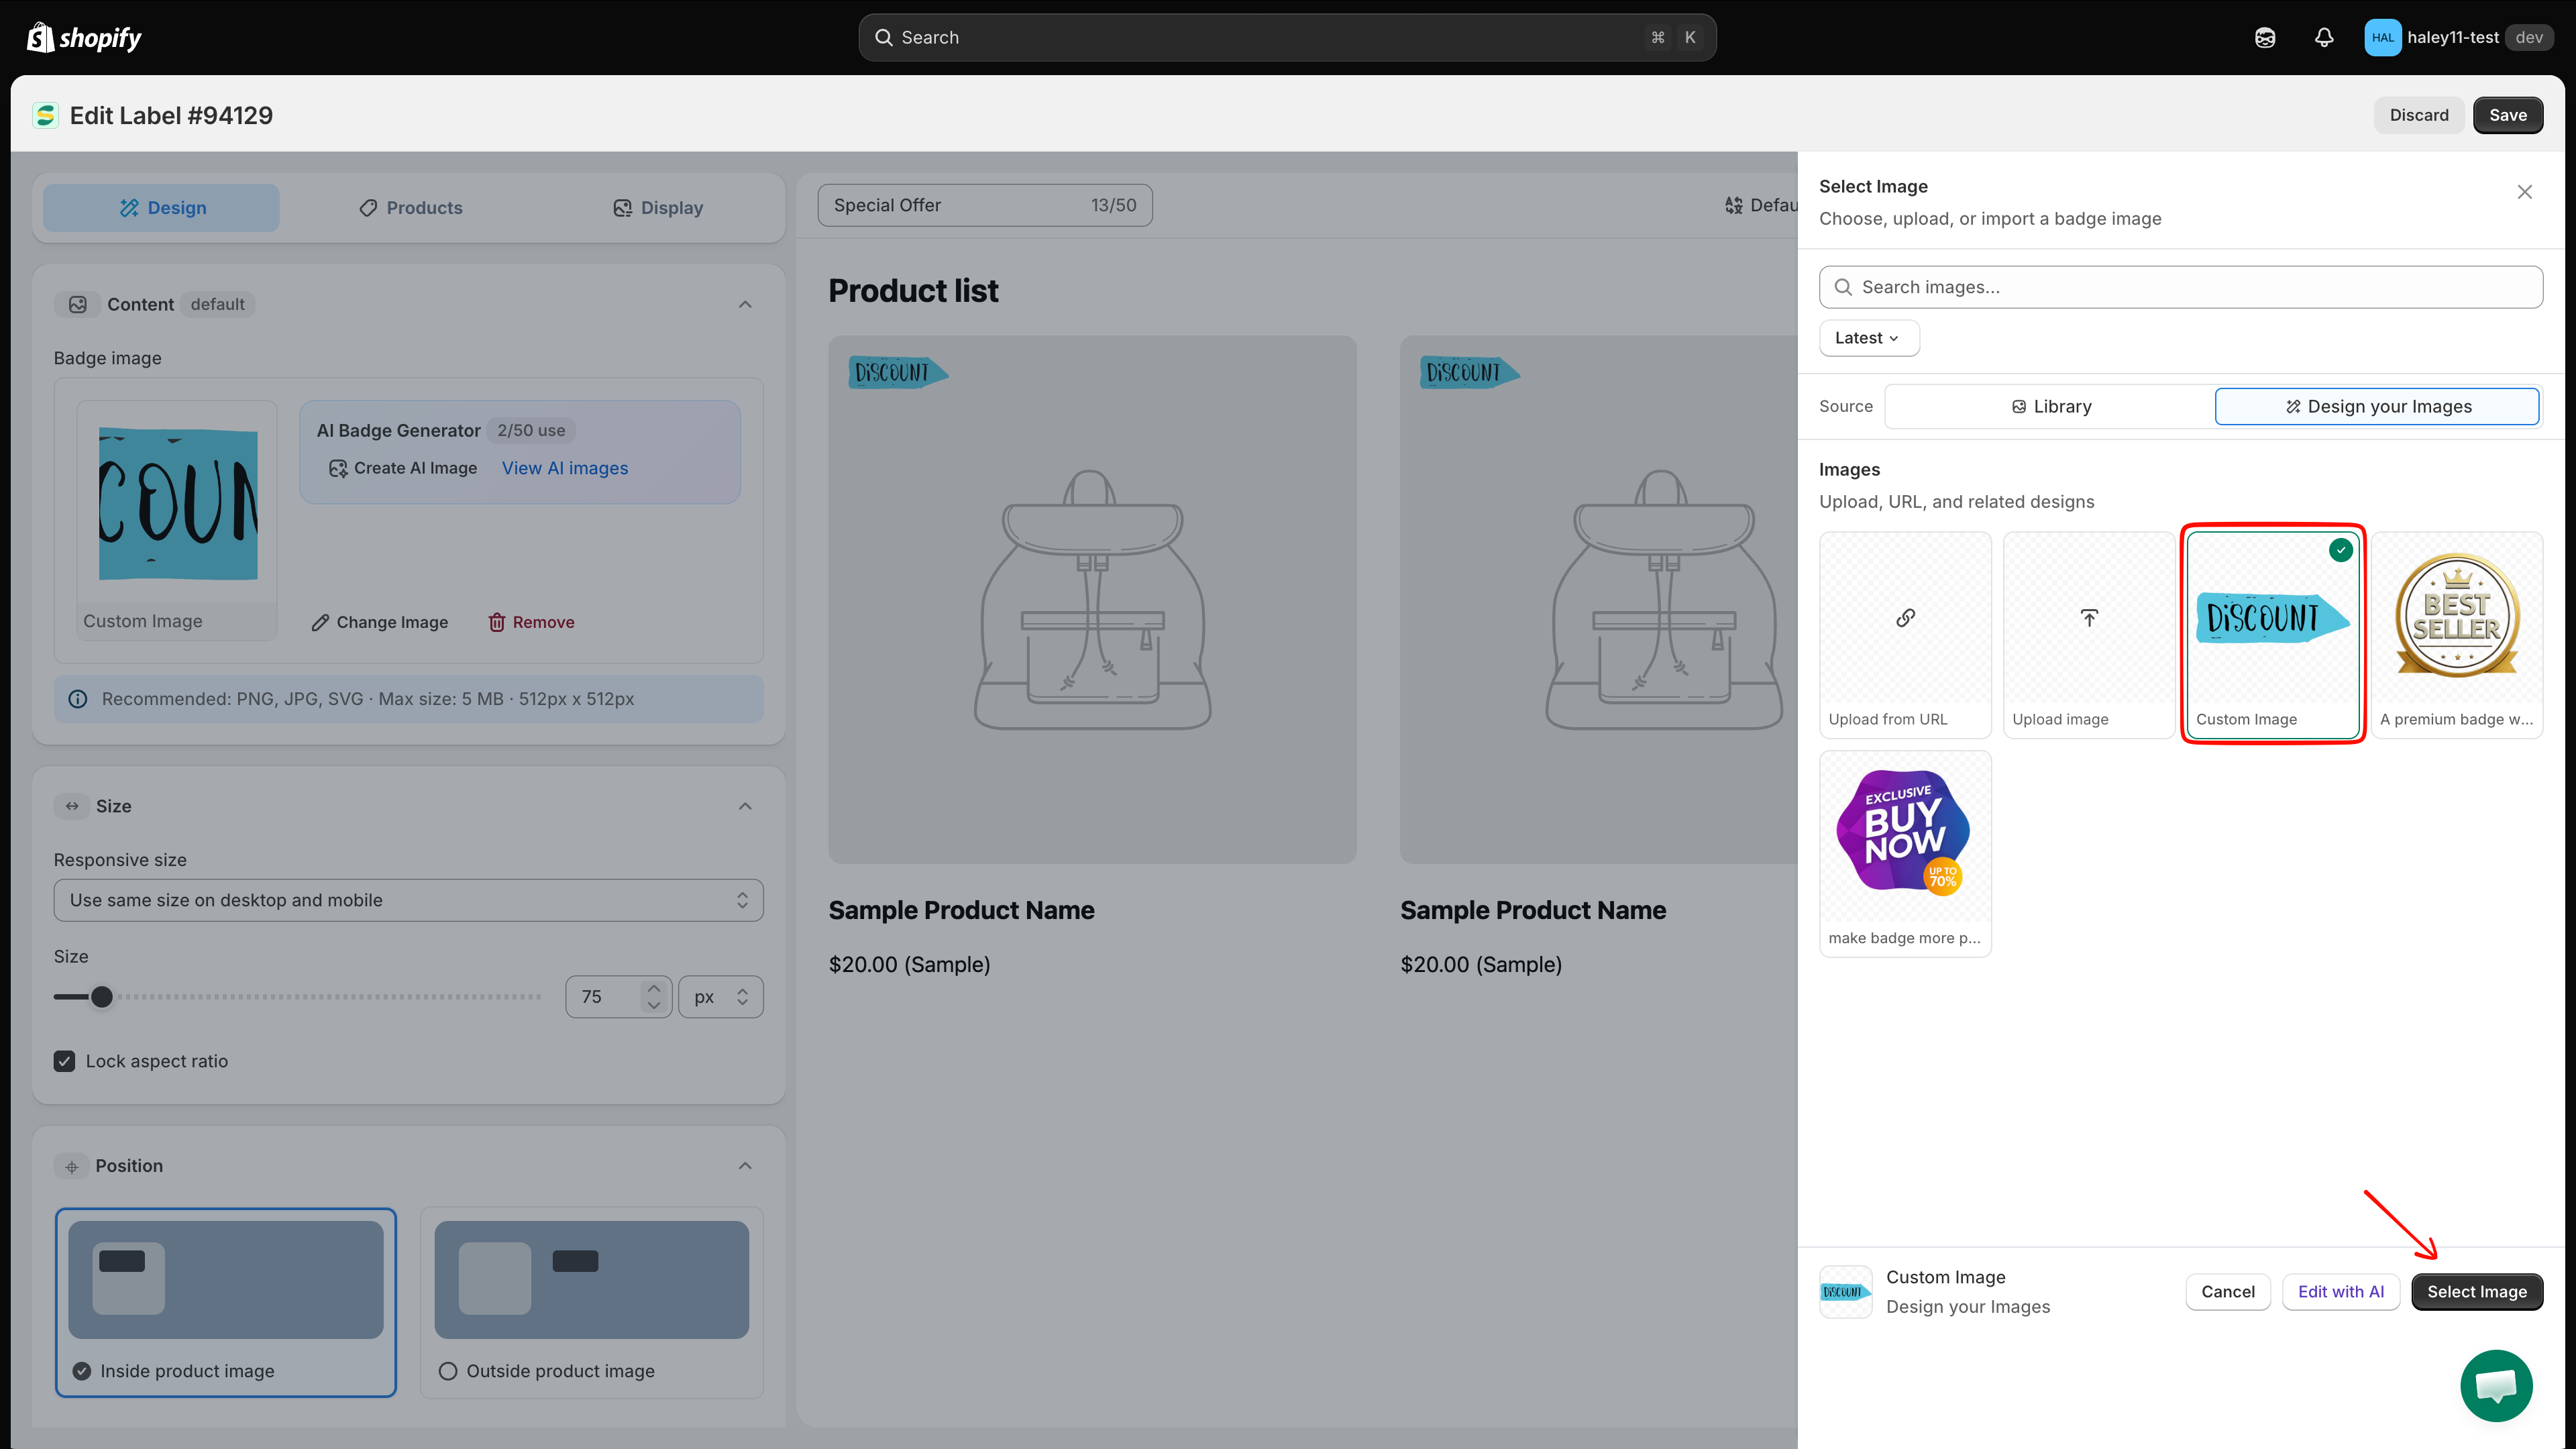
The message **The image uploaded** appears and the image is added to **Design your Images** as a new tile named **Custom Image**.

If you see **Something went wrong, please try again**, the link could not be downloaded — see [Troubleshooting](#troubleshooting) below.

<figure><img src="https://1598842017-files.gitbook.io/~/files/v0/b/gitbook-x-prod.appspot.com/o/spaces%2F1WRTlT5AcaLSAedbCJyZ%2Fuploads%2Fgit-blob-5c622b3ef9df1925853bf0f255529863f3b5adb7%2Fimage_83.png?alt=media" alt="Imported image added as a new tile named Custom Image"><figcaption><p>The imported image is saved to your image list and can be reused later.</p></figcaption></figure>
{% endstep %}

{% step %}

## Apply the image

Click the new tile, then click **Select Image**. The **Content** section now shows the image name with the **Change Image** and **Remove** actions.

<figure><img src="https://1598842017-files.gitbook.io/~/files/v0/b/gitbook-x-prod.appspot.com/o/spaces%2F1WRTlT5AcaLSAedbCJyZ%2Fuploads%2Fgit-blob-05b1d94474f957743c7614570a5273797e7771ad%2Fimage_84.png?alt=media" alt="Content section showing the applied custom image with Change Image and Remove"><figcaption><p>The badge now uses your own image.</p></figcaption></figure>
{% endstep %}
{% endstepper %}
{% endtab %}
{% endtabs %}

## Manage your uploaded images

Hover over any tile in **Design your Images** to reveal two icons:

* **Pencil** — rename or edit the image.
* **Trash** — delete the image from your list.

You can also click **Edit with AI** at the bottom of the panel to modify the selected image with the AI editor.

{% hint style="warning" %}
Deleting an image that a badge already uses removes that artwork from the badge, so check where it is used first.
{% endhint %}

## Finish the badge

After the image is applied:

1. Set the badge size in the **Size** section — keep **Lock aspect ratio** ticked so the image is not stretched.
2. Adjust **Position**, then set targeting on the **Products** and **Display** tabs.
3. Choose **Active** or **Draft**, then click **Save**.

See [Create an image badge](/badges-and-labels/create-image-badge.md) for the full set of steps.

## Troubleshooting

| Problem                                    | What to do                                                                                                                                                                                 |
| ------------------------------------------ | ------------------------------------------------------------------------------------------------------------------------------------------------------------------------------------------ |
| **Something went wrong, please try again** | The link is not a direct image link, the file is private, or the host blocks other sites from loading its images. Try another host, or download the file and use **Upload image** instead. |
| The badge looks blurry                     | Upload a larger image — around 512 × 512 px — instead of enlarging a small one.                                                                                                            |
| The image has a white box around it        | Use a PNG or SVG with a transparent background.                                                                                                                                            |
| The file is rejected                       | Check that it is PNG, JPG, or SVG and smaller than 5 MB.                                                                                                                                   |

## Next steps

* [Create an image badge](/badges-and-labels/create-image-badge.md) — The complete image badge workflow.
* [Change badge size](/badges-and-labels/change-size.md) — Fine-tune how large the image appears.
* [Change badge position](/badges-and-labels/change-position.md) — Move the badge on the product image.
* [Generate an image with AI](/ai-features/generate-image.md) — Create badge artwork from a prompt.

{% hint style="success" %}
**Need support?**

If you run into any difficulty while following these steps, contact us at <support@samita.io>.
{% endhint %}


---

# Agent Instructions
This documentation is published with GitBook. GitBook is the documentation platform designed so that both humans and AI agents can read, navigate, and reason over technical content effectively. Learn more at gitbook.com.

## Querying This Documentation
If you need additional information that is not directly available in this page, you can query the documentation dynamically by asking a question.

Perform an HTTP GET request on the current page URL with the `ask` query parameter, and the optional `goal` query parameter:

```
GET https://docs.samita.io/badges-and-labels/upload-badge-image.md?ask=<question>&goal=<endgoal>
```

`ask` is the immediate question: it should be specific, self-contained, and written in natural language.
`goal` is optional and describes the broader end goal you are ultimately trying to accomplish on behalf of the user. GitBook uses it to tailor the answer towards what is most useful for that goal.

The response will contain a direct answer to the question and relevant excerpts and sources from the documentation.

Use this mechanism when the answer is not explicitly present in the current page, you need clarification or additional context, or you want to retrieve related documentation sections.