> For the complete documentation index, see [llms.txt](https://docs.samita.io/llms.txt). Markdown versions of documentation pages are available by appending `.md` to page URLs; this page is available as [Markdown](https://docs.samita.io/extra-features/create-trust-badge.md).

# Create a trust badge

Create and customize a trust badge from scratch or a featured template in Sami Product Labels.

A trust badge is a block of payment, security, shipping, guarantee, or policy icons with an optional title and description. The editor has two tabs: **Design** for content and styling, and **Placement** for the built-in product-page position and shortcode.

{% stepper %}
{% step %}

## Open Trust Badges

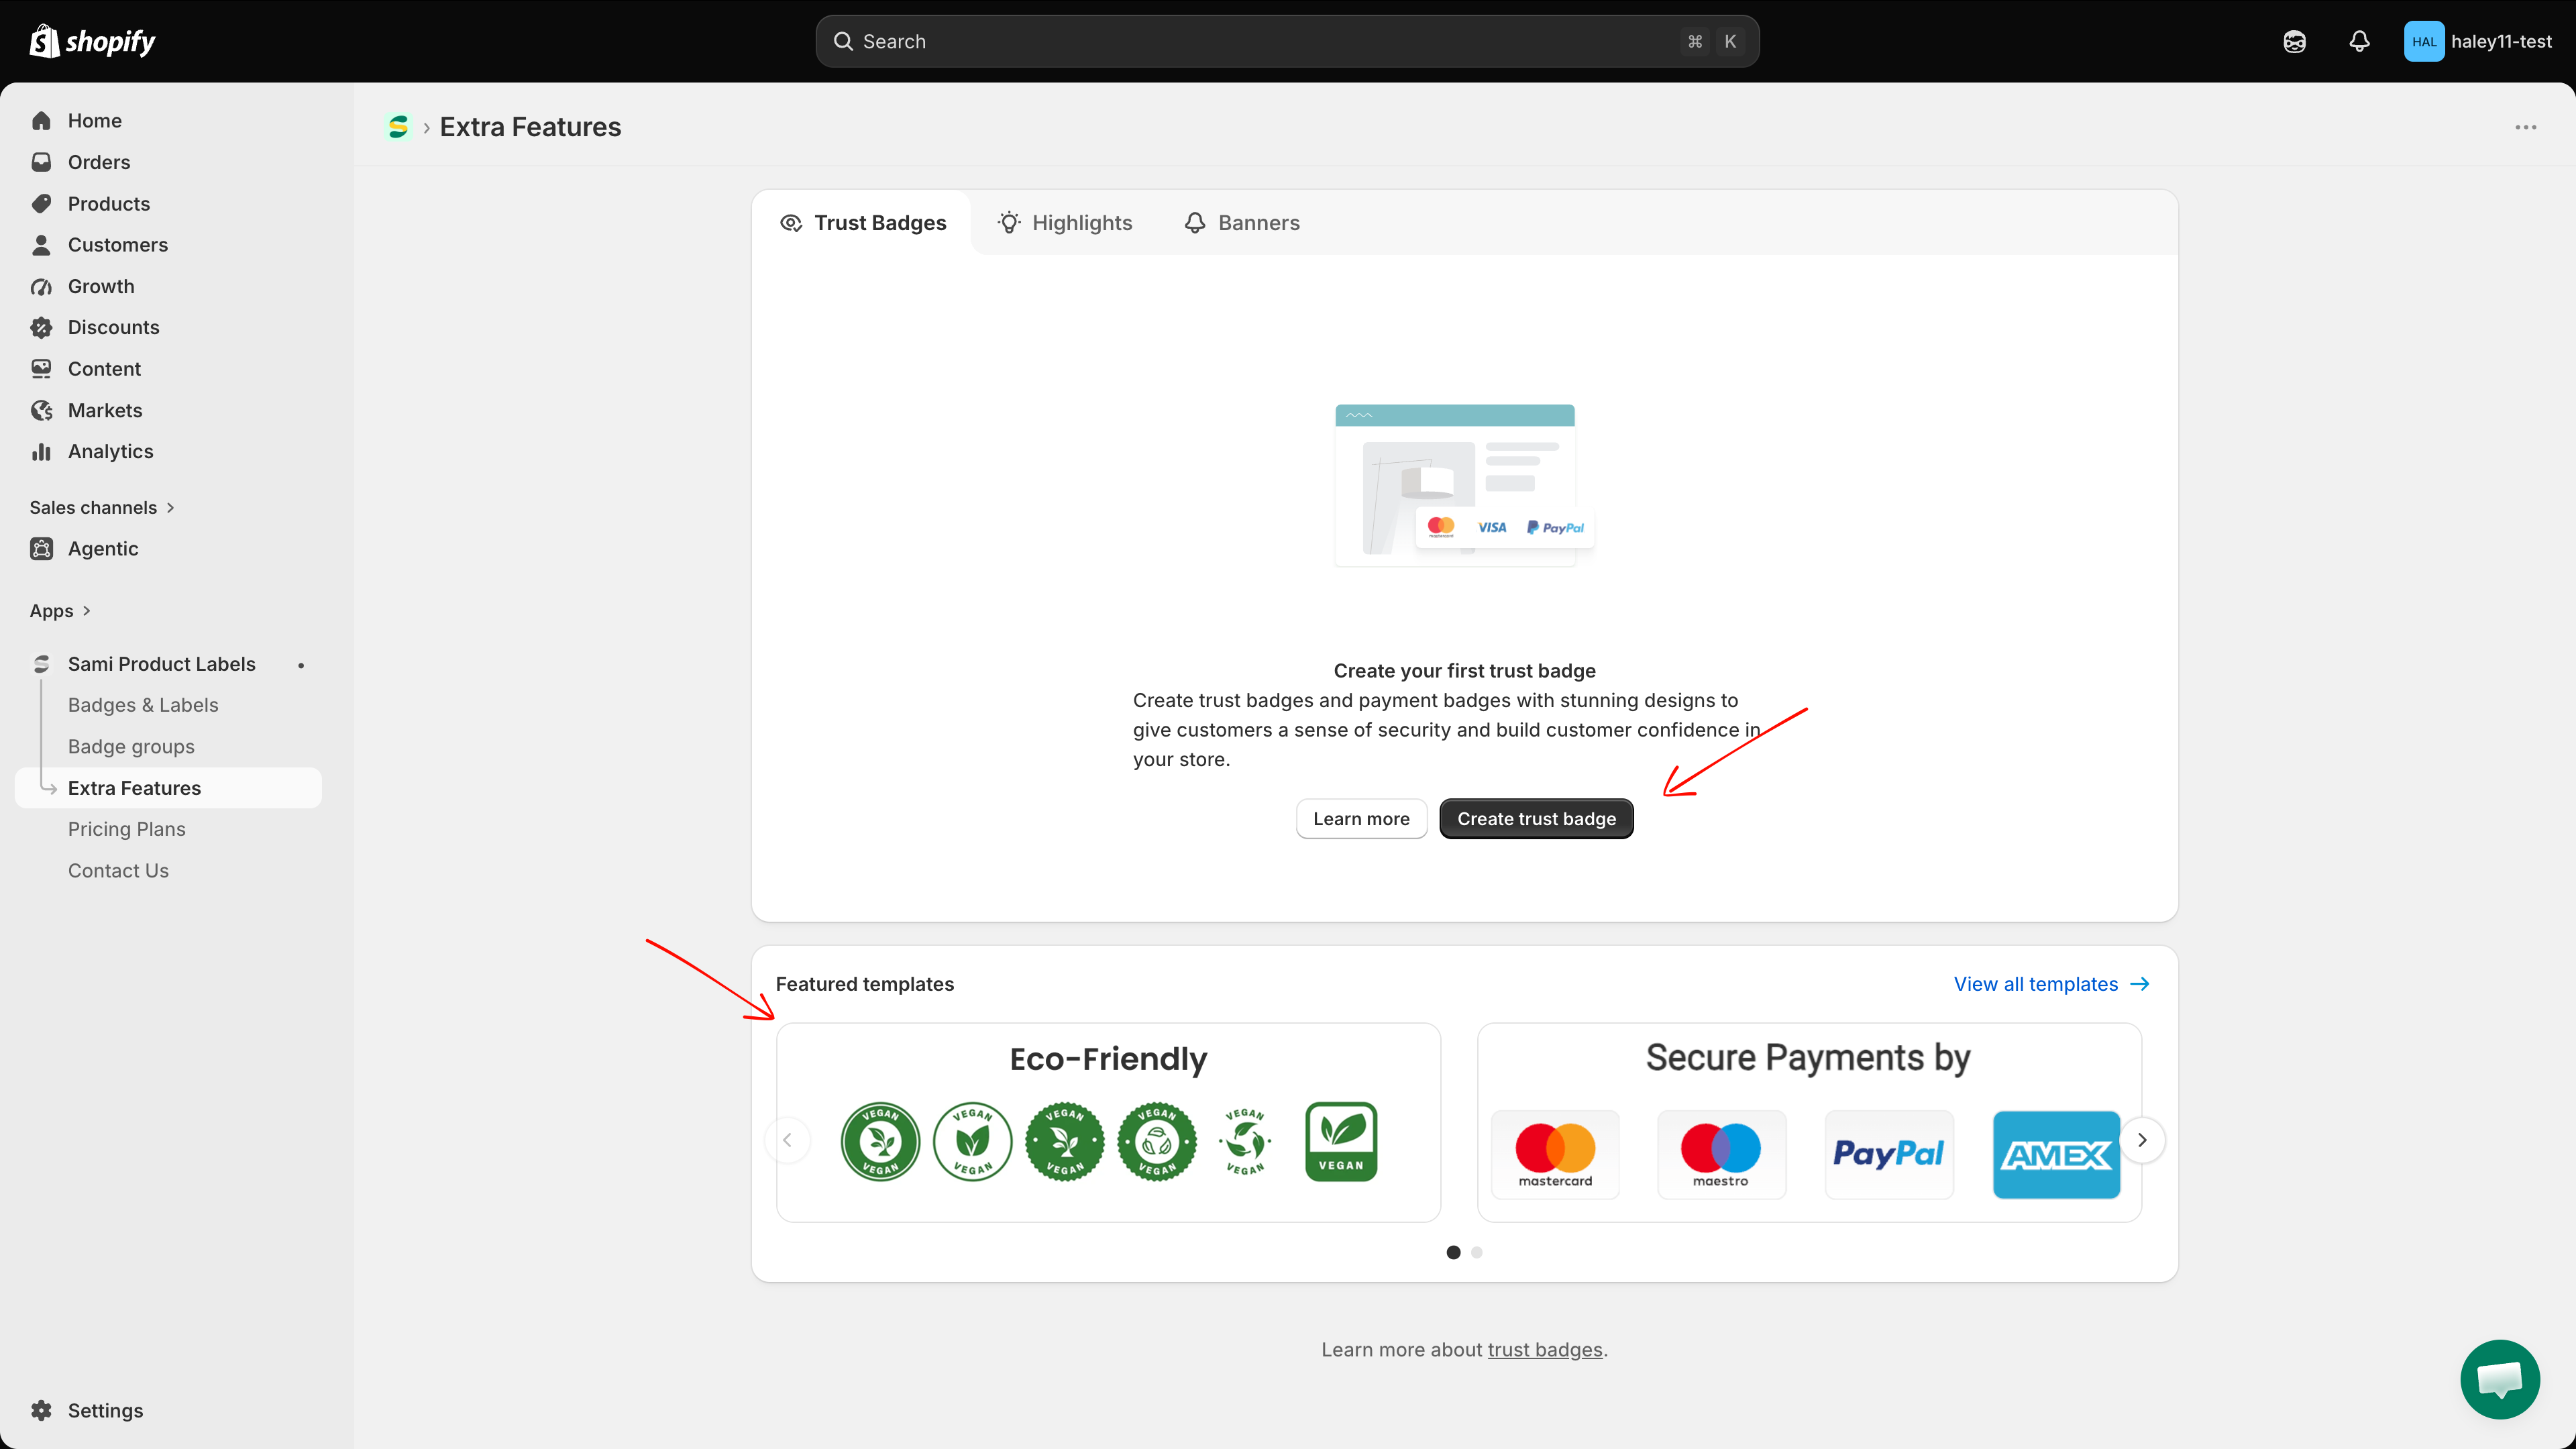
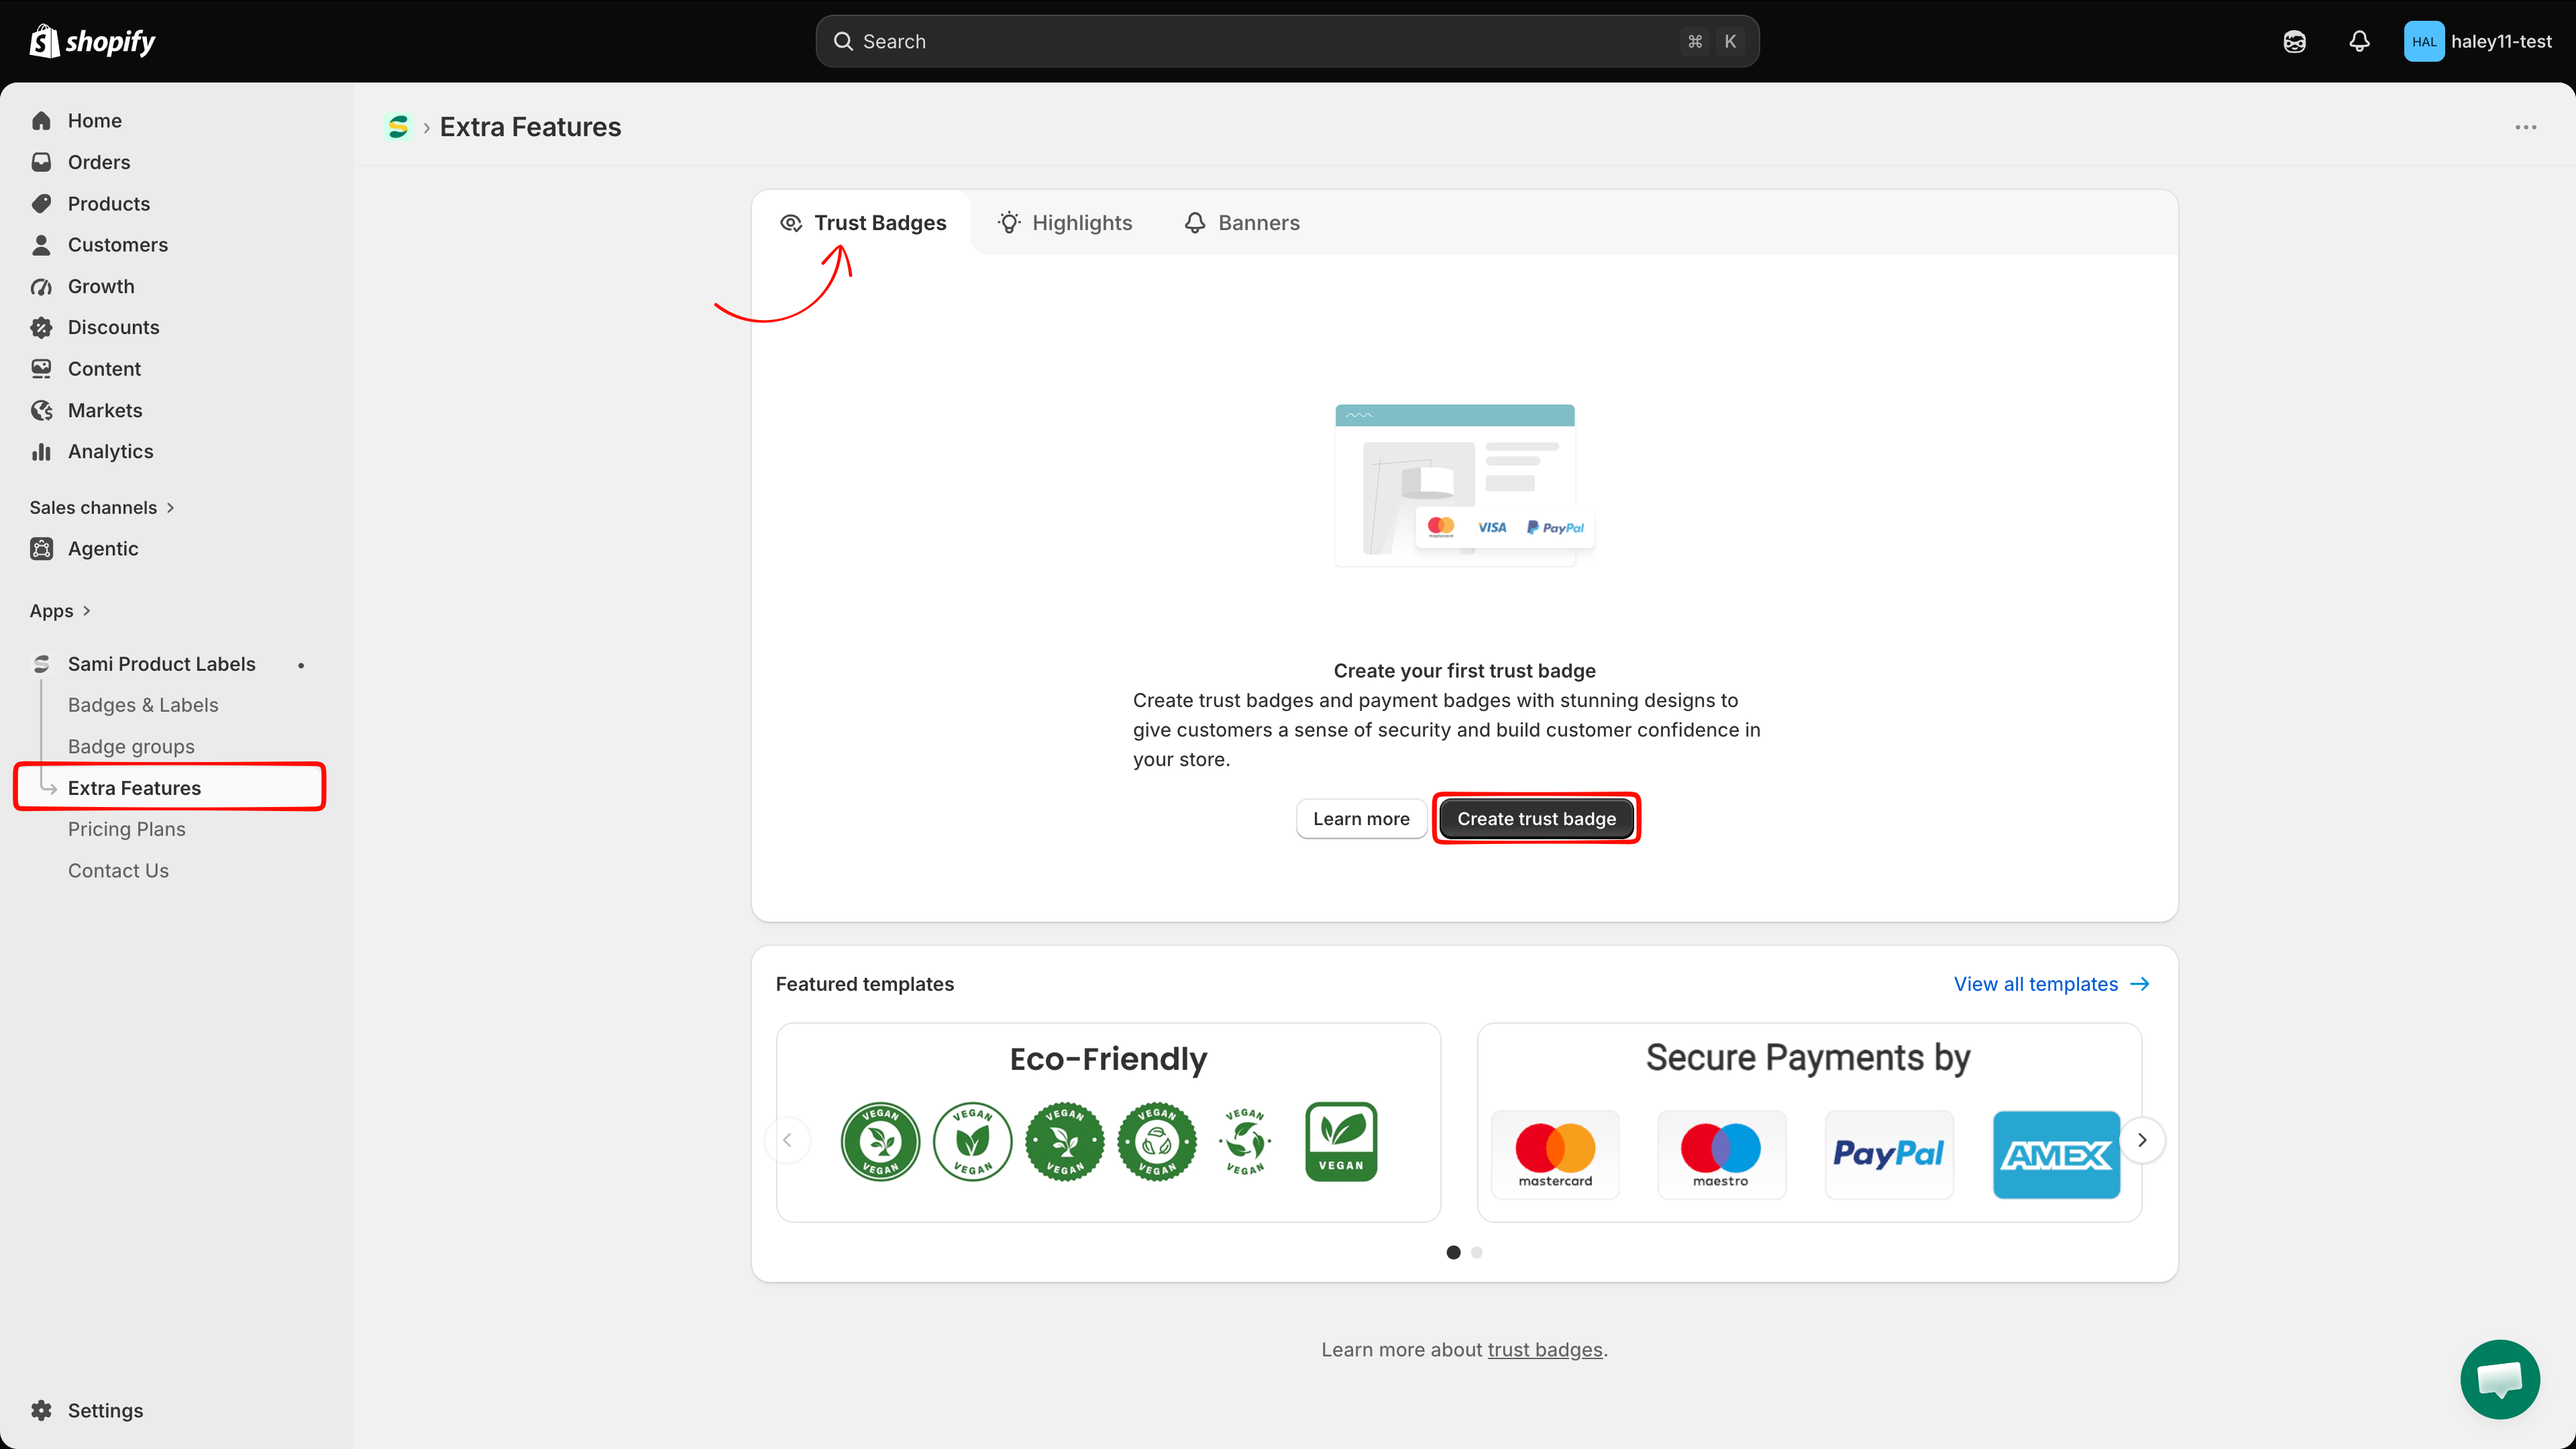
In your Shopify admin, open **Sami Product Labels**, select **Extra Features** in the app navigation, then select the **Trust Badges** tab.

If you already have trust badges, the page shows them in a table. If the list is empty, the page shows a **Create your first trust badge** panel instead.

<figure><img src="https://1598842017-files.gitbook.io/~/files/v0/b/gitbook-x-prod.appspot.com/o/spaces%2F1WRTlT5AcaLSAedbCJyZ%2Fuploads%2Fgit-blob-bf4cc4ccecfb2df9618b8fad7aa3798cb04c702b%2Fimage_202.png?alt=media" alt="Extra Features page with the Trust Badges tab selected"><figcaption><p>The Trust Badges tab contains the create action, saved trust badges, and featured templates.</p></figcaption></figure>
{% endstep %}

{% step %}

## Choose how to start

{% tabs %}
{% tab title="Start from scratch" %}
Click **Create trust badge**. The button appears in the page header when the table is visible, or in the empty-state panel when you have not created a trust badge yet.
{% endtab %}

{% tab title="Use a template" %}
Scroll to **Featured templates**. Click **View all templates** to show all four designs: **Eco-Friendly template**, **With payment method**, **Policies store template**, and **Badge box template**. Click **Select** on a template to open it with its icons and styling already applied.
{% endtab %}
{% endtabs %}

Both options open the editor on the **Design** tab.

<figure><img src="https://1598842017-files.gitbook.io/~/files/v0/b/gitbook-x-prod.appspot.com/o/spaces%2F1WRTlT5AcaLSAedbCJyZ%2Fuploads%2Fgit-blob-0877469254d7ddf1cc45875e1222f61b84fbcb49%2Fimage_203.png?alt=media" alt="Create trust badge button and Featured templates section"><figcaption><p>Create a trust badge from scratch, or select one of the four featured templates.</p></figcaption></figure>
{% endstep %}

{% step %}

## Name the trust badge

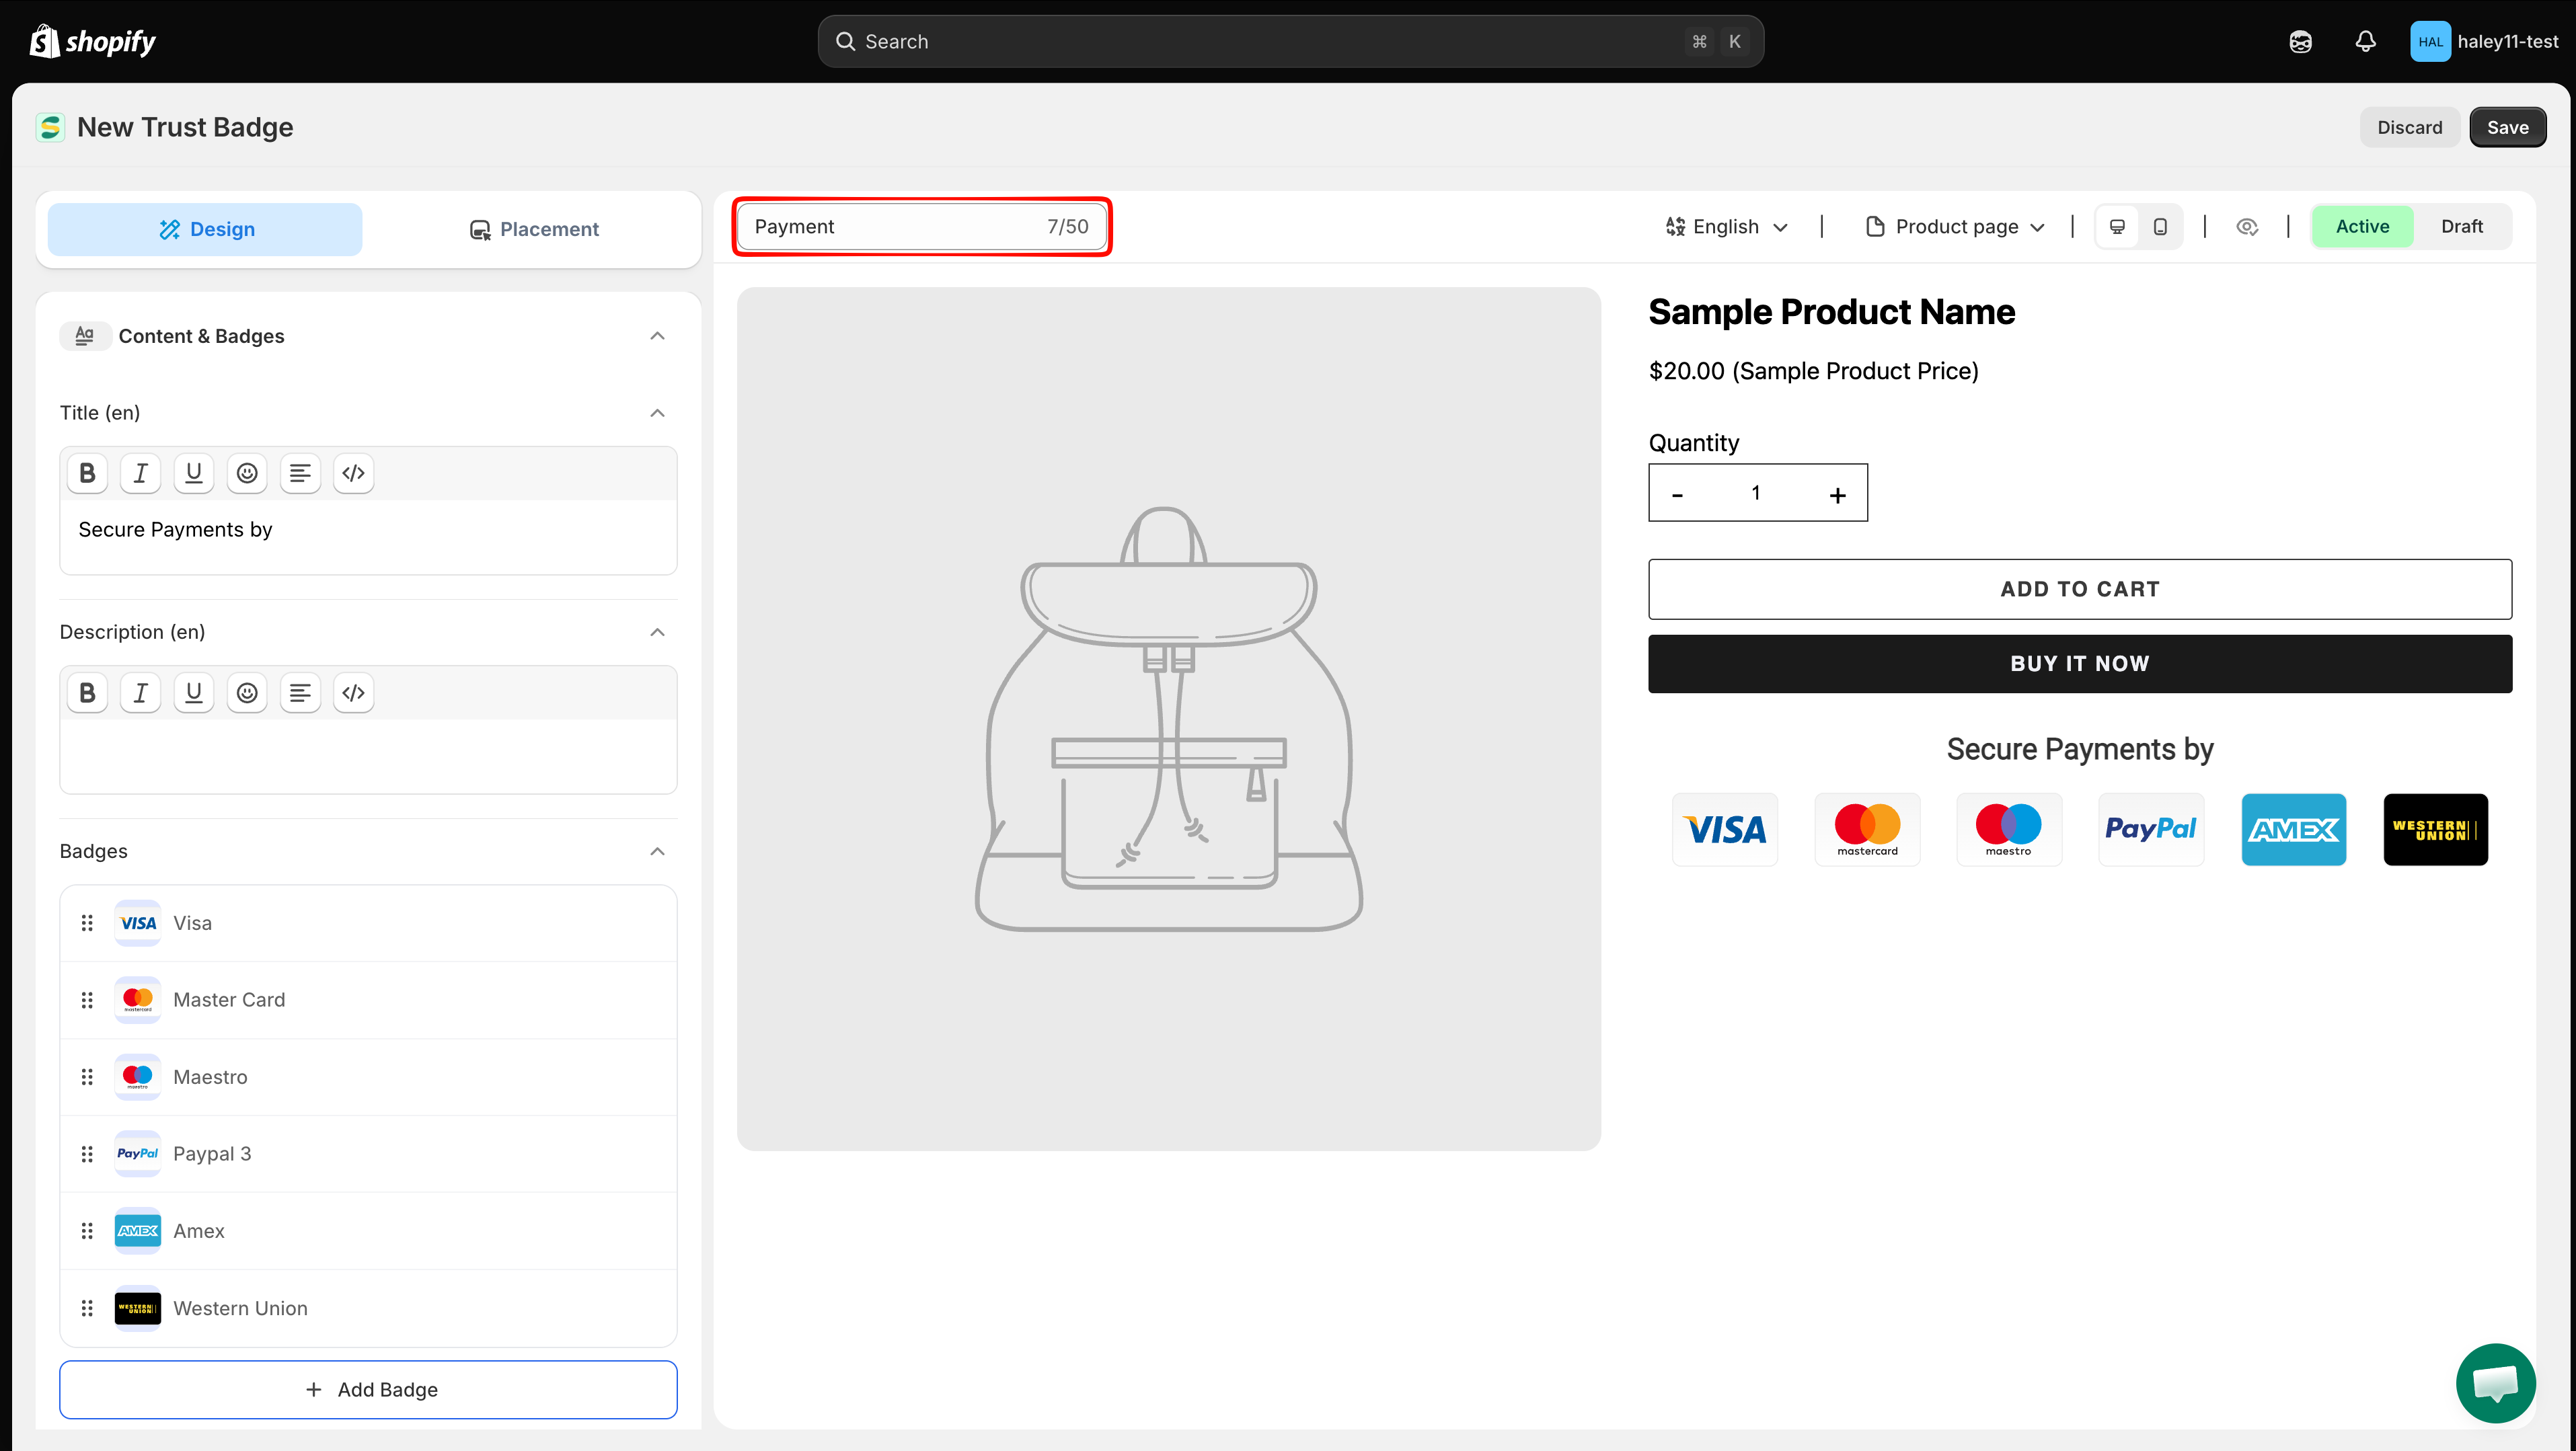
The name field appears above the preview. Replace **New Trust Badge** with a name of up to 50 characters. This name is only used to identify the trust badge in the app and is not shown to customers.

<figure><img src="https://1598842017-files.gitbook.io/~/files/v0/b/gitbook-x-prod.appspot.com/o/spaces%2F1WRTlT5AcaLSAedbCJyZ%2Fuploads%2Fgit-blob-8f050ccdff0560750833163c89fb1713e4eb7145%2Fimage_204.png?alt=media" alt="Trust badge name field above the editor preview"><figcaption><p>Use a clear internal name so the trust badge is easy to find in the table.</p></figcaption></figure>
{% endstep %}

{% step %}

## Add a title and description

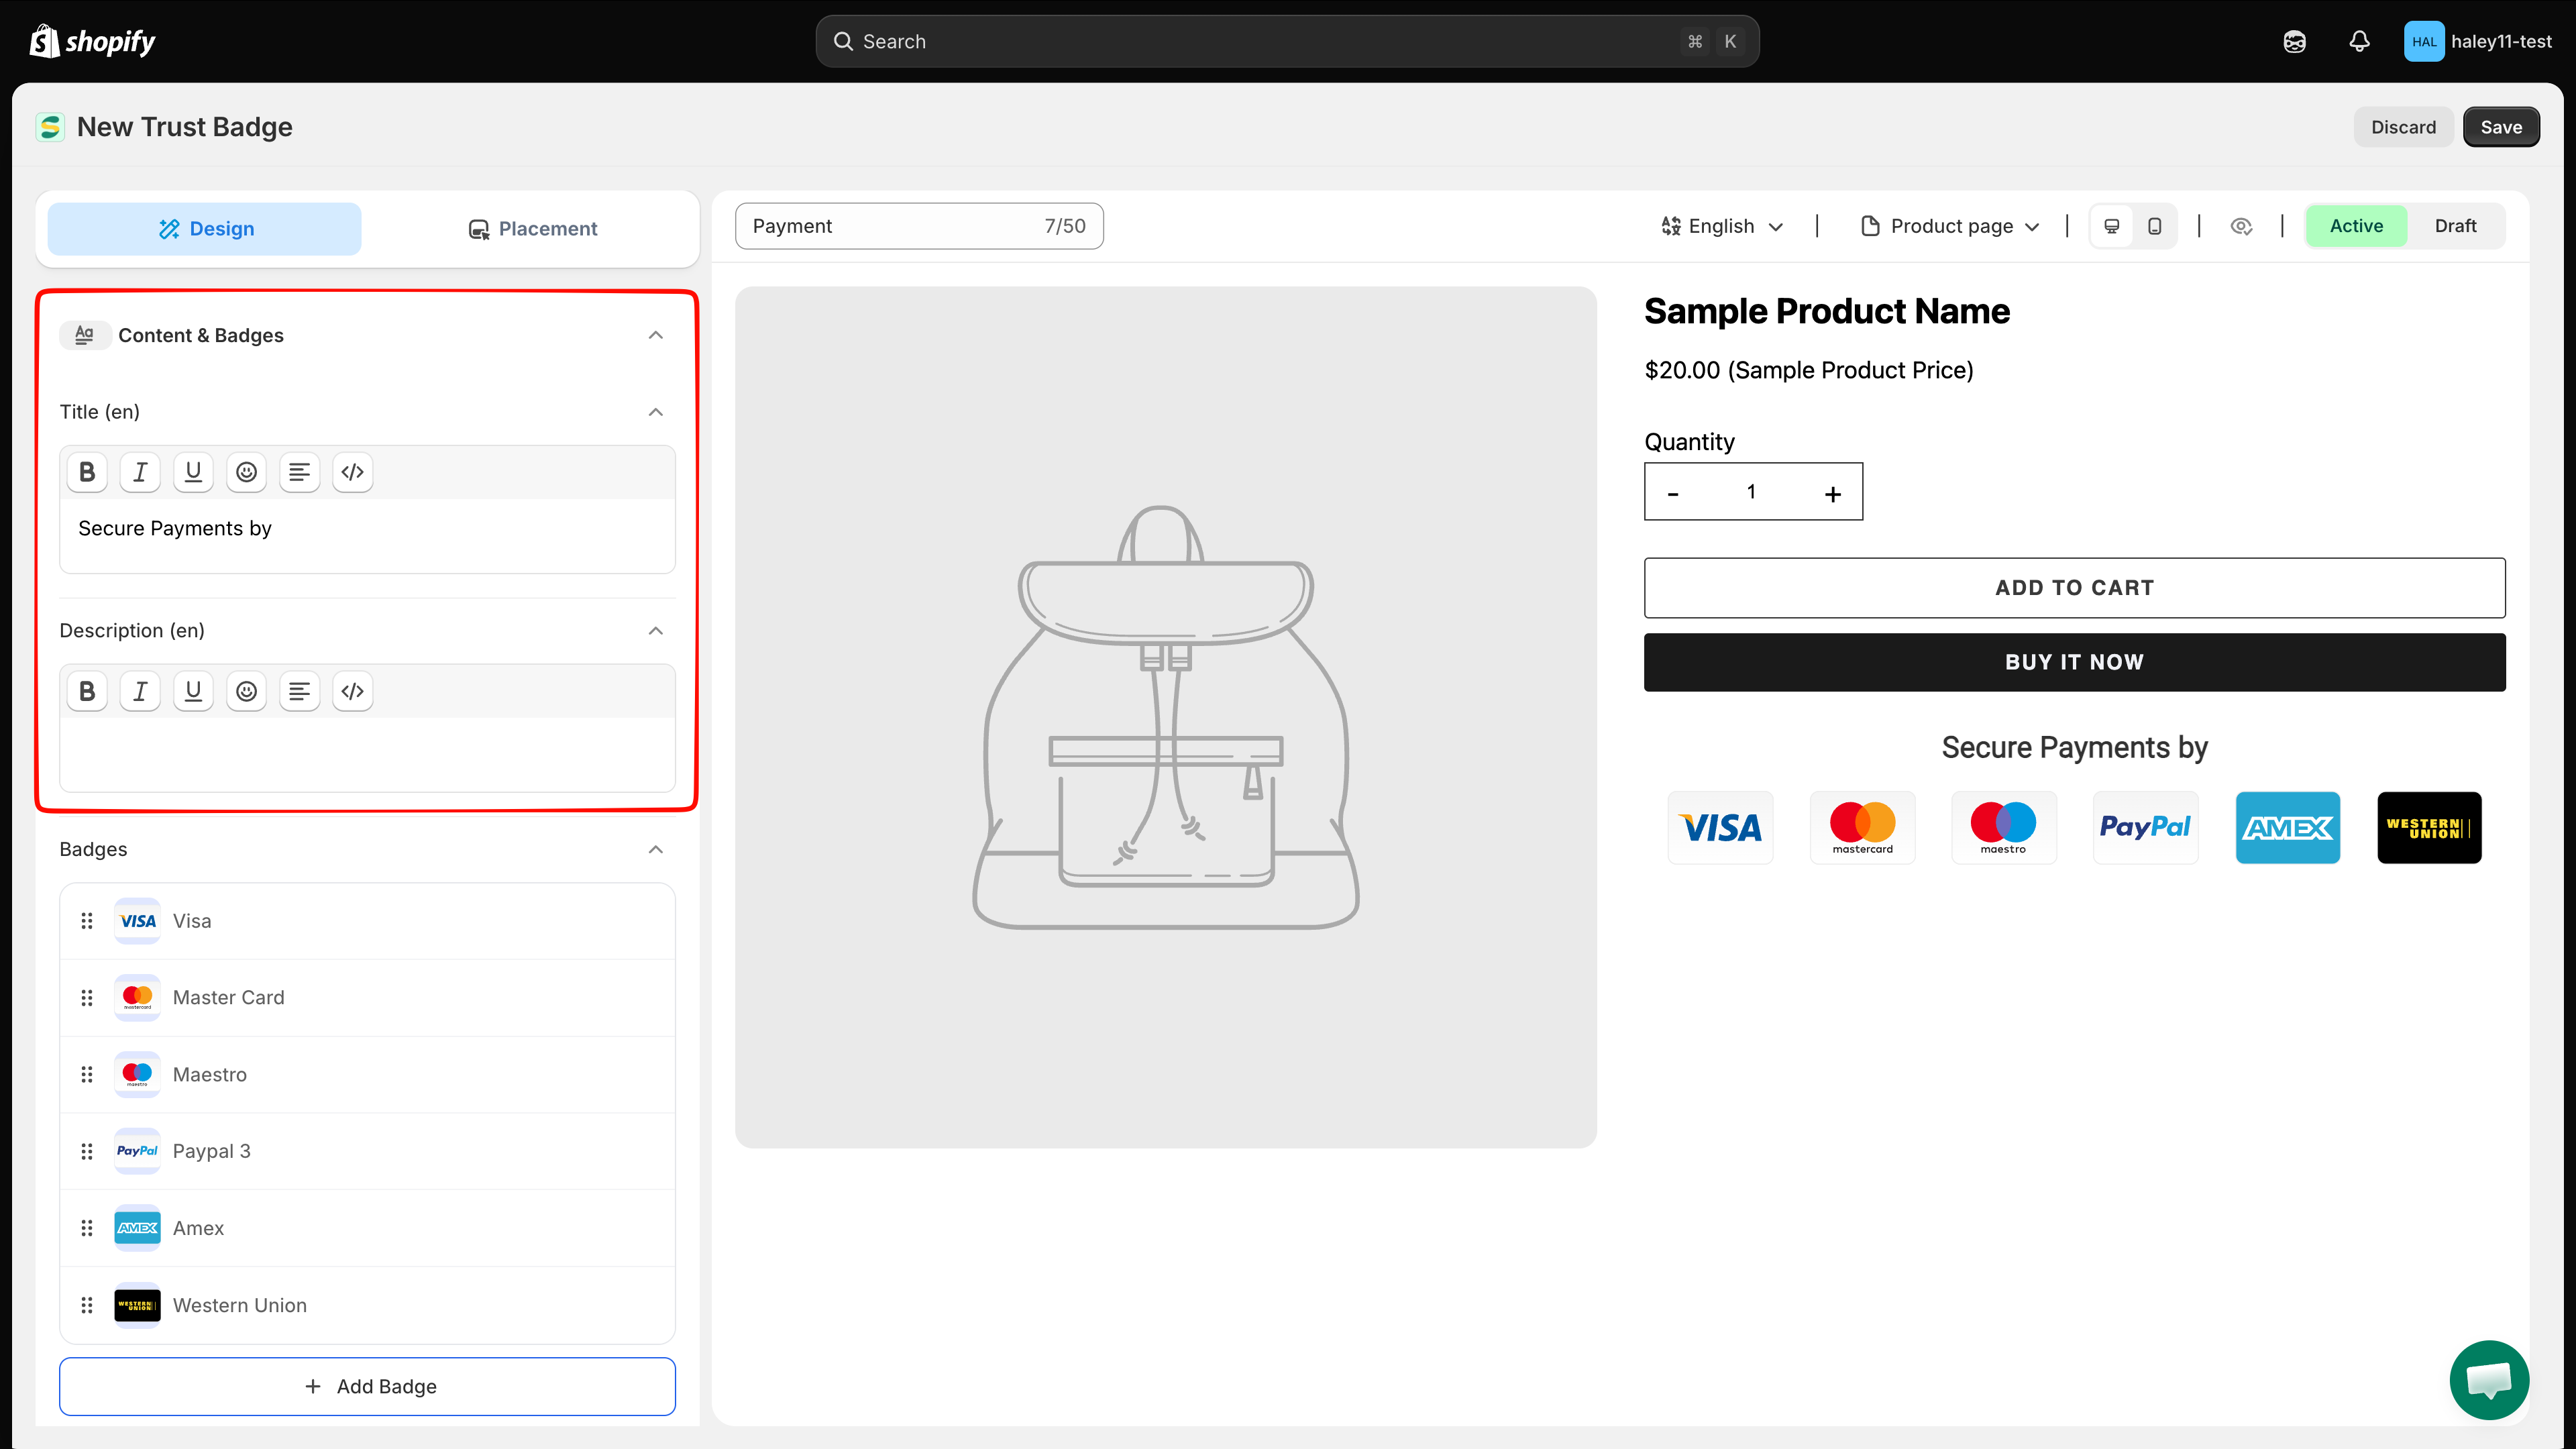
In **Content & Badges**, open **Title** and **Description** and enter the optional text that appears above the icons. Both fields support bold, italic, underline, emoji, text alignment, and source mode.

The fields are language-specific. Their labels show the active language, for example **Title (en)**. Use the language selector above the preview to edit another language.

Leave both fields empty if you want to show only the icons.

<figure><img src="https://1598842017-files.gitbook.io/~/files/v0/b/gitbook-x-prod.appspot.com/o/spaces%2F1WRTlT5AcaLSAedbCJyZ%2Fuploads%2Fgit-blob-dda273bdcc0ca055675cbedb171d1dcdbc6e7882%2Fimage_205.png?alt=media" alt="Title and Description rich-text editors in Content and Badges"><figcaption><p>Title and Description are optional rich-text fields edited separately for each language.</p></figcaption></figure>
{% endstep %}

{% step %}

## Add badge icons

Under **Badges**, click **Add Badge**, then choose:

| Option                 | What it does                             |
| ---------------------- | ---------------------------------------- |
| **Select badge image** | Opens the **Select Image** dialog.       |
| **Line break**         | Starts the following icons on a new row. |

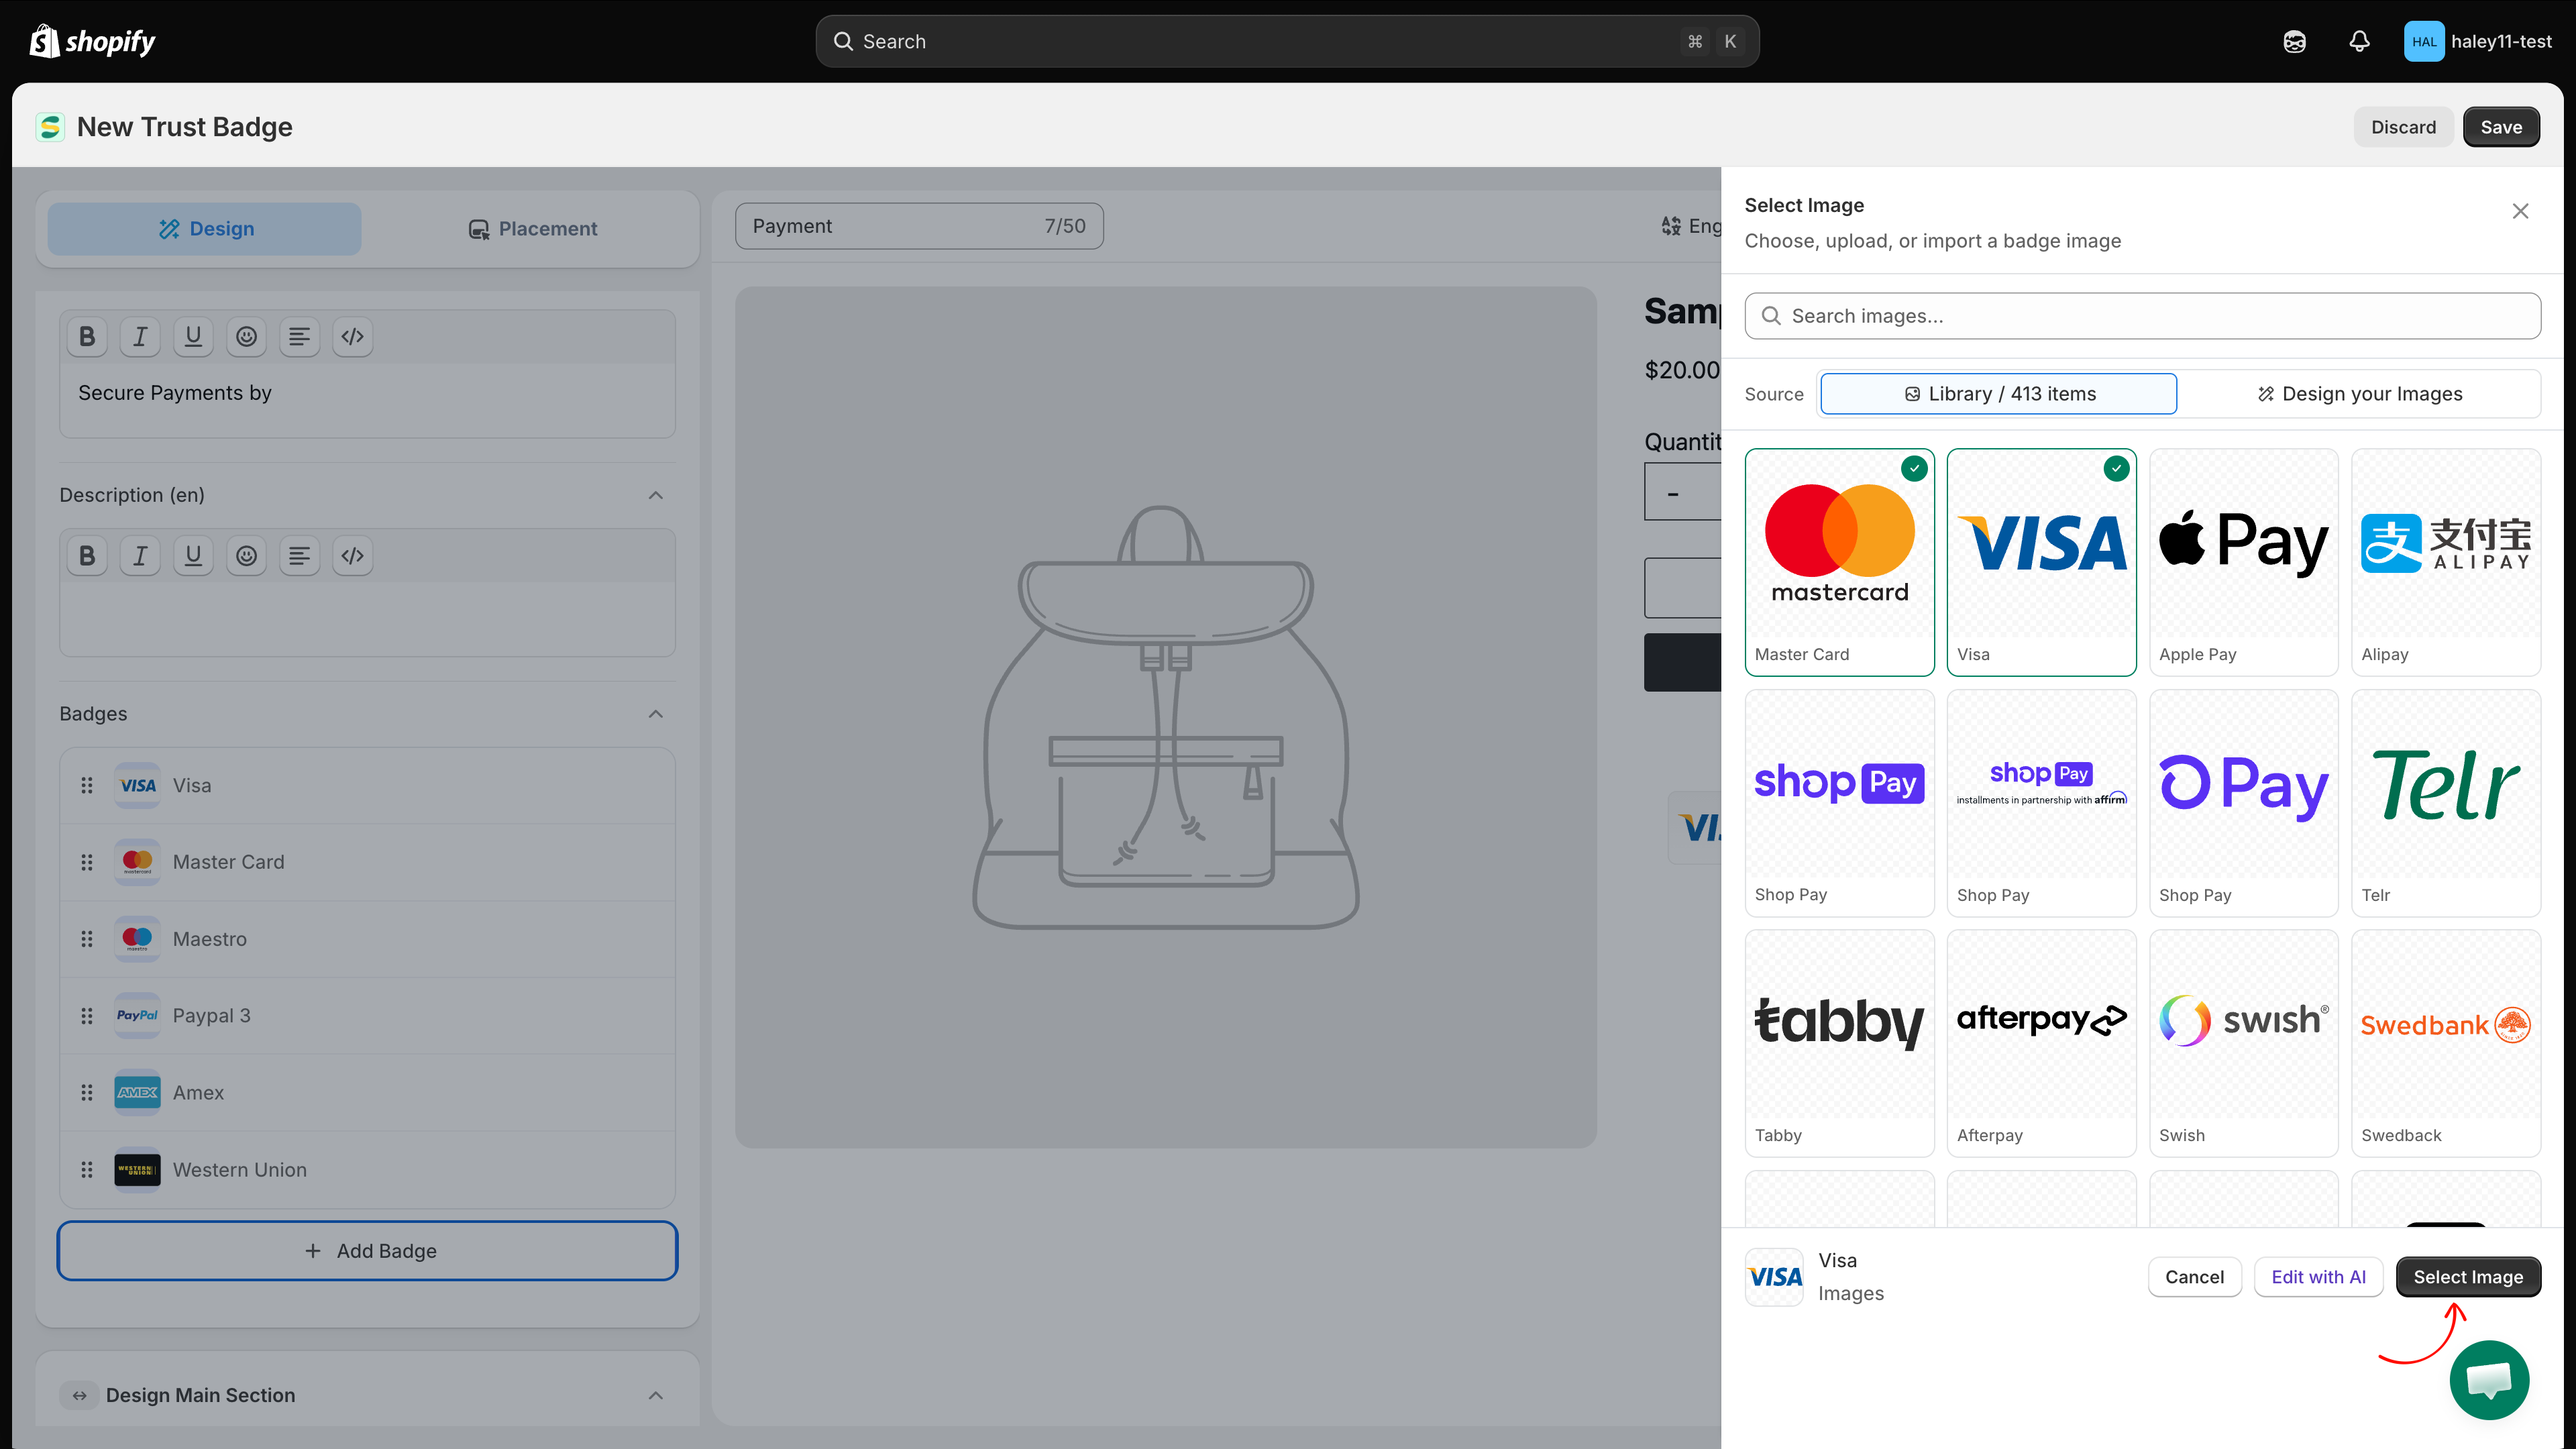
In **Select Image**, use **Search images** to find an icon. The **Library** source contains more than 400 payment, security, shipping, guarantee, and policy images; the current item count appears next to the source name. Select one or more images, then click **Select Image**.

Switch to **Design your Images** to use uploaded, URL-imported, or related custom designs. After selecting an image, click **Edit with AI** if you want to create a variation before adding it.

<figure><img src="https://1598842017-files.gitbook.io/~/files/v0/b/gitbook-x-prod.appspot.com/o/spaces%2F1WRTlT5AcaLSAedbCJyZ%2Fuploads%2Fgit-blob-f404f6e822d93f9d254b3c607824379332a84696%2Fimage_206.png?alt=media" alt="Select Image dialog with Search images, Library, Design your Images, Edit with AI, and Select Image controls"><figcaption><p>Search the built-in library or switch to Design your Images, then confirm your selection.</p></figcaption></figure>
{% endstep %}

{% step %}

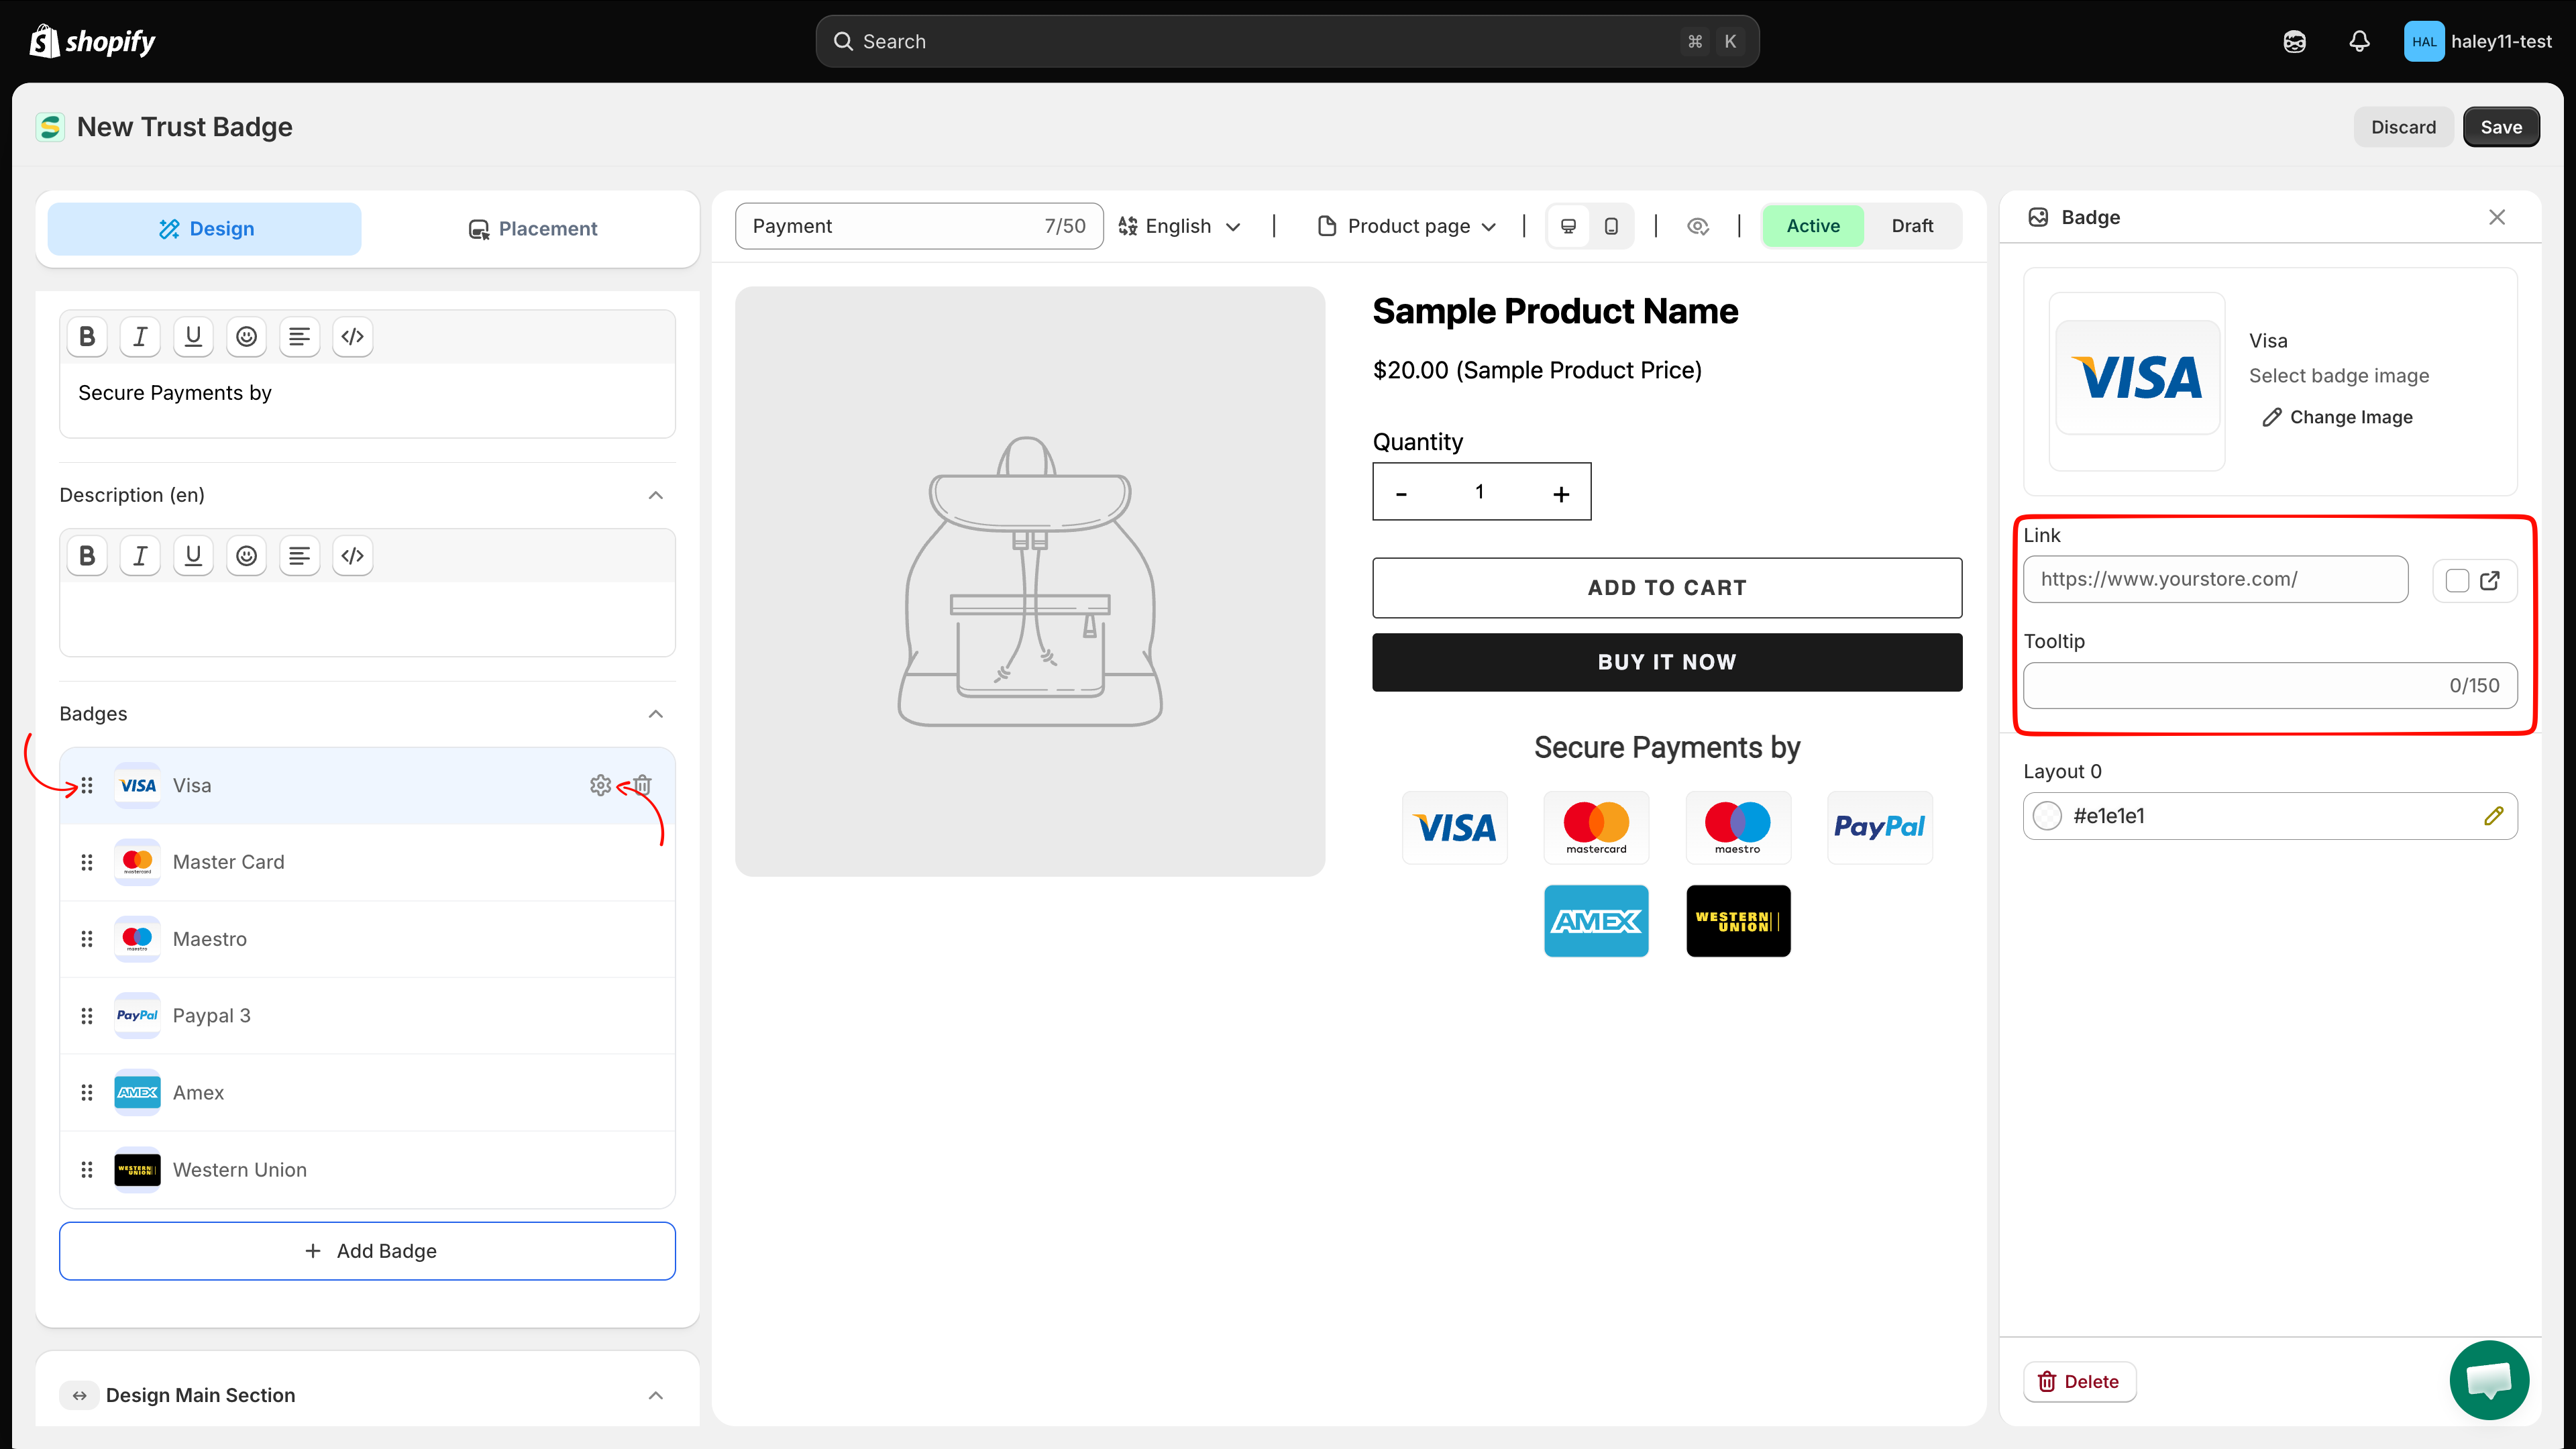
## Reorder and configure each icon

Each icon appears as a row in the **Badges** list. Drag a row by its handle to change the display order, or click **Delete** to remove it. Use **Line break** items to control where a new row starts.

Click the row's **General** button to open its settings:

* **Change Image** — replace the selected icon.
* **Link** — make the icon open a URL; use the external-link option to open it in a new tab.
* **Tooltip** — add up to 150 characters shown when a shopper points to the icon.
* **Layout colors** — recolor supported layers in built-in SVG icons.

<figure><img src="https://1598842017-files.gitbook.io/~/files/v0/b/gitbook-x-prod.appspot.com/o/spaces%2F1WRTlT5AcaLSAedbCJyZ%2Fuploads%2Fgit-blob-4fd24483e01398ee330a33fed34f99835a0924bc%2Fimage_207.png?alt=media" alt="Badges list and General settings panel for one trust badge icon"><figcaption><p>Drag icons to reorder them, and use General to change the image, link, tooltip, or supported colors.</p></figcaption></figure>
{% endstep %}

{% step %}

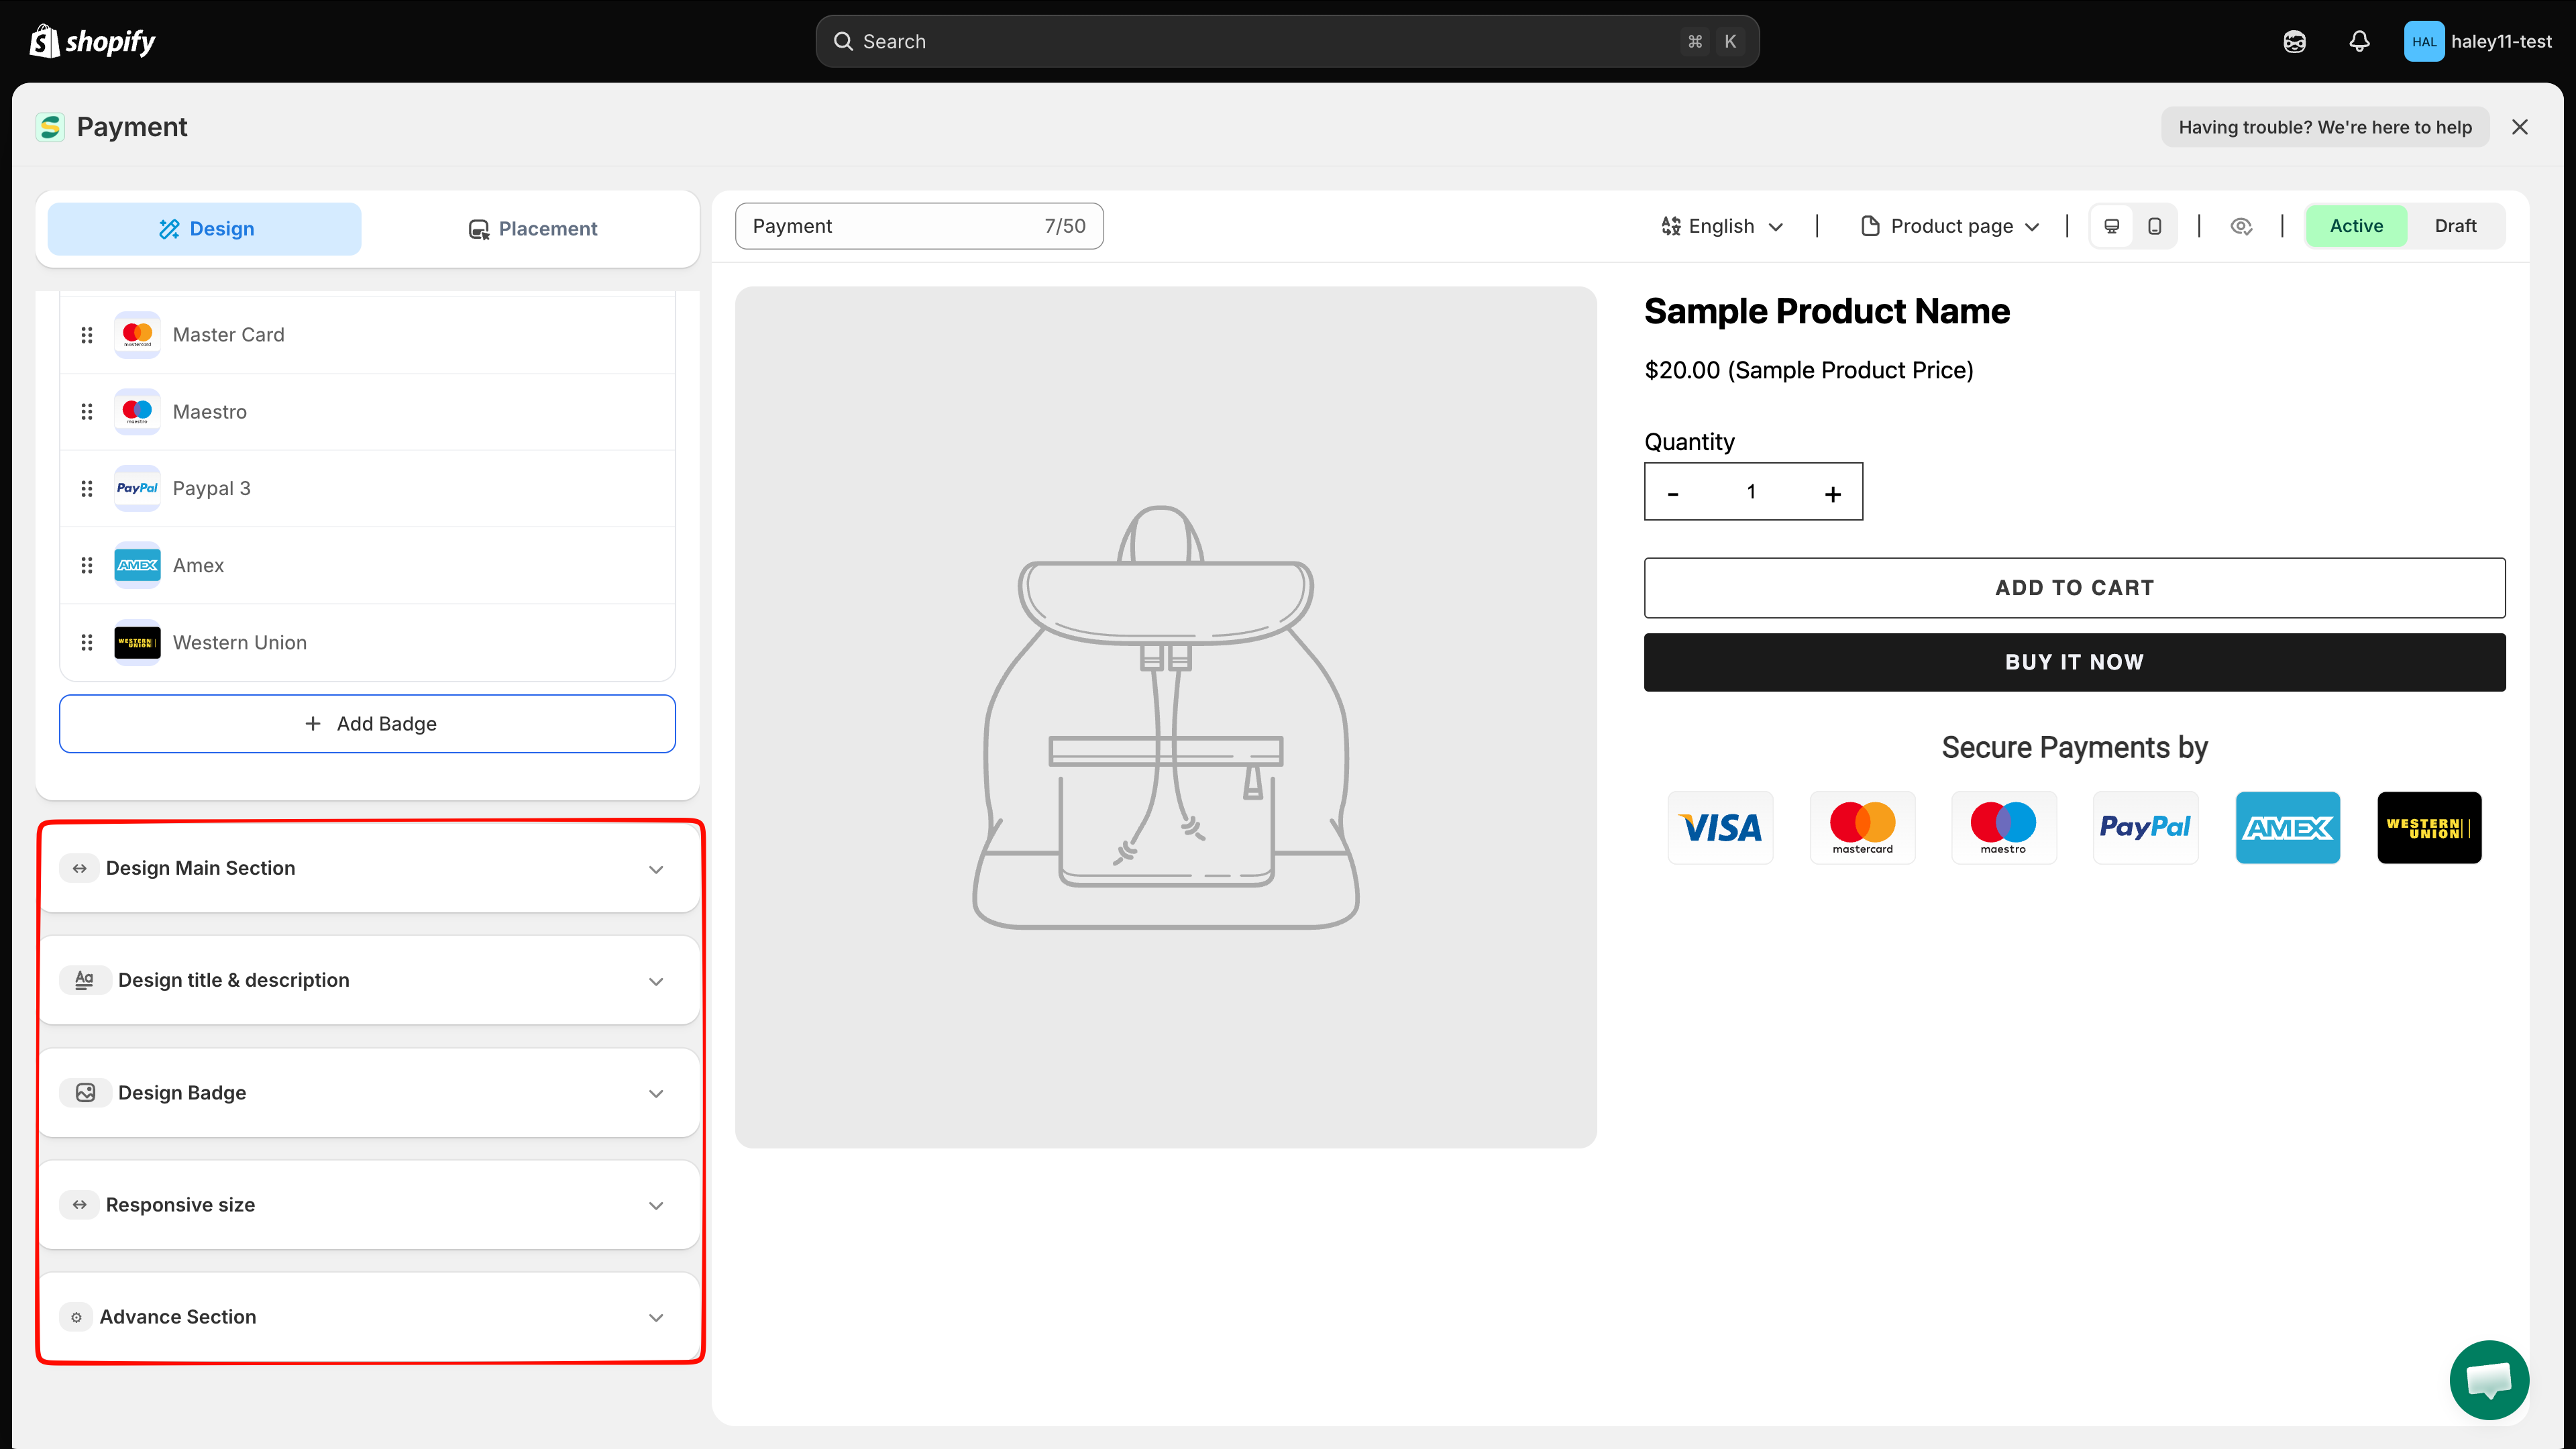
## Style the trust badge block

Use the collapsible design sections to match the trust badge to your theme:

| Section                        | Main settings                                                                                          |
| ------------------------------ | ------------------------------------------------------------------------------------------------------ |
| **Design Main Section**        | Block width, margin, padding, border size/style/color, shadow, and corner radius.                      |
| **Design title & description** | Custom font, color, font size, and line height for the title and description.                          |
| **Design Badge**               | Mono, mono card, original, or original card style; alignment; width and height; margin; and animation. |
| **Responsive size**            | Separate icon width and height for tablet and mobile.                                                  |
| **Advance Section**            | Custom CSS and a clickable CSS reference for the trust badge selectors.                                |

The available animations are **SlideInUp**, **SadeInDown**, **BounceIn**, **FlipInX**, and **ZoomIn**. Turn on **Animation**, select an effect, and use the play button to preview it.

<figure><img src="https://1598842017-files.gitbook.io/~/files/v0/b/gitbook-x-prod.appspot.com/o/spaces%2F1WRTlT5AcaLSAedbCJyZ%2Fuploads%2Fgit-blob-2431ce6ed6de71f6377b33617973b8c37ee703c6%2Fimage_208.png?alt=media" alt="Trust badge editor showing the collapsible design sections"><figcaption><p>Open each design section to style the container, text, icons, responsive sizes, and custom CSS.</p></figcaption></figure>

{% hint style="info" %}
In **Advance Section**, click a selector in **CSS reference** to insert its scoped rule into the custom CSS editor.
{% endhint %}
{% endstep %}

{% step %}

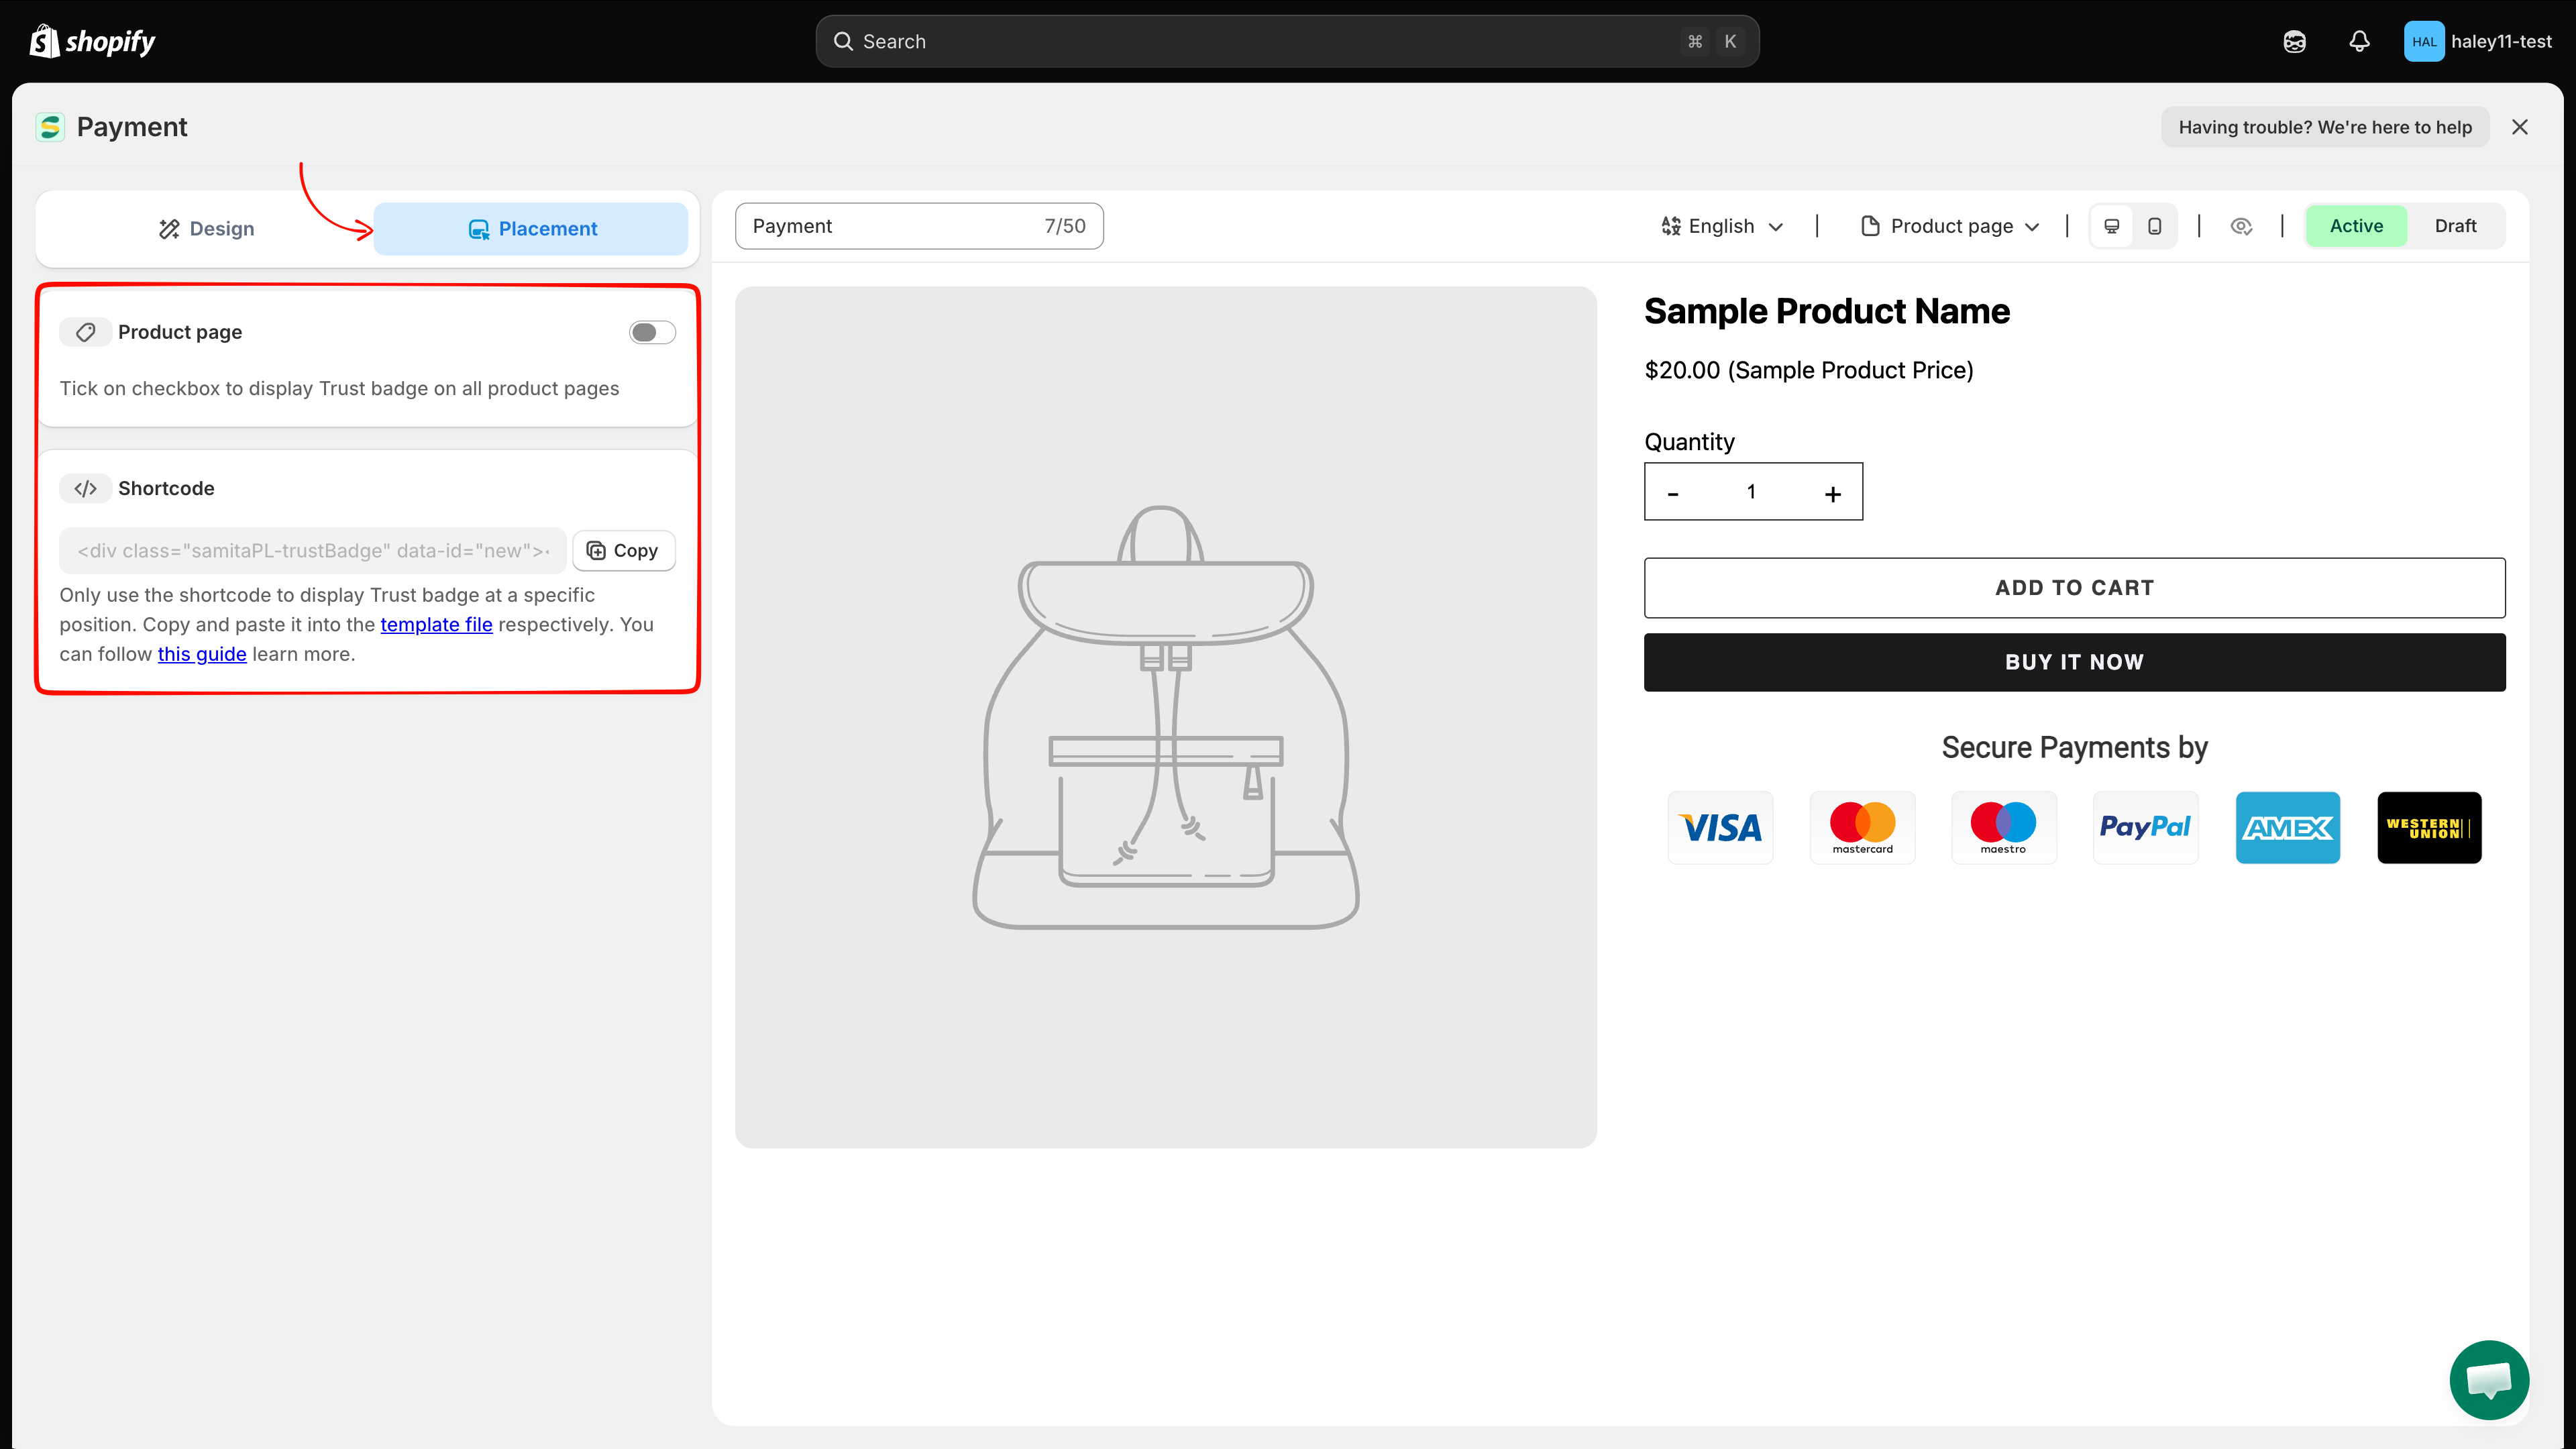
## Choose where the trust badge appears

Switch to the **Placement** tab:

| Option           | What it does                                                                                       |
| ---------------- | -------------------------------------------------------------------------------------------------- |
| **Product page** | Turn on the switch to display the trust badge at the app's built-in position on all product pages. |
| **Shortcode**    | Copy the snippet when you want to place the trust badge at a custom position in your theme.        |

An unsaved trust badge uses `data-id="new"` in its shortcode. Save the trust badge before placing that snippet in your theme.

<figure><img src="https://1598842017-files.gitbook.io/~/files/v0/b/gitbook-x-prod.appspot.com/o/spaces%2F1WRTlT5AcaLSAedbCJyZ%2Fuploads%2Fgit-blob-b2bc5404fd2127ad8c2b5c055cd6f6c8b8b43226%2Fimage_209.png?alt=media" alt="Placement tab with the Product page switch and Shortcode section"><figcaption><p>Use the built-in product-page position or copy the shortcode for a custom position.</p></figcaption></figure>

{% hint style="info" %}
See [Place a trust badge with shortcode](/extra-features/place-with-shortcode.md) for the complete theme-editor flow.
{% endhint %}
{% endstep %}

{% step %}

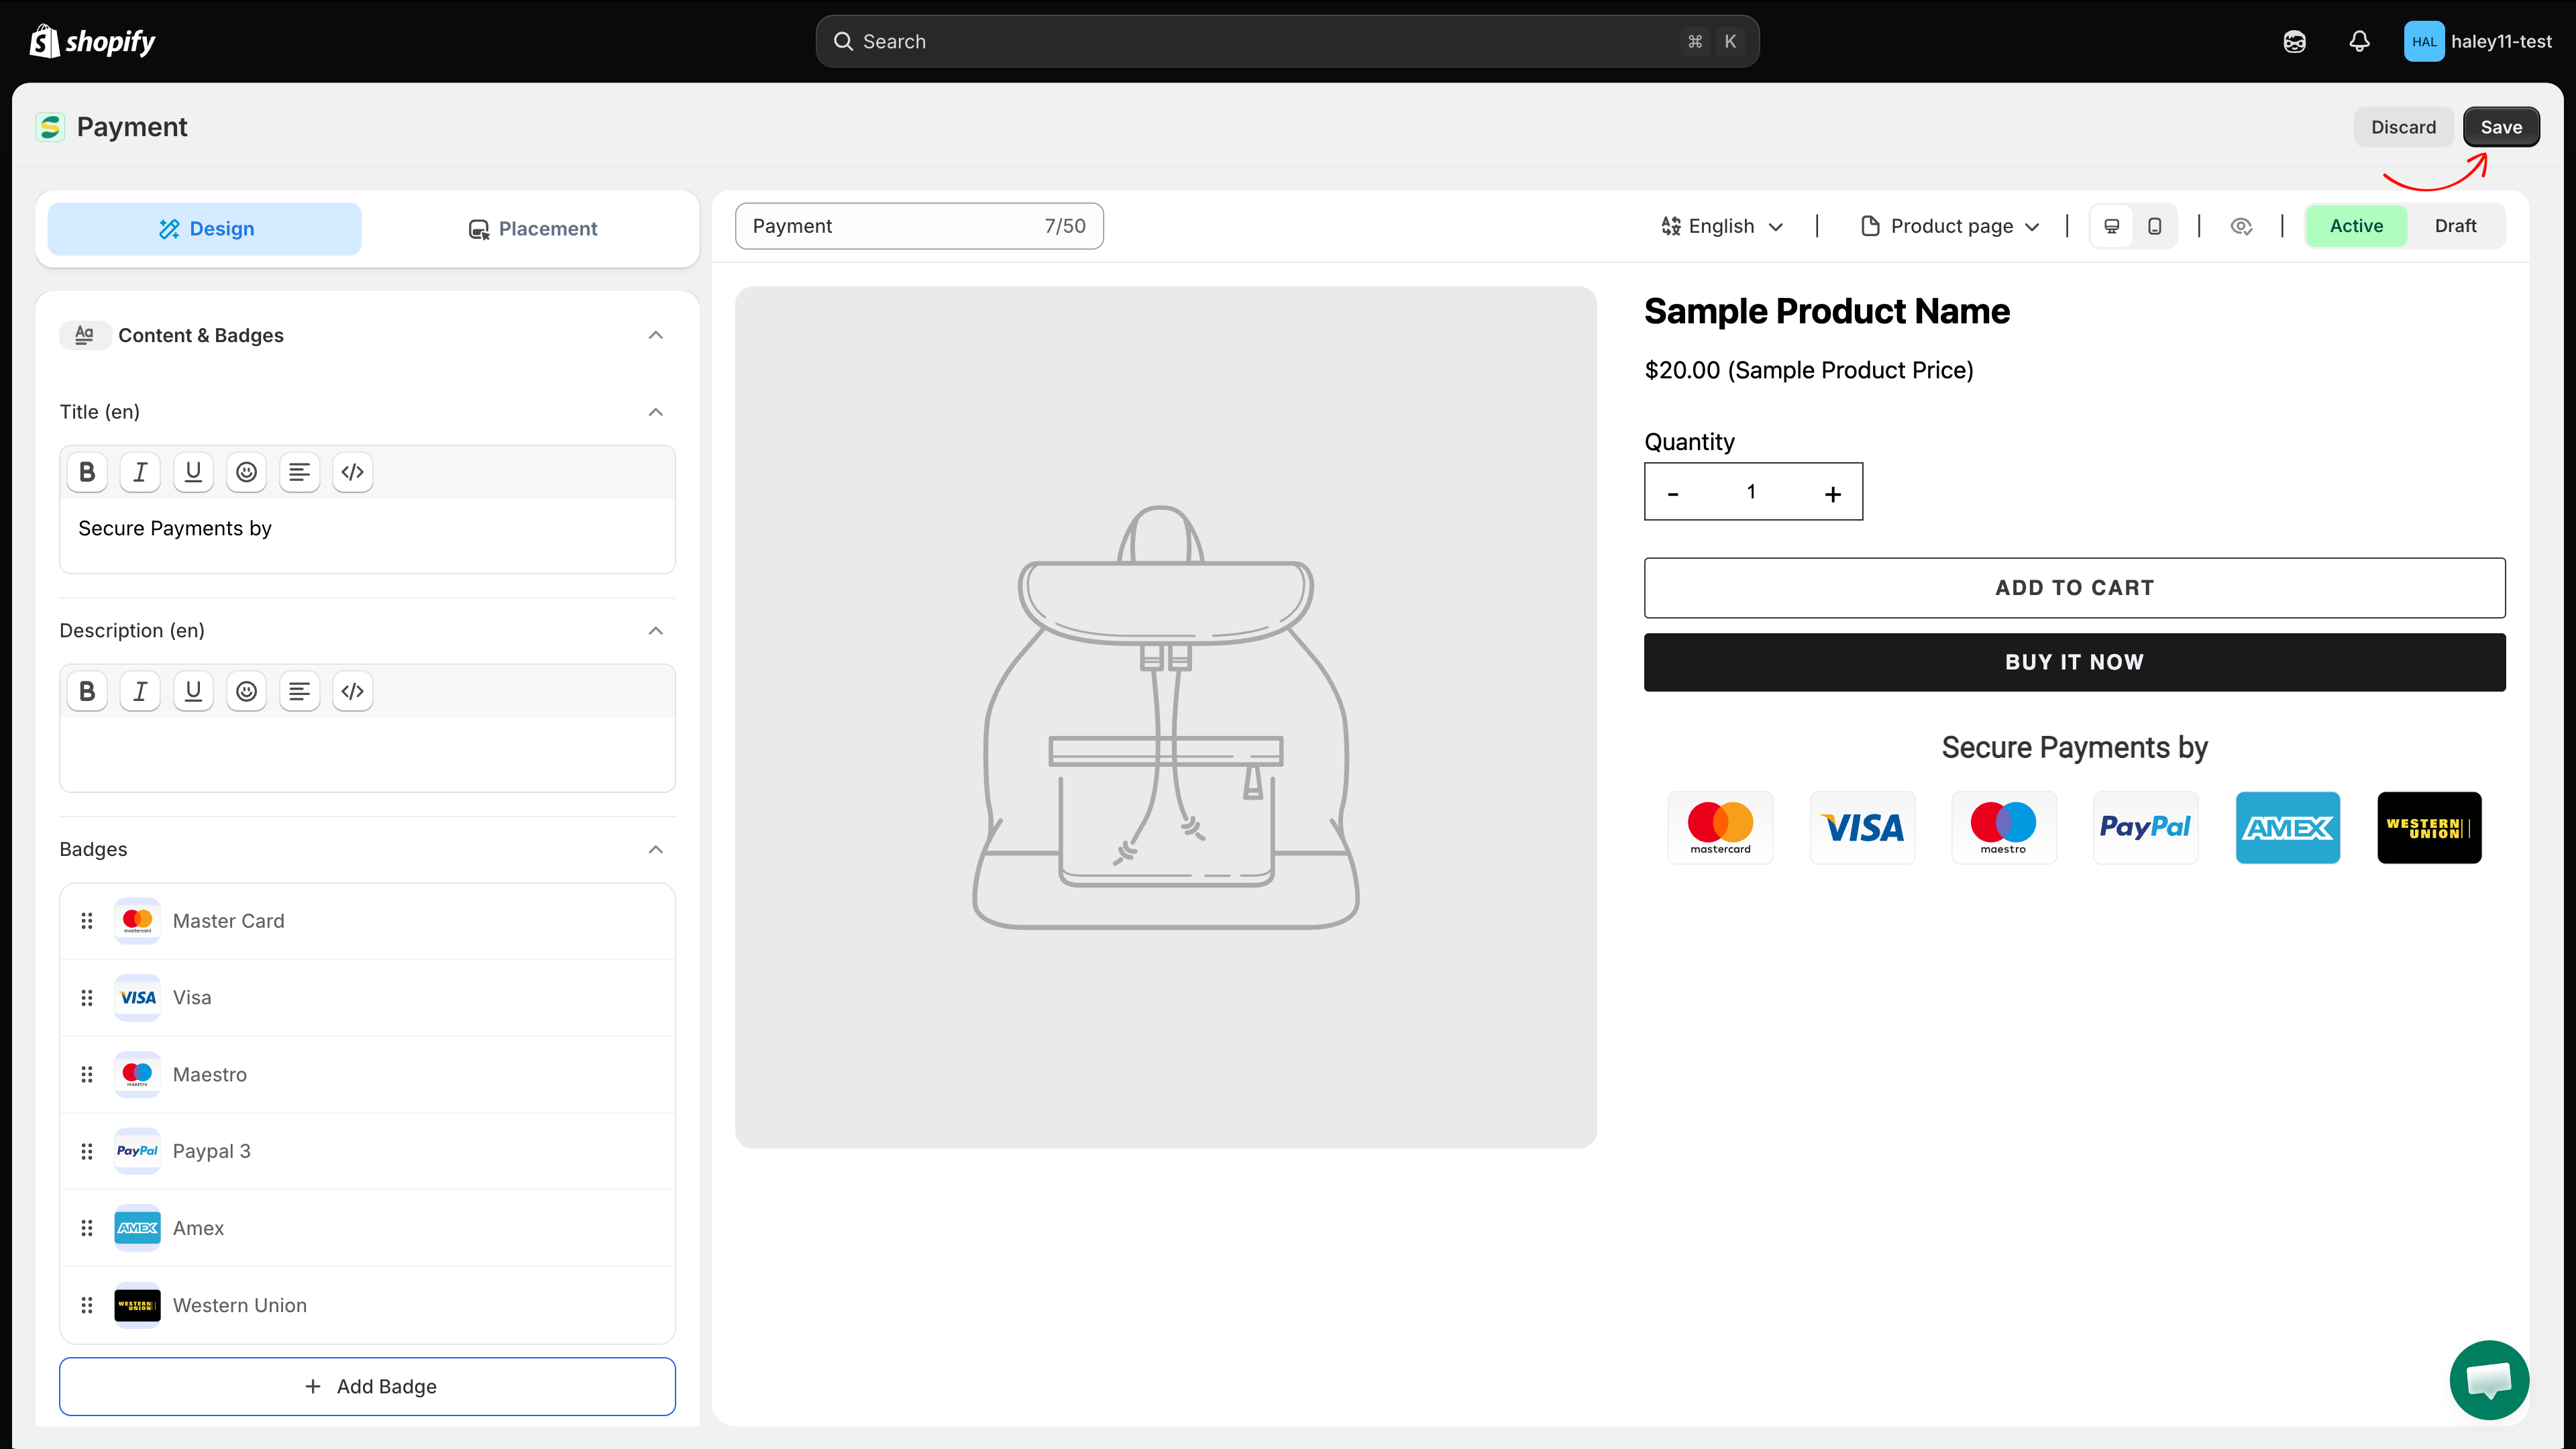
## Preview and save

Use the controls above the preview to:

* switch the editing language;
* preview the **Product page**;
* switch between desktop and mobile views;
* show or hide the sample product;
* set the trust badge to **Active** or **Draft**.

Check the preview, then click **Save** in the top-right corner. Click **Discard** if you want to leave without keeping your unsaved edits.

<figure><img src="https://1598842017-files.gitbook.io/~/files/v0/b/gitbook-x-prod.appspot.com/o/spaces%2F1WRTlT5AcaLSAedbCJyZ%2Fuploads%2Fgit-blob-e45cda437e319317af269b54f6bea925e55a396d%2Fimage_210.png?alt=media" alt="Trust badge editor with preview controls, Active and Draft status, Discard, and Save"><figcaption><p>Preview the result, choose Active or Draft, then save the trust badge.</p></figcaption></figure>
{% endstep %}
{% endstepper %}

## Next steps

* [Trust badge overview](/extra-features/trust-badge-overview.md) — manage saved trust badges, templates, status, and placement.
* [Place a trust badge with shortcode](/extra-features/place-with-shortcode.md) — add the trust badge at an exact position in your theme.

{% hint style="success" %}
**Need support?**

If you run into any difficulty while following these steps, contact us at <support@samita.io>.
{% endhint %}


---

# Agent Instructions
This documentation is published with GitBook. GitBook is the documentation platform designed so that both humans and AI agents can read, navigate, and reason over technical content effectively. Learn more at gitbook.com.

## Querying This Documentation
If you need additional information that is not directly available in this page, you can query the documentation dynamically by asking a question.

Perform an HTTP GET request on the current page URL with the `ask` query parameter, and the optional `goal` query parameter:

```
GET https://docs.samita.io/extra-features/create-trust-badge.md?ask=<question>&goal=<endgoal>
```

`ask` is the immediate question: it should be specific, self-contained, and written in natural language.
`goal` is optional and describes the broader end goal you are ultimately trying to accomplish on behalf of the user. GitBook uses it to tailor the answer towards what is most useful for that goal.

The response will contain a direct answer to the question and relevant excerpts and sources from the documentation.

Use this mechanism when the answer is not explicitly present in the current page, you need clarification or additional context, or you want to retrieve related documentation sections.