> For the complete documentation index, see [llms.txt](https://docs.samita.io/llms.txt). Markdown versions of documentation pages are available by appending `.md` to page URLs; this page is available as [Markdown](https://docs.samita.io/sami-b2b-onboarding/customer-accounts/account-forms.md).

# Account forms

Choose what approved buyers can edit about their company, its locations and themselves, and which of their edits wait for your approval.

Account forms are the forms approved buyers fill in on the [Company self-service page](/sami-b2b-onboarding/customer-accounts/company-self-service-page.md) of their customer account. Sami B2B Onboarding gives you four of them, each tied to a Shopify object. You can reword, reorder, resize and hide their fields, add fields of your own, and decide which edits wait for your approval.

| Form                 | What it holds                                                                                                                  | Saved in Shopify on                                                                                                                                       | Changes need approval, by default |
| -------------------- | ------------------------------------------------------------------------------------------------------------------------------ | --------------------------------------------------------------------------------------------------------------------------------------------------------- | --------------------------------- |
| **Company profile**  | Legal company name, Tax ID, Website, Industry                                                                                  | The company                                                                                                                                               | On                                |
| **Company location** | Location name, Tax registration ID, the shipping address, **Same as shipping address** and the billing address                 | The company location                                                                                                                                      | On                                |
| **Company contact**  | The boxes of the **Add someone** dialog buyers use to invite a colleague: First name, Last name, Email, Job title, Phone, Role | A new company contact (see [Company self-service page](/sami-b2b-onboarding/customer-accounts/company-self-service-page.md#how-a-buyer-adds-a-colleague)) | Not available                     |
| **Contact profile**  | The buyer's own First name, Last name and Phone                                                                                | Their customer record                                                                                                                                     | Off                               |

{% hint style="info" %}
All four forms are off when you install the app. A form that's off doesn't show on the self-service page. **Company contact** is the exception: while it's off, the **Add someone** dialog still works, with its standard wording.
{% endhint %}

## Turn a form on or off

{% stepper %}
{% step %}

### Open the account forms

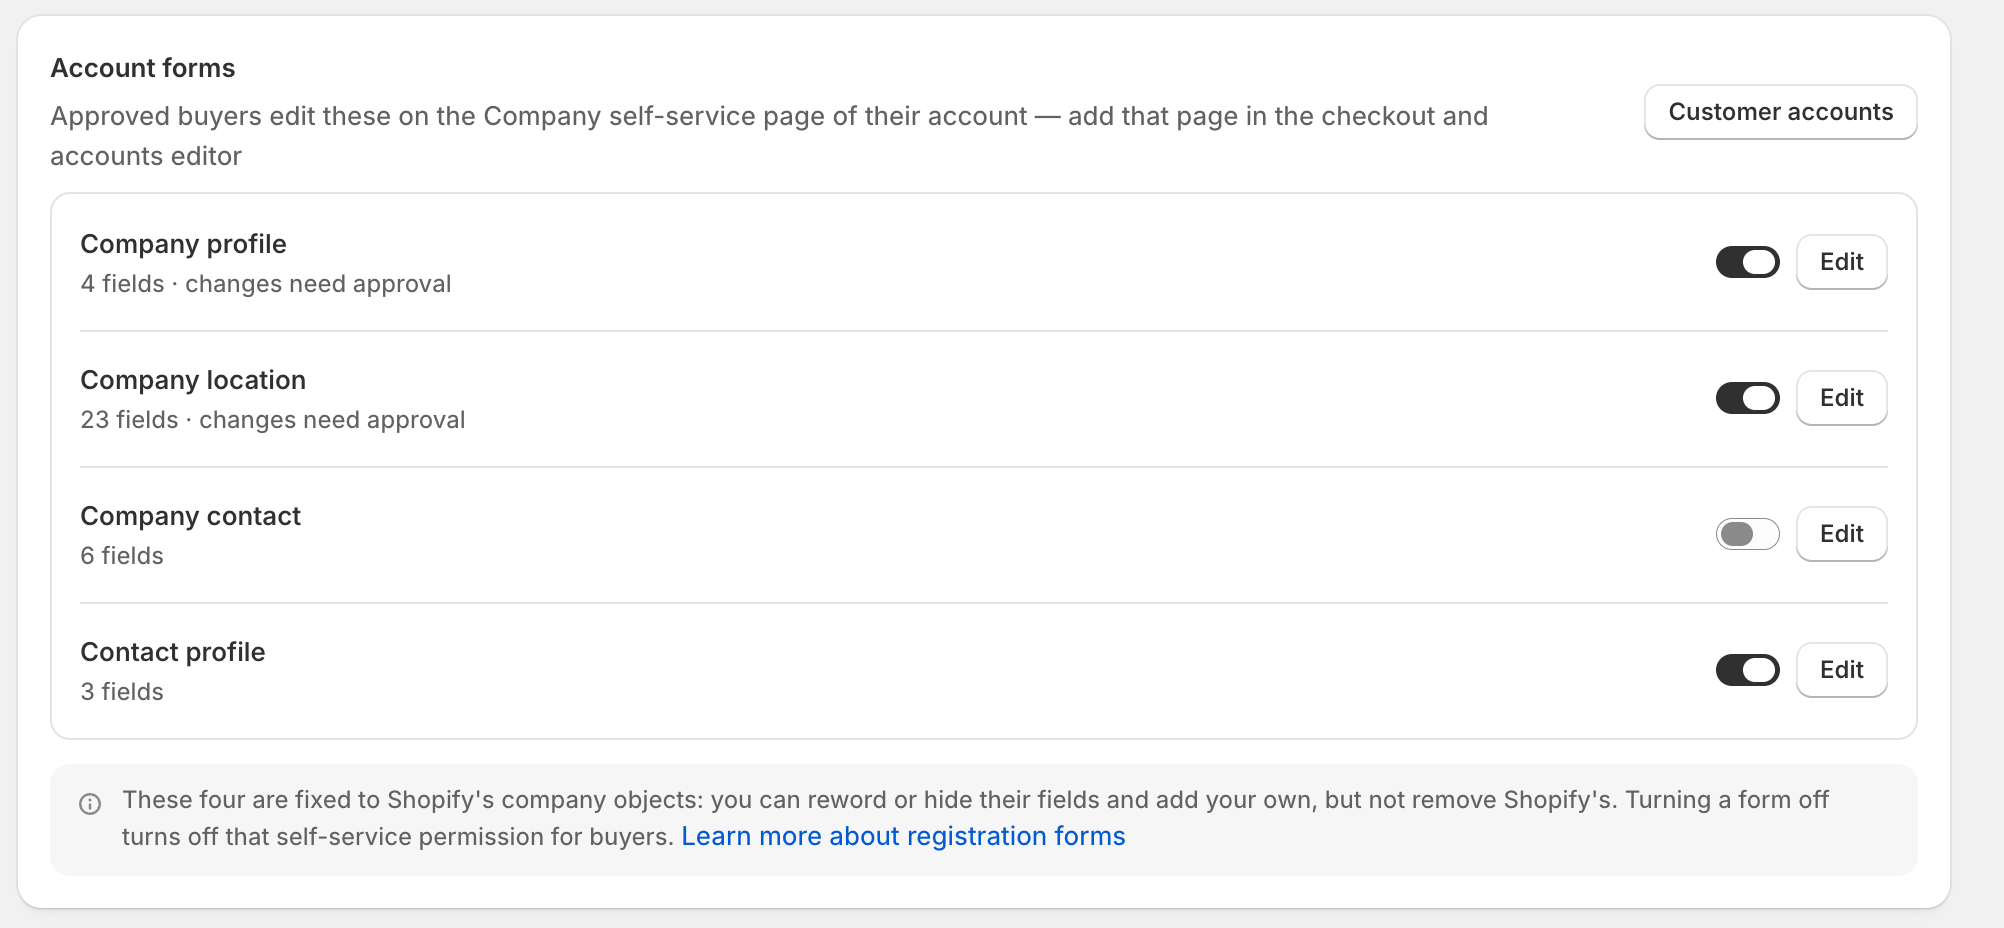
Go to **Forms** in the app and scroll to the **Account forms** card. Each row shows the form's name and how many fields it has, with "changes need approval" when at least one field waits for you.

<figure><img src="https://3844812229-files.gitbook.io/~/files/v0/b/gitbook-x-prod.appspot.com/o/spaces%2FRrf4pQPgjvb3GW7IN3Ci%2Fuploads%2Fgit-blob-52aad3e5bbe3619bce29618e0c8c75d500697324%2Fscreenshot-forms-account-forms-card.png?alt=media" alt="The Account forms card listing Company profile, Company location, Company contact and Contact profile, each with a switch and an Edit button."><figcaption><p>Turn a form on to show it to buyers on the Company self-service page.</p></figcaption></figure>
{% endstep %}

{% step %}

### Switch it and save

Turn the switch on the form's row on or off, then click **Save** in the save bar. "Account form saved" confirms it, or "Account forms saved" when you switched several.
{% endstep %}
{% endstepper %}

Only staff with the admin role can change account forms. Reviewers see each form's **On** or **Off** status.

## Edit an account form

This example edits **Company location**. The other forms work the same way.

{% stepper %}
{% step %}

### Open the editor

In the **Account forms** card, click **Edit** on **Company location**, or click its name. The editor opens full screen: the Elements panel on the left, a preview of the form as buyers see it in the middle. The toolbar shows the form's **On** or **Off** status.
{% endstep %}

{% step %}

### Select a field

Click a field in the preview, for example **Department or attention**, or click it in the Elements panel. Its settings open beside the preview.
{% endstep %}

{% step %}

### Change the field

Change what you need. The panel offers only what this field can take.

| Section        | Setting                                   | What it does                                                                                                                                                 |
| -------------- | ----------------------------------------- | ------------------------------------------------------------------------------------------------------------------------------------------------------------ |
| **Content**    | **Label**, **Placeholder**, **Help text** | The words buyers see on and under the box.                                                                                                                   |
| **Validation** | **Required**                              | Buyers must fill it in. Buyers who left it empty must fill it in before they can save other changes.                                                         |
| **Validation** | **Error message**                         | Shown when **Required** is on: what buyers read when they leave the field empty. Leave it blank to use the standard wording, for example "City is required". |
| **Validation** | **Limit characters**                      | Sets **Min characters** and **Max characters** for text boxes.                                                                                               |
| **Layout**     | **Column width**                          | How much of the line the box takes, out of 12. Boxes in the same row share a line when they fit.                                                             |
| **Visibility** | **Shown to buyers**                       | Turn it off to hide the field.                                                                                                                               |
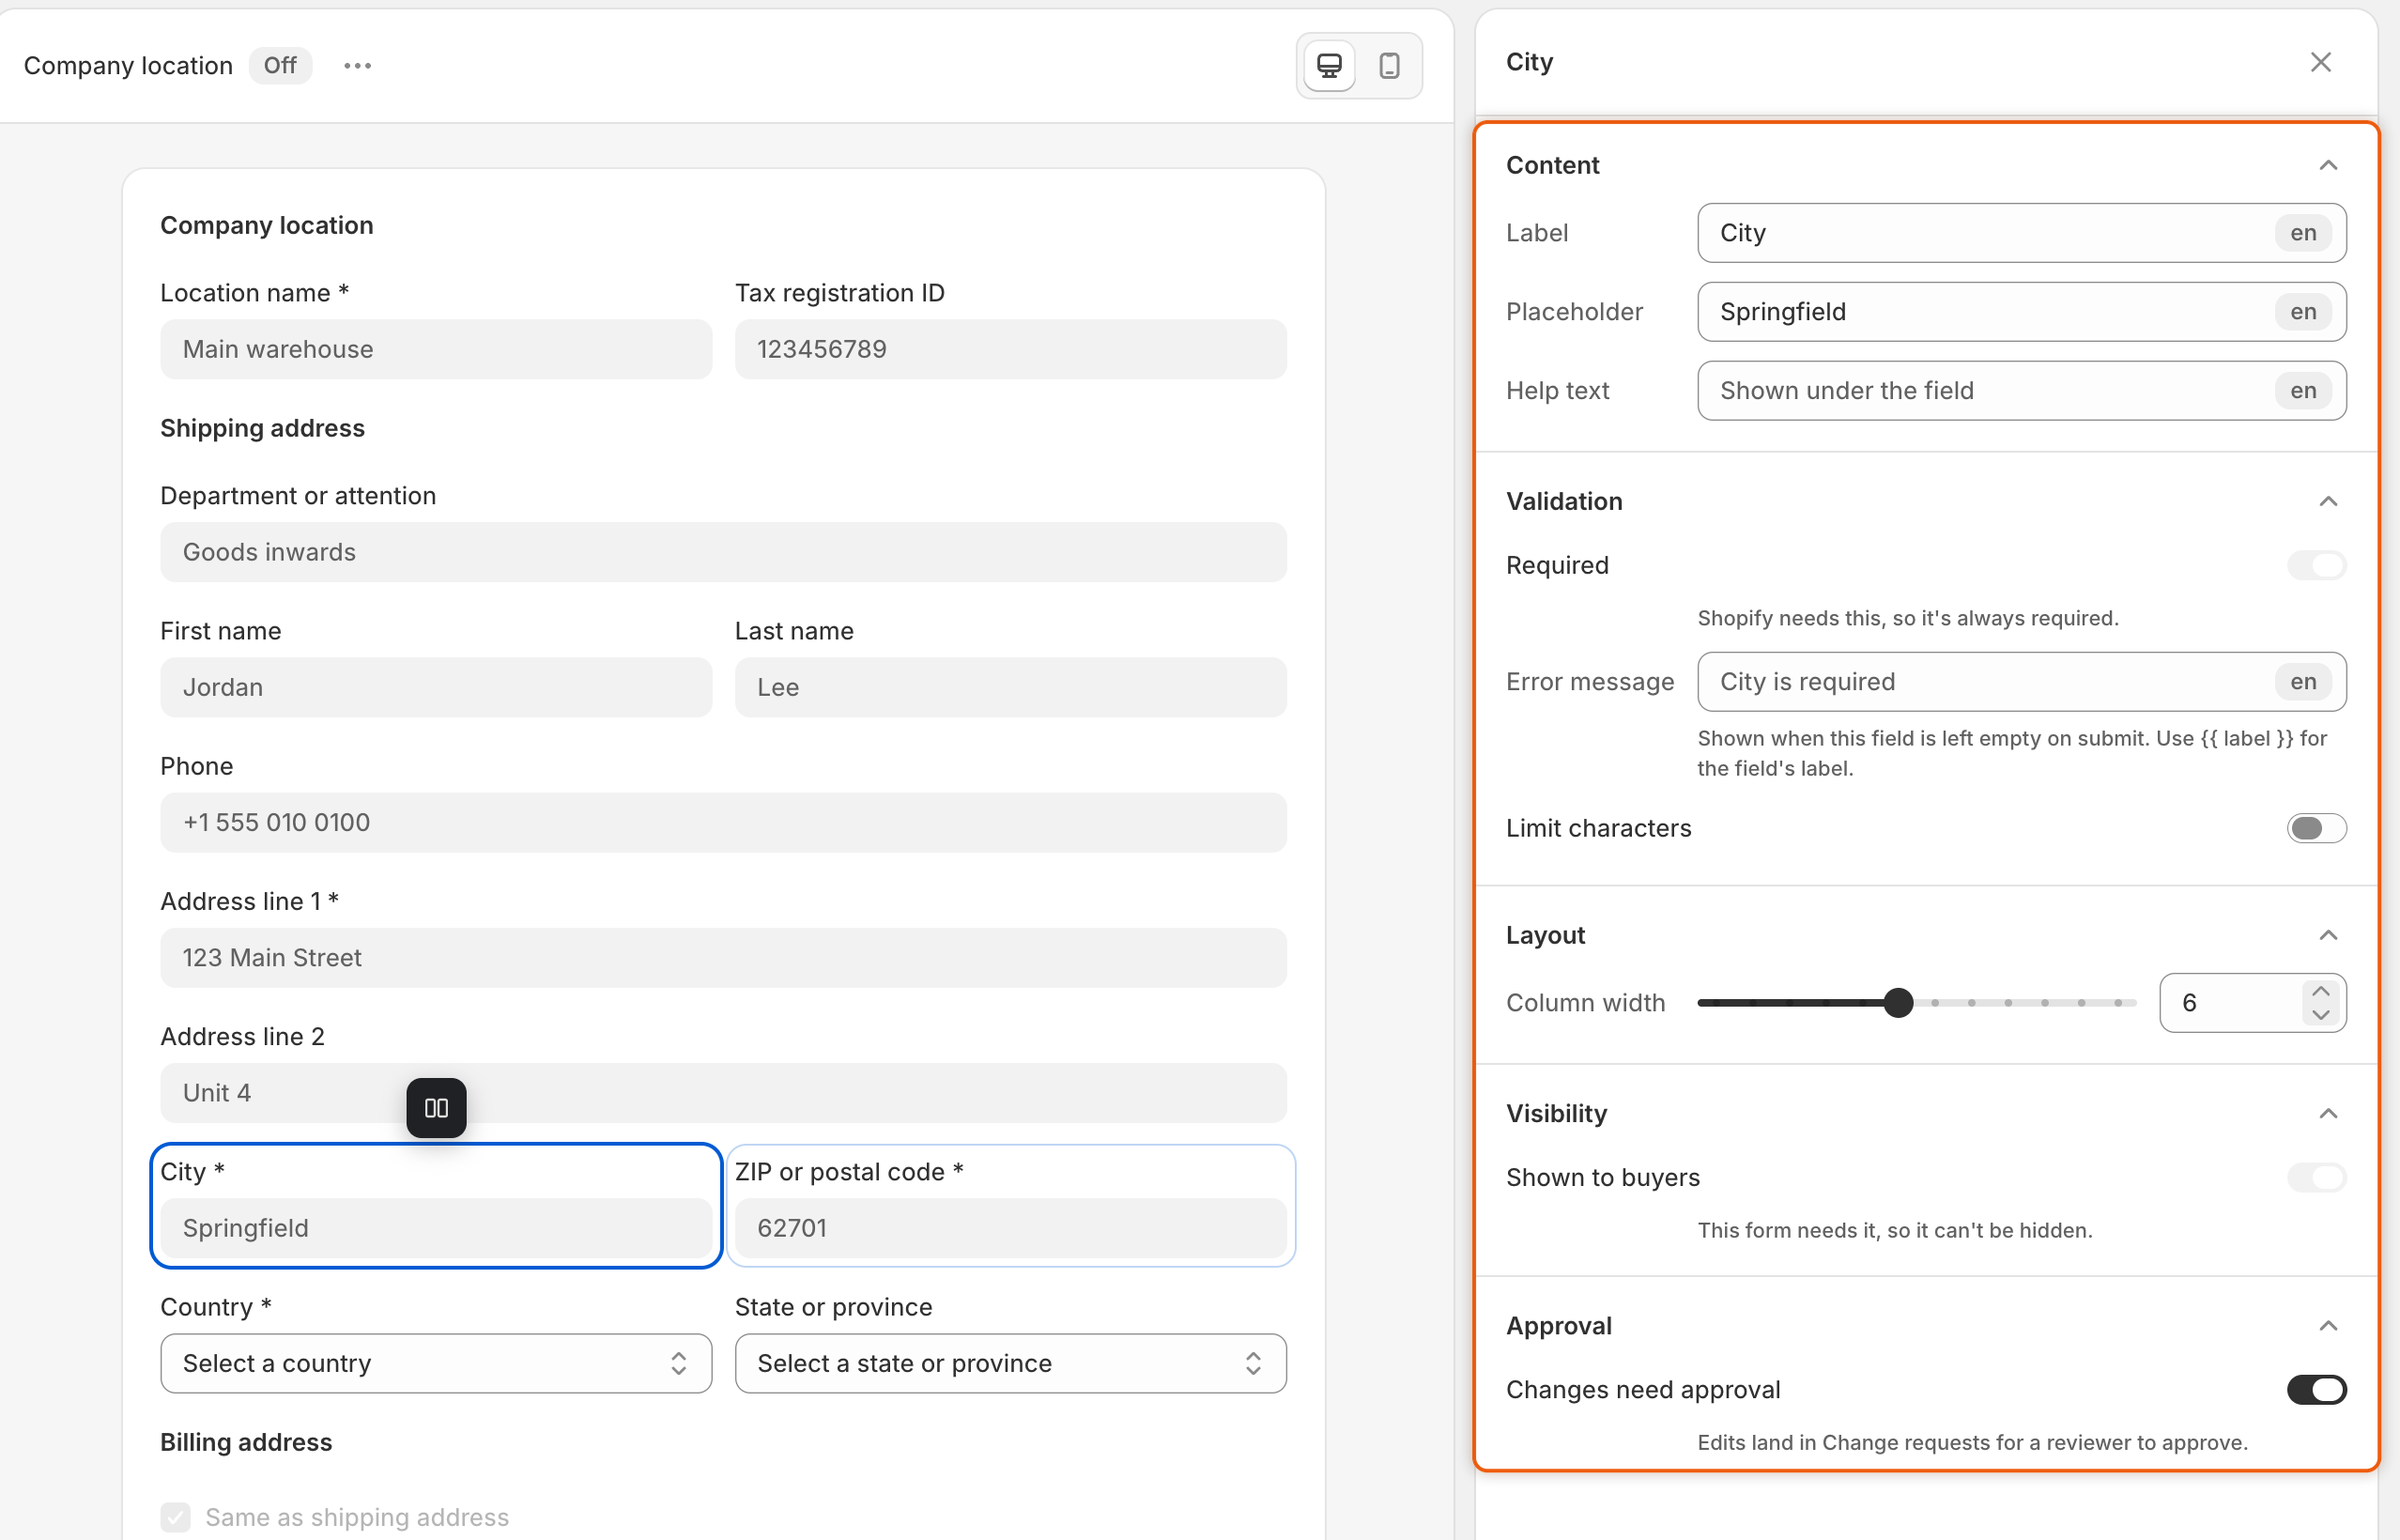
| **Approval**   | **Changes need approval**                 | A buyer's edit to this field waits in **Change requests** instead of going to Shopify.                                                                       |

<figure><img src="https://3844812229-files.gitbook.io/~/files/v0/b/gitbook-x-prod.appspot.com/o/spaces%2FRrf4pQPgjvb3GW7IN3Ci%2Fuploads%2Fgit-blob-da4bebd4099c000b01a7c3966e783b0166e2bc3b%2Fscreenshot-forms-account-form-editor-approval.png?alt=media" alt="The Company location account form editor with City selected and its settings, including Shown to buyers and Changes need approval."><figcaption><p>Each field has its own Changes need approval switch, so you can let buyers fix a typo in a name but check a new address.</p></figcaption></figure>
{% endstep %}

{% step %}

### Move fields

Drag fields in the Elements panel to change their order. A row such as the shipping address moves as a whole. Some orders aren't offered: a row's fields stay together, **State or province** stays after **Country**, and **Same as shipping address** stays above the billing address.
{% endstep %}

{% step %}

### Change the heading and the button

Click **Header** at the top of the Elements panel to change the **Heading** and **Description** buyers see on the card. Click **Footer** at the bottom to change the **Submit label**, the button buyers press to save. It reads "Save changes" until you change it.
{% endstep %}

{% step %}

### Save

Click **Save** in the save bar. "Account form saved" confirms it. Buyers see the change the next time they open the page.

To turn the form on or off from here, open **…** (More actions) in the toolbar and choose **Turn on** or **Turn off**, then save.
{% endstep %}
{% endstepper %}

## What you can't change

The fixed fields belong to Shopify's company objects, so a few things are held in place:

* **Shopify's fields can't be removed.** Hide them instead with **Shown to buyers**. Hidden fields stay in the Elements panel, greyed. To show one again, turn **Shown to buyers** back on, or pick it under **Hidden fields** in **Add field**.
* **Fields Shopify needs are always required** and can't be hidden, such as **Legal company name**, **Location name** and **Address line 1**. Their panel says "Shopify needs this, so it's always required."
* **Same as shipping address** can't be hidden or made required. Buyers see the billing address only while it's unticked.
* **Company contact** takes only labels and placeholders, and hiding the optional boxes. **Email** and **Role** always show. It has no heading, button label, help text, widths or approval, and its order is fixed. Your wording reaches the **Add someone** dialog only while the form is on.

## Add a field of your own

You can add fields to **Company profile**, **Company location** and **Contact profile**. Each one is saved as a metafield on the company, the company location or the customer.

{% stepper %}
{% step %}

### Add the field

In the editor, click **Add field** in the Elements panel, or **+** (**Add a field**) at the end of the preview. Under **Basic fields**, pick **Short text**, **Long text**, **Number**, **Dropdown**, **Checkbox** or **Date**. Give it a **Label**.
{% endstep %}

{% step %}

### Choose where it's stored

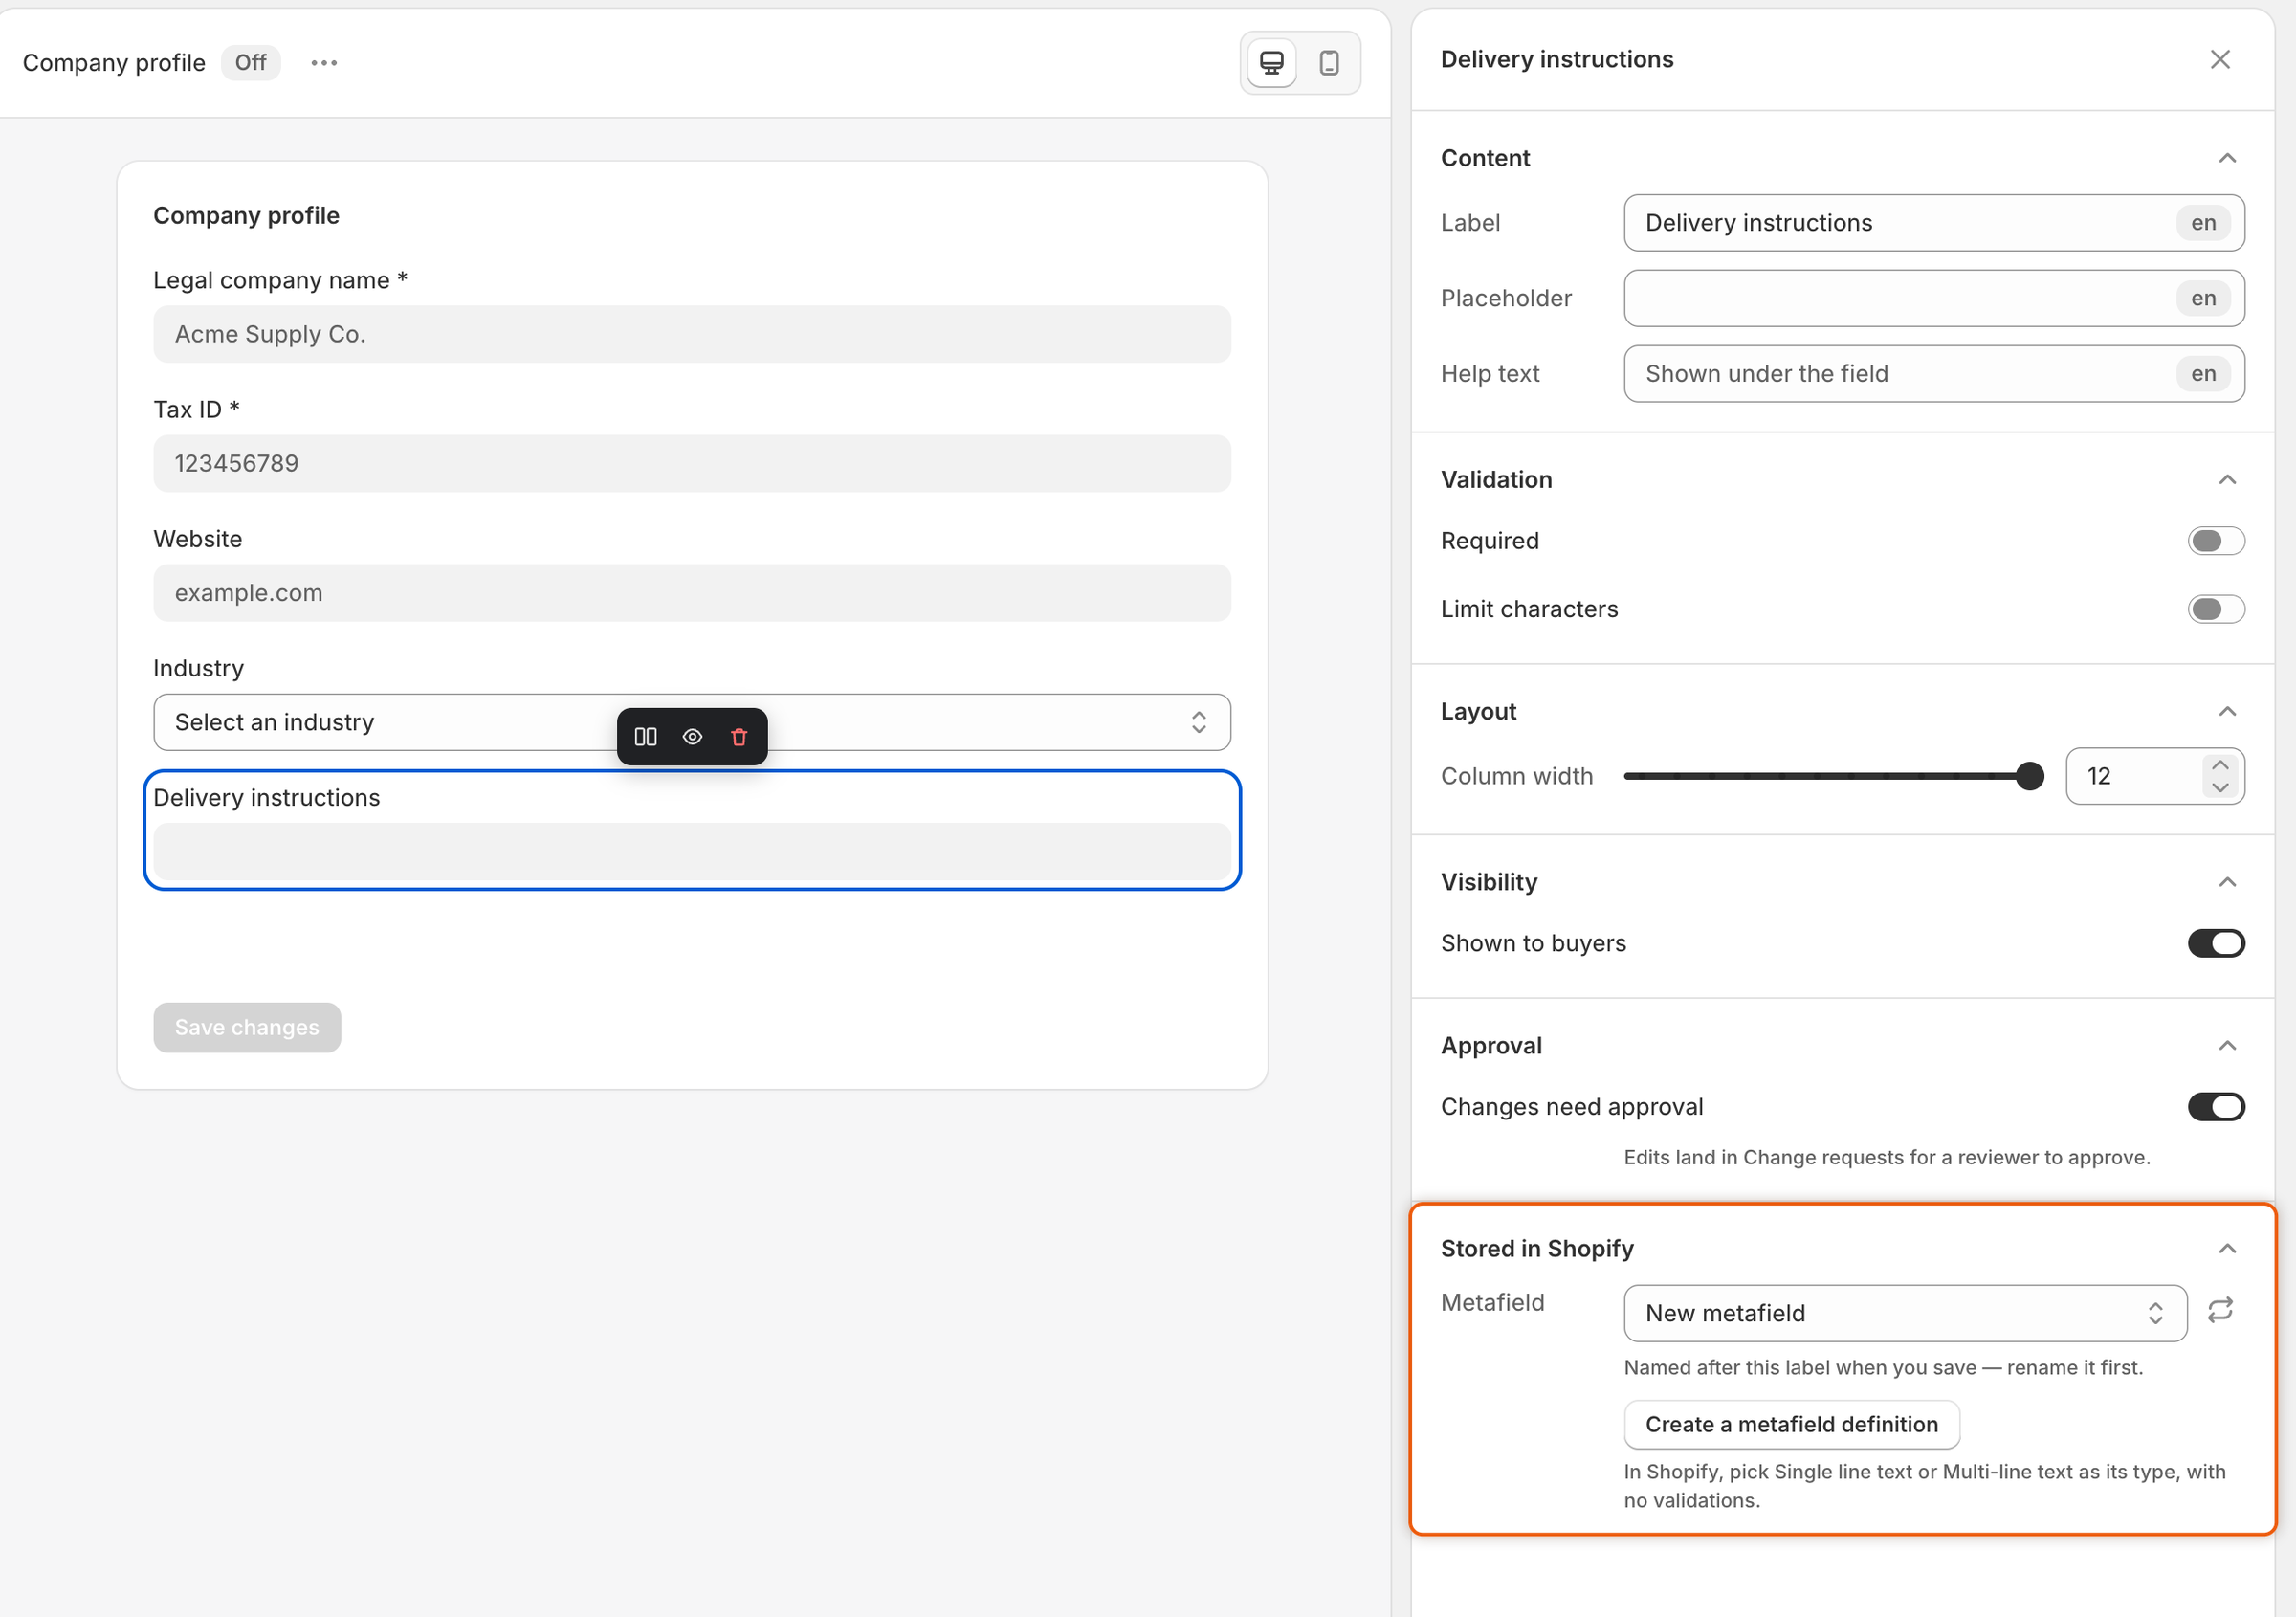
In the field's **Stored in Shopify** section, open **Metafield**:

* **New metafield** creates one when you save, named after the label. Rename the field first if you want a different name.
* Or pick one of your store's own metafield definitions that fits the field's type.

To make a definition with your own settings, click **Create a metafield definition**. Shopify's own form for a new metafield definition opens. The note under the button says which type to pick. When you save the definition there and it fits the field, the field uses it.

<figure><img src="https://3844812229-files.gitbook.io/~/files/v0/b/gitbook-x-prod.appspot.com/o/spaces%2FRrf4pQPgjvb3GW7IN3Ci%2Fuploads%2Fgit-blob-88e0aff9694261fceeb5bb07405f9b8eaeb47865%2Fscreenshot-forms-account-form-stored-in-shopify.png?alt=media" alt="The Stored in Shopify section of a new field, with the Metafield box set to New metafield and a Create a metafield definition button."><figcaption><p>A field of your own is saved as a metafield, new or one your store already has.</p></figcaption></figure>
{% endstep %}

{% step %}

### Save

Click **Save** in the save bar. Once saved, the field's panel shows where its answers are kept, with a **View in Shopify** link to your metafield definitions.
{% endstep %}
{% endstepper %}

To take one of your fields off, select it and click **Remove field**, then save. Answers buyers already gave stay in Shopify. If someone changes or deletes the metafield definition in Shopify, the editor shows "Metafields changed in Shopify" and points you to the field to fix.

## Let buyers add locations

The **Company location** form has a **Settings** section in the editor's rail, under **New locations**:

* **Buyers can add locations** shows an **Add a location** button to company admins on the self-service page. A new location copies your company's first location's catalogs, payment terms, checkout and tax settings, and the buyer becomes its admin.
* **New locations need approval** holds each new location in **Change requests** until you approve it. You can also change this in **Settings › Application rules › New locations**. See [Application rules](/sami-b2b-onboarding/settings/application-rules.md).

Both are on by default. Save the form to keep a change.

## Translate an account form

Open **Settings › Translate**, choose a language and pick the form under **Account forms**. See [Translate](/sami-b2b-onboarding/settings/translate.md).

## Next steps

* [Company self-service page](/sami-b2b-onboarding/customer-accounts/company-self-service-page.md) — add the page where buyers fill in these forms.
* [Account change requests](/sami-b2b-onboarding/customer-accounts/account-change-requests.md) — decide the edits that need your approval.
* [Application rules](/sami-b2b-onboarding/settings/application-rules.md) — choose whether new locations wait for you.


---

# Agent Instructions
This documentation is published with GitBook. GitBook is the documentation platform designed so that both humans and AI agents can read, navigate, and reason over technical content effectively. Learn more at gitbook.com.

## Querying This Documentation
If you need additional information that is not directly available in this page, you can query the documentation dynamically by asking a question.

Perform an HTTP GET request on the current page URL with the `ask` query parameter, and the optional `goal` query parameter:

```
GET https://docs.samita.io/sami-b2b-onboarding/customer-accounts/account-forms.md?ask=<question>&goal=<endgoal>
```

`ask` is the immediate question: it should be specific, self-contained, and written in natural language.
`goal` is optional and describes the broader end goal you are ultimately trying to accomplish on behalf of the user. GitBook uses it to tailor the answer towards what is most useful for that goal.

The response will contain a direct answer to the question and relevant excerpts and sources from the documentation.

Use this mechanism when the answer is not explicitly present in the current page, you need clarification or additional context, or you want to retrieve related documentation sections.