> For the complete documentation index, see [llms.txt](https://docs.samita.io/llms.txt). Markdown versions of documentation pages are available by appending `.md` to page URLs; this page is available as [Markdown](https://docs.samita.io/sami-b2b-onboarding/settings/email-templates.md).

# Edit email templates

Change the subject and message of each email the app sends, insert merge tags, preview the result, turn emails off and translate them.

Every email Sami B2B Onboarding sends starts from a ready-made design that you can reword. You edit them in two places:

* **Application emails** belong to a form, so each form keeps its own version. You edit them in the form builder's **Email** section. These are **New application**, **Buyer resubmitted**, **Application received**, **More information needed**, **Account approved** and **Application declined**.
* **Store emails** aren't about any one form. You edit them in **Settings › Email › Store emails**. These are **Daily pending summary**, **Import completed** and **Company contact invited**.

For when each email is sent, see [Email](/sami-b2b-onboarding/settings/email.md).

## Edit a form's emails

{% stepper %}
{% step %}

### Open the form's Email section

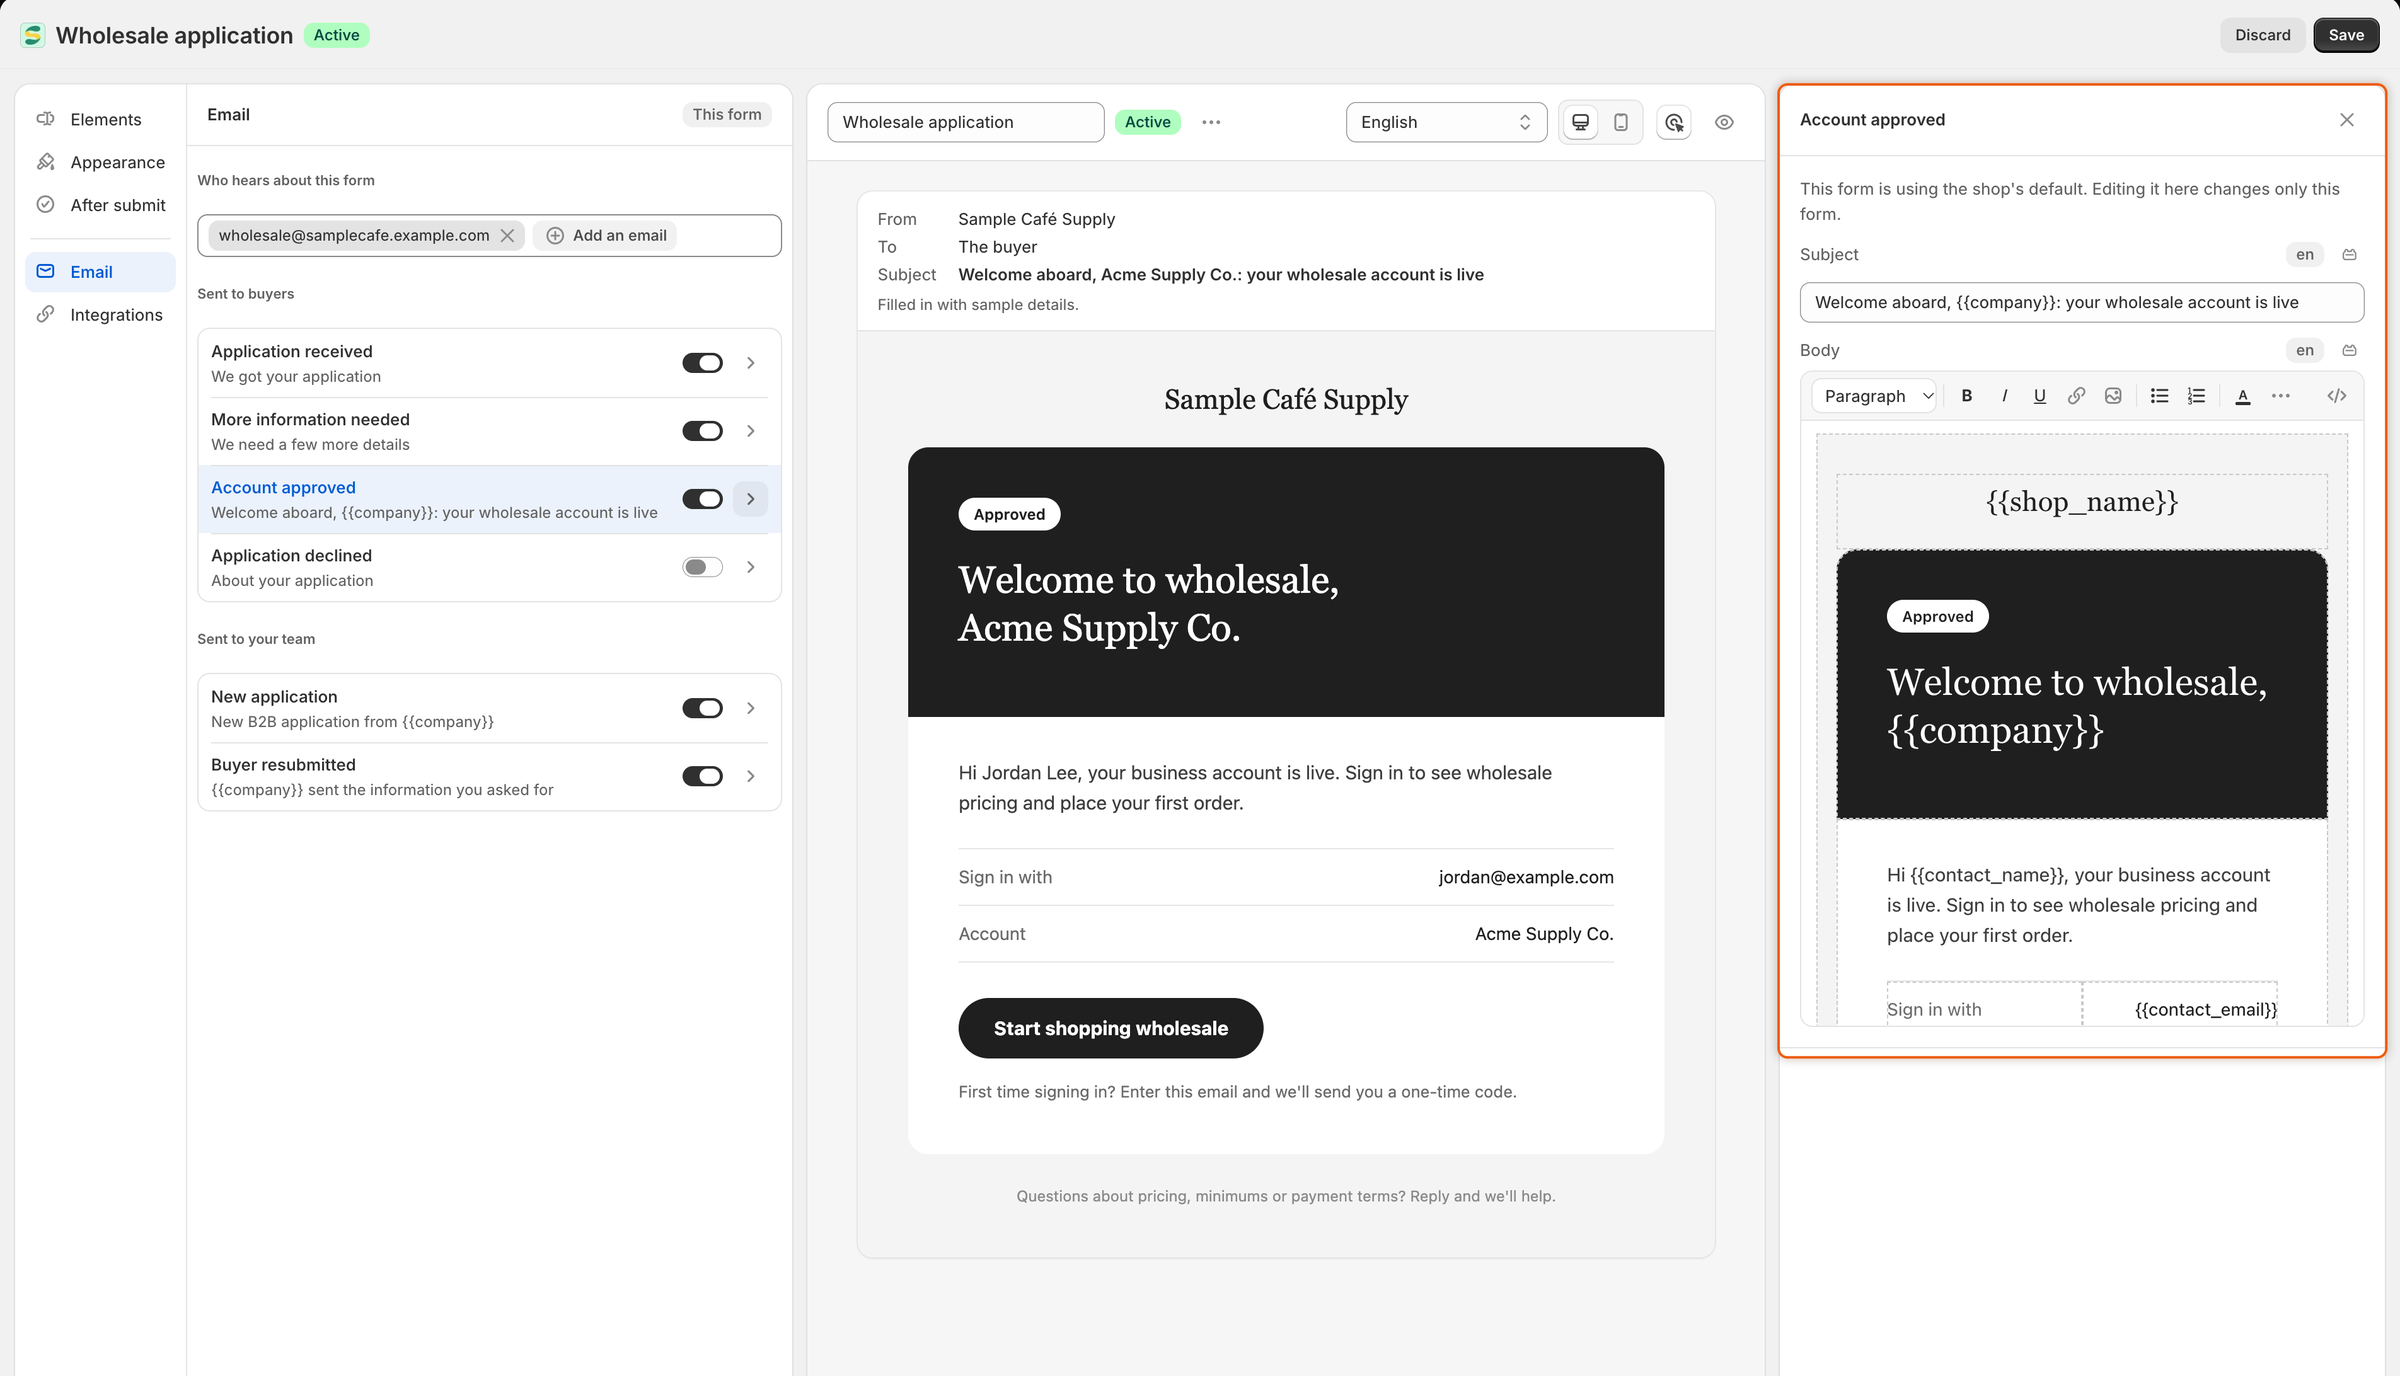
Go to **Forms** and click **Edit** beside the form, for example **Wholesale application**. In the rail on the left of the builder, click **Email**. The emails are listed under **Sent to buyers** and **Sent to your team**, each with its subject line.
{% endstep %}

{% step %}

### Open an email

Click the arrow beside the email, for example **Account approved**. Its panel opens, and the preview in the middle of the builder shows the email as it will arrive, filled in with sample details.

The panel says which version you're looking at: "This form is using the shop's default. Editing it here changes only this form." or "This form has its own version of this email."
{% endstep %}

{% step %}

### Change the subject and message

Type in **Subject**, then edit **Body**. Use the toolbar above the body for bold, lists, links, colors, images, dividers and tables, or click **Edit HTML** to change the code. Links need a full address that starts with `https://`.

To add a detail that changes with each application, such as the company name, see [Insert merge tags](#insert-merge-tags). The preview updates as you type.

If you empty **Subject** or **Body**, that part goes back to the default wording.

<figure><img src="https://3844812229-files.gitbook.io/~/files/v0/b/gitbook-x-prod.appspot.com/o/spaces%2FRrf4pQPgjvb3GW7IN3Ci%2Fuploads%2Fgit-blob-5eb3d853557745b1c08528aaf5fb03507930f8dc%2Fscreenshot-builder-email-panel-account-approved.png?alt=media" alt="The form builder with the Account approved email open: its subject and body in the panel on the right, and a preview of the finished email, filled in for Acme Supply Co., in the middle."><figcaption><p>The preview shows the email as the buyer will get it.</p></figcaption></figure>
{% endstep %}

{% step %}

### Save the form

Click **Save** in the builder's save bar. Only this form changes. Other forms keep their own emails.
{% endstep %}
{% endstepper %}

### Turn an email off for one form

In the form's **Email** section, turn off the switch beside the email and save the form. The **Application declined** email starts turned off. Turn it on here if you want rejected buyers to hear from you.

An email that is on can still be stopped by its event under **Automation › Automations**. It then shows "Its automation trigger is off, so this won't send." See [Automations and Shopify Flow](/sami-b2b-onboarding/automation/automations-and-shopify-flow.md).

### Go back to the default wording

When a form has its own version of an email, its panel has **Back to the default** at the bottom. Click it. The panel says "Going back to the shop's default when you save." Save the form to confirm.

## Edit a store email

{% stepper %}
{% step %}

### Open the email

Go to **Settings › Email**. Under **Store emails**, click **Edit** beside the email, for example **Import completed**.
{% endstep %}

{% step %}

### Choose whether it's sent

The **Send this email** card at the top turns the whole email on or off. The line under it says what that means, for example "Your team gets this email."
{% endstep %}

{% step %}

### Change the subject and message

Edit **Subject** and **Body** the same way as a form's email. While the email is on, both must have text. Otherwise the save stops with "Write the subject line buyers will see." or "Write the message this email sends."
{% endstep %}

{% step %}

### Preview and save

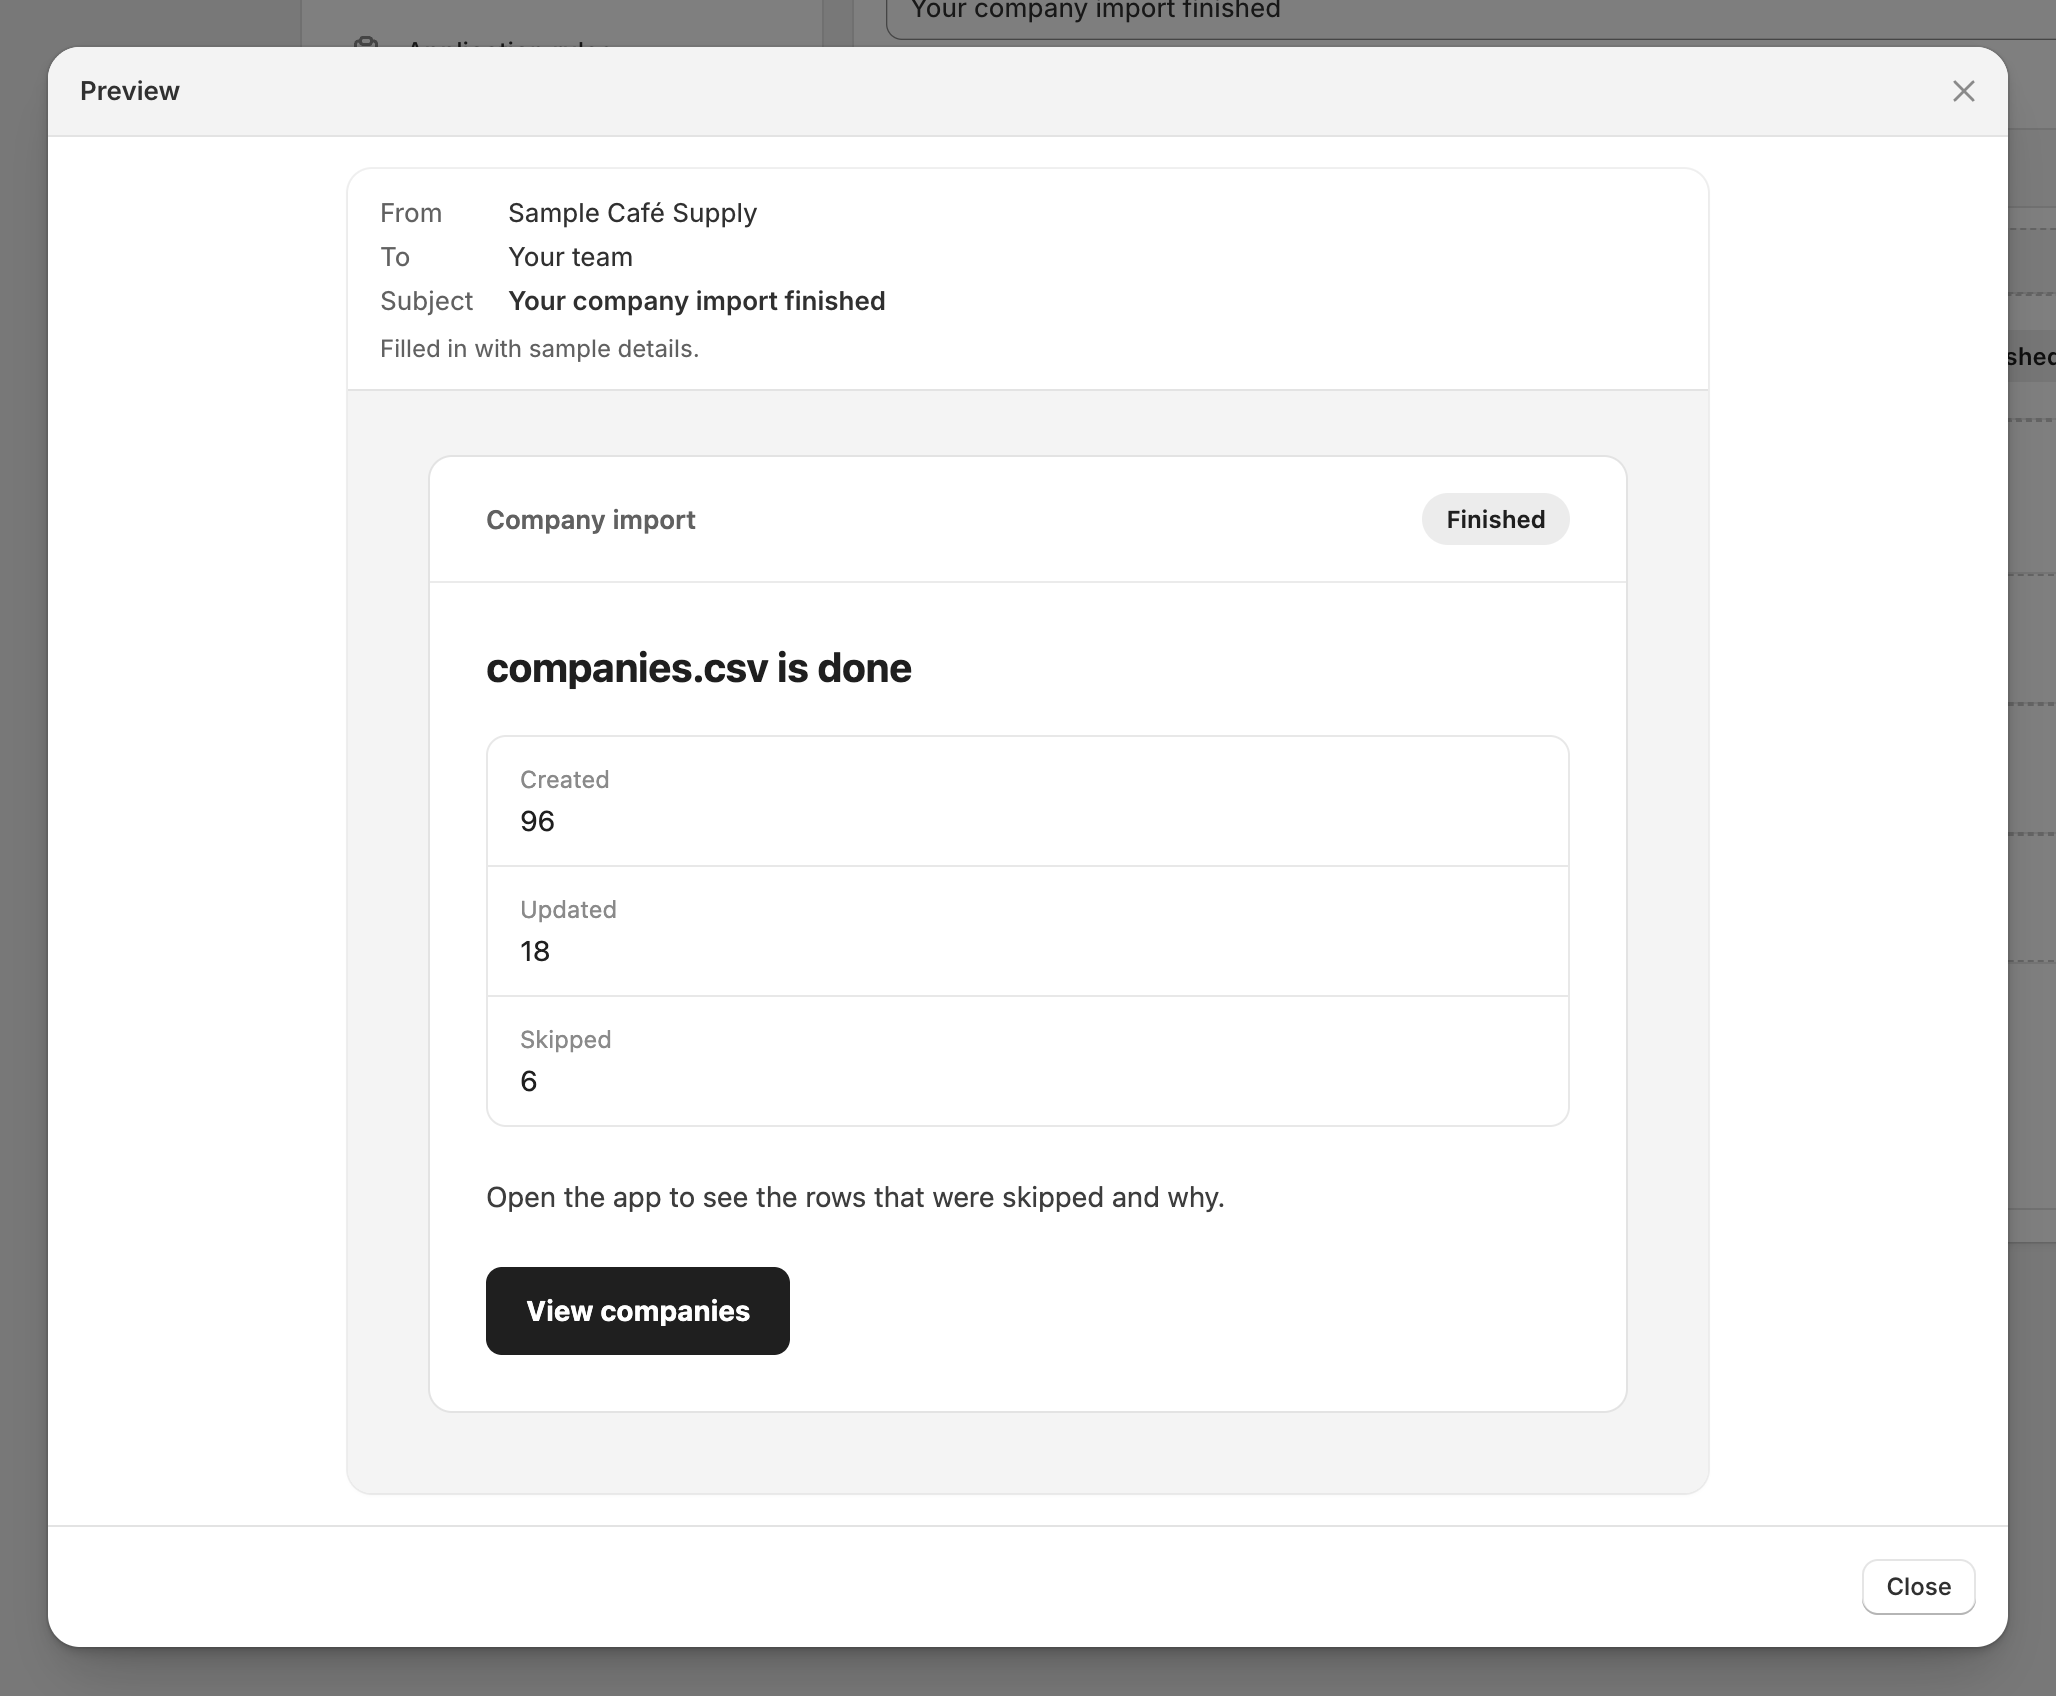
Click **Preview** at the top right. A dialog shows the email as it will arrive, with **From**, **To** and **Subject**, filled in with sample details. Close it, then click **Save** in the save bar. An "Email saved" message appears.

<figure><img src="https://3844812229-files.gitbook.io/~/files/v0/b/gitbook-x-prod.appspot.com/o/spaces%2FRrf4pQPgjvb3GW7IN3Ci%2Fuploads%2Fgit-blob-5c19eb8dec065424ab3b84fc2a886d58ae99e7fd%2Fscreenshot-email-store-email-preview.png?alt=media" alt="The Preview dialog for the Import completed email, showing who it&#x27;s from and to, the subject, and the designed email filled in with sample numbers."><figcaption><p>Preview shows the email with sample details, exactly as your team will receive it.</p></figcaption></figure>
{% endstep %}
{% endstepper %}

To go back to the list, click the envelope icon to the left of the email's name. You can also turn a store email on or off straight from the list with its switch, then click **Save**.

## Insert merge tags

A merge tag is a placeholder, such as `{{company}}`, that the app replaces with the real detail when it sends the email.

{% stepper %}
{% step %}

### Place your cursor

In **Body**, put your cursor where the detail should go. **Subject** doesn't need this step.
{% endstep %}

{% step %}

### Open the tag list

Click the tag button beside the box's label. A list titled **Insert a merge tag** opens.
{% endstep %}

{% step %}

### Pick a tag

Click a tag. In **Body**, it's added where your cursor was. In **Subject**, it's always added at the end of the line, so move it afterwards if it belongs elsewhere.
{% endstep %}
{% endstepper %}

<figure><img src="https://3844812229-files.gitbook.io/~/files/v0/b/gitbook-x-prod.appspot.com/o/spaces%2FRrf4pQPgjvb3GW7IN3Ci%2Fuploads%2Fgit-blob-635f872832fef74e3af55bb0e3db9c1c16900cd5%2Fscreenshot-email-merge-tags-popover.png?alt=media" alt="The Insert a merge tag list searched for company, showing {{answer.company_name}} under This form&#x27;s answers and {{company}} under Every application, each with a short description."><figcaption><p>Search the list to find a tag; each one says what it's replaced with.</p></figcaption></figure>

### Tags in application emails

A form's emails offer two groups. **Every application** holds the tags below. **This form's answers** has one tag per question on the form, listed by the question's label. For example, the **Website** question on the **Wholesale application** gives `{{answer.website}}`. If a form doesn't ask that question, its tag is left blank.

| Tag                   | Replaced with                                                 |
| --------------------- | ------------------------------------------------------------- |
| `{{company}}`         | The company applying                                          |
| `{{contact_name}}`    | Who applied                                                   |
| `{{contact_email}}`   | Their email address                                           |
| `{{reference}}`       | The application reference, e.g. APP-20260923-K7Q2M            |
| `{{form_name}}`       | The form they applied through                                 |
| `{{shop_name}}`       | Your store name                                               |
| `{{shop}}`            | Your store domain                                             |
| `{{store_url}}`       | Your storefront home page                                     |
| `{{login_url}}`       | Where buyers sign in to their account                         |
| `{{update_url}}`      | The link a buyer opens to add what you asked for              |
| `{{review_url}}`      | This application in the app, for your team                    |
| `{{approve_url}}`     | This application with the approval dialog open, for your team |
| `{{reason}}`          | The reason picked when declining                              |
| `{{details}}`         | What the reviewer typed when declining                        |
| `{{message}}`         | What the reviewer typed when asking for more information      |
| `{{requested_items}}` | What the buyer was asked to add                               |
| `{{pending_count}}`   | How many applications are waiting                             |
| `{{answers}}`         | Every answer on the application, one "Label: value" per line  |

Use `{{reason}}` and `{{details}}` in **Application declined**, and `{{message}}`, `{{requested_items}}` and `{{update_url}}` in **More information needed**. Keep `{{review_url}}` and `{{approve_url}}` for team emails: they open the app, which buyers can't use.

### Tags in store emails

Each store email offers only its own tags:

| Email                       | Tags                                                                                                                                                                                                                                                          |
| --------------------------- | ------------------------------------------------------------------------------------------------------------------------------------------------------------------------------------------------------------------------------------------------------------- |
| **Daily pending summary**   | `{{pending_count}}` how many applications are waiting, `{{queue_url}}` the review queue in the app, `{{shop_name}}`, `{{shop}}`                                                                                                                               |
| **Import completed**        | `{{filename}}` the file that was imported, `{{rows}}` how many rows it had, `{{created}}` companies created, `{{updated}}` existing companies updated, `{{skipped}}` rows skipped, `{{companies_url}}` your companies in the app, `{{shop_name}}`, `{{shop}}` |
| **Company contact invited** | `{{contact_name}}` who was added, `{{contact_email}}` their email address, `{{company}}` the company, `{{location}}` the company location when there is one, `{{login_url}}` where buyers sign in, `{{shop_name}}`, `{{shop}}`                                |

## Translate emails

Buyers who applied in another language get a form's buyer emails in that language once you translate them. Open **Settings › Translate**, click **Translate** beside the language, pick the form, then open its **Emails** tab. Only buyer emails that are turned on for that form are listed. For a body, click **Start from the original** to copy your design and translate the words inside it. See [Translate](/sami-b2b-onboarding/settings/translate.md).

Team emails are always sent in your store's language. Store emails are sent in the wording you write here.

{% hint style="info" %}
To see a real email arrive, submit a test application on your store with your own email address. **Send a test** in **Settings › Email** checks only your mail connection and sends a fixed message, not one of these emails.
{% endhint %}

## Next steps

* [Choose who gets notified](/sami-b2b-onboarding/settings/notification-recipients.md) — choose who gets the team emails.
* [Translate](/sami-b2b-onboarding/settings/translate.md) — send buyer emails in the buyer's language.
* [Automations and Shopify Flow](/sami-b2b-onboarding/automation/automations-and-shopify-flow.md) — check the event switches that send each email.
* [Activity log](/sami-b2b-onboarding/settings/activity-log.md) — see whether an email went out.


---

# Agent Instructions
This documentation is published with GitBook. GitBook is the documentation platform designed so that both humans and AI agents can read, navigate, and reason over technical content effectively. Learn more at gitbook.com.

## Querying This Documentation
If you need additional information that is not directly available in this page, you can query the documentation dynamically by asking a question.

Perform an HTTP GET request on the current page URL with the `ask` query parameter, and the optional `goal` query parameter:

```
GET https://docs.samita.io/sami-b2b-onboarding/settings/email-templates.md?ask=<question>&goal=<endgoal>
```

`ask` is the immediate question: it should be specific, self-contained, and written in natural language.
`goal` is optional and describes the broader end goal you are ultimately trying to accomplish on behalf of the user. GitBook uses it to tailor the answer towards what is most useful for that goal.

The response will contain a direct answer to the question and relevant excerpts and sources from the documentation.

Use this mechanism when the answer is not explicitly present in the current page, you need clarification or additional context, or you want to retrieve related documentation sections.