> For the complete documentation index, see [llms.txt](https://docs.samita.io/llms.txt). Markdown versions of documentation pages are available by appending `.md` to page URLs; this page is available as [Markdown](https://docs.samita.io/sami-b2b-onboarding/store-access/lock-the-store.md).

# Lock the store

Cover your store with a screen that asks visitors to log in or apply, and choose the pages that stay open.

The store lock in Sami B2B Onboarding covers your storefront with a screen that asks visitors to log in or apply for an account. Only approved buyers can browse. Pages you choose, such as your policies, stay open to everyone.

{% hint style="info" %}
Before you start, make sure the app embed is on in your theme. See [Turn on the app embed](/sami-b2b-onboarding/getting-started/turn-on-the-app-embed.md). For the **Apply for an account** button to show, at least one application form must be turned on.
{% endhint %}

## What visitors see

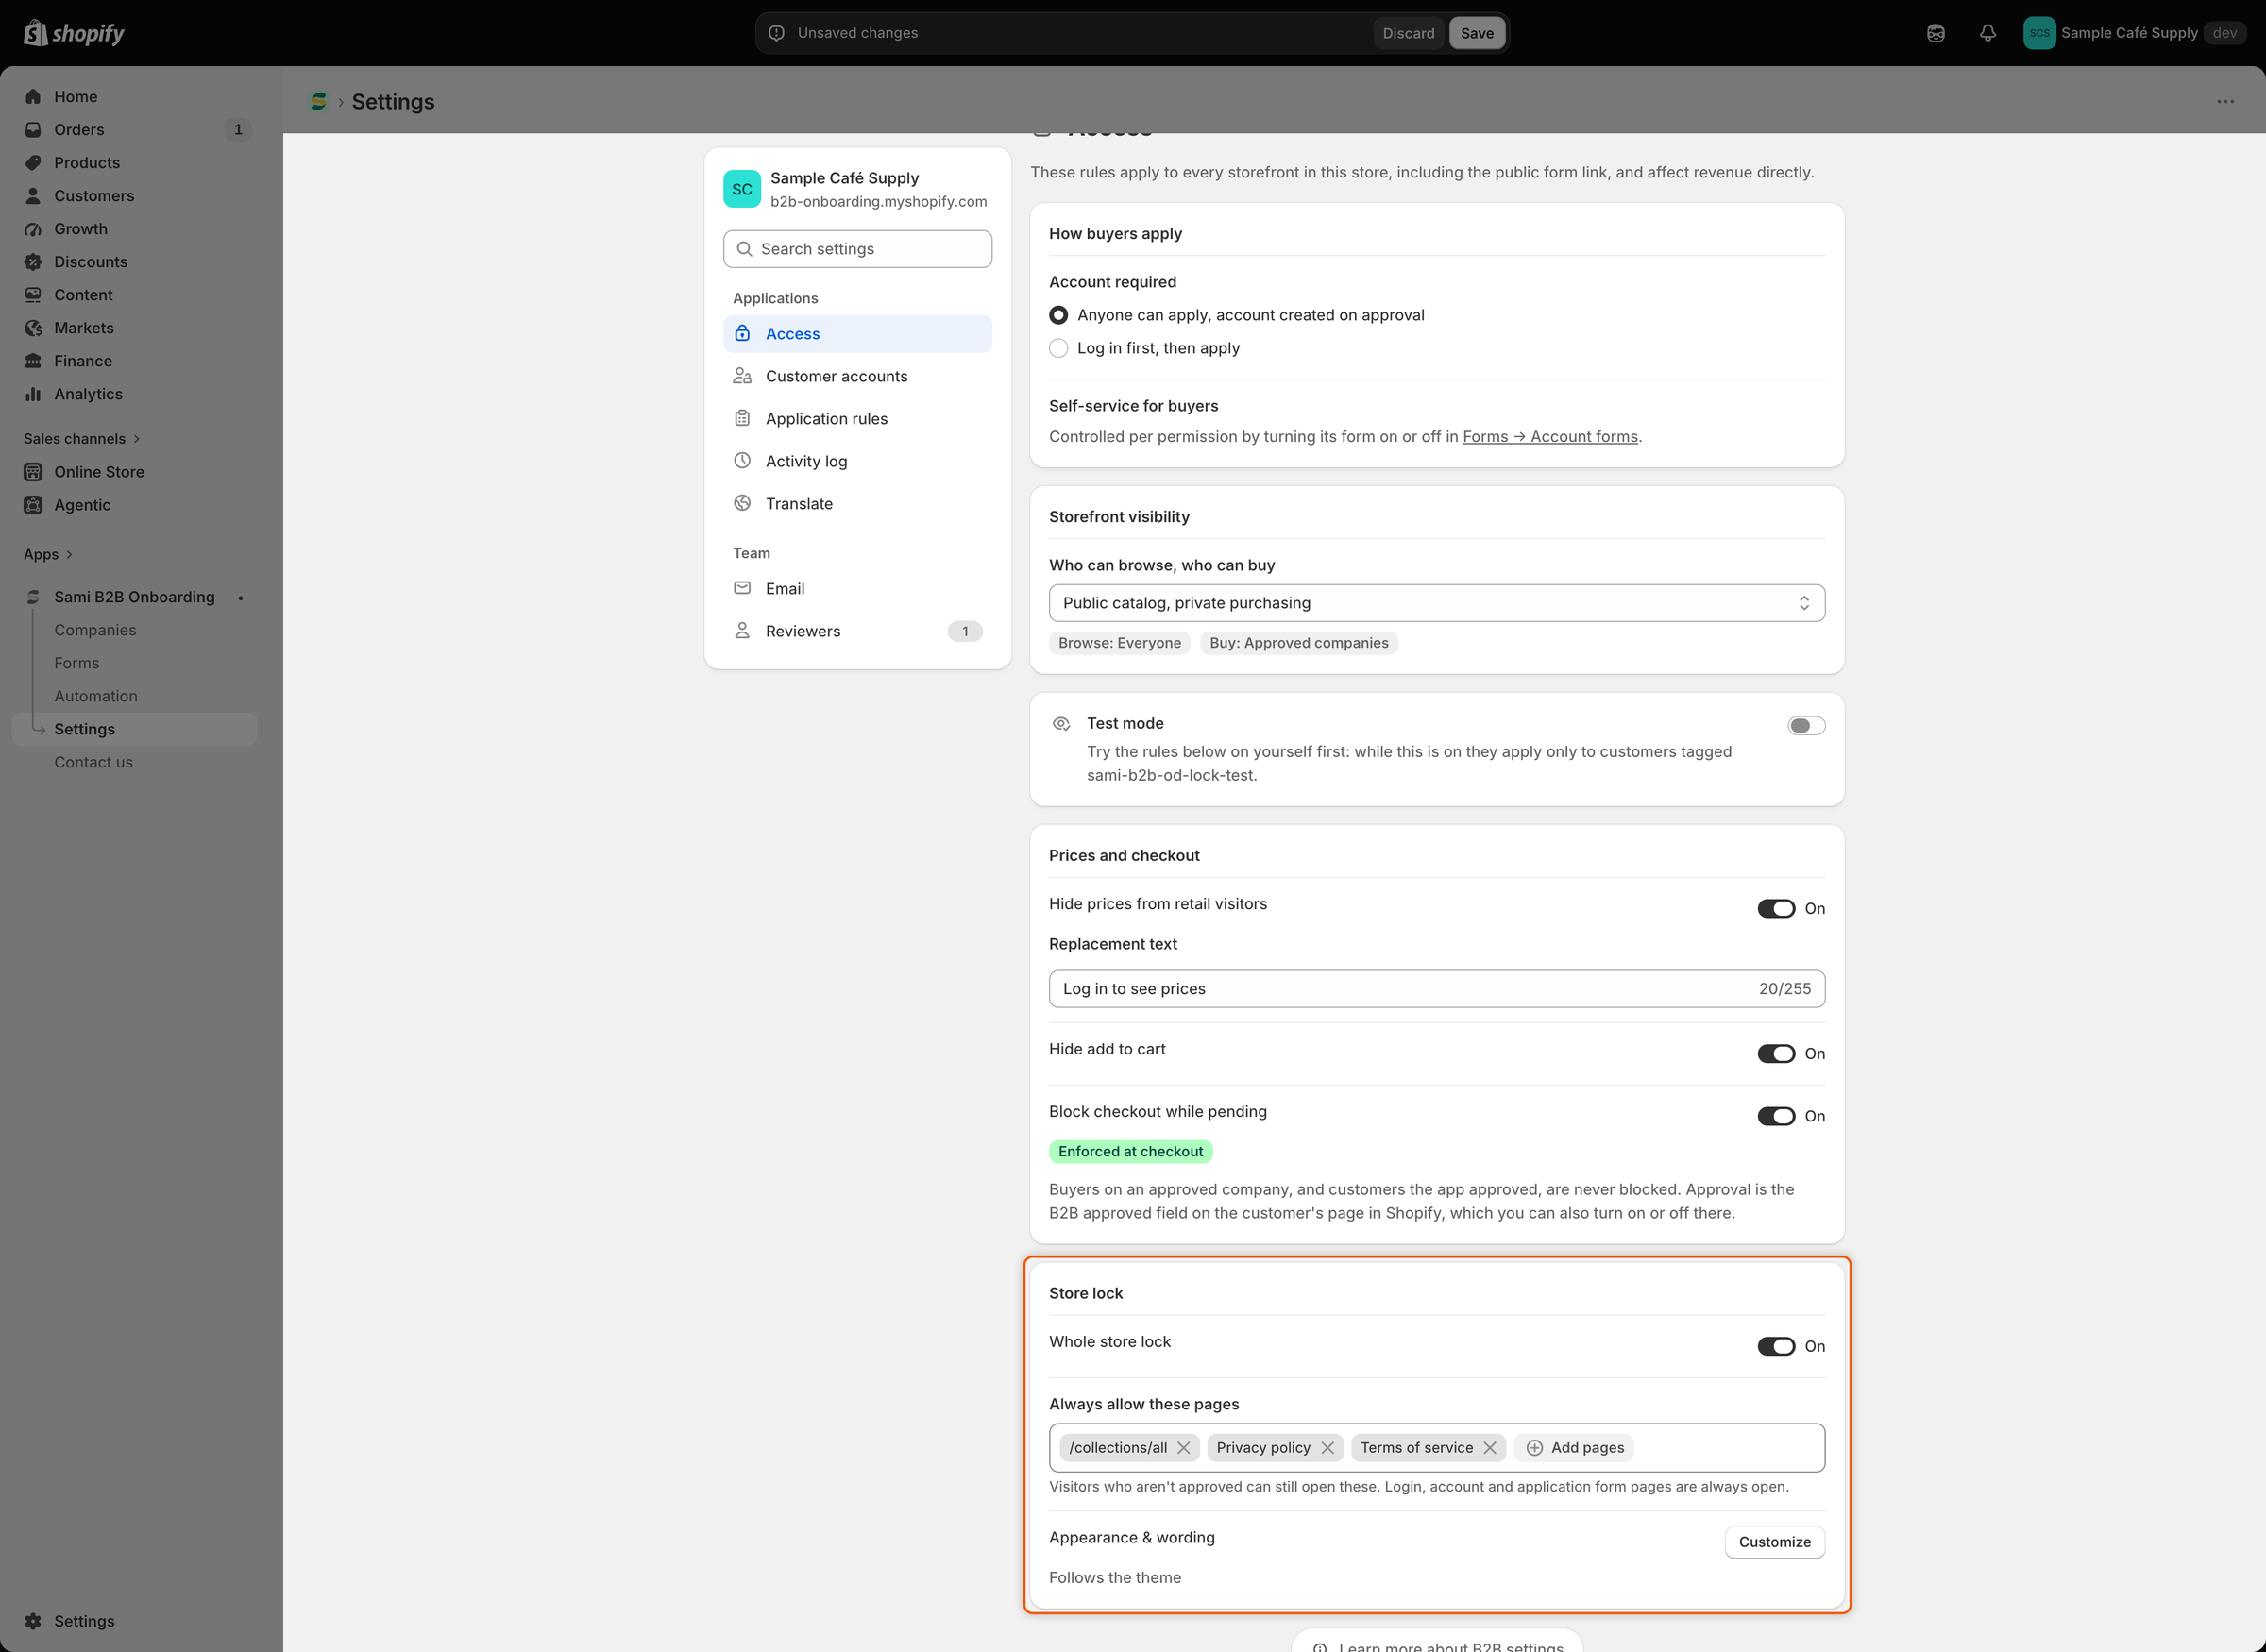
The lock screen fills the window. It can't be closed, and the page behind it can't be scrolled or clicked.

| Visitor                               | What the lock screen shows                                                                                                                                                                                                                      |
| ------------------------------------- | ----------------------------------------------------------------------------------------------------------------------------------------------------------------------------------------------------------------------------------------------- |
| Guest                                 | Your store name (or your logo), the heading **This store is for approved business customers**, the message **Log in with an approved account to browse and buy, or apply for one.**, a **Log in** button and an **Apply for an account** button |
| Logged-in customer who isn't approved | Your store name (or your logo), the heading **Your account is waiting for approval**, the message **We'll email you as soon as your business account is approved.**, a **View account** button and an **Apply for an account** button           |
| Approved buyer                        | No lock screen. They browse the store as normal.                                                                                                                                                                                                |

**Log in** opens your store's log-in page and brings the buyer back to the same page afterwards. **Apply for an account** opens your default application form's page. If that form is turned off, it opens the page of another form that is on. **View account** opens the customer's account.

Locked pages ask search engines not to index them, because a search engine only sees the lock screen.

<figure><img src="https://3844812229-files.gitbook.io/~/files/v0/b/gitbook-x-prod.appspot.com/o/spaces%2FRrf4pQPgjvb3GW7IN3Ci%2Fuploads%2Fgit-blob-dc7100e5149fbbc95722d2b44f41b63c3460ab86%2Fscreenshot-storefront-lock-screen-guest.png?alt=media" alt="The storefront covered by the lock screen, with the store name, the heading This store is for approved business customers, and Log in and Apply for an account buttons."><figcaption><p>A guest sees only the lock screen until they log in with an approved account.</p></figcaption></figure>

## Turn on the lock

{% stepper %}
{% step %}

### Open Access

In the app, click **Settings**. **Access** opens first. If another section opens, click **Access** in the settings menu.
{% endstep %}

{% step %}

### Choose the visibility

Under **Storefront visibility**, set **Who can browse, who can buy**:

* **Public catalog, private purchasing**: the lock is optional. Go on to the next step.
* **Private wholesale store**: the store is always locked. Under **Store lock**, the **Whole store lock** switch is on and can't be turned off, with the note **A private wholesale store is always locked.** Skip the next step.
  {% endstep %}

{% step %}

### Turn on the lock

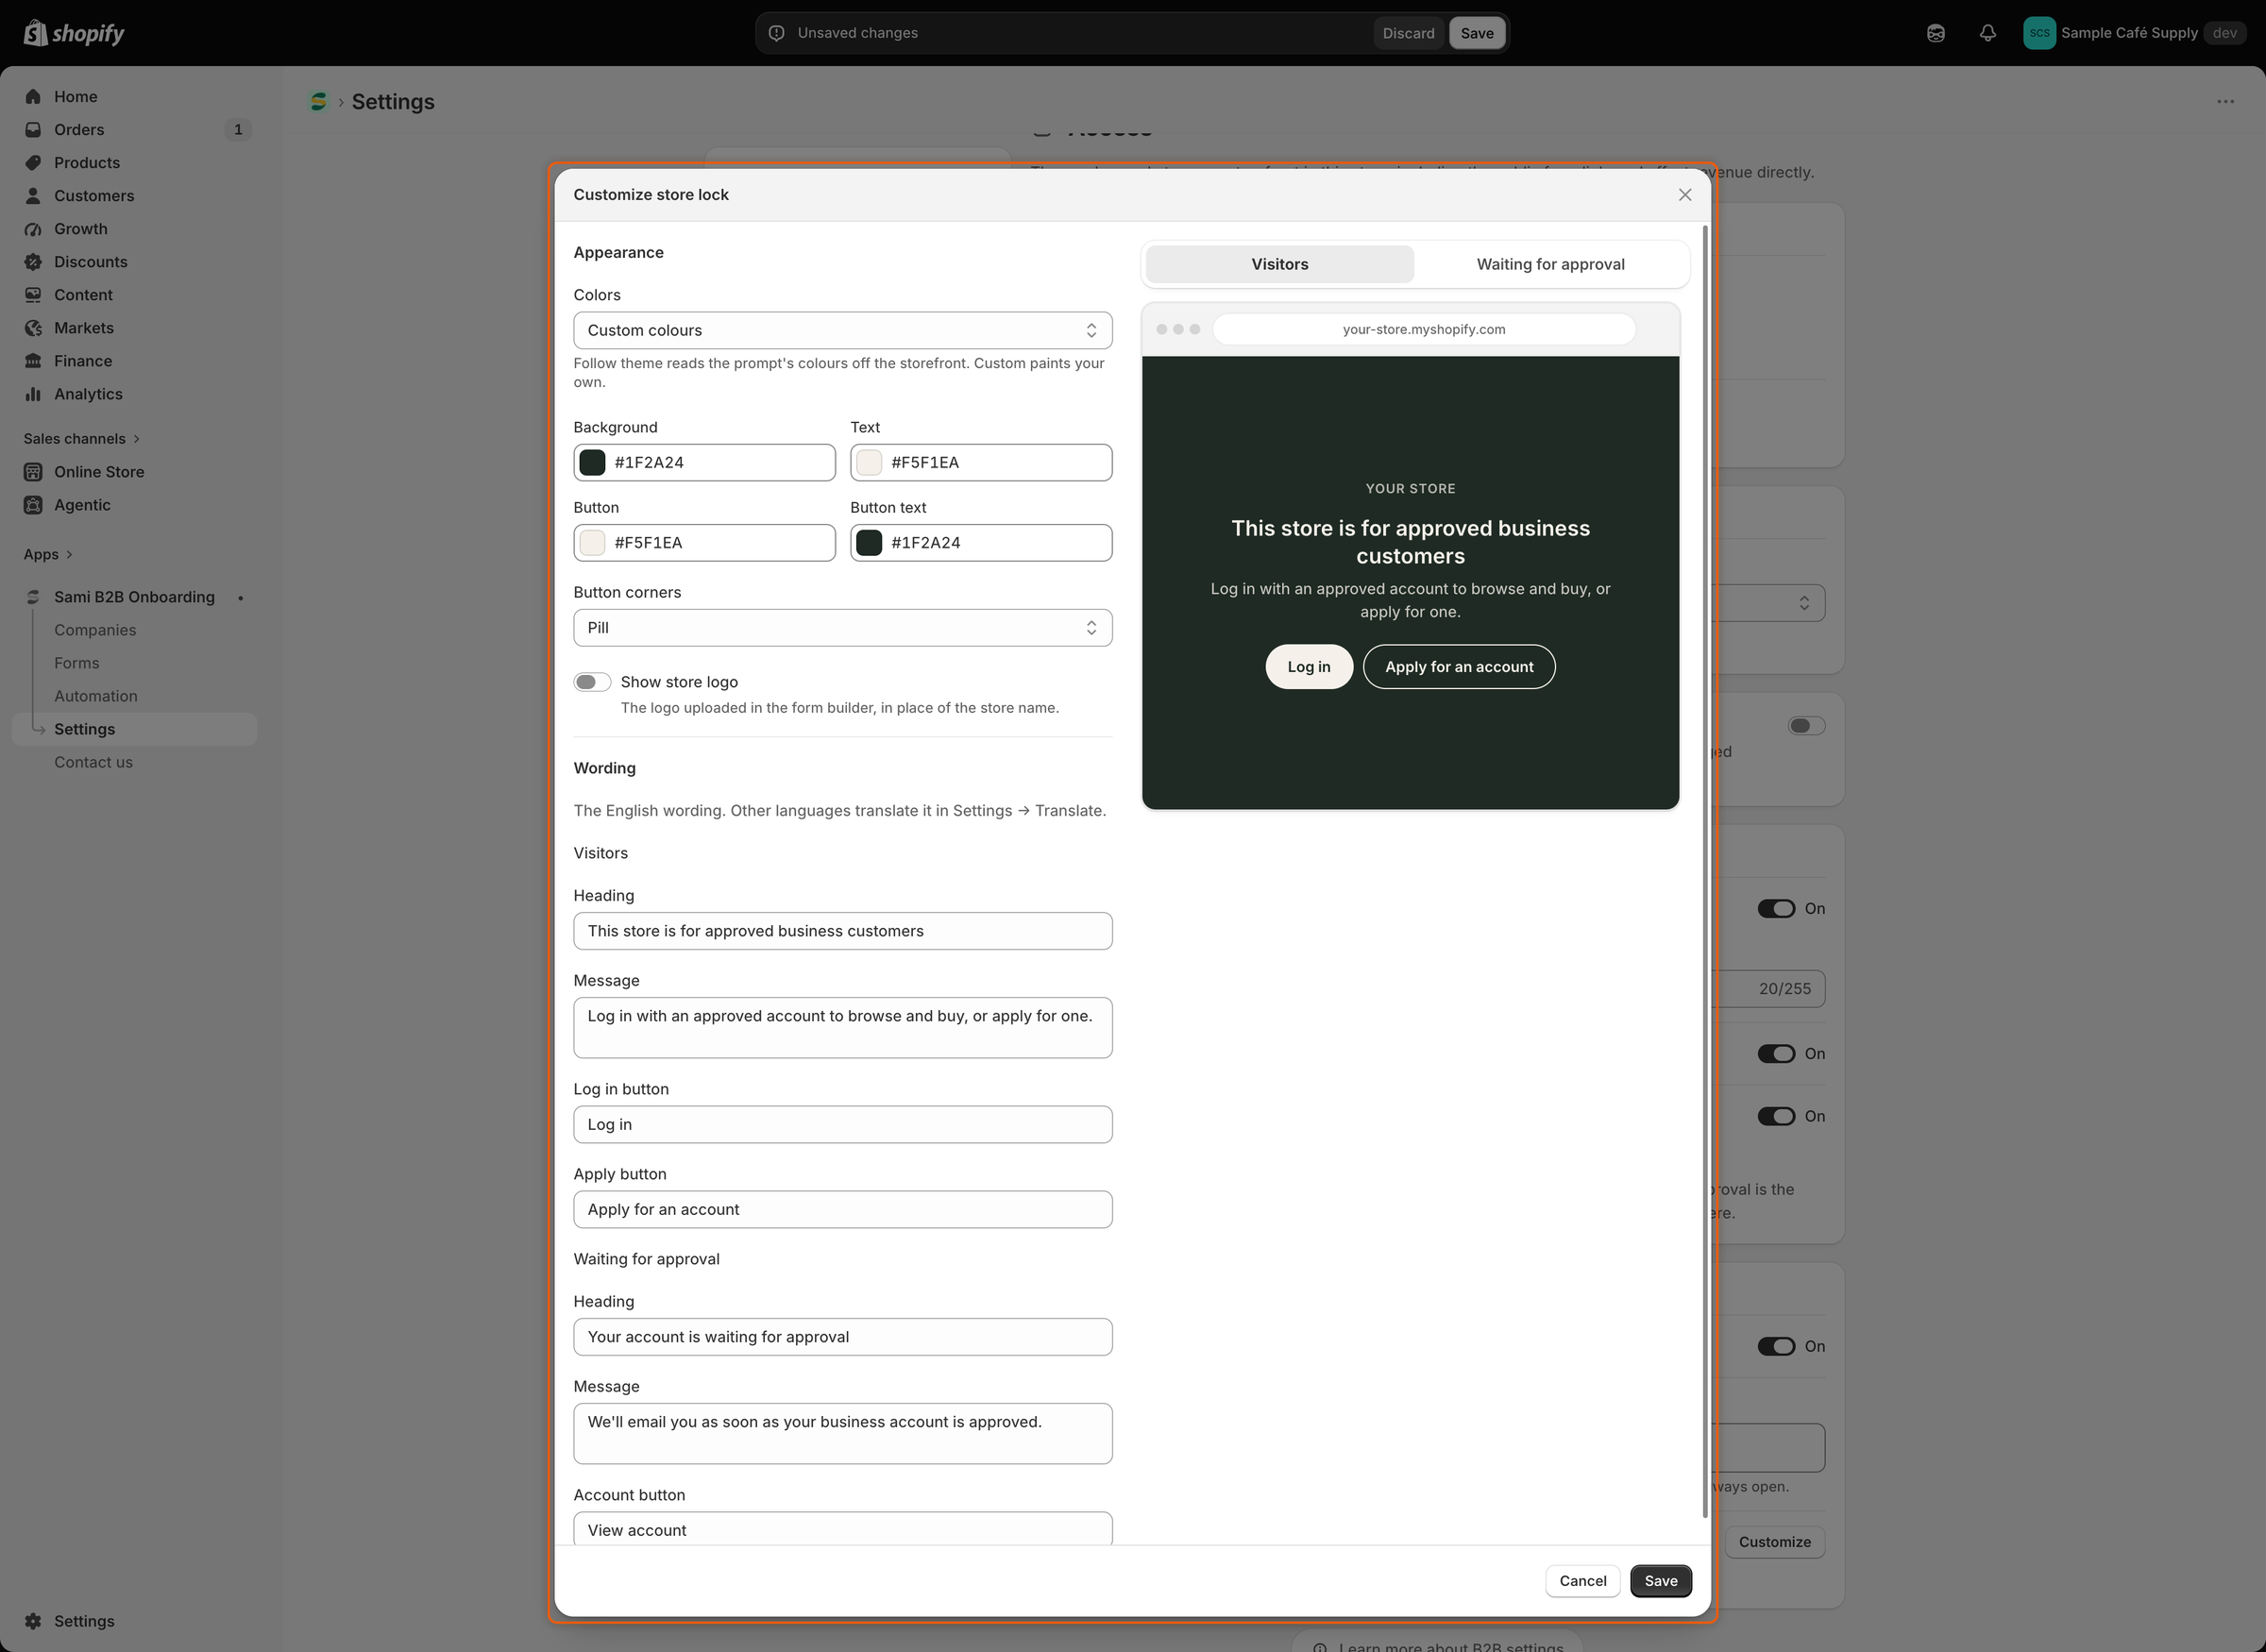
Under **Store lock**, turn on **Whole store lock**. Two more rows appear: **Always allow these pages** and **Appearance & wording**.
{% endstep %}

{% step %}

### Choose pages that stay open

Under **Always allow these pages**, click **Add pages**. The **Pages** list opens. It shows your store's own pages, then **Home page**, **Privacy policy**, **Terms of service**, **Refund policy**, **Shipping policy** and **Contact information**.

* Tick each page that should stay open.
* To add a page that isn't listed, type its path in the search box, starting with `/`, for example `/collections/all`. You can also paste the page's full address. Then click **Add “/collections/all”**.

Each page you add shows as a chip in the box. To remove one, click the **✕** on its chip. You can keep up to 100 pages open.

<figure><img src="https://3844812229-files.gitbook.io/~/files/v0/b/gitbook-x-prod.appspot.com/o/spaces%2FRrf4pQPgjvb3GW7IN3Ci%2Fuploads%2Fgit-blob-a687905a9d3ac1d203073fe1da6d1be4ec2cc193%2Fscreenshot-access-lock-allowed-pages.png?alt=media" alt="The Store lock section with Whole store lock on, three pages in Always allow these pages, and a Customize button beside Appearance &#x26; wording."><figcaption><p>Pages in Always allow these pages stay open to visitors who aren't approved.</p></figcaption></figure>
{% endstep %}

{% step %}

### Save

Click **Save** in the save bar. **Settings saved** appears, and the lock reaches your storefront.
{% endstep %}
{% endstepper %}

## Pages that are always open

Some pages never lock, so buyers can always log in and apply. You don't need to add them:

* Log-in pages and the customer account
* The page of every application form that is turned on, and any of your own pages that shows the application form block
* Your store's password page, if your store has one
* Gift card pages

How the pages you add are matched:

* Each entry opens that one address. Adding `/collections/coffee` opens the collection page, not the products in it.
* Add a page once. It stays open in every language and market version of your store.
* Checkout isn't part of the store lock. To stop visitors who aren't approved from paying, keep **Block checkout while pending** on. See [Block checkout until approved](/sami-b2b-onboarding/store-access/block-checkout-until-approved.md).

## Customize the lock screen

The **Appearance & wording** row reads **Follows the theme**, or shows color swatches and **Custom colours**. It adds **· Logo on** when the logo shows.

{% stepper %}
{% step %}

### Open the dialog

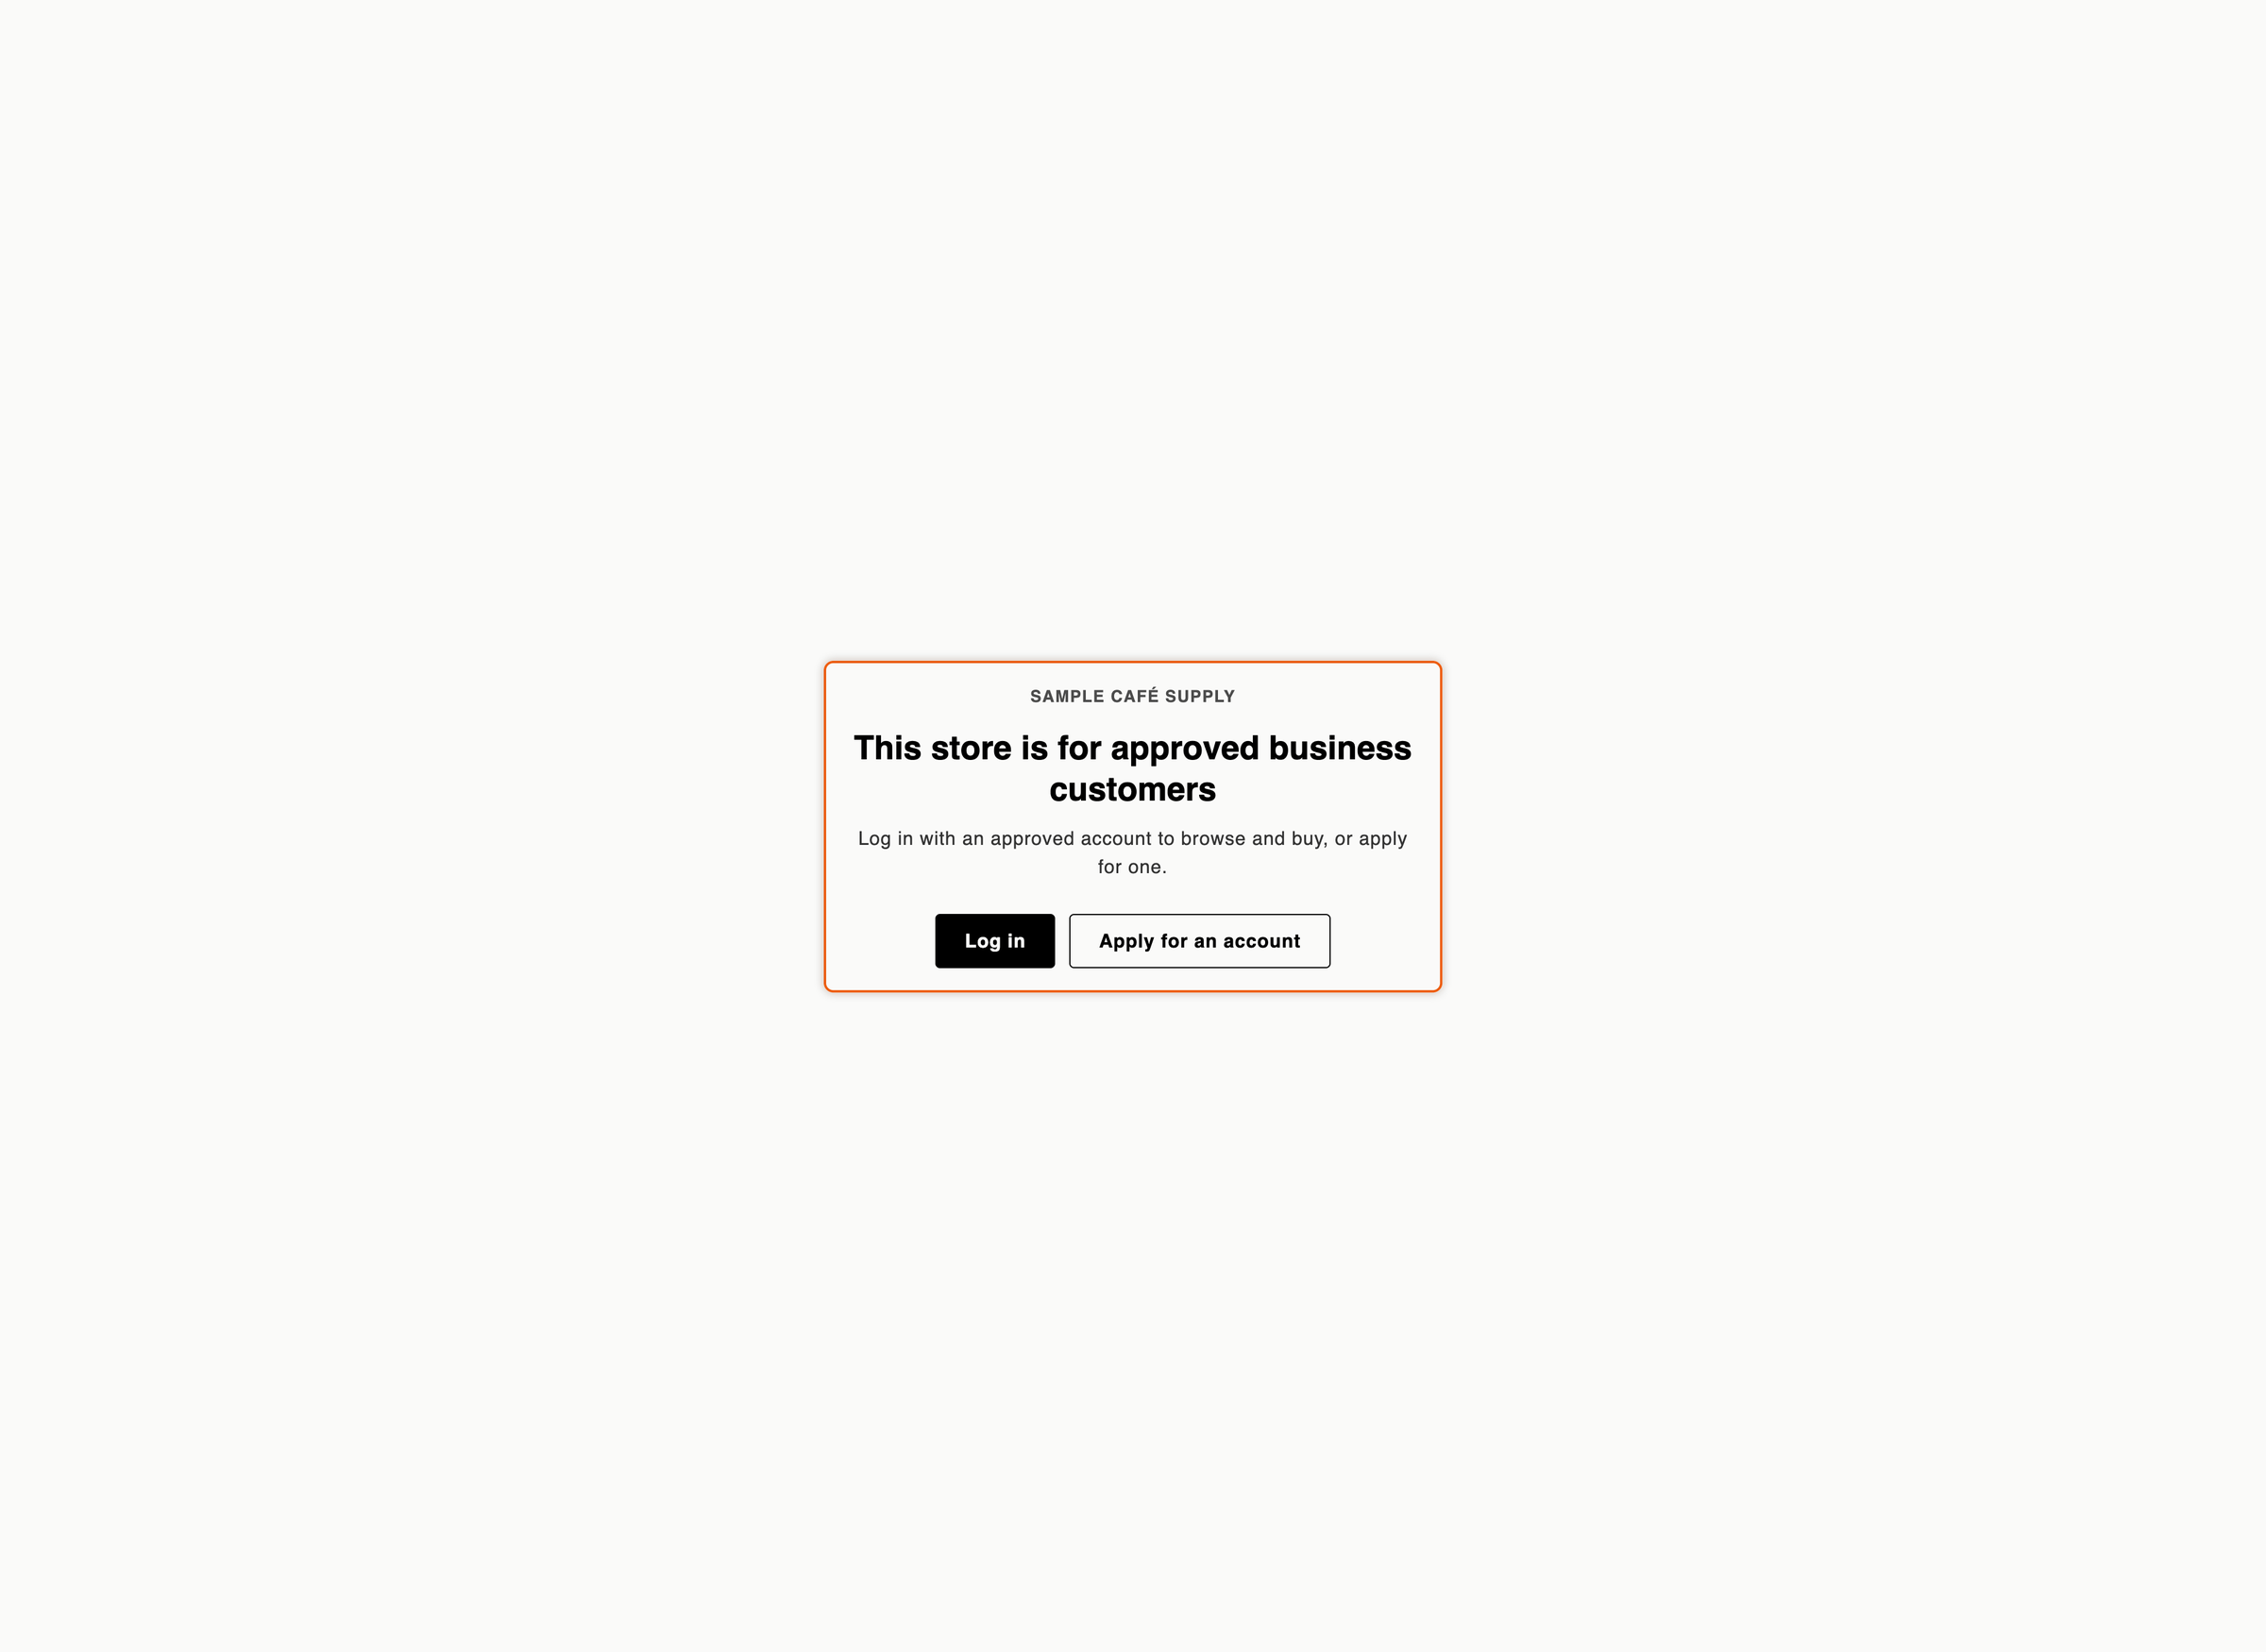
Next to **Appearance & wording**, click **Customize**. The **Customize store lock** dialog opens. Settings are on the left. On the right, a preview shows the lock screen. Switch between **Visitors** and **Waiting for approval** above the preview to see each version.
{% endstep %}

{% step %}

### Set the appearance

| Setting             | What it does                                                                                                                                                                                                                                                            | Default          |
| ------------------- | ----------------------------------------------------------------------------------------------------------------------------------------------------------------------------------------------------------------------------------------------------------------------- | ---------------- |
| **Colors**          | **Follow theme** uses your theme's background and text colors. **Custom colours** shows four color boxes: **Background**, **Text**, **Button** and **Button text**.                                                                                                     | **Follow theme** |
| **Button corners**  | **Square**, **Soft**, **Round** or **Pill**. With **Follow theme** and the logo off, the storefront keeps **Soft** corners.                                                                                                                                             | **Soft**         |
| **Show store logo** | Shows your logo in place of the store name. It's the logo uploaded in the form builder for your default application form. If that form has no logo or is turned off, the app uses the logo of another form that is turned on. If none has a logo, the store name stays. | Off              |

To set a custom color, click its box. Drag in the picker, or type a hex code. Use the opacity strip to make a color see-through. In browsers that support it, the eyedropper button (**Pick a color from the screen**) copies a color from anywhere on your screen.
{% endstep %}

{% step %}

### Change the wording

Under **Wording**, edit what the lock screen says:

* **Visitors**: **Heading**, **Message**, **Log in button** and **Apply button**
* **Waiting for approval**: **Heading**, **Message** and **Account button**

Leave a box empty to go back to the default wording.

<figure><img src="https://3844812229-files.gitbook.io/~/files/v0/b/gitbook-x-prod.appspot.com/o/spaces%2FRrf4pQPgjvb3GW7IN3Ci%2Fuploads%2Fgit-blob-5d2d652348a4ec169700deefb13447d2fa5d901c%2Fscreenshot-access-lock-customize-dialog.png?alt=media" alt="The Customize store lock dialog with color settings and wording fields on the left and a preview of the lock screen on the right."><figcaption><p>The preview on the right updates as you change colors, corners and wording.</p></figcaption></figure>
{% endstep %}

{% step %}

### Save the dialog

Click **Save** in the dialog. It saves straight away, without the save bar, and **Saved** appears.
{% endstep %}
{% endstepper %}

The wording in this dialog is your store's default (English) wording. To translate it, go to **Settings › Translate**, click **Translate** next to the language, then open **Storefront messages**. The **Store access** card lists each line, from **Store lock heading** to **Awaiting approval account button**.

## Check the lock

1. Open your store in a private browser window. The lock screen covers the home page and your products.
2. Open a page you added to **Always allow these pages**. It loads without the lock.
3. Click **Apply for an account**. Your application form's page opens.
4. Log in as a customer who isn't approved, then as an approved buyer. The first sees **Your account is waiting for approval**. The second browses as normal.

The theme editor never shows the lock. If the lock doesn't appear on the storefront, check that **Test mode** is off. See [Test your access rules](/sami-b2b-onboarding/store-access/test-mode.md).

## Next steps

* [Block checkout until approved](/sami-b2b-onboarding/store-access/block-checkout-until-approved.md) — stop unapproved buyers at checkout too.
* [Use the form page the app creates](/sami-b2b-onboarding/add-a-form-to-your-store/use-the-form-page.md) — the page **Apply for an account** opens.
* [Test your access rules](/sami-b2b-onboarding/store-access/test-mode.md) — try the lock on your own account first.
* [Translate](/sami-b2b-onboarding/settings/translate.md) — show the lock screen in your buyers' languages.


---

# Agent Instructions
This documentation is published with GitBook. GitBook is the documentation platform designed so that both humans and AI agents can read, navigate, and reason over technical content effectively. Learn more at gitbook.com.

## Querying This Documentation
If you need additional information that is not directly available in this page, you can query the documentation dynamically by asking a question.

Perform an HTTP GET request on the current page URL with the `ask` query parameter, and the optional `goal` query parameter:

```
GET https://docs.samita.io/sami-b2b-onboarding/store-access/lock-the-store.md?ask=<question>&goal=<endgoal>
```

`ask` is the immediate question: it should be specific, self-contained, and written in natural language.
`goal` is optional and describes the broader end goal you are ultimately trying to accomplish on behalf of the user. GitBook uses it to tailor the answer towards what is most useful for that goal.

The response will contain a direct answer to the question and relevant excerpts and sources from the documentation.

Use this mechanism when the answer is not explicitly present in the current page, you need clarification or additional context, or you want to retrieve related documentation sections.