> For the complete documentation index, see [llms.txt](https://docs.samita.io/llms.txt). Markdown versions of documentation pages are available by appending `.md` to page URLs; this page is available as [Markdown](https://docs.samita.io/samita-countdown-timer-bar/countdown-timer.md).
# Countdown Timer
## 🔗 Create a Countdown Timer
The Countdown Timer is used to create customers’ eagerness for the upcoming products and increase sales to your store. In order to manage this setting, kindly follow the below instructions to know how to set it up:
#### **Step to manage:**
From the **Countdowns** page of the app > Click on **Create countdown** > Choose **Countdown Timer**
There are 3 steps to set up a Countdown timer: **Settings, Design,** and **Display**. The Settings page is showing first when accessing the Countdown timer:
### Setting content:
**You can edit and configure the content of the timer in this step.**
1. In the **Content** section, click on the **Template** and choose the one you like:
2\. Set up **Title**, **Subtitle** and **Date format** for the Timer:
3\. **Show button** (Optional): This setting helps you redirect the customers to the page where the sale presents to purchase stuff easily.
To use this feature, please turn on the slide **“Buy now, add to cart” button**, there will be a **Text** field for you to add content and a **Link** field so you can add the page URL you want the customers to be redirected to:
### Setting timer:
There are 3 time types in this section. Depending on your choice, you can decide to apply the kind of time to the Countdown timer. For further understanding and explanation for each time type, please review this [**guide**](#configure-the-setting-timer).
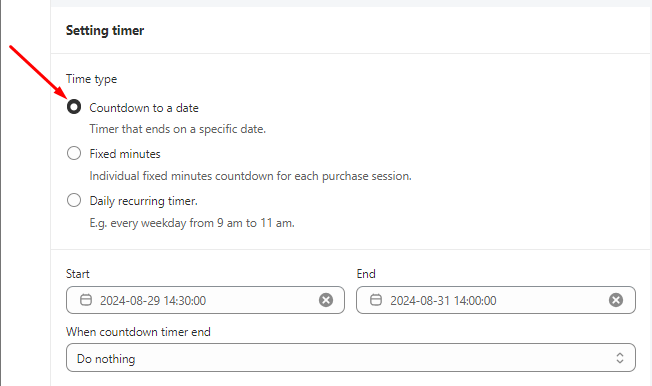
1. Select the **time type** you like. For example, the **Countdown to a date** option is selected:
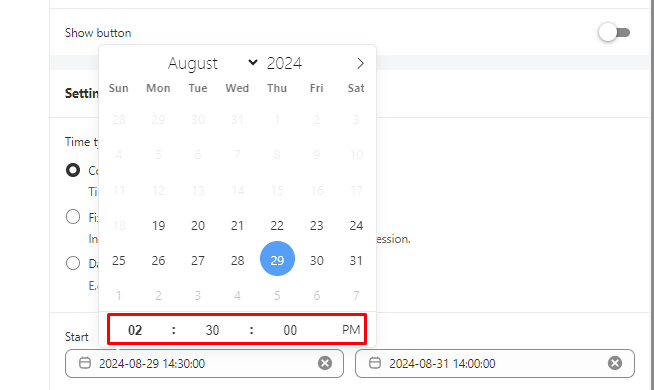
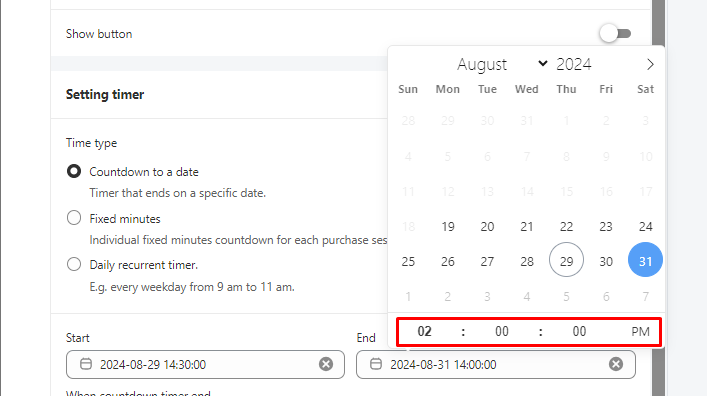
2\. Set up the **Start time** and **End time** for the Countdown timer:
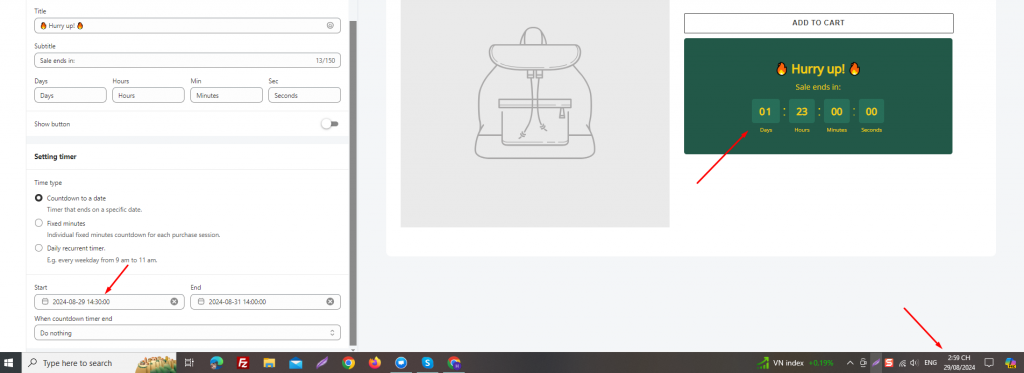
For example, the Sale event starts on 29/08/2024 at 14:30 pm and ends at 14:00 pm on 31/08/2024. The setup will be as follows:
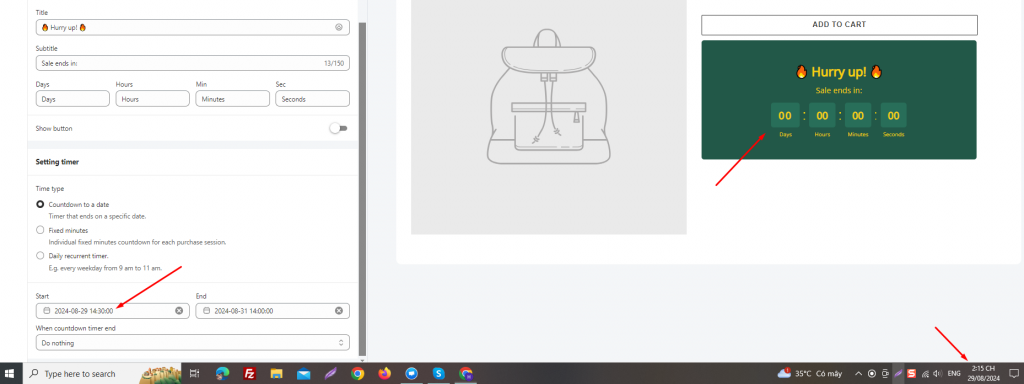
***\*Note: Our app uses the standard timezone for this time setting and displays the time due to the local timezone of your browser. Moreover, if you set up a time that is earlier than the current time, the clock will show as below:***
When the time starts, the clock is counting down like this:
*This is a small note to avoid confusing users about this matter.*
3\. Select the **timer’s action after ending the countdown**:
**– Do nothing:** The countdown timer will stay the same on the page
**– Hide countdown block:** The countdown timer will disappear after the time ends.
### **Design the Countdown timer**
**Step to manage:**
1. Click on the **Design icon**
2. You can choose to set up the template color or use the upload image setting:
3\. Set up the color for the Countdown timer
4\. Design font text and border size for the **Title**, **Subtitle**, **Padding** and **Button** (Show button setting that is mentioned above)
5\. Click on the small arrow to design the **Timer section**, Countdown timer size **on Mobile**
6\. For further customization, you can use the **Custom CSS** box below to add CSS for the Countdown timer design:
### Setting Display condition for the Countdown timer:
1. Configure the condition for the Countdown timer
2. Set up display position: Show the timer on the **product page** or display it in other places by the **Shortcode**
3. Set device targeting to choose the device you want to show the Countdown timer on: **Desktop** or M**obile**.
For further information about this step, please review this [**guide**](https://help.samita.io/docs/samita-countdown-timer-bar/setup-display-conditions-and-display-position-for-the-timer/) for better understanding.
After finishing all steps to create the Countdown, click **Save** and start checking on the front store
**Important step!**
In order to enable the app data to your front store, please don’t forget to activate our app embed to your theme.
***
## 🔗 Configure the Setting Timer
In the Setting timer section, there are **3 time types**. Each of them has its own functionality. In order not to get confused when setting it up, please review this document to better understand the work and usage of each time type.
### **Countdown to a date**
This setting is used to configure the countdown time until a date.
For example, the sale occasion starts at 00:00 on 23/06/2025 and ends at 7:0026M on 31/06/2025. The time will be set up as follows:
***
### **Fixed minutes**
If you only want to kick up a flash sale to your store, this time type can be the best solution as you can create a countdown time by minutes for each purchase session.
Depending on the amount of time you set up in the Minute field, the clock will run backward due to it.
***
### **Daily recurring timer**
If you have a sale event that happens on a specific day/some specific days in a week and the sale only appears for a certain amount of time in the day, this time type can help you do that.
Depending on your wish, you can set up the sale program on any day of the week, at a specific time. In this case, we will set up an example to easier understand.
*“There is a sale event that happens every Tuesday and Friday of the week, it starts from 23/06/2025 to 30/06/2024, at 14:00 PM to 17:00 PM”*
The timer will be set up as follows:
***\*Note: Our app uses the standard timezone for this time setting and displays the time due to the local timezone of your browser. Moreover, if you set up a time that is earlier than the current time, the clock will not start counting down until the time comes.***
**Select the timer’s action after ending the countdown:**
**– Do nothing:** The countdown timer will stay the same on the page
**– Hide countdown block:** The countdown timer will disappear after the time ends.
***
## 🔗 How to enable the Countdown timer on the product page?
In order to show out the Countdown timer on your front store, you can set it up in the **Display position** for the timer.
Go to the **Display setting** page of the Countdown timer > Navigate the **Display position** section > Tick on the check box “**Product page**” option to display the timer on all product pages:
***
## 🔗 What will happen after the Countdown timer ends?
To configure the action after the Countdown timer ends, you can set it up by this way:
Go to the Setting page of the Countdown timer > Navigate the Setting timer section > Scroll down to find the function named When countdown timer end > Select the option that you find it most suitable for you:
For the option “Do nothing”, the Countdown timer will remain the same position even when the time ends.
For the option ” Hide countdown block”, the Countdown timer will disappear after the time ends.
For the option ”Repeat the time”, the Countdown timer will show again after the time ends.
***
## 🔗 How to set up the Countdown timer for a specific product?
You can manage the Countdown timer to be displayed on which products by setting up the **display condition** for it as follows:
Then the Countdown timer will be displayed only on the products you have chosen above
***
## 🔗 How to manage the app block to show the Countdown timer on a desired position?
In the Shortcode setting, you need to add the code to show the Countdown timer on a specific position you want. To manage this step correctly, you also need to move the app block to the right position, too.
In this case, we will show the Countdown timer on the **Homepage** as an example:
1. On the **Display setting** page of the Countdown timer > Copy the **Shortcode**
2. Go to the **Theme** folder > Click on the **Customize** button
3. On the Homepage customization page, if there is already an **App section**, you just need to **add block** to that section:
You can manage the Samita Countdown block to be above or below the other blocks by **clicking and holding the block** > moving up and down.
If there hasn’t been any App section yet, please click on the **Add section** button and choose the **Samita Countdown option**:
Add the **Shortcode** that you have copied from the Countdown timer display setting to this input field and click **Save**:
Then check the result on the front store:
***
## 🔗 How to show the button with a link to the Countdown timer?
If you want to customize a button that can redirect the customers to a page where the sale event is presented, there is a setting for this action in the Countdown timer bar. It’s called a **Shop** button.
1. On the Settings page of the Countdown timer, navigate to the Content section, there is a slide **“Buy now, add to cart”** > Turn it on to configure
2\. Set up the button title and add the link for the button:
3\. Click **Save** and check the result on the front store
{% hint style="success" %}
**Friendly reminder!**\
If you do encounter any difficulty while proceeding with these steps, don’t show any hesitation to contact us promptly via the email address
{% endhint %}
---
# Agent Instructions
This documentation is published with GitBook. GitBook is the documentation platform designed so that both humans and AI agents can read, navigate, and reason over technical content effectively. Learn more at gitbook.com.
## Querying This Documentation
If you need additional information that is not directly available in this page, you can query the documentation dynamically by asking a question.
Perform an HTTP GET request on the current page URL with the `ask` query parameter, and the optional `goal` query parameter:
```
GET https://docs.samita.io/samita-countdown-timer-bar/countdown-timer.md?ask=&goal=
```
`ask` is the immediate question: it should be specific, self-contained, and written in natural language.
`goal` is optional and describes the broader end goal you are ultimately trying to accomplish on behalf of the user. GitBook uses it to tailor the answer towards what is most useful for that goal.
The response will contain a direct answer to the question and relevant excerpts and sources from the documentation.
Use this mechanism when the answer is not explicitly present in the current page, you need clarification or additional context, or you want to retrieve related documentation sections.