***
## 🔗 Theme Integration
### Enable the app embed to the (live) theme
In order to let the app work on the front store, the app embed must be enabled on the theme. To do this, please follow the below instructions:
1. From the App Dashboard, click on the **Theme integration** section. As you can see the app embed is deactivated on the live theme.\
2. Click on **Go to Theme editor**
3. On the Theme editor page, please turn on our app embed and click **Save**
Now in the app, it shows that you enable the app embeds successfully.
***
### Disable the app embed to the (live) theme
If you don’t want the app data to be displayed on your end, you can disable the app embed on your theme to prevent this. Kindly review the following steps to know how to turn off the app embed.
1. From the App Dashboard, click on the **Theme integration** section.
2. Click on **Go to Theme editor**.
3. On the Theme editor page, turn off the app embed and click **Save** to save the change.
Now in the app, it shows that you enable the app embeds successfully.
***
## 🔗 Activate/Deactivate the Timer on the front store
The Timer will automatically be active after creating it. However, you can manage its status by setting it in our app. Please follow the below instructions to know how to activate the Timer and deactivate it when it’s no longer needed.
### Disable the Timer on the front store
1. From the App admin page, click on the **Countdowns** section in the navigation bar. There will be a Countdown list page:
2\. Tick on the Timers you want to be inactive, click on **Set as draft**
3\. The status is now changed to “**Draft**” which means the Timer doesn’t show up on your end anymore.
You can go to the front store and check the result.
***
### Enable the Timer on the front store
If you want to show the Timer on your front store again, you can set the Timer as active again by the above step.
Tick on the Timer you want > Choose **Set as active**
***
## 🔗 Search and filter the Timer on the Countdown list
If you have created several Timers and it’s hard for you to navigate the Timer you want to edit or remove, this setting will be a solution for this issue. You can find the Timer by searching its name or adding a filter to look for it. Kindly see the below instructions to know how to use the setting.
1. Click on the **Countdowns** section in the navigation bar > Click on the **Search button** which is next to the **Sort button**.
2\. Enter the Timer name you are looking for if you search it in all Timers:
You can also search the Timer name by filtering the Timer status.
1. Click on the **Search button** > Click **Add filter** > **Status**
2\. Choose the status as “**Active**” or “**Draft**”
In this case, we choose “Active”, and enter the name of the Timer. For example, “Stock countdown”. You will receive the result as below:
***
## 🔗 Duplicate/Delete the Timer
### Duplicate the Timer
1. From the App Dashboard > Navigate to the **Countdowns** section
2. Tick on the Timer you want to duplicate > Click on the More action button on the top right corner > **Duplicate selected countdown(s)**
Then you will have a new Timer identical to the old one. Please click on that new Timer and start editing it. Don’t forget to save the changes after you configure the new Timer.
### Delete the Timer
1. From the App Dashboard > Navigate to the **Countdowns** section
2. Tick on the Timer you want to delete > Click on the More action button on the top right corner > **Delete selected countdown(s)**
The timer will completely disappear after being deleted so please think carefully before doing this.
***
## 🔗 Sort the Timer on the Countdown list page
In order to help users find the Timers more conveniently, we have created a sorting function in the Countdown list so that the users can easily find the Timer they have set up based on the Date and Name of the timer, users can sort from the oldest timer to the newest one and vice versa.
1. From the App Dashboard > Navigate to the **Countdowns** section
2. On the Countdown list, click on the **Sort button** on the top right corner of the list.
There will be a dropdown menu, please select the option you want to sort by: **Date** or **Countdown name**, **Oldest first** or **Newest first**.
***
## 🔗 Add search file to enable the collection condition
In order to display the countdown you have created on the front store, you need to add some codes to enable the app data (especially used for the **Collection condition**). Kindly follow the below instructions to better know how to do it:
1. From the Shopify admin page, choose the **Online Store** folder > **Themes**
2. In **Themes** > choose the **More actions** button > **Edit code**
3\. On the code page, click on **“Add a new template”** > choose Template type: **search** > **liquid** > Fill in the file name as: **samiCountdownsProductsJson**
4\. Set **Done**.
5\. Add the below codes to the file:
```
{%- layout none -%}
{%- paginate search.results by 1000 -%}
[{%- for product in search.results -%}
{%- unless forloop.first -%},{%- endunless -%}
{
"id":{{-product.id-}},
"title":{{-product.title | json-}},
"handle":{{-product.handle | json-}},
"price":"{{-product.price-}}",
"price_max":"{{-product.price_max}}",
"price_min":"{{-product.price_min}}",
"type":{{-product.type | json-}},
"created_at":"{{-product.created_at | date: "%Y-%m-%d %H:%M" -}}",
"published_at":"{{-product.published_at | date: "%Y-%m-%d %H:%M" -}}",
"tags": {{-product.tags | json-}},
"vendor": {{-product.vendor | json-}},
"featured_image":"{{-product.featured_image-}}",
"url":"{{-product.url-}}",
"collections":{{-product.collections | map: 'id' | json-}},
"compare_at_price":"{{-product.compare_at_price-}}",
"compare_at_price_max": "{{-product.compare_at_price_max-}}",
"compare_at_price_min": "{{-product.compare_at_price_min-}}",
"price_varies": "{{-product.price_varies-}}",
"compare_at_price_varies": "{{-product.compare_at_price_varies-}}",
"images":[
{%- for image in product.images -%}{%- unless forloop.first -%},
{%- endunless -%}{"id":{{-image.id-}},
"src":{{-image.src | json-}}}{%- endfor -%}],
"first_available_variant":{"id":{{-product.selected_or_first_available_variant.id | times: 1 -}}},
"available":{{-product.available | json-}},
"options": {{-product.options | json-}},
"variants":[
{%- for variant in product.variants -%}{%- unless forloop.first -%},
{%- endunless -%}
{
"id":{{-variant.id-}},
"title":{{-variant.title | json}},
"name":{{-variant.name | json}},
"price":{{-variant.price-}},
"compare_at_price":{{-variant.compare_at_price | times: 1-}},
"available":{{-variant.available-}},
"sku":{{-variant.sku | json -}},
"weight":"{{-variant.weight-}}",
"weight_unit": "{{-variant.weight_unit-}}",
"inventory_quantity":{{-variant.inventory_quantity-}},
"option1": {{-variant.option1| json-}},
"option2": {{-variant.option2| json-}},
"option3": {{-variant.option3| json-}},
"options": {{-variant.options| json-}},
"selected": {%- if variant.selected -%} {{-variant.selected-}} {%- elsif product.selected_or_first_available_variant.id == variant.id -%} true {%- else -%} false {%- endif -%}
}
{%- endfor -%}
]
}
{%- endfor -%}]
{%- endpaginate -%}
```
6. Click **Save** to finish creating this new file.
{% hint style="info" %}
**IMPORTANT step**: Go back to the Countdown Sami app, and open the Theme integration section so the latest codes are being pushed to the theme/app data. Please review this [**document**](#enable-the-app-embed-to-the-live-theme) to know how manage it.
{% endhint %}
***
## 🔗 Steps to use Shortcode to display the Timer at a specific position
The app provides Shortcode to help users show the Timer at any specific place they want. However, you should only use this option if you want to show the Timer in a special place outside the product page or position the Timer in a different place on the product page.
**Step to manage:**
You have to create the Timer and finish the setup for the Timer content as well as the design first. Then click **Save**:
1. In the Timer setting, navigate to the **Display** button and click on it.
2. Scroll down to the **Display position** section, pay attention to the **Shortcode box** > click **Copy**
3\. Go back to the Shopify admin page > Click on the **Online store** folder > **Themes** > Click on the **Customize** button.
Depending on your choice, you can place the Timer at any position on any page you like. In this case, we will use the collection page as an example. We will show the Countdown timer on the collection page
4\. In the navigation bar on the left, click on the **Add section** button in the **Template** section:
5\. Paste the Shortcode you have copied earlier into the Shortcode input field > Click **Save** after pasting it.
6\. Go check the result on the front store
You can apply these steps for other timers like Estimated Delivery Date, Cart Countdown and Stock Countdown.
***
## 🔗 Setup display conditions and display position for the Timer
After creating the Timer, you can set up the place to show it on the online store. The app supports you in configuring the display condition in order to manage where the Timer can be shown on what product/page/collection or by customer types (logged-in/non-logged-in/tag). You can also adjust the Timer position on a page with the display position setting of our app. Kindly follow the below guidelines to better know how to set them up.
### **Display conditions**
**Step to manage:**
1. From the Admin Dashboard > Click **Countdowns** > Choose the Timer you want.
In this case, we will use the Stock countdown as an example.
2\. Click on the **Display icon** in the Timer setting page:
3\. Look at the **Conditions** section, please click on the dropdown menu and select the option you want to show the label on.
Currently, there are 7 options for you to choose:
* **All products:** Show on all products of the store
* **Select products:** Show on some products that are selected
* **Product variants:** Show for each variant of the products
* **Collections:** Show on the products in a collection (This setting can save you time if the products you want to have the timer on are all in one collection)
* **Customer:** Show due to the customer status (Logged-in or Non logged-in customers)
* **Customer tag:** Show due to the tag that is added to the customer accounts (You can do this step in the Customers folder)
* **Page:** Show only on a specific page (You can also decide not to show the timer on what page by this setting)
In this case, we will choose to show the Timer on some specific products, then click on “**Select products**” and browse the items:
4\. If you want to set multi-conditions, please click on **Add another condition** and set up the condition just as above.
However, you need to consider selecting **Any condition** or **All conditions** after adding more display conditions.
* **All conditions:** Only work if meeting all conditions at the same time
* **Any condition:** Work even when meeting only one of the conditions.
You have finished the condition setup step, now move to the **Display position** section.
### **Display position**
**Step to manage:**
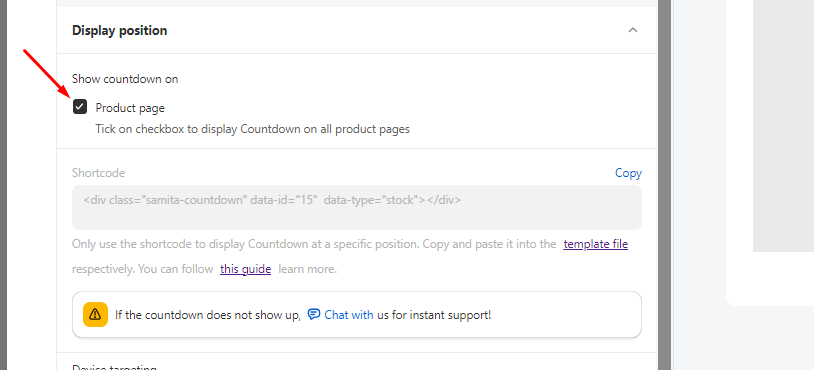
1\. If you want to show the Timer only on the Product page, please tick the checkbox “**Product page**“:
2\. If you want to show the Timer in another place outside the product page, please use the **Shortcode** setting. For further information about this setting, please review this [**instruction**](https://help.samita.io/docs/samita-countdown-timer-bar/steps-to-use-the-shortcode-to-display-the-timer-on-a-specific-position-on-the-online-store/).
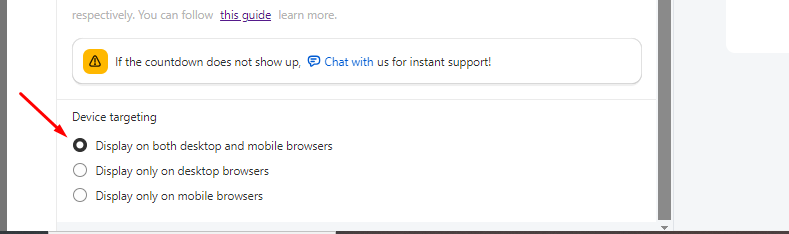
#### **Device targeting:**
This function helps you manage to show the Timer on the devices you want (mobile or desktop).
After finishing all these setups, please click **Save.**
Go to the front store and check for the result:
{% hint style="success" %}
**Friendly reminder!**\
If you do encounter any difficulty while proceeding with these steps, don’t show any hesitation to contact us promptly via the email address
{% endhint %}
---
# Agent Instructions: Querying This Documentation
If you need additional information that is not directly available in this page, you can query the documentation dynamically by asking a question.
Perform an HTTP GET request on the current page URL with the `ask` query parameter:
```
GET https://docs.samita.io/samita-countdown-timer-bar/general.md?ask=
```
The question should be specific, self-contained, and written in natural language.
The response will contain a direct answer to the question and relevant excerpts and sources from the documentation.
Use this mechanism when the answer is not explicitly present in the current page, you need clarification or additional context, or you want to retrieve related documentation sections.