> For the complete documentation index, see [llms.txt](https://docs.samita.io/llms.txt). Markdown versions of documentation pages are available by appending `.md` to page URLs; this page is available as [Markdown](https://docs.samita.io/samita-countdown-timer-bar/setup-display-conditions-and-display-position-for-the-timer.md).
# Setup display conditions and display position for the Timer
After creating the Timer, you can set up the place to show it on the online store. The app supports you in configuring the display condition in order to manage where the Timer can be shown on what product/page/collection or by customer types (logged-in/non-logged-in/tag). You can also adjust the Timer position on a page with the display position setting of our app. Kindly follow the below guidelines to better know how to set them up.
### **Display conditions**
**Step to manage:**
1. From the Admin Dashboard > Click **Countdowns** > Choose the Timer you want.
In this case, we will use the Stock countdown as an example.
2\. Click on the **Display icon** in the Timer setting page:
3\. Look at the **Conditions** section, please click on the dropdown menu and select the option you want to show the label on.
Currently, there are 7 options for you to choose:
* **All products:** Show on all products of the store
* **Select products:** Show on some products that are selected
* **Product variants:** Show for each variant of the products
* **Collections:** Show on the products in a collection (This setting can save you time if the products you want to have the timer on are all in one collection)
* **Customer:** Show due to the customer status (Logged-in or Non logged-in customers)
* **Customer tag:** Show due to the tag that is added to the customer accounts (You can do this step in the Customers folder)
* **Page:** Show only on a specific page (You can also decide not to show the timer on what page by this setting)
* **Language** : Show for targeted different countries
In this case, we will choose to show the Timer on some specific products, then click on “**Select products**” and browse the items:
4\. If you want to set multi-conditions, please click on **Add another condition** and set up the condition just as above.
However, you need to consider selecting **Any condition** or **All conditions** after adding more display conditions.
* **All conditions:** Only work if meeting all conditions at the same time
* **Any condition:** Work even when meeting only one of the conditions.
You have finished the condition setup step, now move to the **Display position** section.
### **Display position**
**Step to manage:**
1\. If you want to show the Timer only on the Product page, please tick the checkbox “**Product page**“:
2\. If you want to show the Timer in another place outside the product page, please use the **Shortcode** setting. For further information about this setting, please review this [**instruction**](https://help.samita.io/docs/samita-countdown-timer-bar/steps-to-use-the-shortcode-to-display-the-timer-on-a-specific-position-on-the-online-store/).
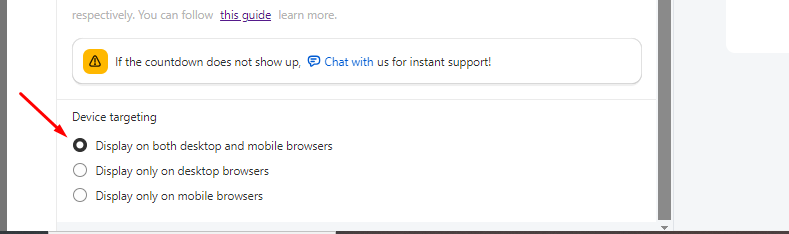
#### **Device targeting:**
This function helps you manage to show the Timer on the devices you want (mobile or desktop).
After finishing all these setups, please click **Save.**
Go to the front store and check for the result:
{% hint style="success" %}
**Friendly reminder!**\
If you do encounter any difficulty while proceeding with these steps, don’t show any hesitation to contact us promptly via the email address [support@samita.io](https://samita.io/pages/contact)
{% endhint %}
---
# Agent Instructions
This documentation is published with GitBook. GitBook is the documentation platform designed so that both humans and AI agents can read, navigate, and reason over technical content effectively. Learn more at gitbook.com.
## Querying This Documentation
If you need additional information that is not directly available in this page, you can query the documentation dynamically by asking a question.
Perform an HTTP GET request on the current page URL with the `ask` query parameter, and the optional `goal` query parameter:
```
GET https://docs.samita.io/samita-countdown-timer-bar/setup-display-conditions-and-display-position-for-the-timer.md?ask=&goal=
```
`ask` is the immediate question: it should be specific, self-contained, and written in natural language.
`goal` is optional and describes the broader end goal you are ultimately trying to accomplish on behalf of the user. GitBook uses it to tailor the answer towards what is most useful for that goal.
The response will contain a direct answer to the question and relevant excerpts and sources from the documentation.
Use this mechanism when the answer is not explicitly present in the current page, you need clarification or additional context, or you want to retrieve related documentation sections.