
Loading...
Loading...
Loading...
Loading...
Loading...
Loading...
Loading...
Loading...
Loading...
Loading...
Loading...
Loading...
Loading...
Loading...
Loading...
Loading...
Loading...
Loading...
Loading...
Loading...
Loading...
Loading...
Loading...
Loading...
Loading...
Loading...
Loading...
Loading...
Loading...
Loading...
Loading...
Loading...
Loading...
Loading...
Loading...
Loading...
Loading...
Loading...
Loading...
Loading...
Loading...
Loading...
Loading...
Loading...
Loading...
Loading...
Loading...
Loading...
Loading...
Loading...
Loading...
Loading...
Loading...
Loading...
Loading...
Loading...
Loading...
Loading...
Loading...
Loading...
Loading...
Loading...
Loading...
Loading...
Loading...
Loading...
Loading...
Loading...
Loading...
Loading...
Loading...
Loading...
Loading...
You can manually set sale prices on individual products without using discount codes.
When you put a product on sale for a lower price, you might want your customers to be able to see the original price, so they see the price comparison. To show a sale price in your online store, your product details need to include a sale price and the original price, called the compare-at price.
Steps to manage
From your Shopify admin page, click Products > open the product detail you want
Scroll down to Pricing part, enter the sale price to Price field. For example: 90$
Enter a larger price to the Compare-at price field
Click Save
Click the product Preview so you can see how the product is listed on your storefront
To apply the lock to your site, please make sure the app is integrated into the theme.
From the App dashboard page > Navigate the App status section > Click Enable:
Click on the Enable button, you will be redirected to the Theme customize page > App embeds section > Turn on the slider to activate our app in your theme:
Click Save to update the theme
Back to the app, click Refresh to update the changes:
From the App dashboard page > Navigate the App status section > Click Disable:
Click on the Disable button, you will be redirected to the Theme customize page > App embeds section > Turn off the slider to deactivate our app in your theme:
Click Save to save the changes.
Back to the app, click Refresh to update the changes:
Store owners can offer wholesale prices for specific customers and customer groups. Our app allows users to customize the discounts based on customer groups and products. These discounts can be applied to any number of products, collections, or the entirety of your store.
These discounts can be set as percentages, or specific amounts on selected collections, products, or customers. The inclusion of wholesale specials will increase your store’s wholesale revenue, by showing them how much they save, while also being able to cater to retailers who aren’t buying in bulk.
Volume discount pricing means providing discounted prices for bulk purchases. It’s a pricing model that product manufacturers and service providers use to encourage individuals or businesses to purchase multiple units or large quantities of a single product.
It’s a win-win strategy for the seller and the buyer. The seller can reduce their inventory, while the buyer takes the opportunity of quantity discounts to optimize their cost.
The discount becomes greater as the number of units sold increases, meaning the original price per unit goes down.
Example:
10-19 products = 10% discount
20-29 products = 20% discount
30-39 products = 30% discount
40-49 products = 40% discount
50 products ++ = 50% discount
Wholesale pricing
Normal discount: 1 discount value applied to selected product/customers
Example:
Buy product A get (x)% discount
Volume pricing
Wholesale pricing is what you charge retailers who buy products in large volumes.
The goal of wholesale pricing is to earn a profit by selling goods at a higher price than what they cost to make.
For example, if it costs you $5 in labor and materials to make one product, you may set a wholesale price of $10, which gives you a $5 per unit gross profit.
The retail price is what retailers set as the final selling price for consumers.
Retail pricing is all about the customer. These customers don’t purchase the item to resell it but to use it.
The fundamental objective for a retailer when setting a price is to maximize the profit while setting a price that customers will be ready to pay.
The retail price is the price set by retailers that’s the final selling price for customers.
Wholesale prices are typically much lower than retail prices, because retailers are offered a discount in exchange for agreeing to purchase a large amount of product.
For BETA version only
In order to show the quick order form on your online store, you must create a new template file in your theme.
Steps to manage
Open your theme > Click “Edit theme code”
Under the Template folder, create a new file with the “Page” template
Choose the liquid template type.
Create a new liquid file called samitaWS-QuickOrderForm
Copy the codes and paste them into this file
Click “Save” to finish creating this new file.
IMPORTANT step: Go back to the Sami Wholesale app, open the Settings > Theme integration section so the latest codes are being pushed to the theme/app data
Welcome to Samita Wholesale Pricing – the all-in-one Shopify solution to manage B2B customers, offer flexible pricing, streamline bulk orders, and customize the purchasing experience for wholesale buyers.
Whether you’re selling to retailers, distributors, or VIP customers, our app equips your store with tools to support volume discounts, registration flows, quick orders, and more.
1. Open the app > From the app’s dashboard page, choose Wholesale Pricing > click on the Create new wholesale pricing button
2. Enter the title (only you can view the title) > select status Active if you want to make the pricing work on the site
3. In Customer conditions section > Apply to Customers : select Customer tags > enter tag “wholsale customer


Example:
Buy 10 get 10% discount
Buy 20 get 15% discount
Display Volume pricing table on the front store


Mail SMTP +API: With SMTP, you can configure your own email provider as the sender, allowing emails to be delivered directly from your official business address, helping you build trust and present a more professional image to your customers. The app now supports additional email providers such as Outlook, Amazon SES, and more - instead of being limited to Google as before.
🎉 NEW FEATURES
Apply Discounts to Manual Draft Order: In addition to displaying discounts on the storefront for customers to view and purchase directly at the reduced price, the app now also allows admins to create draft orders with the discounted price already applied. This makes it much easier for you to manage wholesale orders on behalf of your customers from the admin side.
🛠️ IMPROVEMENTS
Improving & Optimize performance and Feature: Continue to learn and improve the app for the best user experience.
🎉 NEW FEATURES
Registration form with multi-language: The registration form can automatically display in the customer’s preferred language. You can customize the text for each supported language to ensure a consistent and localized experience for all users.
New UI with Registration:
Edit Customer Registration Form
🛠️ IMPROVEMENTS
Improving & Optimize performance and Feature: Continue to learn and improve the app for the best user experience.
🎉 NEW FEATURES
Add feature download order invoice, add items to cart, create new cart, in cart drawer: Once you activate the app's cart, it will be displayed for all customers (retail customers and wholesale customer). Please note that using the app’s cart is optional; you can skip it if you prefer to keep using your theme’s default cart.
Build cart form: With Sami’s Wholesale cart, you can collect additional information from customers before they proceed to checkout by enabling a form in the cart. Follow the steps below to set up this form.
🛠️ IMPROVEMENTS
Improving & Optimize performance and Feature: Continue to learn and improve the app for the best user experience.
🎉 NEW FEATURES
Discount box & Cart discount combination: With Sami Wholesale, you can let customers apply an additional discount code when proceeding to checkout. Please enable the Box Discount feature in the app to display the discount box on your theme’s cart page.
🎉 NEW FEATURES
Tax exemption feature: this feature allows you to exclude taxes from a customer's order. The app will display a tax section in the cart (cart drawer and cart page of your theme) as well as in our Quick Order Form, where customers can enter their tax ID before checkout to receive a tax exemption.
Tax display feature: this feature lets you display product prices either with tax included or without tax. By default, the app uses the tax settings from Shopify and display that information to the front store, however, you can also override them with settings in the app.
🎉 NEW FEATURES
Power your retail growth with a POS system: Easily integrate the POS system with existing platforms for smooth operations.
Add feature Payment term: With Payment term feature, Sami Wholesale Pricing allows your B2B customers to pay for the order later or on a specific date in the invoice you send to them instead of paying immediately on the checkout page.
🛠️ IMPROVEMENTS
Improve UI and UX Quick Order Form: Streamlined design enhances user experience and reduces learning curve.
Add pricing plan for app.
Here’s how Samita Wholesale Pricing can power your Shopify B2B business:
Create separate pricing tiers for different customer groups (e.g., tagged as “wholesalers”, “resellers”), showing exclusive prices when logged in.
Encourage bulk purchases by offering quantity-based discounts. Set up pricing rules such as:
Buy 10–19 → 10% off
Buy 20+ → 20% off
Allow new wholesale customers to apply via a customizable registration form. Approve or deny access manually or automatically based on tags or conditions.
Enable fast ordering experiences for B2B buyers – display a compact table view with variants, quantities, and add-to-cart options all in one place.
Enhance the shopping experience with tools like:
Custom cart drawer for wholesale orders
Order minimum/maximum limits
Extra fees or charges (handling, bulk)
Wholesale-specific shipping rates
Payment term settings (e.g., NET 30)
Let’s get your wholesale store running in just a few steps:
Go to Pricing Rules
Click Create Rule
Choose the customer group (by tag, login status, etc.)
Add your wholesale price per product or set up a percentage discount
Define quantity tiers and discount percentages
Preview how prices change based on quantity selected
Navigate to Registration
Enable the form and drag/drop to customize fields
Choose how to tag customers upon approval
Go to Quick Order
Choose where it appears (e.g., specific collections or pages)
Select products or let customers browse by collection
Configure minimum order value
Set up extra fees or shipping
Design cart drawer behavior
4. In Product conditions section > Apply to Products:, select All products.
If you want to exclude specific products, select Exclude Products: > Specific products
5. In Discount Groups section, select Percent > Enter the discount percentage value in the Discount per item field
Example: 50% Percent Off would mean that an item that originally cost $100 would now cost 50$.
If you want to give an amount off instead of percentage, please choose “Amount” option. Then the new price will be the old price deducts the amount off
And if you want add a whole new price for the products, choose “fixed amount”.
6. Set Active dates (It’s optional so you can skip this part)
7. Click Save
Note
Please make sure you enter the correct customer tag to aplly the wholesale pricing. The tags are case-insensitive that means you can enter them in uppercase or lowercase letters.
wholesale tag is different from Wholesale tag.


Go to the Tax display page > Click on the Tax display setting you have created:
Scroll down to the bottom of the page and check on your right-handed bar, there is a Design section:
Display price type: Manage how the pricing should be displayed, you can either show only price with/without tax or both prices:
Ratio between Excl tax & Incl tax font size: Set the font size ratio between the two prices (only applies if you’ve selected “Both prices” in the Display Price Type setting). By default, the app uses a 1:1 ratio, meaning both prices will appear with the same font size. You can change to other ratios available in the dropdown list.
Change color for the pricing:
Click Save to update the changes.
If in the Tax Exempt General section, you select EU VAT API option, you will be able to select which countries in EU will be validated for this VAT ID things.
In the Tax exempt general section, tick on EU VAT API:
Scroll down to the bottom of the page, there is a section called Select EU VAT for specific countries > Toggle it on and a list of countries will show up:
Tick on the countries you want to be validated only and Save:
Then in the cart, there will be only those selected countries appear in the list:
You can select the country that issued your Tax ID before entering it. The app will then validate whether the Tax ID matches the format and rules of the selected country.
If you disable this Select EU VAT setting in the app (toggle off the setting) or don't choose any countries for validation, there will be no country list shows up in the cart anymore. Then when a customer fills out a VAT ID, the app will validate the entered VAT ID against all EU countries. As long as the VAT ID is valid in any one of them, the order will be tax-exempt and be able to checkout.
In order to get the Sami Wholesale app to work in your theme, you need to manually add a search file for the app to enable the app data in your theme. Kindly review this document to know how to set it up.
From the Shopify admin page, choose the Online Store folder > Themes


In Themes > choose the More actions button > Edit code
On the code page, right-click on the Template tab > Choose New file to create this search file.
Then set up name for this file like this: search.samitaWSProductsJson.liquid
Add the below codes to the file:
Click Save to finish creating this new file.


From the app admin page, click Wholesale Pricing
Tick on the checkbox of the Wholesale Pricing(s) you want to delete > More options (...) > Select Delete Wholesale pricing(s)
From the app admin page, click Wholesale Pricing
Tick on the checkbox of the Wholesale Pricing(s) you want
Click Duplicate Wholesale Pricing(s) button
Now new Wholesale Pricing is created. You can view and edit the Wholesale Pricing based on your needs.
Since the app automatically generates a discount code on the checkout page, a discount label will be displayed as shown below:
You can personalize this Discount label into another content you like.
Step to manage:
Go to the app > Settings page > General tab.
Navigate the Checkout discount methods section > Edit the Discount label:
Save the changes and check the result in the front store:
The discount label will also be updated in Shopify Discounts:
This article shows you how to how to set the Samita Registration form to automatically create subscribed customers accounts after the form is submitted.
First, please follow the steps in to integrate Samita form data with Shopify customer data
Second, follow the steps below to enable the function you want
Steps to manage
In the Registration form editor, click Settings > Integration
Click Shopify >
This is for new version of the Quick order form
When the discount is applied to products and customers add product to checkout page to purchase, the order will be processed with a discount code applied directly in the order.
Sami Wholesale uses Draft order API as checkout method. The discount will be shown at checkout as below:
With this Checkout discount method, all products in the order will receive one discount code that matches the discount shown on the front store. You can find automatically generated discount codes at Shopify Discounts folder:
This discount code cannot be edited or deleted. If removed, the customer’s order will no longer have the discount applied.
The Draft Order API checkout method will create draft orders in your store whenever a customer proceeds to checkout on the storefront.
Step to manage
From the app admin page, click on the Settings section in the Navigation bar > Translations
Select the part you want to edit text: Volume Pricing table, Discount box, Quick order form table, Cart Drawer
Optional: Click Add Languages in case you want to translate the text into another language
The app allows you to override tax data for specific regions. This setting works the same as the Tax override setting in Shopify Taxes and Duties.
To find this setting in the app, kindly go to the Settings section of the Tax display setting:
Navigate the Override Tax Setting field > Find the country/region you want to set Tax-override > Click on the Action icon:
You can apply tax settings to products based on their collections.
If a product belongs to multiple collections, the app will use the tax settings from the collection that was created first (sorted by created at date).
With Sami Wholesale, you can let customers apply an additional discount code when proceeding to checkout. Please enable the Box Discount feature in the app to display the discount box on your theme’s cart page.
Open the app > click Add-on Features section in the Navigation bar > Wholesale cart > Turn it on and click Setup Wholesale cart to open the settings inside it.
Change the cart template to Cart page. Please note that the "Cart page" refers to your theme’s cart page. The app itself only provides a cart drawer, but it also supports displaying the discount box on your theme’s cart page:
Once customers choose to pay later, we will create draft order/invoice for their orders so they can pay for it later. You can view the draft orders created from this payment term here:
1. From the app dashboard page > Payment term > Set up payment term.
2. On the Payment term page > Click on the View draft orders button:
{%- layout none -%}
{%- paginate search.results by 250 -%}
    [{%- for product in search.results -%}
        {%- unless forloop.first -%},{%- endunless -%}
        {
            "id":{{-product.id-}},
            "title":{{-product.title | json-}},
            "handle":"{{-product.handle-}}",
            "price":"{{-product.price-}}",
            "price_max":"{{-product.price_max}}",
            "price_min":"{{-product.price_min}}",
            "product_type":"{{-product.product_type-}}",
            "created_at":"{{-product.created_at-}}",
            "published_at":"{{-product.published_at-}}",
            "tags": {{-product.tags | json-}},
            "vendor": "{{-product.vendor-}}",
            "featured_image":"{{-product.featured_image-}}",
            "url":"{{-product.url-}}",
            "collections":{{-product.collections | map: 'id' | json-}},
            "compare_at_price":"{{-product.compare_at_price-}}",
            "compare_at_price_max": "{{-product.compare_at_price_max-}}",
            "compare_at_price_min": "{{-product.compare_at_price_min-}}",
            "options": {{-product.options | json-}},
            "options_with_values": {{-product.options_with_values | json-}},
            "images":[
            {%- for image in product.images -%}{%- unless forloop.first -%},
            {%- endunless -%}
            {
                "id":{{-image.id-}},
                "src":{{-image.src | json-}},
                "variant_ids":{{-image.variants | json-}}
            }
            {%- endfor -%}
            ],
            "first_available_variant":{"id":{{product.selected_or_first_available_variant.id}}},
            "available":{{-product.available-}},
            "variants":[
                {%- for variant in product.variants -%}{%- unless forloop.first -%},
                    {%- endunless -%}
                    {
                    "id":{{-variant.id-}},
                    "title":{{-variant.title | json}},
                    "name":{{-variant.name | json}},
                    "price":{{-variant.price-}},
                    "compare_at_price":"{{-variant.compare_at_price-}}",
                    "available":{{-variant.available-}},
                    "vendor": "{{-variant.vendor-}}",
                    "sku":{{-variant.sku | json -}},
                    "weight":"{{-variant.weight-}}",
                    "image_id": "{{-variant.image_id-}}",
                    "weight_unit": "{{-variant.weight_unit-}}",
                    "option1":  {{-variant.option1| json-}},
                    "option2":  {{-variant.option2| json-}},
                    "option3":  {{-variant.option3| json-}},
                    "options":  {{-variant.options| json-}},
                    "inventory_quantity":{{-variant.inventory_quantity-}},
                    "inventory_policy": {{-variant.inventory_policy | json -}}
                    }
                {%- endfor -%}
            ]
        }
    {%- endfor -%}]
{%- endpaginate -%}Yes, it is possible to build your store that will have both retail and wholesale price on one website. Only B2B customers will be able to see discounted wholesale prices, while your B2C retail customer will only be able to see the general market price.
Our app provides you wholesale registration form that allows customers sign up as a wholesale customers.
After customers fill out and submit the form, the customer accounts are created automatically in your Shopify Customers and tagged “wholesale” automatically.
You can manage customers with tags.


Yes! Our app compatible with all Shopify themes.
Add the app to your Shopify store from Shopify app store. Here is the app link for your installation.
Create new wholesale pricing/volume pricing in the app
Integrate the app into the copy theme to check the function on the front store
Click Set as active button. Choose Set as draft if you want to deactivate the volume pricing.
From the app admin page, click Volume Pricing
Navigate tge Status slider of the Volume Pricing you want to change the status. Toggle on or off to manage its status
From the app admin page, click Volume Pricing
Open the Volume Pricing you want
Change the Status setting of this Volume Pricing. Toggle the slider
Click Save.
Enable the setting Accepts marketing。All of customers created (updated) by this form, will be received marketing material via email by default. And the status of customer account is Subscribed.
Click Save
Result
After customers submit the form, the customer account is created in Shopify backend.
From the app admin page, click Volume Pricing
Tick on the checkbox of the Volume Pricing(s) you want to delete
Click on the show more icon (…) > click Delete Volume pricing(s)
From the app admin page, click Volume Pricing
Tick on the checkbox of the Volume Pricing(s) you want to duplicate > Click on Duplicate volume pricing(s) button:
Amount
Fixed Price
Percent Off means that the wholesale price is given as an amount per hundred of the current retail price of the product. Example:
20% Percent Off => An item that originally cost $100 would now cost 80$.
Amount means that the wholesale price is given as a fixed amount of retail price that will be changed based on the retail price of products in Shopify (not the compare-at-price). Example:
Retail price of the item is 100$ . You set Amount = 20$
=> Customers will see 80$ as final price.
When you change the retail price to 120$, the wholesale price is 120$-20$=100$
Fixed Amount means that the wholesale price is given as a fixed amount of retail price that won’t be changed even the retail price is changed. Example:
The retail price of the item is 100$ . Fixed amount = 80$.
=> Then customers will see 70$ as final price.
Click Set as active or Set as draft button
With the same steps in Solution 1, you can simply toggle on/off the Status slider to quickly disable/enable the wholesale pricing:
Click on the Wholesale pricing you want to manage its status.
Navigate the Status section > toggle on/off the slider, at the same time, the status label will be changed to Active or Draft as well.
Click Save
Click Create new Quick Order Form button
In the Apply to products section, select products/collections to add to the form
In the Display section, select the information/column you want to display on the form
Drag and drop the option to change its position
Scroll down in that same page, you can:
Select Pagination, enter the number of products you want to display per page on the form
Configure the style of the form: Color, Border, and Text. Add custom CSS code if you are familiar with it.
Click Save
Please refer to this document to know how to show the form in the front store.
After setting up everything, you can view the page to see the result:
Need support?If you do encounter any difficulty while proceeding these steps, don’t show any hesitation to contact us promptly via the email address [email protected]
Each draft order will include an order tag named ‘samita-wholesale’. However, please note that no discounts are applied to these draft orders when viewed in Shopify Draft Orders


Select the colors you want and adjust the table border size. You can use the Custom CSS setting for further customizations.
4. Use the Translation setting to edit the text in the table. You also can add new languages to the table as well.
5. Click Save

3. Enter the target text into the field below the default text label.
4. Click Save and check the result on the front store.

Choose Duplicate registration form(s)
Then an exact the same form with different ID will be created.
From the app admin page, click Registration form
Tick on the checkbox of the form you want to delete
Click on More action icon (...) > Choose Delete registration form(s)
That form will be deleted permanently.


Enable Box discount to allow customers add extra discounts when proceeding to checkout:
Style the discount box field if needed.
After finishing, click Save.
Now your theme cart will have a discount box field as well:


In addition to displaying discounts on the storefront for customers to view and purchase directly at the reduced price, the app now also allows admins to create draft orders with the discounted price already applied. This makes it much easier for you to manage wholesale orders on behalf of your customers from the admin side.
Step to manage:
Create wholesale pricing in the app. Read this to set up one first.
Go to the Orders folder in Shopify > Drafts section > Choose Create order:
Manage the order for your customer. Choose product + set up customer information and other necessary information:
Click Save to finish the order:
Click on More actions setting to Apply Wholesale Discount from the app:
Choose the market you set up discounted price for the order. This action is required if you already configured wholesale pricing for specific markets in the app:
If you set up to apply wholesale pricing for "all markets", please bypass this step and click Preview immediately:
Apply the discount:
Reload the site to update the changes:
Done! The discount is automatically applied, and the appropriate order tags are also added to the draft order, making it easier for you to track and manage all related order details:
There are 3 Discount Types Options for Volume Discounts
Apply Volume Pricing per Variant (Discount applies to each specific variant)
Apply Volume Pricing across a Group (Mix and match products for discount)
Apply Volume Pricing within Product Group
The discount applies only when a customer buys two or more units of the exact same product variant — meaning the same size, color, and style. For example, purchasing two 'Large Red' shirts will qualify for the discount, but buying one 'Large Red' and one 'Medium Blue' shirt will not."
e.g: Product T-shirt has 2 colors red and white. The customer buys 2 of the same large Red shirt, he gets a discount of 10%
If the customer buys 2 of the same large White shirt, he will get a discount of 15% The customer buys 2 items, 1 Red T-shirt, and 1 white T-shirt, he gets no discount. Note: It’s required for a customer to buy separate quantity for each color
The discount applies when customers purchase any combination of variants within the same product group.
For example, buying any 2 units of the same item in any size or color will qualify for the discount.
This means you could mix and match variants, such as one 'Large Red' shirt and one 'Medium Blue' shirt, and still receive the price break."
Note: It’s required for a customer to buy quantity of each product separately to qualify for the Pricing Discounts. Quantity can be the sum of different variants of the same product in the cart.
The discount applies only to products that belong to a specific group you’ve set. Customers can purchase any 2 products from this group in any variant (size, color, or style), to qualify for the price break.
For example, if the group contains T-shirt A and T-shirt B, a customer could buy one 'Large Red' T-shirt A and one 'Medium Blue' T-shirt B and still receive the discount.
Note: the discount is only applied to the selected products. And this rule is applied for products you set in a volume pricing setting only. The app cannot mix product groups in other volume pricing settings to receive discount.
With Sami’s Wholesale cart, you can collect additional information from customers before they proceed to checkout by enabling a form in the cart. Follow the steps below to set up this form.
Step to manage:
Open the app > click Add-on Features section in the Navigation bar > Wholesale cart > Turn it on and click Setup Wholesale cart to open the settings inside it.
Click on the Cart form tab > Enable cart form:
Set up condition for this cart form, manage who can view this cart form by usng the Apply to Customers setting:
All customers: everyone will see this cart form
Logged-in customers: only who login to your store can see the form in this cart
Non logged-in customers: vice versa of the "logged-in customers"
Customer tags: only who login to your store with the tag (you set up there) can see the form in this cart.
If you select the “All customers” condition but want to hide this form from specific customers with certain tags, you can exclude them by using the Exclude customer option.
Set up fields for the form in the Elements section. You can add more field (or remove fields) to get the information you want from customers.
Save when the setup is done. You can check the result in the front store now.
Open the app > click Registration form > open the form you want
Click Publish tab > click Other Page
Select publication type (form code type) and copy the form code
Go to the Shopify admin page, click Online stores > Themes > Pages, open to the page detail you want to add the form
Please click on the HTML symbol (<>) on the top right of the content box > Paste the shortcode into the field
Save the page to apply the change
You also can manage how many times the Shipping rate should be applied.
Currently, there are two options:
Limit number of times this rule can be applied in total
Limit number of times this rule can be applied per customer
This setting works based on the Customer condition in the Shipping rate feature. Depending on the customer condition you select, the setting will appear.
If you choose the “All customers” option, the “Limit number of times this rule can be applied in total” setting will appear.
If you choose the “Logged-in customers” option or “Customer tags” option, the “Limit number of times this rule can be applied per customer” setting will show.
So how to understand these settings work?
Limit number of times this rule can be applied in total
This setting limits the number of times that the Shipping rate works in your store. And it’s applied for all customers.
Tick on this rule, you’re allowed to enter a number for the time this Shipping rate will be applied on your store.
For example, you add “10” in this input field:
The Shipping rate will appear and be applied to 10 customers when they place orders in your store. It will stop for the 11th customer, which means the 11th customers can buy your products without paying the Shipping fee.
2. Limit number of times this rule can be applied per customer
This setting limits the number of times that the Shipping rate is applied to a customer. And it’s applied based on the customer condition in the Shipping rate setting (Logged-in customers or Customer tags)
Tick on this rule, you’re allowed to enter a number for the time this Shipping rate will be applied to a customer.
For example, you add “5” in this input field:
The Shipping rate will appear and be applied 5 times for 1 customer when that customer places orders in your store. It will stop for the 6th purchase. Each customer will be applied this shipping rate 5 times like that, no limitation on the number of customers.
There are two options to add products to the quick order form:
Specific products: Manually select product one by one to show them in the form.
Specific collections: Browse which collections will be shown in the form.
Note: You can only add maximum of 5 collections to the form.
Then in the front store, you can sort the products/collections by this filter:
Easily apply your wholesale pricing at your physical store
With the Sami Wholesale Pricing app, you can offer your wholesale discounts not only on your online store but also directly in your retail store using Shopify POS.
When you integrate Sami Wholesale Pricing with Shopify POS, your wholesale customers can get their special pricing when they buy in person.
Wholesale prices are automatically synced to your POS.
Approved wholesale customers can check out at their discounted rates right at the counter.
Orders placed via POS are tracked the same way as online wholesale orders.
On Smart grid section > Add tile:
In the App tile section, choose App and you will see POS apps you have already added in Shopify admin > Select Sami Wholesale:
That's how you set up and add Sami Wholesale app to POS. From there, you can create orders from POS with the app's discounts.
Since the app will show a Tax section in the theme cart, you can customize/style it by using this setting in the app.
From App dashboard page > Tax Exempt > Customize Tax exempt input:
Edit color for the texts and background of the Tax input field:
To edit/translate text for this section, kindly manage it in the Translation setting of the app (Settings section > Translation > Cart drawer tab)
To make a B2B order on POS, kindly follow the below steps:
Add products to cart:
Go to the app to check the discount information. The discounted pricing and other features (like extra fee or payment terms) will be auto-applied if the products and customer account are all qualified for the discount:
If the discount isn't applied, kindly check the customer information and market condition again.
After making sure that the discount is applied correctly, please click on "Apply wholesale discount" and check the information once again in POS cart and checkout:
Proceed to checkout with the order and discounted pricing. That's how you create a B2B order via POS.
If you no longer want to apply the discount to the order, please go back and click "Remove wholesale discount":
Design payment button:
1. From the app dashboard page > Payment term > Set up payment term.
2. On the Payment term page > Click on the Settings button:
3. Enable the Pay Later button.
4. If you want to set the Pay Later button with same color and style as the Checkout button, tick on this setting below:
If you want new color for the button, please untick it to see other color settings:
For further customization, kindly use the Custom CSS box (developer zone).
5. Click Save.
Edit button text and add translation for the text:
Not only you can edit the button color, you also can edit the button content and add translation for it in the Translation setting of the app.
Kindly go to Settings section > Translation > Payment term tab:
Don’t forget to click Save to save the changes.
The Payment term feature allows you to show the Draft orders list of each customer on the Account page. Customers need to login to your store to view the Account page and check the draft orders related to the payment term they are using.
This feature is supported using Shopify’s new Customer Account Extension UI, which means your store must use New login type of Shopify to be able to use this feature.
For further information, kindly review the document.
1. From the app dashboard page > Payment term > Set up payment term.
2. On the Payment term page > Click on the Settings button:
3. Click on Customer account section > Go to Customer account:
4. On the Checkout and Customer account page in Shopify theme, navigate the Sami Wholesale app section > Click on the icon “+” to add a section for the Draft order list:
5. The Draft order section is successfully created in the theme, kindly click Save > Add the section to Menu:
6. Set up section name for this Draft order list in the Menu list and click Save:
6. Everything is all set, you can login to the store and check the result. Make sure that you are using new login type of Shopify:
1. Open the app > From the app’s dashboard page, choose Wholesale Pricing > click on the Create new wholesale pricing button
2. Enter the title (only you can view the title) > select status Active if you want to make the pricing work on the site
3. In Customer conditions section > select customers to apply the pricing
4. In Product conditions section > Apply to Products: Specific products, enable set pricing for products variants > there will be an input field appeared for each product you selected. Fill out the value you want to give and select the discount type next to it.
If your product has variants inside it, please turn on this setting and set up price for each product variant
6. Click Save
After all, go to the online store to check the result.
On the front store, the discount price shows up for each product variant. Please see the video below for more details.
Finally, Sami Wholesale can work in POS now. However, there are still some key points to keep in mind about this integration.
Supported features: Wholesale, Volume, Payment Terms, Extra Fees
Even though Sami Wholesale has a lot of features related to B2B feature, we only support applying 4 features which are Wholesale pricing, Volume pricing, Payment terms and Extra fee to POS. For other features (Order limit, Shipping rate) are not yet enabled in POS.
For Wholesale pricing: You can review in this
For Volume pricing: Customers can change quantity of the cart item to reach the price break or add properties..
For Extra fee: it will be applied as custom items and applied along with the discounted pricing
For Payment term: The "Pay later" button will show up at cart page
Click on it, there will be a notification about a draft order creation. You then can clear the cart.
You still have to configure everything in the Sami Wholesale app (from Shopify admin); the POS only pulls the data and applies it.
When you add the app to POS, if your current plan doesn’t include this feature, you’ll see a warning message: “You need to upgrade your plan to use this feature.” (This POS integration is only available on the Gold plan of the app)
Otherwise, it will show option: “Wholesale B2B pricing, volume discount, quantity break.”
The app syncs tax data from your Shopify store to retrieve region-specific tax information (e.g., by country or state).
This synchronization automatically runs once when you create your first tax display setting in the app.
If you later make changes to tax settings in Shopify, you’ll need to open the app and manually click "Sync" to update the tax data.
To do this, kindly go to the Settings section of the Tax display setting:
In the Sync with Shopify tax and duty settings field > Click on the Synchronize button:
The integration between the app data and Shopify will be completed.
After the form is submitted, a new customer account will be created in Customers of your Shopify store. The data filled on the form will also be added to customer detail.
To achieve that, all you need to do is to link all of your form elements to the customer properties.
Below are the common customer properties:
first name
last name
In order to let the customers see the obvious change in the prices, the app supports showing the old prices of the products next to the new prices under the cross-out format. Please follow the below instructions to better know how to set it up.
Steps to manage
From the app admin page, click on the Settings section in the Navigation bar > General
There are two options to show cross-out prices: Show the old product prices as cross-out prices and Show the compare-at-price prices as cross-out prices.
1. Open the app > From the app’s dashboard page, choose Wholesale Pricing > click on the Create new wholesale pricing button
2, Enter the title > select status Active if you want to make the pricing work on the site
3. In Customer conditions section > Apply to Customers : select Customer tags > enter tag “wholsale customer
We created this article for the purpose of showing you how to add the form data to the tag field of Customer data. Simply, this function allows you to automatically add tag “wholesale” to Shopify customer detail after the Samita Registration form is submitted.
Then you can easily manage customers with tag “wholesale“.
Firstly, please make sure the form data is connect with Shopify customer data.
Steps to manage
Our app supports sending email notification to merchants and their customers once customers choose to pay later (using payment term). In the email, we will also attach a PDF file to it.
Please set it up in the Payment terms setting > Settings tab > Notifications > Tick Attach PDF file setting in both Merchant and Customers sections:
Tax Exempt Setup on Cart helps you configure how the tax ID is validated in the cart.
There are 3 options for this setting, you can tick all or tick on specific feature(s) you want to apply only.
Required Tax ID Field on Cart: When enabled, customers must enter a valid Tax ID in the cart before proceeding to checkout.
If you don't tick on this setting in the app, the Tax ID field will not be validated, and
Firstly, in order to activate reCaptcha v2 on your form, please make sure that you have filled out Site key and Secret key in the app’s Settings.
Note: If you have not finished this task yet, please read article to get Google reCaptcha Site key and Secret key and fill them in the app’s settings.
Get mail notification when there is a customer request to use payment term to pay for the order later. Kindly follow this document to know how to manage.
1. From the app dashboard page > Payment term > Set up payment term.
2. On the Payment term page > Click on the Settings button:
3. On the Payment term Settings page > Click on Notifications tab.
This setting will help you send email to admin/store owner once a customer choose to pay later. Click on Merchant section and set up email address you want to use to receive email notifications:
4. If you want to attach PDF file of the draft order regarding this payment term, please tick on the setting
Please follow our below instructions:
From the app admin page, click Settings
Click Google reCaptcha tab > reCaptcha type dropdown > select v2 or v3
Enter Site key and Secret key you get in step 1 above
Select language of the reCaptcha on front store
Click Save and save the app Settings too
From the app admin page, click Registration Form > open the form you want to edit
Click Settings > Google reCaptcha > tick on checkbox Enable
Click Save to update the changes


The file can be in xlsx format, too
In the file, you need to set up column fields as follows:
Column A: Id (Wholesale pricing ID)
This field helps you make sure that the products and prices you set up for this wholesale pricing are all included in one Wholesale pricing ID
For example, you want to set up 5 products for this wholesale pricing, make sure that you put the same ID for each product row.
Column B: Name (Name of the wholesale pricing you set up)
Column C: Status
Column D: Apply to Customers
In this column, you will have to write down the type of customer condition you want to apply to the customers.
e.g: Customer tags, Logged in customers, Non-logged in customers or All customers
Column E: Customer tags (Name of the customer tag)
e.g: wholesale
Column F: Exclude Customer tags
Column G: Apply to Products
In this column, you need to select the product condition for the wholesale pricing.
e.g: Specific products
Column H: Apply to Product variants (setup wholesale price for each product variant) – (Default column)
Enter TRUE for the column data
Column I: Product Collection Ids (for product condition “specific collection”)
Column J: Product Ids
In this column, you have to enter the Ids of the products you want apply the wholesale pricing for.
To find the product Id, please go to the Products folder of Shopify > Click on the product you want > Check the URL of that product page, the product Id is at the end of the link:
Column K: Product variant Id
You have to enter the product variant Id if you want to set up pricing for each variant of the product.
Same as the product Id, you click on the product you want > navigate the product variant section and click on it. The variant Id is in the tail of the page URL:
Column L: Product tag (for the product condition “product tag”)
e.g: tagA
Column M: Start date (wholesale pricing starts working on..)
Column N: End date (wholesale pricing stops working on..)
Column O: Discount group (Type of discount)
There are 3 types of discounts. Enter one of the below data:
Percent, Amount or Fixed
Column P: All (all customers condition) – (Default column)
Column Q: Customer condition type you have chosen.
All customers – all
Logged in customers – logged
Non-logged in customers – non logged
If the customer condition is customer tag, you write as follow:
e.g: Customer tags – wholesale
The column name will be “wholesale”
After finishing the file setup, please Save it.
From the App dashboard page, click on Wholesale Pricing section
Click on the Import button on the Wholesale Pricing page
3. Upload the file
You also can download the example file to see what information you need to provide in the file.
4. View the file information > Click Upload and preview
5. Succeed
phone
password (legacy)
addresses
apartment, suite, etc..
city
province
zip, postal code
country
company
note[]
tags[]
Please follow our instructions to interlink your form elements to Shopify Customer Data
From the app admin page, click Registration Form > open the form you want to edit
Click Integration tab > Shopify
Tick on checkbox Send email invitation [Required if your store is using the Legacy login type], and Accepts marketing [Optional]
Select the customer properties in the list to the corresponding fields of the form. Note: The email attribute is required to be filled
Save the form to apply the change
Submit the form and check the result in Shopify customers
Depending on your choice, you can select the type of price you want to be displayed as the cross-out price. In this case, we choose the “compare-at-price” option > Enable the slide of Show compare-at-price price as the cross-out price.
Click Save and check the result on the front store

4. In Product conditions section > Apply to Products:, select Specific products > on the popup, tick on the checkbox of product you want to select > Done
5. In Discount Groups section, select Percent > Enter the discount percentage value in the Discount per item field
Example: 50% Percent Off would mean that an item that originally cost $100 would now cost 50$.
If you want to give an amount off instead of percentage, please choose “Amount” option. Then the new price will be the old price deducts the amount off
And if you want add a whole new price for the products, choose “fixed amount”.
6. Click Save
Then go to the online store to check the result.

From the app admin page, click Registration form > open the form you want to edit
Click Settings > General
In the field Add tag when customer is approved, enter the tag you want to add to customer detail. For example: wholesale
Click Save
Steps to manage
1. From the app admin page, click Registration form > open the form you want to edit
2. In Elements tab, click Add element > add a Hidden field to your form
3. In the Hidden element, select Data type: Fixed value > in the Assign value field, enter “wholesale"
4. Move to the Integration tab of the form > Shopify > find the field Hidden and assign attribute tags[]
5. Click Save
Result
After a customer submits Samita Registration form, customer account is created and automatically assigned wholesale tag.
Click here > log into your Gmail account
Please make sure 2-Step Verification is enabled in your Google account. Learn more
Then click here to generate App password
Select Other/Custom name from Select App, give it a name such as “DO – Production Server” and then click Generate.
Note down the application password as it will be required in the next step.
From the app admin page, click Settings > Notifications > Mail SMTP & API
Toggle on the Mail SMTP & API slider:
Enter the SMTP information as below
(1) SMTP (host): enter smtp.gmail.com as your host if you use Google account,
(2) Port: Use port 465
(3) Mail Encryption: SSL
(4) User name/Email address: enter your Gmail login username [email protected]
(5) Enter your App password (generated in step 2 above)
Click Save.
The app also supports setting up SMTP email for other providers like Outlook, Amazon SES,...
Click on the Provider section and select 1 option in the dropdown list:
Note
App password in step 5 is the app password generated in Step #2 above. It’s NOT your Gmail account password.
Remember to Save the configuration before sending test email
If you are using another email service provider (not Gmail), please set up based on your own accocunt.
The app allows users to create multiple wholesale pricing plans and volume pricing plans. Sometimes this case happens: Multiple discount rules are applied to one product.
So how does it work? Which discount will be prioritized to apply to the product?
There are 3 options for you:
Apply to oldest wholesale pricings
Apply to newest wholesale pricings
Auto apply wholesale pricing has more priority
If you want to apply the newly created wholesale pricing, please follow the steps below:
Steps to manage
From the app admin page, click on the Settings section in the Navigation bar > General
In the Multiple Wholesale Pricings section, select Apply to newest wholesale pricings
Click Save
The discount rule with more detail related to customers/products will be prioritized.
Steps to manage
From the app admin page, click on the Settings section in the Navigation bar > General:
In the Multiple Wholesale Pricing section, select the option Auto apply volume pricing has more priority
Click Save
Example:
Result
The Wholesale pricing 2 is prioritized to apply to the products
Please view the diagram below for more details
All applicable items: The free shipping will be applied based on the total qualifying products in the order
Per item: The free shipping will be applied based on each qualifying product of the order
You can manage the scope of this Free shipping rule: Quantity, Amount or Weight > Set up the scope range for this rule (e.g: Buying from … of products to get the Free shipping)
Enter “0” value to the Value input field:
3. Click Save
If you set up multiple products to have the extra fee and support the customers with Free shipping along with it:
You can manage when the Free shipping is applied to the customers by this setting:
If you turn on this slide, the Free shipping will be activated even when only one product in the order satisfies the Extra fee rule
If you don’t set it up, the Free shipping will only be activated when all products in the order satisfy the Extra fee rule.

1. On the Payment term Settings page, click on the PDF template tab:
In the Appearance section: Manage what information will be displayed in the file, you can select the information related to customer and order to show in the PDF file.
In the Style section: Change color for the text and background of the PDF file:
2. After finishing, click Save

Please note:
The page list shown in our app is pulled directly from Shopify Pages. You’ll need to create a page there first, then return to the app to configure the Quick Order Form.
The Quick Order Form can only be applied to pages created in Shopify Pages. It does not support other page types such as collection pages, product pages, or the homepage (index).
Click Save to save this setting.
In the Publication tab > Select Publication type: Shortcode or Embed
Copy the code in this section:
Or you can click on this code in the Quick order form page to copy the code in the Quick order form setting page:
In order to publish the Quick Order Form in your front store, you need to copy the code of the form and paste it to the page content (HTML mode). The form then will show!
From Shopify admin page, go to Online store, click Pages
Open the page you want to add the form or create a new page
In the Page content section > click "</>" and paste the code into the field:
Click Save and check the result in the front store.
Auto Tax Exempt: As long as the tax ID is valid, order will auto-get tax exempted.
This function does two things: Auto-add VAT ID to the Order note section of in the Order and Auto-exempt tax for orders that have valid tax IDs
If you enable the Require Tax ID Field on Cart setting without also enabling the Auto Tax Exempt setting, the app will only require customers to enter a valid VAT ID before checkout, but it will not automatically exempt the order from tax.
Auto Redirect to Checkout: Even if the tax ID is invalid, customers can still be able to checkout by clicking on the checkout button twice.
On the other hand, if the Tax ID is valid, customer will be able to checkout immediately.


Choose Duplicate quick order form(s)
Then an exact the same form with different ID will be created.
From the app admin page, click Quick Order Form
Tick on the checkbox of the form you want to delete
Click on More action icon (...) > Choose Delete quick order form(s)
That form will be deleted permanently.
Need support?If you do encounter any difficulty while proceeding these steps, don’t show any hesitation to contact us promptly via the email address [email protected]
5. Do the same for the Customers section and click Save:
For further configuration for the PDF file, you can refer to this document for better help.


Amount
Fixed Price
Yes!
You can set up discount for selected variants of products.
For example: product T-shirt has 3 sizes S, M, L
You can set up the wholesale pricing and apply it to the product T-shirt – size S only.
Yes, it is possible.
You can set a unique price per product or variant to each individual customer or customer group.
Our app allows users create pricing for specific customers with tag.
It’s possible!
If you set up both wholesale pricing and volume pricing for the same product and using the same customer condition, the app won’t be able to work properly.
You can set up as many pricing as you want, but the setup inside needs to be different from each other to avoid mistakes in calculating prices for your products.
Moreover,
Sami Wholesale Pricing will prioritize the volume pricing more than the wholesale pricing if you set up both of them.
So to make both of them to work, you need to set up the priority rule for it here.


This function will help you manage different volume prices for multiple products of your store.
The file can be in xlsx format, too
In the file, you need to set up column fields as follows:
Column A: Id (Volume pricing ID)
This field helps you make sure that the products and prices you set up for this volume pricing are all included in one Volume pricing ID
For example, you want to set up 10 products for this volume pricing, make sure that you put the same ID for each product row.
Column B: Name (Name of the volume pricing you set up)
Column C: Type (Volume pricing type)
There are two types of volume pricing you can manage: quantity or amount.
e.g: quantity
Column D: Status
Column E: Apply to Customers
In this column, you will have to write down the type of customer condition you want to apply to the customers.
e.g: Customer tags, Logged in customers, Non-logged in customers or All customers
Column F: Customer tags (Name of the customer tag)
Column G: Exclude Customer tags
Column H: Apply to Products
In this column, you need to select the product condition for the volume pricing.
e.g: All products
Column I: Apply to Product variants
Enter TRUE
Column J: Product Collection Ids (for product condition “specific collection”)
Column K: Product Ids
In this column, you have to enter the Ids of the products you want apply the volume pricing for.
To find the product Id, please go to the Products folder of Shopify > Click on the product you want > Check the URL of that product page, the product Id is at the end of the link:
Column L: Product variant Id
You have to enter the product variant Id if you want to set up pricing for each variant of the product.
Same as the product Id, you click on the product you want > navigate the product variant section and click on it. The variant Id is in the tail of the page URL:
Column M: Product tag (for the product condition “product tag”)
Column N: Start date (volume pricing starts working on..)
Column O: End date (volume pricing stops working on..)
Column P: Discount type
Type 1: variant
Type 2: accross_group
Type 3: within_each_group
Column Q: Discount group (Type of discount)
There are 3 types of discounts. Enter one of the below data:
Percent, Amount or Fixed
Column R: From Qty/Amount
Column S: To Qty/Amount
Enter the quantity number for the price break. Please write down the values for the range thresholds (from and to) in order to set up the applicable quantity/price range.
e.g: Buying from 10 to 20 units to get 10% off
Then write in the From Qty/Amount column as "10"
and write in the To Qty/Amount column as "20"
Column T: All (all customers condition) – (Default column)
Column U: Customer condition type you have chosen.
All customers – all
Logged in customers – logged
Non-logged in customers – non logged
If the customer condition is customer tag, you write as follow:
e.g: Customer tags – wholesale
The column name will be “wholesale"
After finishing the file setup, please Save it.
From the App dashboard page, click on Volume Pricing section
Click on the Import button on the Volume Pricing page
3. Upload the file
You also can download the example file to see what information you need to provide in the file.
4. View the file information > Click Upload and preview
5. Succeed
Example case
Create Volume Pricing for all products on the store.
If customers buy from 5 product units, they will get 50% discount.
The Volume Pricing will be applied to customers who has tag with “wholesale”
1. Open the app > click Volume Pricing > click Create new Volume pricing button > Select the Quantity option
2. Enter the title (only you can view the title) > select status Active if you want to make the pricing work on the site
3. In the Customer Conditions section > Apply to Customers , select Customer tags > enter tag “wholesale“ (or any texts you like)
4. In the Market condition, choose which market you want to have this volume pricing applied (All markets or Specific market)
In the Product Conditions section > Apply to Products, select Specific products and manually browsing products you want to the setting:
In the Discount Groups section > Discount range, select Percent > Enter the discount percentage value in the Discount per item field.
Example: 50% Percent Off would mean that an item that originally cost $100 would now cost $50.
For further information on this Discount format, please refer to this .
Set up quantity break for the volume pricing. Configure value for Quantity from and Quantity to so customers can know how many product units they need to add to cart to have volume pricing applied.
If you want add more quantity breaks, kindly click on Add range to set up more:
In the Discount Types section, select one of 3 options.
By default, Volume Pricing is applied based on the total quantity of each variant separately in the cart (Free plan)
You can change the option according to your requirements (Silver and Gold plans)
For further details, kindly review this .
Click Save
You can use these settings in the app to control the pricing table visibility in the product page. And also style the table to match your theme style:
Don't forget to Save the change
Not only creating discounted prices based on the bulk product quantity, Sami Wholesale also supports you in creating discounted prices based on the order amount (the total prices of the order). Kindly read this document to know how to set it up.
On the Volume Pricing feature page > Click Create new Volume pricing > Select the Amount option
Enter the title for the Volume pricing (only you can view the title) > Toggle on/off the Status setting to make it as Active or Draft (work or not work in the front store).
In the Customer condition section, choose the best option that you want to apply on the customers.
All customers: Everyone can get this volume price
Logged-in customers: Only customers who log in to your store can get this volume price
Non logged-in customers: On the contrary of the Logged-in customers
Customer tags: Create a customer tag and require the customers to log in to your store and have this tag added to their accounts before getting this volume price
You also can exclude the customers you don’t want them to see the discount
In the Market condition, choose which market you want to have this volume pricing applied (All markets or Specific market)
Product condition: Set up products to have the volume pricing. There are 4 options: All products, Specific products, Specific collections (products in collection), Product tag
You also can exclude the products you don’t want to have the discount applied to.
Discount Groups: Configure the Volume pricing details.
Choose the discount type you for the volume pricing. There are 3 types of discounts for you to manage: Percent, Amount or Fixed price. to understand more about these discount types.
Note: If you use the Fixed price option, the new fixed price needs to be cheaper than the old price
Configure Amount range for the volume pricing. Set up value for Amount from and Amount to so customers can know how much the order value must be to receive discounts, then add to cart to have the discount applied.
For example, order amount from 100d to 500d will get 20% off.
Click Add more price break to get many more price break rules:
In the Discount Types section, select one of 3 options.
By default, Volume Pricing is applied based on the total quantity of each variant separately in the cart (Free plan)
You can change the option according to your requirements (Silver and Gold plans)
For further details, kindly review this .
Click Save
You can use these settings in the app to control the pricing table visibility in the product page. And also style the table to match your theme style:
After finishing everything, don't forget to Save the changes.
Step 1. Go to the Google Recaptcha platform here.
Step 2. Sign up your google account to access to reCaptcha dashboard.
Step 3. When registering a new website, the form will open and you need to fill in all the details correctly then submit the form.
Label – Type a suitable label that co-related your site name and later remembrance.
reCaptcha Type – Select reCAPTCHA v2 > “I’m not a robot Checkbox“
Domain – The Shopify store domain, where you will use these keys like
Owners – You don’t need to change this, it’s set by default according to the logged-in account. If you want to report more email addresses, you can add multiple email accounts here
Alerts – You can enable it to get email alerts to owners, in case there is any problem on your website such as reCaptcha misconfiguration or increase suspicious traffic.
Click Submit.
Step 4. After submitting the form, you will get the newly generated Site Key and Secret Key as below.
Now, you can use the site key and secret key above to configure the Google reCaptcha setting in our app.
Step 1. Go to the Google Recaptcha platform .
Step 2. Sign up your google account to access to reCaptcha dashboard.
Label – Type a suitable label that co-related your site name and later remembrance.
reCaptcha Type – Select reCAPTCHA v3
Domain – The Shopify store domain, where you will use these keys like
Click Submit.
Step 4. After submitting the form, you will get the newly generated Site Key and Secret Key as below.
Now, you can use the site key and secret key above to configure the Google reCaptcha setting in our app.
Thanks for catching up with our online tutorials to generate your keys.
We hope for your interest in the updated tutorial and its helpfulness to your case!
The Order Limit feature helps you set up a condition that the customers need to satisfy before being able to place the order and checkout.
Please kindly review this document to better know how to set up a limit rule for your products.
From the App Dashboard page > Click on the Order limit feature > Setup order limit
2. On the Order limit page, click Create new order limit
3. Set up the title for this order limit to differentiate it from others (in case you will create several of them). Set up the status for this feature as active or draft (if you don’t want to publish it immediately).
4. In the Customer condition section, choose the best option that you want to apply on the customers.
All customers: Everyone can get this order limit
Logged-in customers: Only customers who log in to your store can get this order limit
Non logged-in customers: On the contrary of the Logged-in customers
Customer tags: Create a customer tag and require the customers to log in to your store and have this tag added to their accounts before getting this order limit.
You also can exclude the customers you don’t want them to see this limit.
5. Set up products to have this limit. There are 4 options: All products, Specific products, Specific collections (products in collection), Product tag
You also can exclude the products you don’t want to have this limit applied to.
6. Configure the details of the order limit.
* Currently, there are 3 types of order limit:
Apply order limit to each product variant: Customers need to add a proper number of this product variant quantity before being able to checkout.
Apply order limit to each product: Customers need to add a proper number of this product quantity (with any variants inside) before being able to checkout.
Apply order limit to all products in the order: Customers need to add a proper number of products to sucessfully place an order (with any variants, any products inside)
* Choose the scope of this order limit. You can set up an order limit based on product quantity, product amount or product weight
Each of them will have an input to set up the limit range (from … to … of items).
7. Click Save
Step 1. Go to the Google Recaptcha platform here.
Step 2. Sign up your google account to access to reCaptcha dashboard.
Step 3. When registering a new website, the form will open and you need to fill in all the details correctly then submit the form.
Label – Type a suitable label that co-related your site name and later remembrance.
reCaptcha Type – Select reCAPTCHA v2 > “I’m not a robot Checkbox“
Domain – The Shopify store domain, where you will use these keys like
Owners – You don’t need to change this, it’s set by default according to the logged-in account. If you want to report more email addresses, you can add multiple email accounts here
Alerts – You can enable it to get email alerts to owners, in case there is any problem on your website such as reCaptcha misconfiguration or increase suspicious traffic.
Click Submit.
Step 4. After submitting the form, you will get the newly generated Site Key and Secret Key as below.
Now, you can use the site key and secret key above to configure the Google reCaptcha setting in our app.
Step 1. Go to the Google Recaptcha platform .
Step 2. Sign up your google account to access to reCaptcha dashboard.
Label – Type a suitable label that co-related your site name and later remembrance.
reCaptcha Type – Select reCAPTCHA v3
Domain – The Shopify store domain, where you will use these keys like
Click Submit.
Step 4. After submitting the form, you will get the newly generated Site Key and Secret Key as below.
Now, you can use the site key and secret key above to configure the Google reCaptcha setting in our app.
From the app admin page, click Registration Form
Open the form you want > Click Settings > Google reCapthca
Enter the site key and secret key created
Click Save
What is the difference between reCAPTCHA v2 and v3?
ReCAPTCHA v2 requires the user to click the “I’m not a robot” checkbox and can serve the user an image recognition challenge.
ReCAPTCHA v3 runs in the background and generates a score based on a user’s behavior. The higher the score, the more likely the user is human
This feature lets you display product prices either with tax included or without tax. By default, the app uses the tax settings from Shopify and display that information to the front store, however, you can also override them with settings in the app.
When enabled, the app automatically replaces your store’s original product prices with the adjusted prices (either including or excluding tax, as you’ve set).
If you’ve set up wholesale pricing within the app, the same rule applies and wholesale prices will also be shown either with or without tax, depending on your tax display settings.
Kindly follow these steps below to know how to configure this Tax display feature in Sami Wholesale.
From the App dashboard page > Click on Tax display section > Set up tax display:
In the Tax display setting page, set up name for this Tax setting and manage its status by toggling on and off slider.
If you configure multiple tax-exempt settings, a Priority option will appear as shown below. This allows you to set the order of precedence. The higher the number, the higher the priority of that tax setting.
In the Apply to setting, you can manage on which page you want the Tax display to be shown: Product page, Cart page, other pages (Collection page, Search page...)
Decide How Tax Is Charged: How pricing is calculated based on the Include sales tax in product prices option in Shopify. When this option is turned on, Shopify will automatically display product prices inclusive of tax.
There are two theories for this setting:
When this option is disabled (default setting):
The base price is treated as Tax-excluded price.
The price including tax = Base price + applicable tax.
Example: Base price = $100, tax = 10% → Price excluding tax = $100, Including tax = $110.
Customer condition: Choose which type of customers will be able to see this Tax display.
Everyone who accesses your store (All customers) or specific logged-in customers only (Logged-in customers or Customer tags)
Product condition: Manage which products should display prices with this tax setting.
Click Save to finish the setup.
From the App Dashboard page > Click on the Shipping rate feature > Setup shipping rate
2. On the Shipping rate page, click Create/Add new shipping rate
3. Set up the title for this shipping rate to differentiate it from others (in case you will create several of them). Set up the status for this feature as active or draft (if you don’t want to publish it immediately)
4. In the Customer condition section, choose the best option that you want to apply on the customers.
All customers: Everyone can get this shipping rate
Logged-in customers: Only customers who log in to your store can get this shipping rate
Non logged-in customers: On the contrary of the Logged-in customers
Customer tags: Create a customer tag and require the customers to log in to your store and have this tag added to their accounts before getting this shipping rate.
You also can exclude the customers you don’t want them to see this fee.
5. Set up products to have this shipping fee. There are 4 options: All products, Specific products, Specific collections (products in collection), Product tag
You also can exclude the products you don’t want to have this fee applied to.
6. Configure the details of the shipping rate.
You can add as many ranges of shipping fees as you want. However, when two shipping rate rules apply to the same products or customers, the lower shipping rate will take precedence.
Select the scope for this shipping fee: Quantity, Amount, or Weight
Enter the range for the shipping rate, the app will based on this range to show the proper shipping fee on the checkout page
There are two formats for the shipping fee: Percent or Flat rate
Percent: The Shipping fee is calculated based on a percentage of the total order amount.
Flat rate: The Shipping fee is applied as a fixed price no matter how much the total order costs.
7. Click Save
During the checkout process, the app may occasionally lag, displaying the error message “Something Went Wrong. What Happened? This Invoice Is Not Available Yet, Please Try Again Later.”
When there is a delay in execution, the cart items are not recognized, resulting in this error. It is crucial to remember that this problem only affects apps that employ draft orders. You can click this link to learn more about this mistake and how it occurs in other apps that use draft orders.
This is a result of a recent modification to Shopify’s invoice creation process for draft orders. The app creates and transfers your discount to Shopify’s checkout via draft orders. But now, it takes a little longer for Shopify to process this, which can result in these problem messages showing up.
You can try duplicating the theme you’re using and apply our Sami Wholesale app to that new theme to see if the checkout process works fine again.
Contact our Support team ([email protected]) immediately to get a proper support. We will try customizing codes to your theme to change the process time of creating draft order so as to match the way Shopify deals with the checkout process.
The Extra fee helps you charge customers a fee to prepare a special order. For example, one product in your store needs some specific ingredients to prepare which causes you a lot of work and time to manage. This feature will help you create an additional fee and inform the customers about it by a notification popup in the cart.
From the App Dashboard page > Click on the Extra fee feature > Setup extra fee
2. On the Extra fee page, click Create new extra fee
3. Set up the title for this extra fee to differentiate it from others (in case you will create several of them). Set up the status for this feature as active or draft (if you don’t want to publish it immediately)
You also can customize a name for the extra fee (the one will show for the customers)
4. In the Customer condition section, choose the best option that you want to apply on the customers.
All customers: Everyone can get this extra fee
Logged-in customers: Only customers who log in to your store can get this extra fee
Non logged-in customers: On the contrary of the Logged-in customers
Customer tags: Create a customer tag and require the customers to log in to your store and have this tag added to their accounts before getting this extra fee
You also can exclude the customers you don’t want them to see this fee.
5. Set up products to have this extra fee. There are 4 options: All products, Specific products, Specific collections (products in collection), Product tag
You also can exclude the products you don’t want to have this fee applied to.
6. Configure the details of the extra fee. There are 2 types of extra fees.
All applicable items: The extra fee will be calculated based on the total products in the cart.
Per item: The additional fee will be applied based on each product in the cart.
* Choose the scope of this extra fee. You can set up a fee based on product quantity, product amount, or product weight
Each of them will have an input to set up a range for this fee (from … to … of items)
You can set a fixed price for this fee or set it as a percent amount based on the order subtotal.
7. Click Save
Open the app > click Volume Pricing > click Create new Volume pricing button
Choose Quantity or Amount type for the Volume pricing and start configuring settings inside.
In Customer conditions, select customers to apply the volume pricing (All customers or logged-in customers)
Set up Market, choose to show the volume pricing in which location.
In Product conditions section, to show the volume pricing for a specific variant of product only, select Specific products > Click on the product that has variants you want, all variants of that product will be added by default:
If you want only 1 or some variants to have this volume pricing applied, please tick on it only and untick the unwanted ones > Select:
The Product condition is now set for only one variant of the product only > Set up Quantity break for the Volume pricing as usual. Add more ranges if you want more than one quantity break for this volume pricing:
In Discount Groups section, select discount type
On the right-handed bar, enable Show Table on Product Page option [optional]
Click Save
When the customers don’t satisfy the order limit, there will be a message popup shows up to remind them to reach the correct number of products to be able to place an order.
The app supports you in customizing this popup box due to your liking.
On the Order limit page, please click on the Customize message popup button. Design the popup with the colors and texts.
You can edit the text for the Popup box in the Translation setting of the app.
Please go to the Settings page > Translations > Choose Order limit option. Set up new text or add new language for the popup in this setting:
You can edit the texts in the popup box and translate to another language in the Translation setting.
After finishing, please click Save to keep all the changes.
With Payment term feature, Sami Wholesale Pricing allows your B2B customers to pay for the order later or on a specific date in the invoice you send to them instead of paying immediately on the checkout page.
Once the feature is activated, a Pay later button will be placed on the cart page of your store. Click on the button, the app will create draft order and clear the cart:
To know how to set it up, kindly follow the below guidelines.


When this option is enabled:
The base price is treated as Tax-included price.
The price excluding tax = Base price - tax rate.
Example: Base price = $100, tax = 10% → Including tax = $100, Excluding tax ≈ $90.


Alerts – You can enable it to get email alerts to owners, in case there is any problem on your website such as reCaptcha misconfiguration or increase suspicious traffic.


Alerts – You can enable it to get email alerts to owners, in case there is any problem on your website such as reCaptcha misconfiguration or increase suspicious traffic.
1. From the app dashboard page, navigate the Payment term section > Set up payment term:
2. On the Payment term page, click Add new payment term:
3. Starting to configure.
Status: Enable the payment term and set up name for it
If you have more than one payment term, you will be able to set Priority for the term you want:
Payment term: Choose the term type you want the customers to have when paying for the order. They can pay on a specific date or pay within an amount of time:
Customer targeting: Choose type of customers you want to apply this payment term to. For logged-in customers or tagged customers, you also can manually select customers from Shopify Customers list:
Product targeting: Select which products will have this term applied, you can select products or collections:
Apply payment terms based on cart condition: The payment term is applied if either one item in the cart or all items in the cart satisfy the condition (product targeting):
Order conditions: The payment term is applied if the order value reached a specific amount. You can set up minimum order amount or maximum order quantity in this setting.
Order tagging: Automatically add a tag to the draft order once it’s created to recognize which order is set to pay later. The tag should be created in Shopify first, then it will be in the below list:
4. After finishing, click Save.
You can design the Payment term button in other settings in the app. Kindly follow this document to know how.


Tax-exempt feature allows you to exclude taxes from a customer's order. The app will display a tax section in the cart (cart drawer and cart page of your theme) as well as in our Quick Order Form, where customers can enter their tax ID before checkout to receive a tax exemption.
For better understanding how to set it up, kindly follow the below instruction:
From the App dashboard page > Click on Tax exempt section > Set up tax exempt:
In the Tax exempt setting page, set up name for this Tax setting and manage its status by toggling on and off slider:
If you configure multiple tax-exempt settings, a Priority option will appear as shown below. This allows you to set the order of precedence. The higher the number, the higher the priority of that tax setting.
In the Tax exempt general section, you will set up how the tax exempt should function in your store.
At the moment, the app supports validating 5 types of tax ID, tick on the type you want the app to work with (you can tick all or some types only):
To recognize which order has tax-exempt, you can set up an order tag here. This tag will be auto-added to the customer's order once their order has been tax-excluded from the app:
Decide How Tax Is Charged: This option help you add a Discount to Exclude Tax from Product Prices:
You can choose to apply a discount to each item to exclude the tax portion from the product price. If this option is enabled, the system will automatically apply a discount equivalent to the tax amount, as shown in this example:
Example:
Original product price: $100
Applied tax rate: 10%
Discount applied to exclude tax: ~$9.09
=> Final product price after discount: $100 - $9.09 = $90.91 (10% tax on $90.91 is approximately $9.09, so the total remains $100)
Note: If the product already has an existing discount (e.g., wholesale pricing), the tax-exempt discount will be added on top of the current discount.
In the Customer condition section, you can choose which type of customers will get this tax-exempt applied.
It can be for everyone accesses your store or only some specific customers who login/login with tag:
Tax Exempt Setup on Cart: This setting helps you configure how the tax ID is validated in the cart.
There are 3 options, you can tick on all or only specific ones:
Select EU VAT for specific countries: Choose which countries within the EU will require Tax ID validation. to get more information about this setting.
After finishing the setup, click Save.


From the App admin page, click Registration Form
Click on the Create new registration form button > Select available template the app provides you
Elements: This tab is used to set up Header, Body and Footer for the form.
You can set up more fields for the form in this setting by clicking on the Add elements button.
To add more elements, click on the Add elements button in section 1. The list of available elements will appear > Select the element that you want to add to the new form
Click on the element, available properties setting for the element will be displayed
(Note: Available properties setting will correspond to a type of element)
Some general settings for elements as below:
(1) Label name
(2) Placeholder
(3) Description
(4) Limit characters
(5) Hide label
(6) Required
7) Select icon
(8) Column width
Finally, click the Save button to update the form
You also can edit the Header and Footer of the form by clicking on each of them:
Header:
Footer:
Design the form: Click on the Appearance tab to find the settings to change color, form size:
The purpose of this form is used to create a sign-up form for your customers, who want to become wholesalers. In order to make it works and the customer’s data can appear in the Shopify Customers folder, you have to integrate the form to Shopify. Please read to know how to link the form to Shopify.
Once you do this step, the customers will receive an account activation email from Shopify after you approve receive and approve their registrations.
However, the Registration form doesn’t replace the Shopify default login so the customers who have registered to this form will still need to log in to your store again to complete the step and become the wholesale customers. The registration form works along with Shopify login page, in case your store doesn’t have the Login page, this form is meaningless.
To show the form in your front store, you need to use the app shortcode to manage this step. Please follow to know how to do it.


Need support?If you do encounter any difficulty while proceeding these steps, don’t show any hesitation to contact us promptly via the email address [email protected]
Need support?If you do encounter any difficulty while proceeding these steps, don’t show any hesitation to contact us promptly via the email address [email protected]
Need support?If you do encounter any difficulty while proceeding these steps, don’t show any hesitation to contact us promptly via the email address [email protected]
Need support?If you do encounter any difficulty while proceeding these steps, don’t show any hesitation to contact us promptly via the email address [email protected]
Need support?If you do encounter any difficulty while proceeding these steps, don’t show any hesitation to contact us promptly via the email address [email protected]
Need support?If you do encounter any difficulty while proceeding these steps, don’t show any hesitation to contact us promptly via the email address [email protected]
Need support?If you do encounter any difficulty while proceeding these steps, don’t show any hesitation to contact us promptly via the email address [email protected]
Need support?If you do encounter any difficulty while proceeding these steps, don’t show any hesitation to contact us promptly via the email address [email protected]
Need support?If you do encounter any difficulty while proceeding these steps, don’t show any hesitation to contact us promptly via the email address [email protected]
Need support?If you do encounter any difficulty while proceeding these steps, don’t show any hesitation to contact us promptly via the email address [email protected]
Need support?If you do encounter any difficulty while proceeding these steps, don’t show any hesitation to contact us promptly via the email address [email protected]
Need support?If you do encounter any difficulty while proceeding these steps, don’t show any hesitation to contact us promptly via the email address [email protected]
Need support?If you do encounter any difficulty while proceeding these steps, don’t show any hesitation to contact us promptly via the email address [email protected]
Need support?If you do encounter any difficulty while proceeding these steps, don’t show any hesitation to contact us promptly via the email address [email protected]
Need support?If you do encounter any difficulty while proceeding these steps, don’t show any hesitation to contact us promptly via the email address [email protected]
Need support?If you do encounter any difficulty while proceeding these steps, don’t show any hesitation to contact us promptly via the email address [email protected]
Need support?If you do encounter any difficulty while proceeding these steps, don’t show any hesitation to contact us promptly via the email address [email protected]
Need support?If you do encounter any difficulty while proceeding these steps, don’t show any hesitation to contact us promptly via the email address [email protected]
Need support?If you do encounter any difficulty while proceeding these steps, don’t show any hesitation to contact us promptly via the email address [email protected]
Need support?If you do encounter any difficulty while proceeding these steps, don’t show any hesitation to contact us promptly via the email address [email protected]
Need support?If you do encounter any difficulty while proceeding these steps, don’t show any hesitation to contact us promptly via the email address [email protected]
Need support?If you do encounter any difficulty while proceeding these steps, don’t show any hesitation to contact us promptly via the email address [email protected]
Need support?If you do encounter any difficulty while proceeding these steps, don’t show any hesitation to contact us promptly via the email address [email protected]
Need support?If you do encounter any difficulty while proceeding these steps, don’t show any hesitation to contact us promptly via the email address [email protected]
Need support?If you do encounter any difficulty while proceeding these steps, don’t show any hesitation to contact us promptly via the email address [email protected]
Need support?If you do encounter any difficulty while proceeding these steps, don’t show any hesitation to contact us promptly via the email address [email protected]
Need support?If you do encounter any difficulty while proceeding these steps, don’t show any hesitation to contact us promptly via the email address [email protected]
Need support?If you do encounter any difficulty while proceeding these steps, don’t show any hesitation to contact us promptly via the email address [email protected]
Need support?If you do encounter any difficulty while proceeding these steps, don’t show any hesitation to contact us promptly via the email address [email protected]
Need support?If you do encounter any difficulty while proceeding these steps, don’t show any hesitation to contact us promptly via the email address [email protected]
Need support?If you do encounter any difficulty while proceeding these steps, don’t show any hesitation to contact us promptly via the email address [email protected]
Need support?If you do encounter any difficulty while proceeding these steps, don’t show any hesitation to contact us promptly via the email address [email protected]
Need support?If you do encounter any difficulty while proceeding these steps, don’t show any hesitation to contact us promptly via the email address [email protected]
Need support?If you do encounter any difficulty while proceeding these steps, don’t show any hesitation to contact us promptly via the email address [email protected]
Need support?If you do encounter any difficulty while proceeding these steps, don’t show any hesitation to contact us promptly via the email address [email protected]
Need support?If you do encounter any difficulty while proceeding these steps, don’t show any hesitation to contact us promptly via the email address [email protected]
Need support?If you do encounter any difficulty while proceeding these steps, don’t show any hesitation to contact us promptly via the email address [email protected]
Need support?If you do encounter any difficulty while proceeding these steps, don’t show any hesitation to contact us promptly via the email address [email protected]
Need support?If you do encounter any difficulty while proceeding these steps, don’t show any hesitation to contact us promptly via the email address [email protected]
Friendly reminder!
If you do encounter any difficulty while proceeding with these steps, don’t show any hesitation to contact us promptly via the email address [email protected]
We are always willing to help with all sincerity!
Once you activate the app's cart, it will be displayed for all customers (retail customers and wholesale customer)
Please note that using the app’s cart is optional; you can skip it if you prefer to keep using your theme’s default cart.
Steps to manage
Open the app > click Add-on Features section in the Navigation bar > Wholesale cart > Turn it on and click Setup Wholesale cart to open the settings inside it:
Click on the Appearance tab to design the Cart template. Set up the cart color to match your theme style:
For further configuration, you can try customizing CSS into this box:
Enable Box discount to allow customers add extra discounts when proceeding to checkout (Optional):
Click Save to keep the changes you have done and let them be updated in your front store.


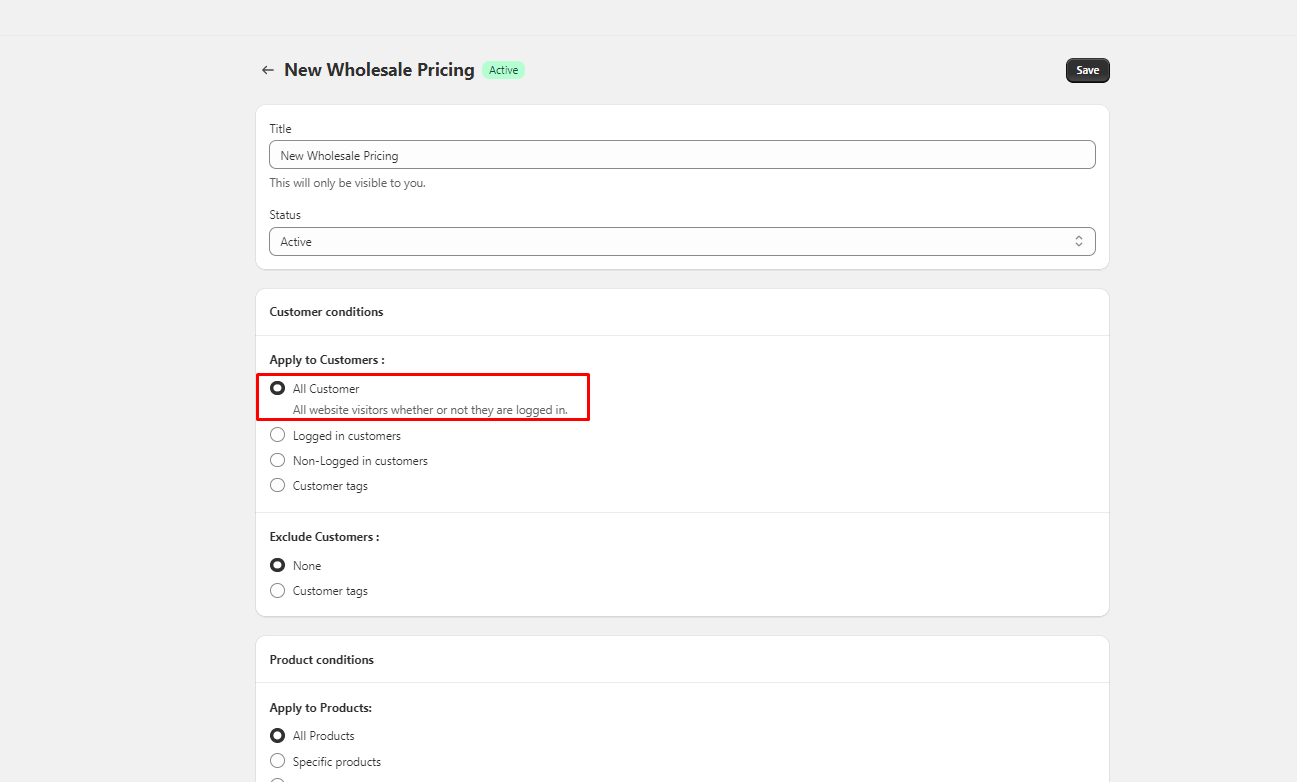
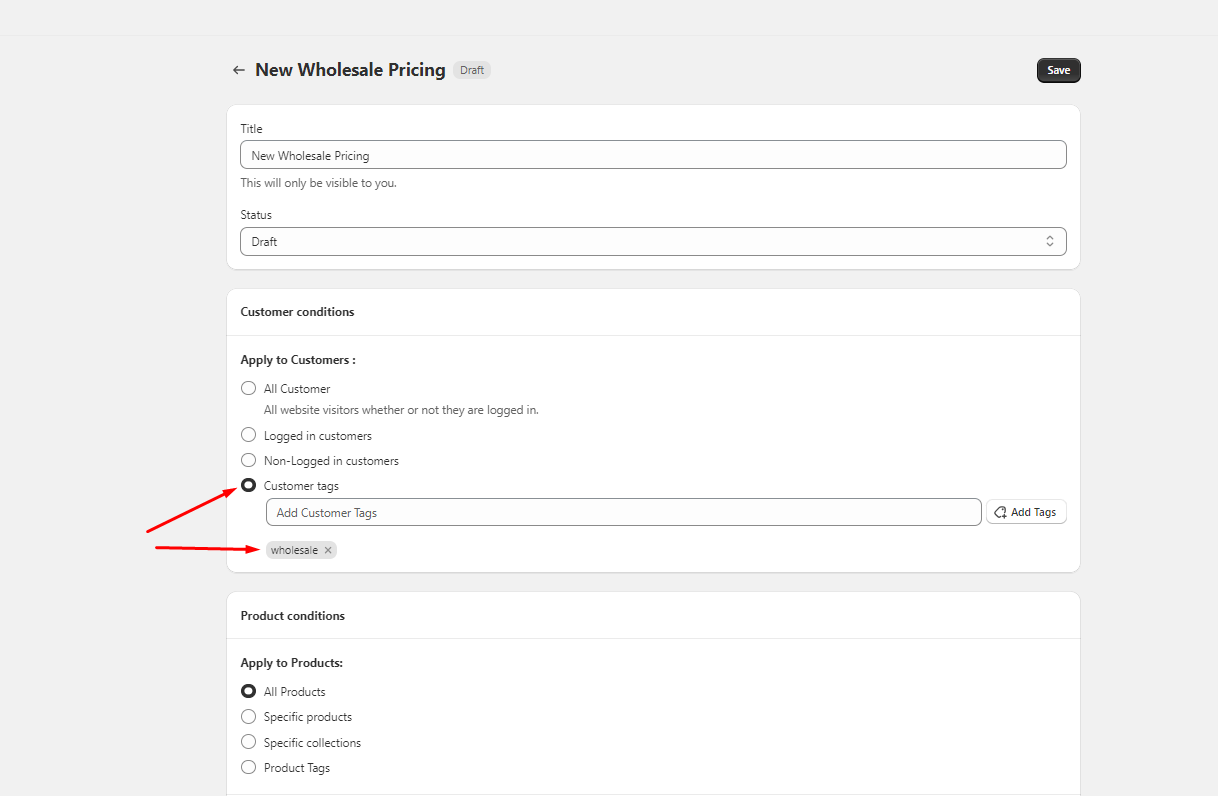