
Loading...
Loading...
Loading...
Loading...
Loading...
Loading...
Loading...
Loading...
Loading...
Loading...
Loading...
Loading...
Loading...
Loading...
Loading...
Loading...
Loading...
Loading...
Loading...
Loading...
Loading...
Loading...
Loading...
Loading...
Loading...
Loading...
Loading...
Loading...
Loading...
Loading...
Loading...
Loading...
Loading...
Loading...
Loading...
Loading...
Loading...
Loading...
Loading...
Loading...
Loading...
Loading...
Loading...
Loading...
Loading...
Loading...
Loading...
Loading...
Loading...
Loading...
Loading...
Loading...
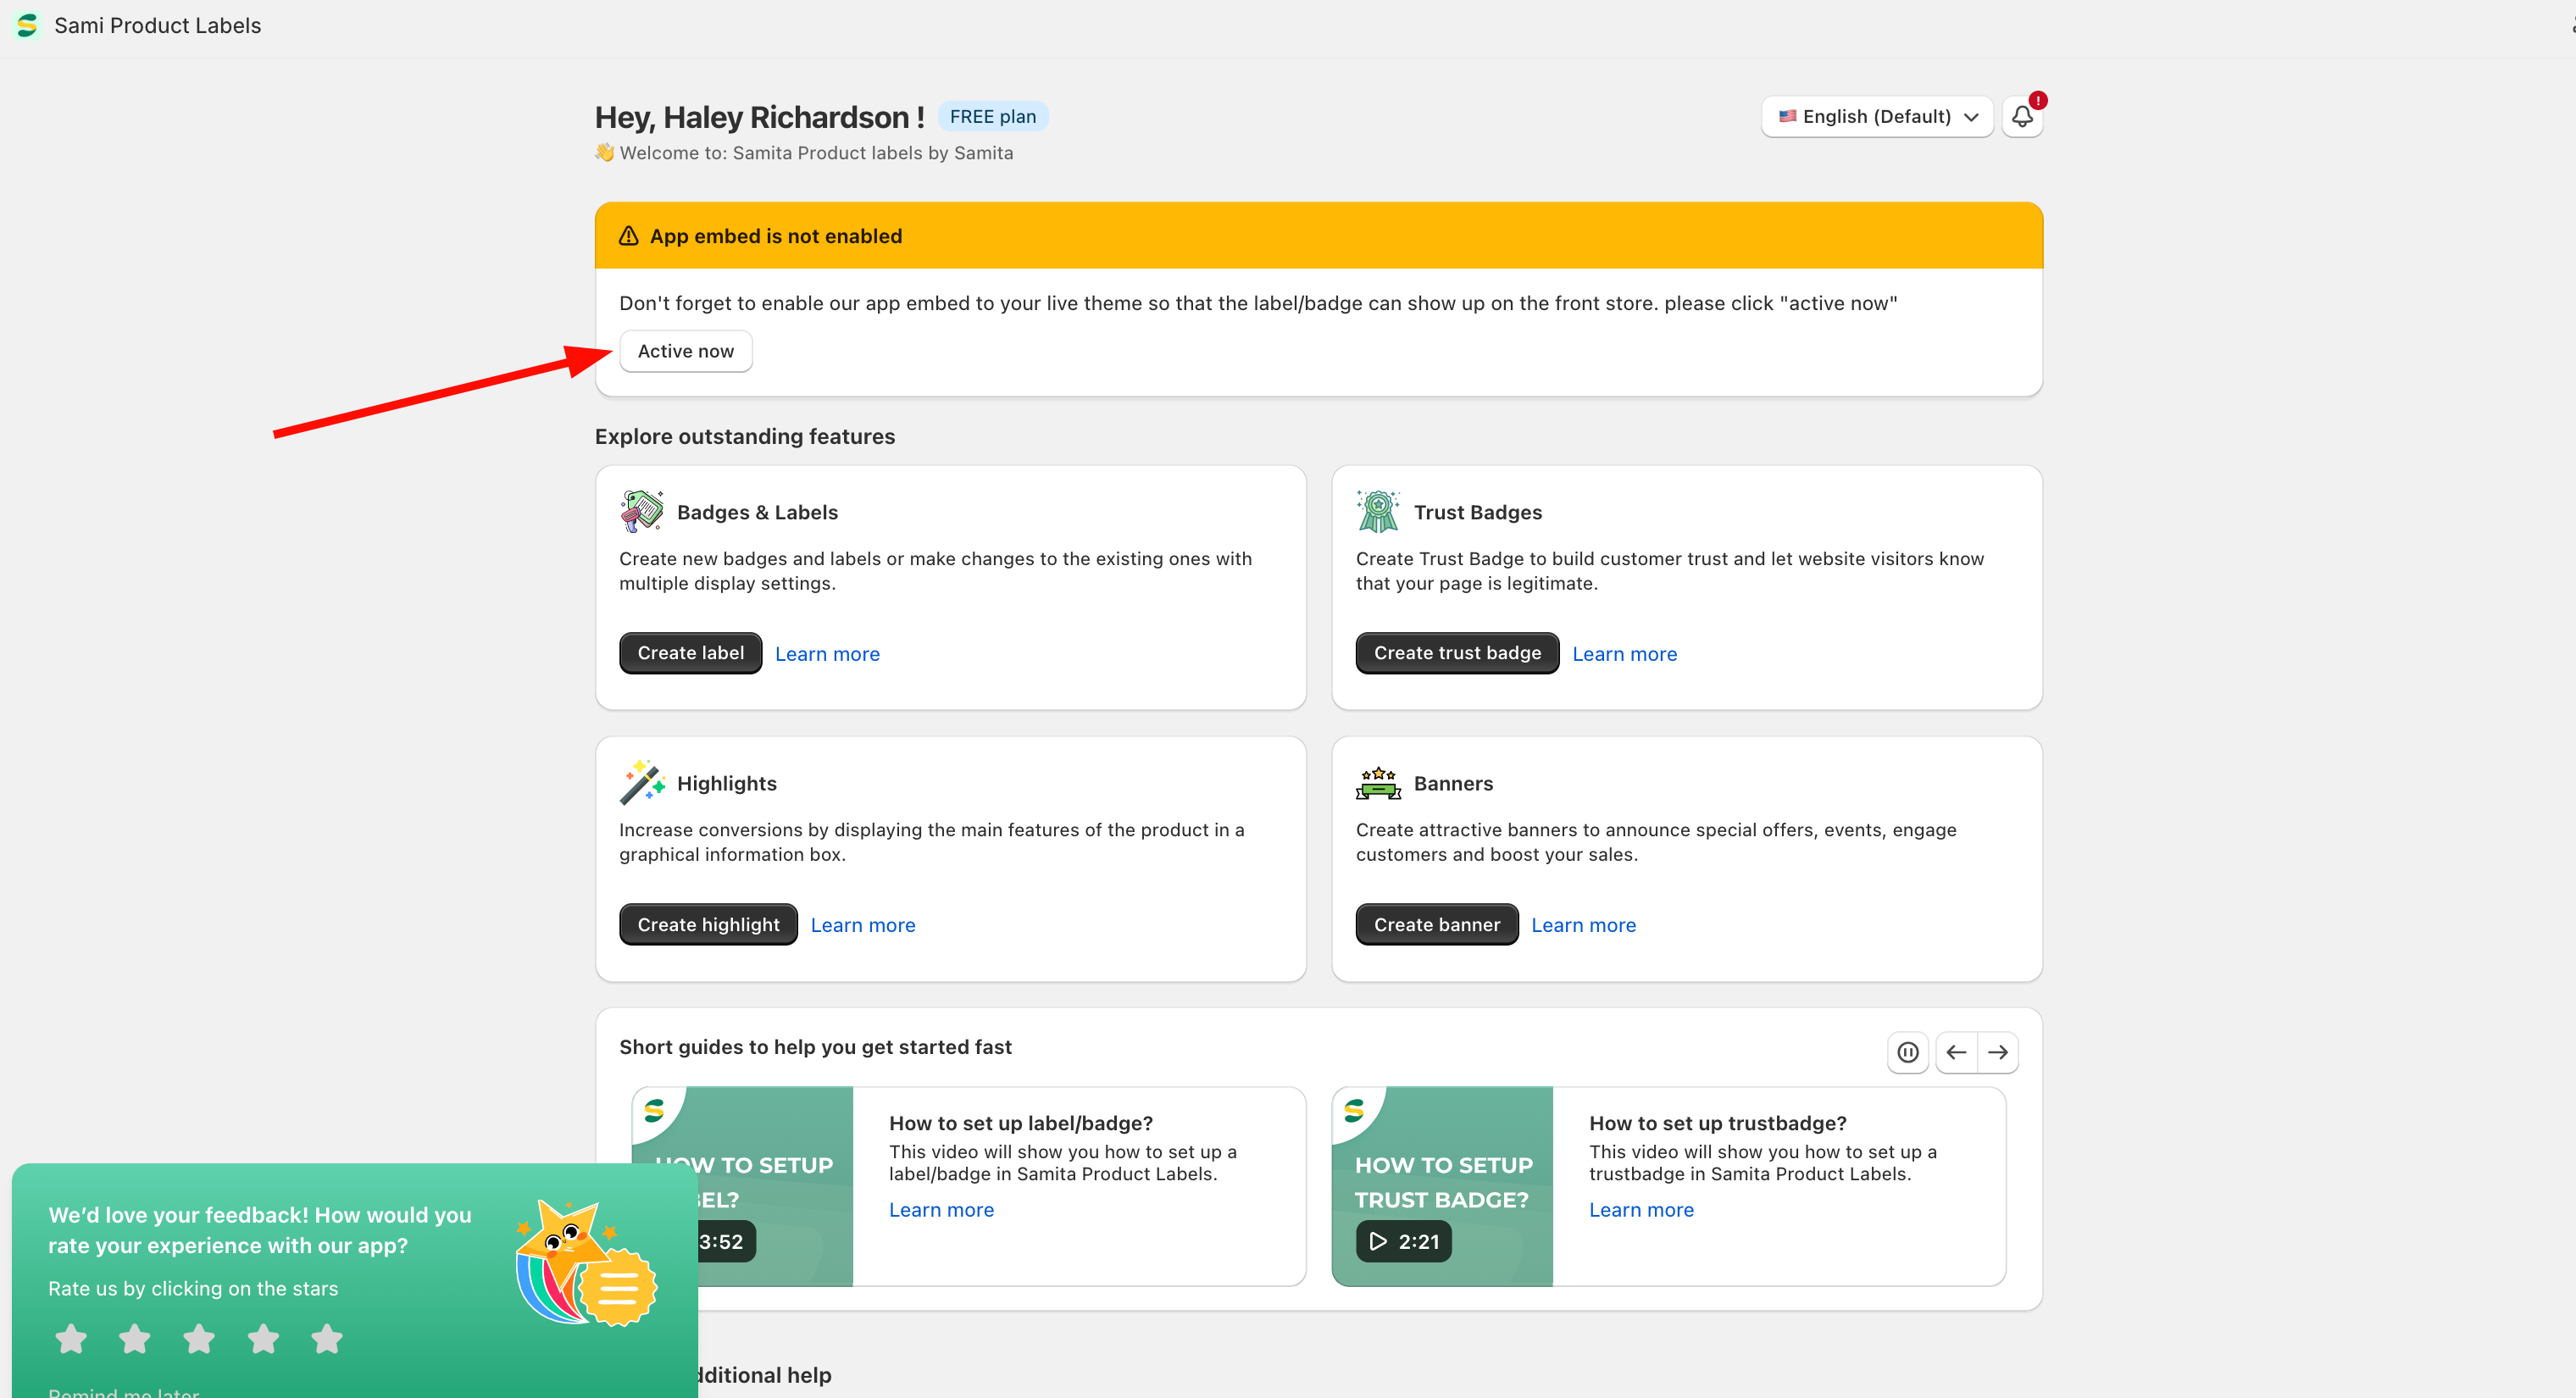
From the App Dashboard page, there is a notification message like this:
This message will let you know that the app hasn’t been activated in your theme yet. You need to do this step now!!
This message will let you know that Samita Product labels is DISABLE. You need to do this step now!!
So how to enable the app embed? Look at the message box, there is a button “Active“, kindly click on it:
Then you will be redirected to the Theme customize page > App embeds section:
Click Save to integrate the app to your theme. If you go back to the app now, the message no longer appears on the App Dashboard page, which means the app is successfully activated in the theme:
This app helps you showcase your products more effectively by displaying dynamic visuals directly on product images, listings, and promotional areas. Here's what you can do:
Create eye-catching badges or labels such as “New Arrival”, “Best Seller”, “50% OFF”, etc., to highlight key product features and promotions.
Group multiple labels together and display them under specific conditions (e.g., by product tag, collection, inventory level, customer type).
Build customer trust by adding payment security badges, guarantee seals, and free shipping indicators that help reinforce your store’s credibility.
Display small but impactful info boxes to communicate key selling points, such as “Eco-friendly”, “Limited Stock”, or “Fast Shipping”.
Show custom banners like "Online Only", "Cyber Monday Deals", or countdown timers to create urgency and drive conversions.
Getting up and running is quick and easy:
Visit the Shopify App Store and install the Product Labels & Badges – Samita app.
Navigate to Labels > Create Label
Choose a label type (image or text)
Select a pre-designed template or create your own
Customize the style, position, and animation
Set display rules based on:
Product tags
Inventory level
Price, vendor, type
Customer tags
Page context (home, product, collection, etc.)
Use the live preview tool to see how your label looks, then click Save & Enable.
Add Trust Badges to your product pages
Create Label Groups for targeted campaigns
Highlight product USPs with Highlights
Launch eye-catching Promotional Banners


Currently, the app is having the available variables for the text badges or labels :
{product_vendor}
{product_type}
{product_sku}
{inventory}
{sale}
{sale_amount}
{countdown}
{product_variant_count}
{customer_order_total}
{customer_spent_total}
You can check their descriptions more from the modal window of Variables :
For example, it will show the remaining time left when you use the {countdown} variable :
In order to upload your own image as a label to Sami Label app, there are two ways for you to do it.
Upload image from your device
Upload image by using an image URL
Kindly follow the guidelines to know how.
From the Label settings page, choose Image tab > click “Change” in the image of the Label/Badge.
2. Choose “Select Image” to change the Label/Badge
3. Click the box of “Upload From URL”
4. Add file from URL
NOTE: The image size must be less than 1MB. The format must be JPEG, SVG, JPG or PNG.
5. Click Save to update the changes.
From the Label settings page, choose Image tab > click “Change” in the image of the Label/Badge.
Choose “Select Image” to change the Label/Badge
Click on this setting box:
4. Choose an image from your computer/device:
5. Click Save to finish the uploading
1. From the app admin page, click Badges and Labels
2. Tick on checkbox before the badge/label you want to duplicate > Click Duplicate selected badge(s)/label(s)
3. Go to the new badge/label detail and configure it
4. Click Save to update the changes
If you do encounter any difficulty while proceeding with these steps, don’t show any hesitation to contact us promptly via the email address
We are always willing to help with all sincerity!
This setting allows users to create the copy highlight in a second. You can duplicate the highlight and then edit the new duplicated one to save time.
Step to manage
From the app admin page, click Highlights
Tick on the checkbox of the Highlight(s) you want
Click More actions button > Duplicate selected Highlight(s) button. The copy Highlight(s) are created immediately in the Highlight list in the app.
This helps you create a copy of the current banner quickly.
Open the app > click Banners
Tick on the checkbox of the banner(s)
Click More actions icon > click Duplicate selected banner(s)
A new banner will be created that is the same as the current one. Now you can edit the new banner quickly to complete a new banner
Highlights provide short bulleted lists of the most relevant highlights of your products.
The highlights you submit should provide customers with easily consumable, quick-to-scan sentence fragments that answer the most common consumer questions or that focus on the most important attributes of the product.
For example, offering additional services like free shipping or extended warranties on certain products will set you apart from other businesses in the same industry.
We need to add custom code to the pages from PageFly to show the Samita badge/labels. Please follow the steps below to implement it.
1. In PageFly app, open the page you want to display the Samita badges/labels
2. Click (+) icon on the ledt navigation to add element to the page > select a HTML/Liquid element
3. Drag and drop the HTML/Liquid element to the position you want to place the badges/labels on the page
4. In the HTML/Liquid
This setting allows users to create the copy badge in a second. You can duplicate the badge and then edit the new duplicated one to save time.
Step to manage
From the app admin page, click Trust Badges
Tick the checkbox of the Trust badge(s) you want.
Click on the More actions button -> Click the
You can activate or deactivate on the front store via this setting in the app.
From the app admin page, click Trust Badges
Tick on the checkbox of the trust badge(s)
Select status Set as draft or Set as Active (depending on your choice)

A badge:
From the app admin page, click Badges and Labels.
Click the Create new badge/label button.
Select Label type > click Create button (If you want to create a badge, then select Badge type).
In the Label configuration, select the Image type.
Under the Select label image area, upload/select the label image you’d like to use.
Select products to show the label. Please view for more detail
Click Save to update the changes.
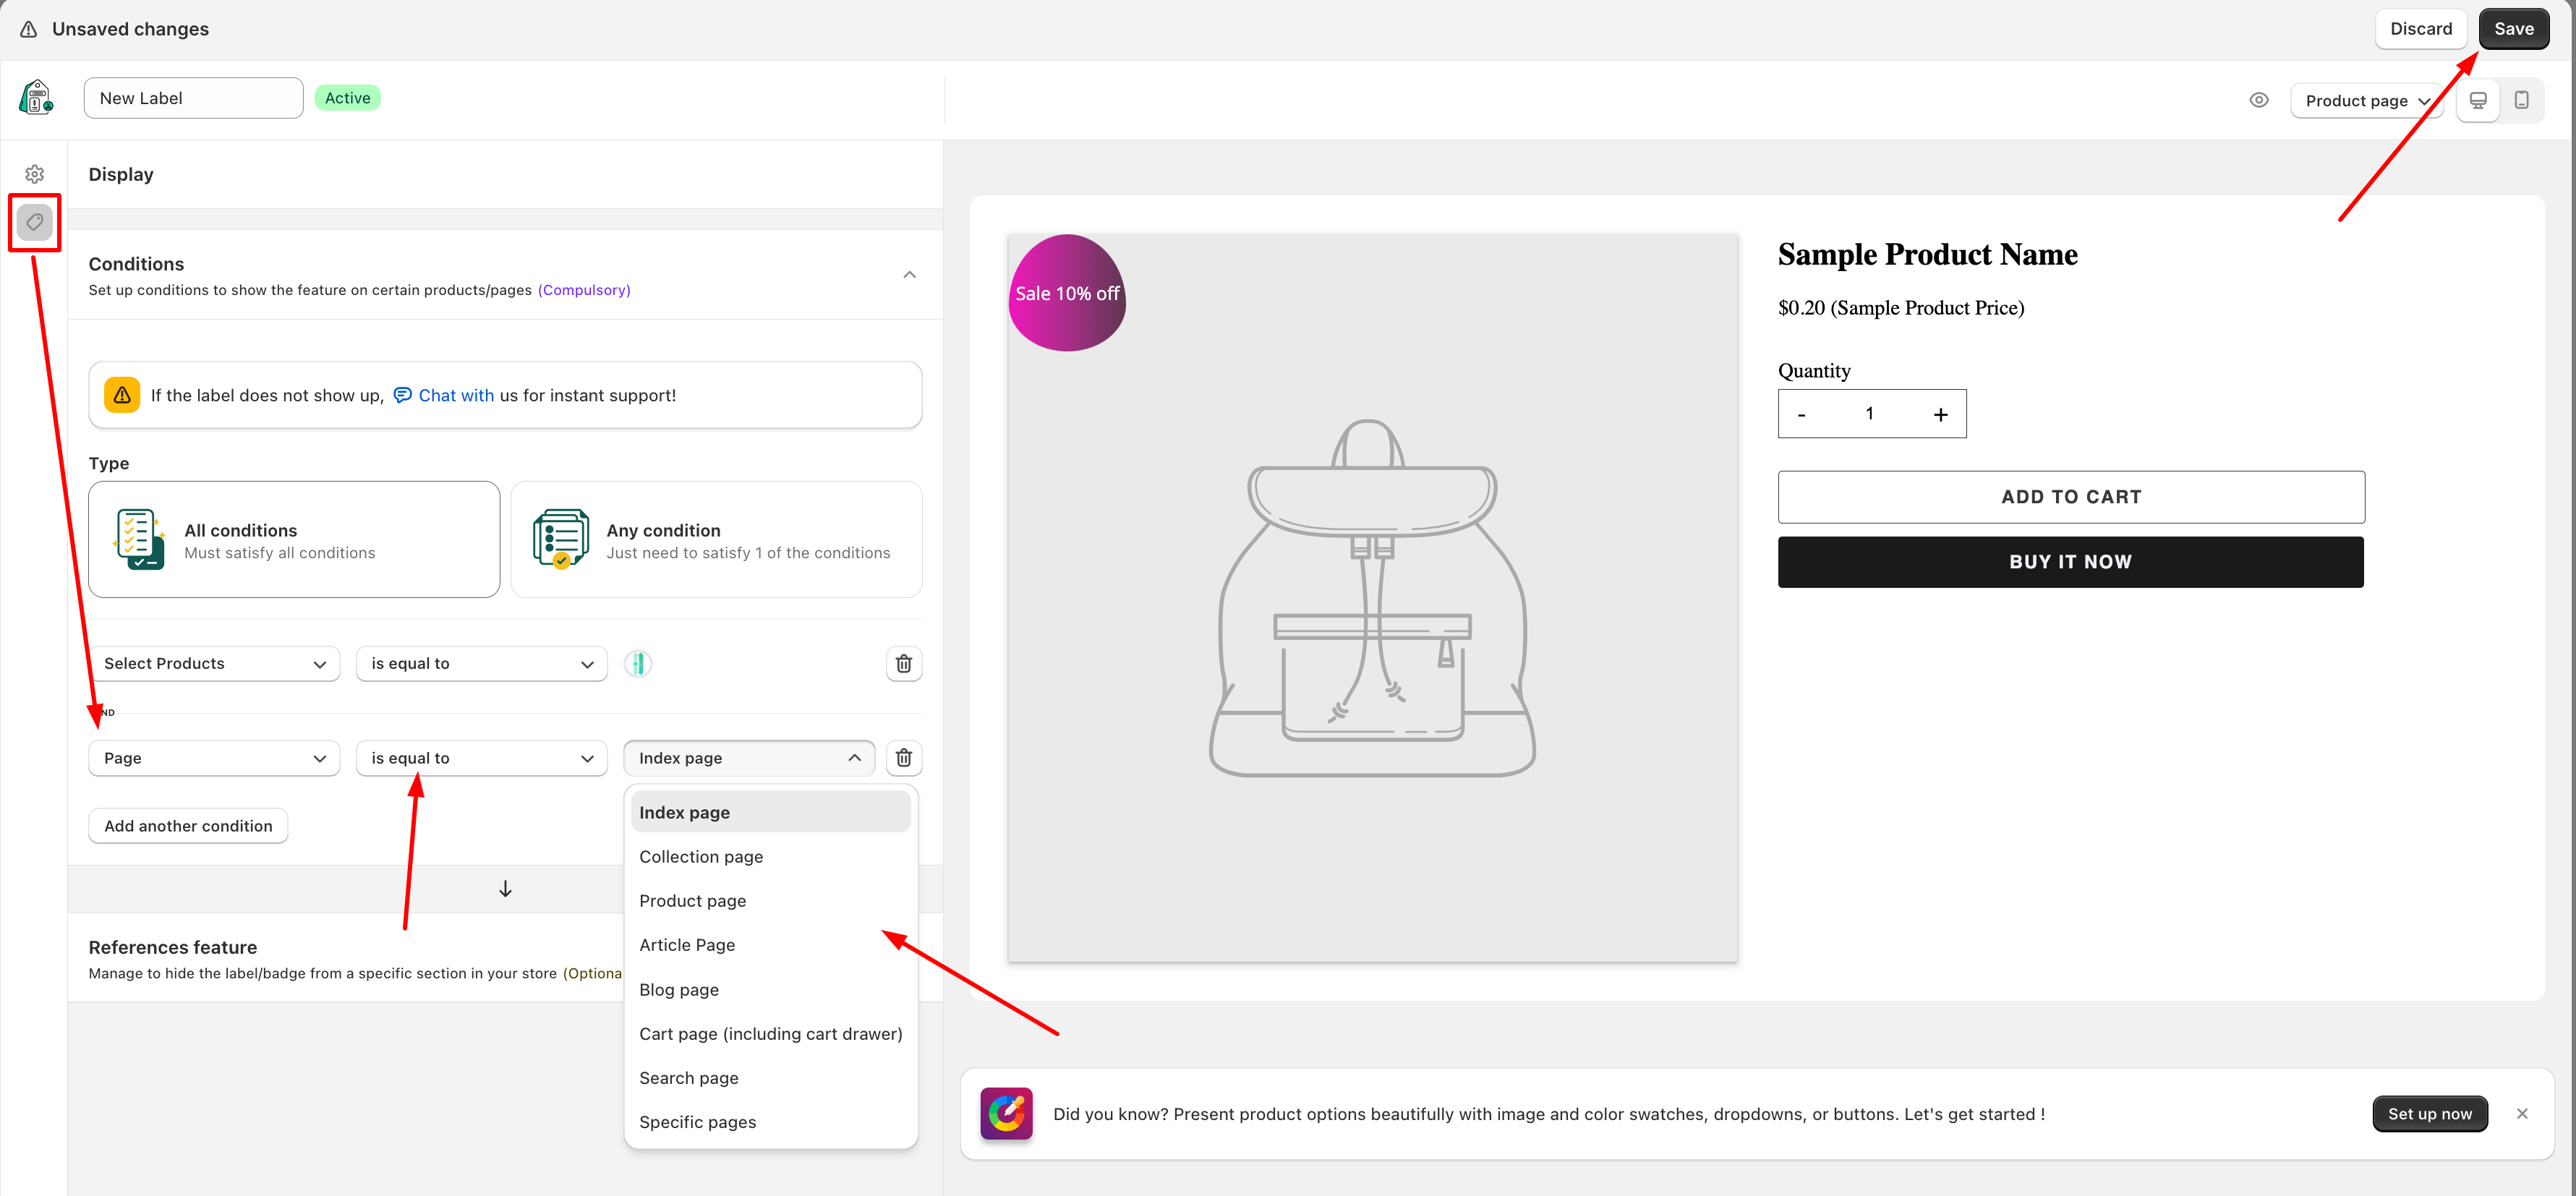
Click the Display icon on the left > Select the condition “Page”. This condition helps you show the label on a specific page in your store only, not anywhere else (Product page, Collection page, Homepage, Cart page or any specific page you want)
Set up a condition like this: Page > is equal to > choose a page in the dropdown list that you want to specially show the label only on it
Click Save
Check the result on the front store
NoteIf the page you want to show the label is not listed in the dropdown setting, please use the “specific page” option and paste the page URL into the input field as belows:
If you add multiple conditions, please check that the Products must match all conditions
Click Add another condition button > set the condition like this: Select products – is equal to – select the products you want
Click the Add another condition button, and add the condition for the page: Page – is equal to – Product page
Select Device Targeting
Click Save
Check the result on the front store
Products must match all conditions or any condition. – If you select "all conditions", products must match all the conditions added – If you select "any condition", products must match at least one of the conditions
You add a HTML tag > add a class: .product-block–price on the product
Then you add the class to the Position in the product page field in the app as screenshot below
The badge will show up right below the class you add to the product page
4. Click Save to update the changes.

Locate the position you want to hide the label.
In our below example, I do not want the label to show on the item in my cart drawer.
In Settings > Display Products > Do not show Labels on, paste the class in the box.
Click Save to update the changes
5. Paste below code to the code editor:
6. Click Save and close button
7. Click Save to update the page
<a href="/products/{{product.handle}}" style="display: none;"></a>Enter the Start date-hour and End date-hour
Click Save
Note: If you set the Start date as a future date, the label will show up on the date you configured. It can not be visible right away.
Click More actions button > Delete selected Trust badge(s). Then the selected Trust badges are removed completely from the list
From the admin app, go to Theme Customize page
Click the App embeds section.
Disable this setting:
Click Save to finish.


You can show a label or badge on different products containing same product / variant metafields.
Step one : you create your product or variant metafields from your Shopify Settings > Metafields and metaobjects > Add definition:
Then you click on the Copy to clipboard button to paste it inside the namespace.key input at the Step three below :
2. Step two : add values for each Product metafield or Vairant metafield from your Shopify Products tab, then you paste the values inside the corresonding value inputs at the below Step three :
3. Step three : navigate to the Display tab to add the Product metafield or Variant metafield conditions with your recently created namespace.key fields and their values :
⚠️ Ensure the Storefront API access is enabled from Metafields and metaobjects setting.
Click Save then check your label or badge on your website.
Our app provides you the shortcode of the trust badge that allows you to place it at any position you want.
Note: Only use the badge short code when you want to place it in a specific position.
From the app admin page, click Trust Badges > open the trust badge you want
In the Display tab > Shortcode section > Copy the Shortcode of the badge
Go back to the Shopify admin page > Online stores > Themes > Customize (the theme you want) > open the page template you want
Click Add block > find the app block of the Samita Trust badge app > click Add
In the block content, paste the shortcode of the trust badge
Drag and drop the block of the change the position of the badge on the product
Click Save to update the changes in the theme editor
Trust badges are symbols displayed on a website to demonstrate to visitors that the business is legitimate and concerned about data security.
Because the trust seal company has agreed to place their badge on your website, customers will know that all the processes taking place are safe and secure.
Generally, trust badges used on website can be classified into five types:
Security Trust Badges validate that the checkout process on an e-commerce site is secure and that customer credit card information is protected.
Payment Trust Badges certify that a business accepts widely used forms of payment, such as Visa, Mastercard, American Express, and PayPal, increasing consumer trust and embodying anti-fraud principles.
Guarantee Trust Badges like a “30-day money-back guarantee” icon can be used to allay potential customers’ fears regarding the purchase by providing reassurance and making it easier to turn doubtful visitors into happy customers.
Listed below are the most effective parts for adding trust badges to your website:
Homepage: Displaying a trust badge like third-party validation on your homepage gives a positive first impression to visitors.
Product Page: Adding a guarantee or shipping trust badges to your product page can be a good motivator and the final push for users to finalize their purchase decisions.
1. From the app admin page, click Badges and Labels
2. Open the label/badge detail you want to edit
3. Click the Settings icon on the left side > scroll down to Design > Text
4. Click the Change button to select the font you want to use or tick the checkbox Use Custom Font Style to customize your own font
5. Click Save
Check the result on the front store
Our app provides you the shortcode of the Highlight that allows you to place it at any position you want.
Note: Only use the short code when you want to place it in a specific position.
Steps to manage
1. Open the app, click Highlights > open the Highlight you want
2. Tick the Product page to show the highlight on all product pages.
3. Click the Display icon on the left > Shortcode section > Copy the Shortcode of the Highligh
4. Go back to the Shopify admin page > Online stores > Themes > Customize (the theme you want) > open the page template you want
5. Click Add section > find the app block of Samita Highlights > click Ad
6. In the block content, paste the shortcode of the Highligh
7. Drag and drop the block the change the position of the badge on the product
8. Click Save to update the changes in the theme editor
You can use the shortcode to display the banner at a specific position.
In the Samita app:
Open the app > click Banners > open the banner or create a new one
Click the Settings icon on the left sidebar > Banner Configuration > Select A Display Position > Select Custom Placement – Place the bar anywhere on your online store
Click the Display icon on the left sidebar > copy the Shortcode of the banner
On the Shopify admin page:
From the Shopify admin page, open the page/template you want to add to the banner
Paste the Shortcode of the banner
Save the changes
Check the result on the front store
From the app admin page, click Highlights > open the Highlight you want
Click the Display icon on the left > Conditions > Click Add another condition
Set up the condition as below: Customers – Is Logged In
Click Save to update the changes
On the front store, only customers who logged into the customer account can see the highlight on the product page.
You can activate or deactivate the banner on the front store via this setting in the app.
Solution 1:
Open the app > click Banners
Tick on the checkbox of the banner(s)
Click Set as active to activate the banner on the front store. Click Set as draft to deactivate the banner on the front store.
Solution 2:
Open the app > click Banners
Click on the banner you want to disable.
In the banner setting, click on the More options button of the Save button, and choose Set as draft.
1. From the app admin page, click Badges and Labels > open the label/badge detail you want to edit
2. Click the Settings icon on the left > scroll down to Design > Size
3. Select one of the options S ( small ) , M ( medium ) , L ( large) , or customize it by yourself
4. Click Save to update the changes
Then go to the front store to check the result
You want to customize size of label/badge?
If you want to customize the size of the label/badge, click on Custom and adjust the Width and Height
You can change the size unit to px or %:
px amount: it is fixed size and the size will be kept the same on all screens
%: the size of the label/badge will depend on the screen size (recommended)
1. From the app admin page, click Badges and Labels > open the label/badge detail you want to edit
2. Click the Settings icon on the left > scroll down to the Design part > click Show Advanced options
3. Set up the label size for Tablets and Mobiles
Note: If you want to enter the value just leave the Width and Height fields blank. Don’t add 0 (px/%)
Click Save
1. From the app admin page, click Highlights > click on the Create Highlights button
2. In the Title & Description section, enter the text to describe the Highlight [optional]
3. In the Select Highlight sections, click Add Highlight > select the available highlight the app provides or upload your own images, URL to create your custom badge
4. Click here to Custom color, shape for the Highlight [optional]
5. Continue to click Add Content to add as much as badges as you want
6. Configure the style of the Title and Description
7. Click Save
Sami Product Labels newly releases this “Recommendation Highlights” in order to help you quickly customize a trending highlight for your store
Click on one highlight you like and start configuring further inside
Open the app > click Badges and Labels > open to the badge/label you want to edit
Click the Display icon on the left > Select the condition “Page”. This condition also helps you hide the label on a specific page in your store, and still displays in other pages (Product page, Collection page, Homepage, Cart page or any specific page you want)
Please set up the condition like this: Page > is not equal to > choose a page in the dropdown list that you want to hide the label
Click Save
Check the result on the front store
NoteIf the page you want to hide the label is not listed in the dropdown setting, please use the “specific page” option and paste the page URL into the input field as belows:
Steps to manage
1. Open the app > Choose Banners > Click the Create banners button to start setting up
2. In the Elements sections, click on Group 1 of the banner > click Add content > select one of the content types: Line break, Message, Button, Image
3. For each content type, you can configure the text and color. For example, click on Message to add text to the banner
4. In Banner configuration sections, tick on the checkbox Bar Clickable and Include Close Button [optional]
5. Select A Display Position of the banner on the page with its effect
6. In the Design section, configure the design of the color of the banner bar, text, padding, and the Interval Between Bar Display
7. Click Save
Please view to know more
The color setting is only available for badge/label in text form.
1. From the app admin page, click Badges and Labels
2. Open the label/badge detail you want to edit
3. In setting tab, you can customize the shape here
4. Scroll down to Design > Color
5. You can change the color of the following parts:
Background left
Background right
Text
Border
6. Click Save to update the changes
7. Go to the front store to check the result
To help you decorate your store site, Sami Product Labels app has a section which has all the trending label style due to month. You can use the recommended labels to set up one for your store.
Kindly review the below instruction to find the setting and configure.
Go to the app > Choose Badges and Labels section > There is a section below the list of created labels and badges:
2. Click on the design you like and set up a label or badge from it:
3. Then start configuring as usual
If you want to design your own image label, you can use this setting:
Set up name for your label
Upload an image for the label or you can choose one from the app’s library
Set up content for the label and style the font text
After finishing the customization, click “Save and create label” to save your custom label and continue configuring it as a label or badge with more settings inside the app
From the app admin page, click “Change” in the image of the Label/Badge
Choose “Select Image” to change the Label/Badge
Click here to Select the image
Click Save to update the changes
Then go to the front store to check the result
Not only show the label due to the product data in the theme, Sami Product Labels app can also show the label due to the location (country) of the customers who access your store site.
To find the setting, please go to the app > Badges and Labels > Set up a label or badge first:
In the Display setting of the label, kindly set up the condition “Country” and choose a country you want to be able to see the label:
Click Save and check the result in your front store.
You can change the position of the product badge/label on the front store based on your need.
Please follow this guide: Change the position of badges/labels on the front store
Specifically, there is one option that helps you customize the position of the badge/label.
Click The icon (+) to customize the position on the front store based on your desire
– Drag the slide bar to adjust the position of the label/badge
– Click the exchange icon to change to top or bottom alignment
But after the changes the badge/label is not placed at the position you want, or maybe it looks good on the product page but not beautiful on other pages, please don’t hesitate to to contact us at.
Our team will help you adjust it ASAP to make it look nice on your store.
In many cases, the developers will need to get access to your admin page to support you better with the issues you are dealing with. Some stores are set with code so that someone can send the access request. In case you are confused in finding the code, this article will help you.
What is the Collaborator Request Code?
As a store owner, you can share access to your store with another person – a collaborator. There are 2 ways to grant permission to your store:
Anyone can send you an access request via email where you can approve for.
Only people who knows your 4-digit code (collaborator access code). We recommend enabling this option as it provides more security to your store.
After you create badges/labels and select products to show but there is none of them appears on the front store with products, please follow the steps below to solve the situation.
Solution 1: Make sure that the app embeds is enabled on your theme.
To show the badge/labels on the front store, firstly please enable app embeds on your theme.
Learn more about App embeds .
1. From the admin app, go to Theme Integration
2. Select a theme to install the app and then click on the Go to Theme editor button
3. In the theme editor, enable the app embed.
4. Click Save to update the changes
Label Group feature allows you to apply 3 to 4 labels in a product and make them align in a vertical/horizontal way. To better understand how to do it, kindly follow this document:
Step to manage:
1. From the app dashboard page, go to Label groups section > Create a label group:
2. In the Settings page >
Note
This feature is only available in DIAMOND plan of the app.
It is possible for users to show the label based on the language of the site.
For example:
Steps to manage
Open the app > click Banners
Tick on the checkbox of the banner(s)
Click on the More actions icon > click Deleted selected banners


Endorsement trust badges that provide third-party validation, case studies, online reviews, professional certifications, and B2B customer logos.

Where to find Collaborator Request Code?
To find the 4-digit access code, please follow the steps below:
Navigate to your Shopify store admin > Settings > Users and permissions.
Scroll down to the section Collaborators, and there’s your code.
Copy the 4-digit code in Collaborator Request Code field.
Sharing this code does not mean automatically grant someone permission to your store. This is only used for someone you allow to send the Collaborator request.
If you cannot figure it out, please do not hesitate to contact us via email [email protected]. We are happy to help!
Solution 2: Check the product selected to show the badges/label
Please make sure the products you want to show the badge/label match the conditions in the app.
If you select all conditions, products must match all the conditions added
If you select any condition, product must match at least one if the conditions
The data entered in the condition field is case-sensitive.
For example: The condition Product title contains Dress but the product you check has title “Modern Kimono dress”
-> The product doesn’t match the conditions -> the badge/label doesn’t show up on the product image in the front store.
Solution 3: Check the visibility date of the label/badge
From the app admin page, click Badges and Labels
Open the label/badge detail you want to edit
Click the Settings icon on the left > scroll down to the Visibility date
Enter the Start date-hour and End date-hour
Click Save
Solution 4: If the 2 above solutions don’t help, please don’t hesitate to contact us at [email protected].
We appreciate your patience and we will try our best to help you solve the issue.


Please make sure that you already created labels in the Badges & Labels section before going to this label group step.
3. Select labels you want to add into a group:
4. Click Select and that’s how a label group is set.
1. Move to the Design section, choose the layouts for the label group: Horizontal or Vertical style.
Set up label size and size gap between the labels:
2. Use the Advanced setting if you want to customize the labels further.
1. Click on the Display setting, set up where the label should be displayed in your front store: Keep individual label condition or Set up a custom group condition. For further understanding, please review this document.
2. Set up condition for this label group:
3. After finishing, click Save and check the result in the front store:

Show label text “Nouvelle arrivee” on the product images when the language of the site is French.
Show label text “新货” on the product images when the language of the site is Chinese.
Please follow the steps below to create a label based on a specific language. You can do the same with a badge.
From the app admin page, click Badges and Labels
Click the Create new badge/label button > Select Label type > Create
In the Label Selection section, select Text Type
In the Content part, the first Content box is for the default label. The text of this label will show up for all languages on the site. You can leave this default field blank.
To translate the label text to other languages, click Add language > select a country – for example: French.
In the French section, click Edit button > then Enter the French text for the new label – for example: Nouvelle arrivee
To show translation text for any other languages, click Add language again > do the same changes as steps #5 and #6 above.
Click Save to finish.


Label group condition helps you manage where the label group can be displayed in the front store. There are two options for you to set up condition for the label group.
1. Keep individual label condition: This condition allows you to display label groups based on the individual rules of each label within the group. Depending on the product and the conditions set for each individual label, the label group will display differently.
Example:
Label A is set up for products X and Y.
Label B is set up for product C.
A label group (containing Label A and Label B) is assigned to collection Z, which includes products X, T, and C.
With the above condition applied:
Product X will display Label A (since it matches Label A’s condition).
Product C will display Label B (as it meets Label B’s condition).
Product T does not meet the conditions for either Label A or Label B, but since it’s part of collection Z (which has the label group assigned), it will still show the label group (which includes both Label A and Label B).
2. Set a custom group condition: This setting will override all individual label rules and apply a new condition for the label group. The label group will show for products/collections you configure in this setting:
Choose “any condition” if you have more than 1 condition:
This is the result in the front store when using this condition:
In the Samita app:
Open the app > click Banners > open the banner or create a new one
Click the Settings icon on the left sidebar > Banner Configuration > Select A Display Position > Select Custom Placement – Place the bar anywhere on your online store
Click the Display icon on the left sidebar > Copy the Shortcode of the banner
On the Shopify admin page:
From the Shopify admin page, click Online store > Themes > click Customize button of the theme you want to work on
Open the page template (Homepage)
On the left, click Add section > Apps > select Samita banner
1. From the app admin page, click Trust Badges > click the Create new trust badges button
2. In the Title & Description section, enter the text to describe the badge [optional]
3. In the Select Badges sections, click Add trust badge> select the available badge the app provides or upload your images or add URL to create your custom trust badges
Drag/drop the app section to change the position of the banner on the page
Save


Open the app > click Banners > open the banner or create a new one
Click the Display icon on the left sidebar
In the Conditions parts, skip this part and the banner will automatically display on all pages
In the field under the Conditions field > Select Display on both desktop and mobile browsers. The banner will always show up on all pages of the site
Click Save
Currently, the app allows you to set up conditions to show a banner on the front store.
We can show banners with selected pages, languages, products, product tags, customers, or customer tags.
Open the app > click Banners > open the banner or create a new one
Click the Display icon on the left sidebar
Click Add another condition button > Set the condition with pages, customers, or products based on your needs. For example: Page – is equal to – Collection page
If you add multiple conditions, please check the if Products must match: all conditions or Any condition.
Select where to display
Click Save
Check the result on the front store
Products must match all conditions or any condition. – If you select "all conditions", products must match all the conditions added – If you select "any condition", products must match at least one of the conditions
You can use the shortcode to display the banner at a specific position.
In the Samita app:
Open the app > click Banners > open the banner or create a new one
Click the Settings icon on the left sidebar > Banner Configuration > Select A Display Position > Select Custom Placement – Place the bar anywhere on your online store
Click the Display icon on the left sidebar > copy the Shortcode of the banne
On the Shopify admin page:
From the Shopify admin page, open the page/template you want to add to the banner
Paste the Shortcode of the banner
Save the changes
Check the result on the front store
In the Samita app:
Open the app > click Banners > open the banner or create a new one
Click the Settings icon on the left sidebar > Banner Configuration > Select A Display Position > Select Custom Placement – Place the bar anywhere on your online store
Click the Display icon on the left sidebar > Copy the Shortcode of the banner
On the Shopify admin page:
From the Shopify admin page, click Online store > Themes > click Customize button of the theme you want to work on
Open the page template (Homepage)
On the left, click Add section > Apps > select Samita banner
Paste the shortcode of the banner to the section
Drag/drop the app section to change the position of the banner on the page
Save
If you set multiple conditions, consider selecting Any condition or All conditions
Click Save to update the changes
Go to the front store to check the result
For example, setting up a label to show on some specific products only:
Note: - The data entered in the condition field is case-sensitive. If the product tag is "Dress", the condition with product tag "dress" will not work.
From the app admin page, click Badges and Labels > open the badge or label you want to edit
Click the Display products
In the dropdown, select All products
Click Save to update the changes
Go to the front store to check the result
Open the app > click Badges and Labels > open the badge or label you want to edit
Click Display products
In the condition dropdown, select Select Products – is equal to –
Then click select Items> tick on the checkbox of the products you want > Save
If you want to remove the selected products, untick the checkbox of the products or click on the (x) icon next to the product ID
Click Save to update the changes
Go to the front store to check the result
Please see the screenshot below for reference:
From the app admin page, click Badges and Labels > open the badge or label you want to edit
Click Display products
In the dropdown, select Collections > is equal to
Click Select Items> tick on the checkbox of the collection you want
If want to remove the selected products, untick the checkbox of the products or click on the (x) icon next to the product ID
Click Save to update the changes
Go to the front store to check the result
The example case is that you want to display the label Big sale on the products with the tag “big sale“. Please follow the steps below to set it up.
From the app admin page, click Badges and Labels > open the badge or label you want to edit
Click Display products
In the dropdown, select Product tag > is equal to > enter the text bigsale on the field after
Click Save to update the changes
Go to the front store to check the result
4. Click the content you have just added to custom color for the trust badge [optional]
5. Continue to click Add Content to add as much as badges as you want
6. In the Design Badge section, configure the style of the badge like size, position, Alignment, Animation
7. Click Save
After choosing badges and adding content for the trust badges, kindly move to the Design setting.
There are 3 sections for you to style the trust badges, click on each section to see more settings:
You also can set up size for the trust badges in other devices like mobile or tablet:
Step to manage
From the app admin page, click Trust Badges > open the trust badge
Click the Display icon on the left > Show trust badge, tick on the checkbox Product page
Click Save
Now the Trust badge automatically shows up on the product page. Please go to the front store to check the result.
Our app provides you the short code of the trust badge that allows you place it at any position you want.
Note: Only use the badge short code when you want to place it in a specific position.
Steps to manage
1. From the app admin page, click Trust Badges > open the trust badge you want
2. Click the Display icon on the left > Shortcode section > copy the Shortcode of the badge
3. Go back to the Shopify admin page > Online stores > Themes > Customize (the theme you want) > open the page template you want
4. Click Add section > find the app block of the Samita Trust badge app > click Add
5. In the block content, paste the shortcode of the trust badge
6. Drag and drop the block the change the position of the badge on the product
7. Click Save to update the changes in the theme editor
Note:With this setting, the trust badge will automatically show up on all product pages below the add to cart button.
You don’t need to customize more.
Sami Product Labels newly releases this “Recommendation trustbadges” in order to help you quickly customize a trending trustbadge
Click on one trustbadges model you like and start configuring further inside

From the app admin page, click Badges and Labels.
Go to the label detail you want to edit.
In the Settings tab > scroll down to Design > Position. There are two ways to set the position of the label.
Use predefined position:
Use Custom position: Click “Use Custom Position” to customize the position on the front store based on your desire. – Drag the slide bar to adjust the position of the label/badge
– Click the exchange icon to change to top or bottom alignment
4. Click Save to update the changes.
Note
Don’t drag the slide bar to 100 left side or top side.
Steps to manage
From the app admin page, click Badges and Labels
Open the badge detail you want to edit
In Settings tab > scroll down to Design > Position
Change the position of the badge on the product page by selecting the option in the Position dropdown below:
At this moment, there are 4 available positions for you to choose from:
Below the product image
Below the product title
Below the product price
Below the product quantity
Below the add to cart button
Below the buy now button
Custom position: Click Custom and customize the position of the badge based on your needs.
5. You can also adjust the predefined position of the badge by using the Predefined position
Lastly, click Save to update the changes.
Need support?If you do encounter any difficulty while proceeding these steps, don’t show any hesitation to contact us promptly via the email address


Need support?If you do encounter any difficulty while proceeding these steps, don’t show any hesitation to contact us promptly via the email address


Need support?If you do encounter any difficulty while proceeding these steps, don’t show any hesitation to contact us promptly via the email address


Need support?If you do encounter any difficulty while proceeding these steps, don’t show any hesitation to contact us promptly via the email address


Need support?If you do encounter any difficulty while proceeding these steps, don’t show any hesitation to contact us promptly via the email address
Need support?If you do encounter any difficulty while proceeding these steps, don’t show any hesitation to contact us promptly via the email address
Need support?If you do encounter any difficulty while proceeding these steps, don’t show any hesitation to contact us promptly via the email address
Need support?If you do encounter any difficulty while proceeding these steps, don’t show any hesitation to contact us promptly via the email address
Need support?If you do encounter any difficulty while proceeding these steps, don’t show any hesitation to contact us promptly via the email address
Need support?If you do encounter any difficulty while proceeding these steps, don’t show any hesitation to contact us promptly via the email address
Need support?If you do encounter any difficulty while proceeding these steps, don’t show any hesitation to contact us promptly via the email address
Need support?If you do encounter any difficulty while proceeding these steps, don’t show any hesitation to contact us promptly via the email address
Need support?If you do encounter any difficulty while proceeding these steps, don’t show any hesitation to contact us promptly via the email address
Need support?If you do encounter any difficulty while proceeding these steps, don’t show any hesitation to contact us promptly via the email address
Need support?If you do encounter any difficulty while proceeding these steps, don’t show any hesitation to contact us promptly via the email address
Need support?If you do encounter any difficulty while proceeding these steps, don’t show any hesitation to contact us promptly via the email address
Need support?If you do encounter any difficulty while proceeding these steps, don’t show any hesitation to contact us promptly via the email address
Need support?If you do encounter any difficulty while proceeding these steps, don’t show any hesitation to contact us promptly via the email address
Need support?If you do encounter any difficulty while proceeding these steps, don’t show any hesitation to contact us promptly via the email address
Need support?If you do encounter any difficulty while proceeding these steps, don’t show any hesitation to contact us promptly via the email address
Need support?If you do encounter any difficulty while proceeding these steps, don’t show any hesitation to contact us promptly via the email address
Need support?If you do encounter any difficulty while proceeding these steps, don’t show any hesitation to contact us promptly via the email address
Need support?If you do encounter any difficulty while proceeding these steps, don’t show any hesitation to contact us promptly via the email address
Need support?If you do encounter any difficulty while proceeding these steps, don’t show any hesitation to contact us promptly via the email address
Need support?If you do encounter any difficulty while proceeding these steps, don’t show any hesitation to contact us promptly via the email address
Need support?If you do encounter any difficulty while proceeding these steps, don’t show any hesitation to contact us promptly via the email address
Need support?If you do encounter any difficulty while proceeding these steps, don’t show any hesitation to contact us promptly via the email address
Need support?If you do encounter any difficulty while proceeding these steps, don’t show any hesitation to contact us promptly via the email address
Need support?If you do encounter any difficulty while proceeding these steps, don’t show any hesitation to contact us promptly via the email address
Need support?If you do encounter any difficulty while proceeding these steps, don’t show any hesitation to contact us promptly via the email address
Need support?If you do encounter any difficulty while proceeding these steps, don’t show any hesitation to contact us promptly via the email address
Need support?If you do encounter any difficulty while proceeding these steps, don’t show any hesitation to contact us promptly via the email address
Need support?If you do encounter any difficulty while proceeding these steps, don’t show any hesitation to contact us promptly via the email address
Need support?If you do encounter any difficulty while proceeding these steps, don’t show any hesitation to contact us promptly via the email address
Need support?If you do encounter any difficulty while proceeding these steps, don’t show any hesitation to contact us promptly via the email address
Need support?If you do encounter any difficulty while proceeding these steps, don’t show any hesitation to contact us promptly via the email address
Need support?If you do encounter any difficulty while proceeding these steps, don’t show any hesitation to contact us promptly via the email address
Need support?If you do encounter any difficulty while proceeding these steps, don’t show any hesitation to contact us promptly via the email address


Click Save
Now the Highlight automatically shows up on the product page. Please go to the front store to check the result.
This setting allows you to display the highlight on a specific product on the product page that you want.
Step to manage
1. From the app admin page, click Highlights > open the Highlight you want
2. Click the Display icon on the left > Condition section > click Add another condition button > Set up the condition like this: Select Products – is equal to – (selected items)
3. Click Select items > Add the products you want for the condition
4. Click Save
Our app provides you the shortcode of the Highlight that allows you to place it at any position you want.
Note: Only use the shortcode when you want to place it in a specific position.
Steps to manage
1. Open the app, click Highlights > open the Highlight you want
2. Click the Display icon on the left > Shortcode section > Copy the Shortcode of the Highlight
3. Go back to the Shopify admin page > Online stores > Themes > Customize (the theme you want) > open the page template you want
4. Click Add section > find the app block of Samita Highlights > click Add
5. In the block content, paste the shortcode of the Highlight
6. Drag and drop the block the change the position of the badge on the product
7. Click Save to update the changes in the theme editor
Step to manage
From the app admin page, click Highlights > open the Highlight you want
Click the Display icon on the left > Conditions > Click Add another condition
Set up the condition as below: Customers – Is Logged In
Click Save to update the changes
On the front store, only customers who logged into the customer account can see the highlight on the product page.
This setting allows you show the Highlight on the front store and only customers with specific tag can see it.
Steps to manage
From the app admin page, click Highlights > open the Highlight you want
In the Display tab > Condition section > set up the condition like this: Customer tag – is equal to – wholesale [example]
Click Save
Need support?If you do encounter any difficulty while proceeding these steps, don’t show any hesitation to contact us promptly via the email address
Friendly reminder!
If you do encounter any difficulty while proceeding with these steps, don’t show any hesitation to contact us promptly via the email address
We are always willing to help with all sincerity!
Friendly reminder!
If you do encounter any difficulty while proceeding with these steps, don’t show any hesitation to contact us promptly via the email address
We are always willing to help with all sincerity!


1. Open the app > click Banners > click the Create banner button
2. Click the Settings icon on the left > in the Elements sections, click on Group 1 of the banner > click Add content > Select one of the content types: Line break, Message, Button, Image > Countdown. For example, click Countdown to create Countdown for the banner
3. For each content type, you can adjust time to start and end, the text or color
4. After configuring Group 1, click Add group to add the next step of the banner
5. Click Add content to add content to Group 2 and configure it as you do for Group 1
6. Scroll to Time part > set Time Per Group. For example: The Time Per Group is 5 seconds, which means that each group will show up in 5 seconds on the banner
7. Click Save


