> For the complete documentation index, see [llms.txt](https://docs.samita.io/llms.txt). Markdown versions of documentation pages are available by appending `.md` to page URLs; this page is available as [Markdown](https://docs.samita.io/b2b-lock-password-protect/request-access/overview.md).
# Request access overview
Let shoppers ask for access to a Passcode- or Secret-link-protected lock, and review and grant those requests from the admin.
Request access adds a "please give me access" path for shoppers who hit a lock they can't get past on their own. Instead of only showing a passcode field or requiring a secret link, the lock can also show a small form. The shopper fills it in, you get notified, and you decide whether to send them the passcode or secret link by email.
{% hint style="info" %}
Request access only works on locks that use the **Passcode** or **Secret link** access rule. It isn't available for other rule types (logged-in customers, customer tags, date range, and so on), because those don't have a shared credential for you to hand out.
{% endhint %}
## Turn on Request access for a lock
1. Open the lock's editor and click **Customize templates** in the **Preview** panel.
2. In the left sidebar of the panel that opens, select the template your lock uses — **Passcode** or **Secret link**.
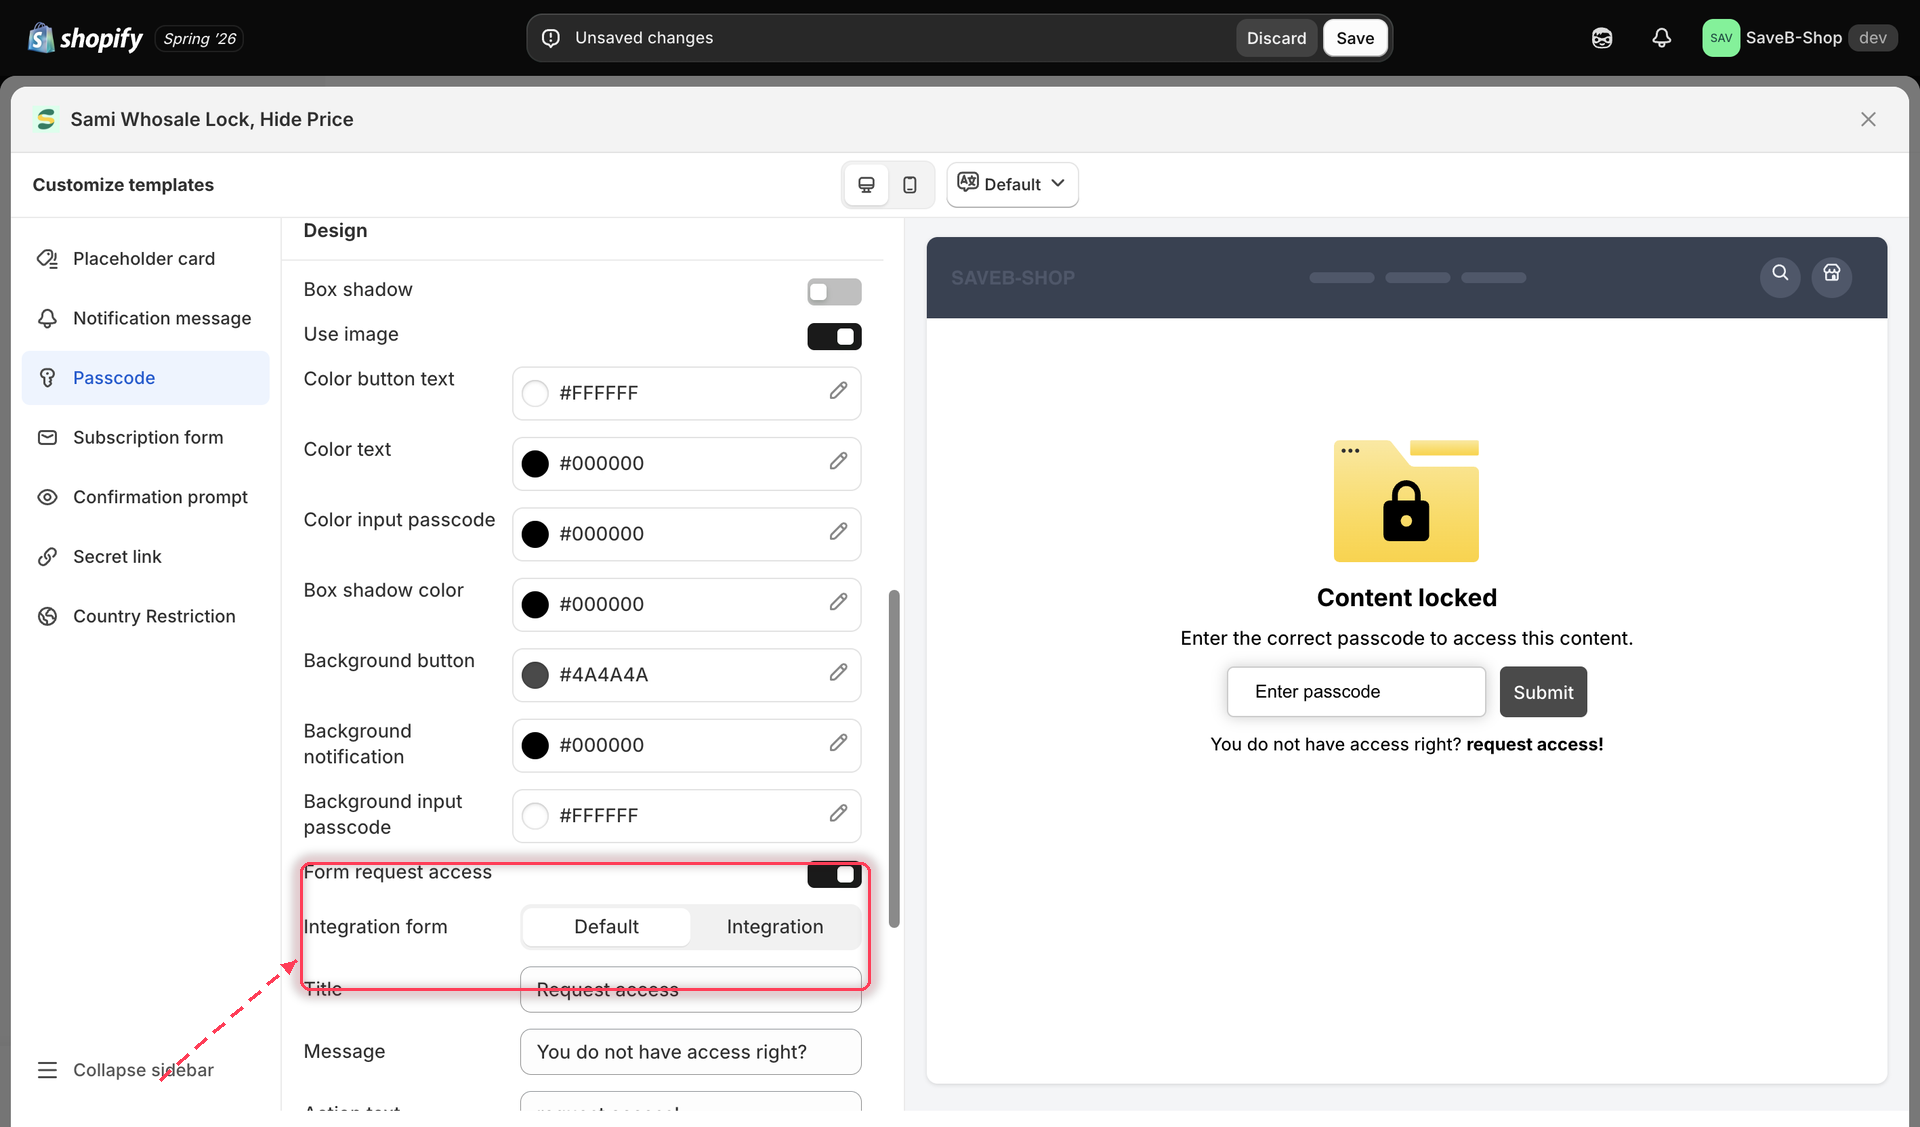
3. Scroll the middle column past **Translation** to the **Design** section and turn on **Form request access**.
If the lock's access rule isn't Passcode or Secret link, this option isn't available — switch the lock to one of those two rule types first. Request access may also require a paid plan; if it does, you'll see an upgrade prompt instead.
Turn on Form request access in the Customize templates panel, under Design.
## Choose how the form is collected: default or Integration
Once Form request access is on, pick how the request form itself is shown:
* **Default** — the app shows its own built-in form on the storefront lock screen. No extra setup needed; this is the simplest option.
* **Integration** — instead of the app's form, you use a form hosted or built by a third-party tool (for example, a form builder or CRM). Selecting Integration reveals a **Short code** field where you paste an embeddable snippet (the app shows a placeholder like ``). That short code is what actually renders on the lock screen in place of the default form. An in-app info banner points you to further documentation if you're not sure how to get the short code for your form.
Use Integration when you already collect leads through another tool and want the request to land there instead of in the app's own Request access list.
## Customize the form copy
Directly below the **Form request access** toggle, in the same **Design** section, you can edit the text shown with the form:
| Field | Default |
| --------------- | ------------------------------- |
| **Title** | `Request access` |
| **Message** | `You do not have access right?` |
| **Action text** | `request access!` |
The preview on the right updates as you type, so you can see exactly how the invitation reads on the lock screen.
The form's own field labels (Email, Name, Message, Send request) and its success message live a little higher up in the same panel, under **Translation** — and like all lock copy, they're editable per storefront language via the language switcher at the top of the panel. See [Translate lock messages](/b2b-lock-password-protect/design-and-customization/translate-messages.md).
## How the end-to-end flow works
1. A shopper reaches a Passcode- or Secret-link-protected page and doesn't have the passcode or a valid secret link.
2. Because Form request access is on, they see the request form (or your Integration form) instead of a dead end. They submit their name, email, and an optional message.
3. You're notified by the **Admin notification email**, sent to your store's contact address for every new request.
4. You open the request in the **Request Access** list, review who asked and for what, and pick which passcode or secret link to hand out.
5. You click **Send access**. The shopper receives the **Customer access email** containing the actual passcode or secret link, and the request is marked resolved.
See [Manage access requests](/b2b-lock-password-protect/request-access/manage-requests.md) for what the list and the review screen look like, and [Customize request and access emails](/b2b-lock-password-protect/request-access/email-setup.md) for editing what those two emails say and look like.
{% hint style="info" %}
This is separate from a Shopify customer account access request. Request access is specific to content locked with the app's Passcode or Secret link rule — it has nothing to do with Shopify's own customer account or B2B company account approval flows.
{% endhint %}
## Video walkthrough
Request access lives inside a Passcode or Secret link lock, so this walkthrough builds a passcode lock from scratch — the setup Request access sits on top of:
{% embed url="" %}
## Related docs
* [Passcode](/b2b-lock-password-protect/access-rules/passcode.md)
* [Secret link](/b2b-lock-password-protect/access-rules/secret-link.md)
* [Manage access requests](/b2b-lock-password-protect/request-access/manage-requests.md)
* [Customize request and access emails](/b2b-lock-password-protect/request-access/email-setup.md)
---
# Agent Instructions
This documentation is published with GitBook. GitBook is the documentation platform designed so that both humans and AI agents can read, navigate, and reason over technical content effectively. Learn more at gitbook.com.
## Querying This Documentation
If you need additional information that is not directly available in this page, you can query the documentation dynamically by asking a question.
Perform an HTTP GET request on the current page URL with the `ask` query parameter, and the optional `goal` query parameter:
```
GET https://docs.samita.io/b2b-lock-password-protect/request-access/overview.md?ask=&goal=
```
`ask` is the immediate question: it should be specific, self-contained, and written in natural language.
`goal` is optional and describes the broader end goal you are ultimately trying to accomplish on behalf of the user. GitBook uses it to tailor the answer towards what is most useful for that goal.
The response will contain a direct answer to the question and relevant excerpts and sources from the documentation.
Use this mechanism when the answer is not explicitly present in the current page, you need clarification or additional context, or you want to retrieve related documentation sections.