
Bulk edit badges
Edit up to 250 badges at once in a spreadsheet-style grid: change text, translations, image, position, colors, products and conditions, priority, devices, and schedule, or set one value for every selected badge.
Bulk edit opens the badges you select in a spreadsheet-style grid, one row per badge and one column per setting. Change a value in any cell, or set one value for the whole column, then save every badge in a single step.
Use it when the same change has to reach many badges, for example a new end date for every Black Friday badge, a new color for your sale badges, or the same product added to several badges.
Open the bulk editor
Section titled “Open the bulk editor”-
Open Badges & Labels
Section titled “Open Badges & Labels”In Shopify admin, open Sami Product Labels > Badges & Labels.
-
Select the badges to edit
Section titled “Select the badges to edit”Tick the checkbox at the start of each badge row. To select every badge on the page, tick the checkbox in the table header.
To edit badges on more than one page, tick the header checkbox, then click Select all N badges in the bar above the table. The selection follows your current search, filter, and sort, and stays in place when you move between pages.
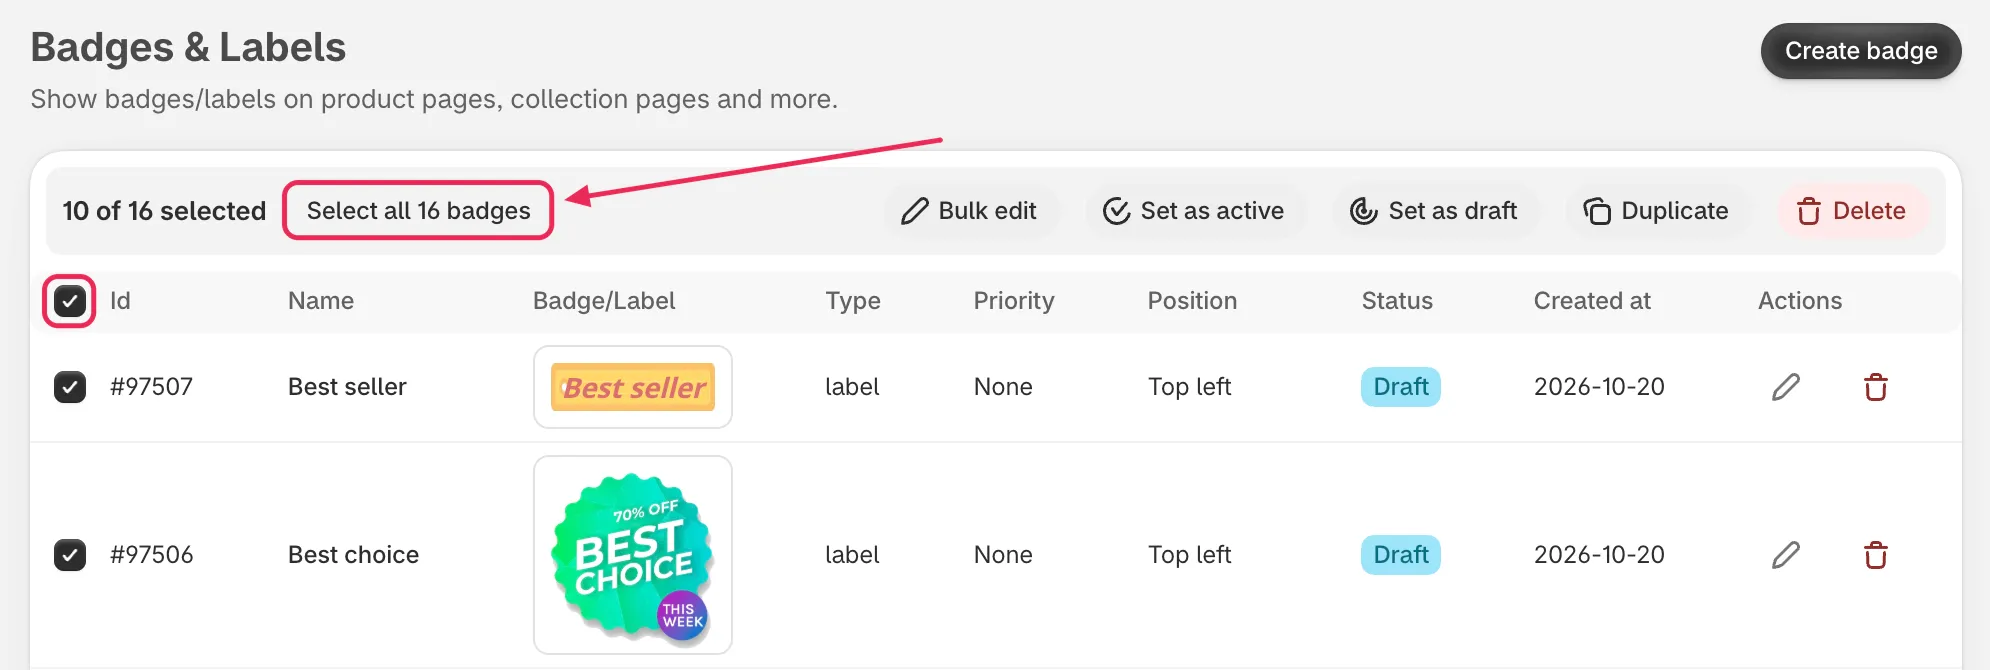
Tick the header checkbox, then click Select all to include badges on every page.
-
Click Bulk edit
Section titled “Click Bulk edit”In the bulk action bar, click Bulk edit. The bulk editor opens in a full-screen window titled Editing N badges.
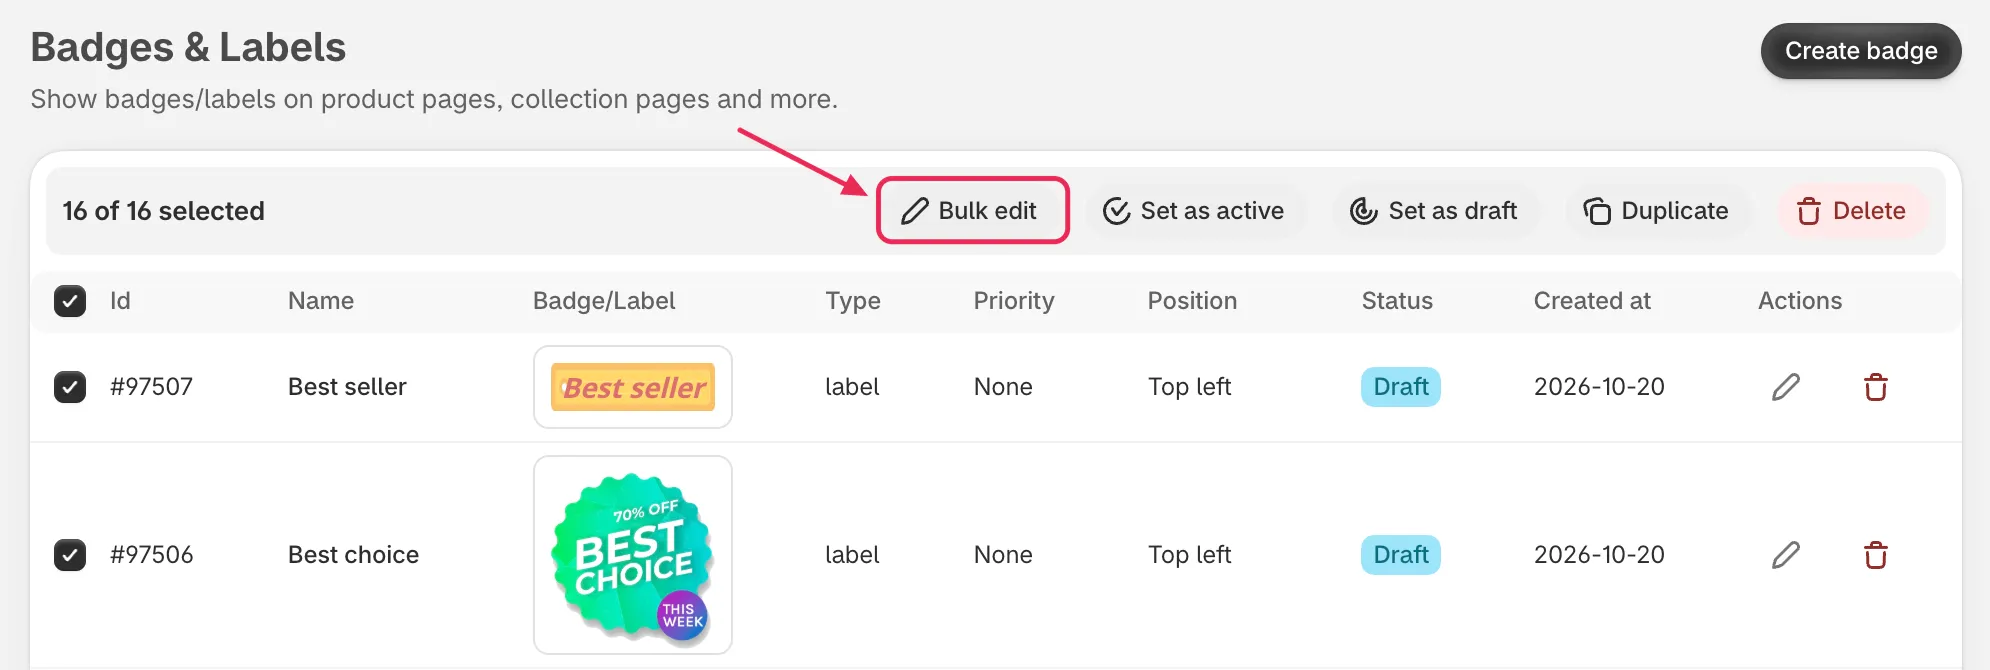
Bulk edit sits first in the bulk action bar.
Get to know the grid
Section titled “Get to know the grid”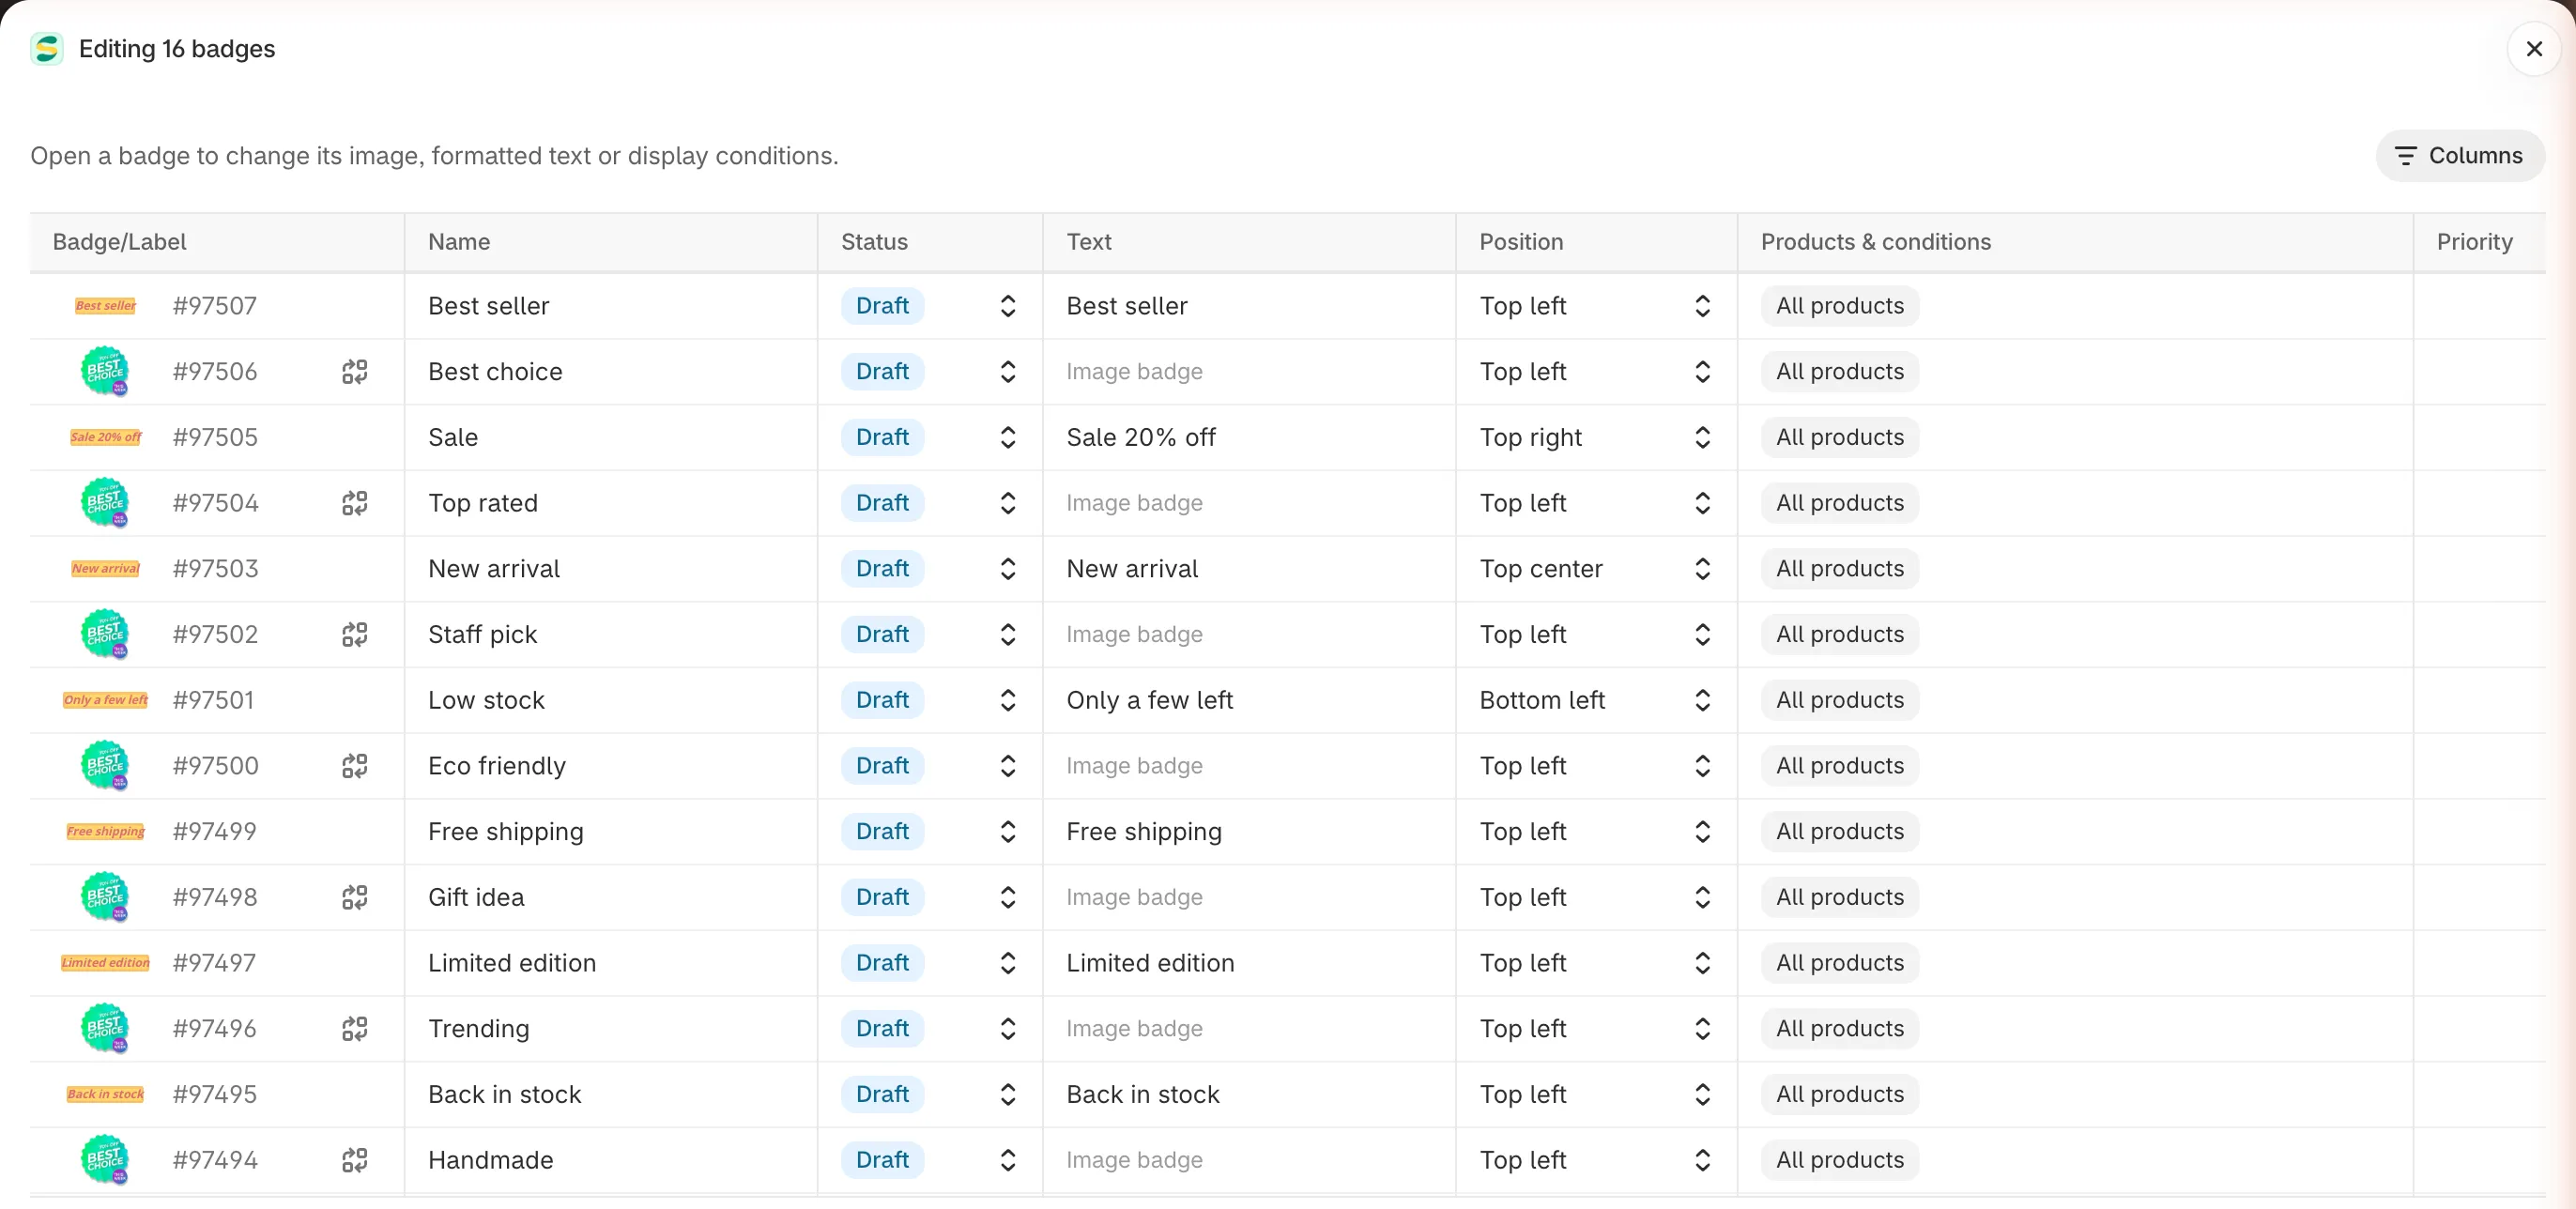
One row per badge, one column per setting.
- Badge/Label column — the first column shows each badge’s ID and a preview. The preview updates as you edit, so you see the result before you save.
- Sub-rows — some settings have more than one value per badge, such as a text badge with translations, or a badge placed differently on listing pages and the product page. These values appear as sub-rows under the badge. Click the arrow next to the preview to show or hide them.
- Gray dash — a cell with a gray dash can’t be changed in the bulk editor. Hover over it to see why. See Cells you can’t edit here.
- Highlighted cells — every cell you changed is highlighted until you save. Below the grid, Changed: N counts the badges with unsaved changes, and With errors: N counts the badges that need fixing.
Choose which columns to show
Section titled “Choose which columns to show”The grid opens with Name, Status, Text, Position, Products & conditions, and Priority. To add or remove columns, click Columns above the grid and tick the ones you need.
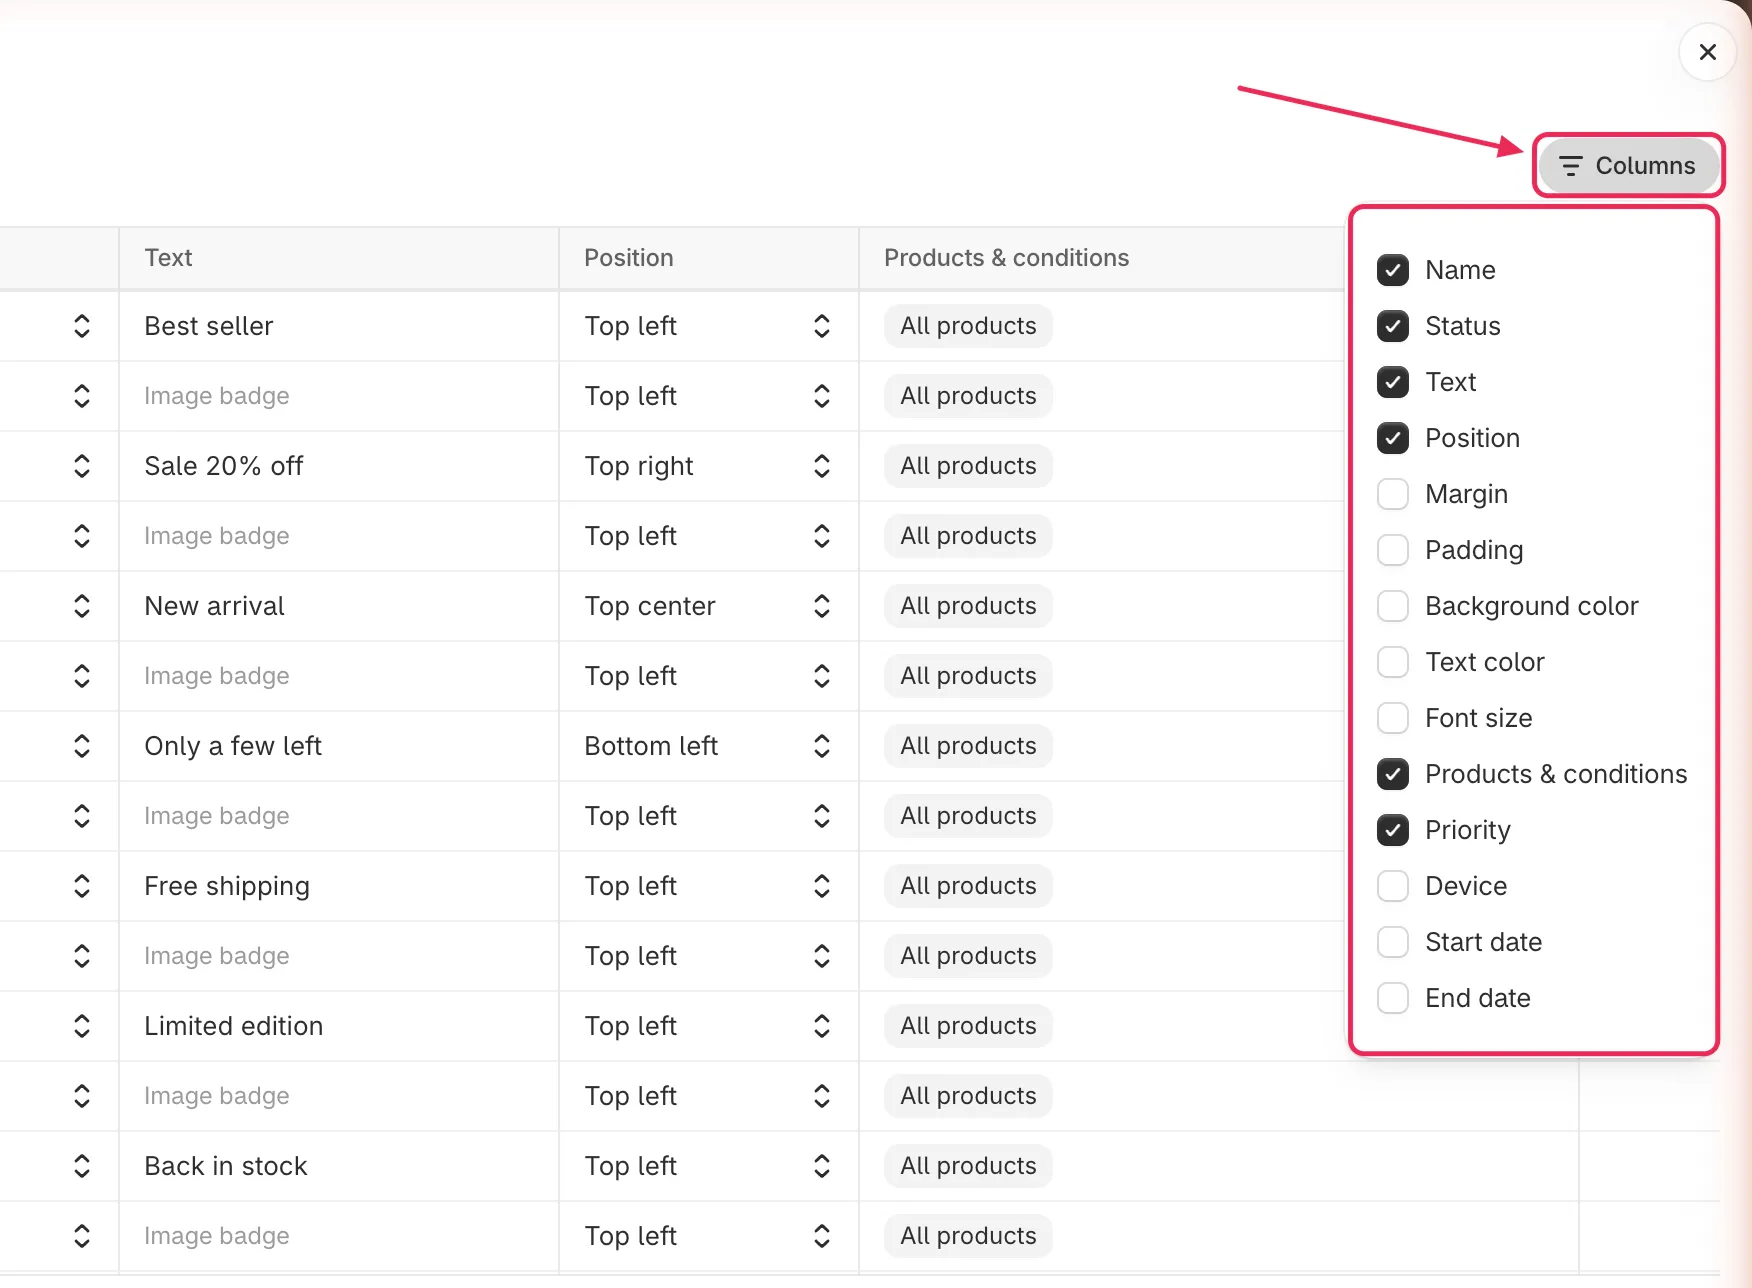
Show only the columns you plan to change.
Edit one badge
Section titled “Edit one badge”Click a cell and type, or pick a value from its menu. Your changes stay in the grid until you click Save.
| Column | What you can change |
|---|---|
| Name | The badge name shown in your list. It can’t be empty. |
| Status | Active to show the badge in your store, or Draft to hide it. |
| Text | The text of a text badge. Each translation appears as a sub-row named after its language. A translation can’t be empty. |
| Position | Where the badge sits. A badge inside the product image offers the nine image positions. A badge below a product-page element offers Left, Center, and Right. A badge placed differently on each page has a sub-row for Listing pages and one for Product page. |
| Margin | The space between the badge and the edge it is pinned to, from 0 to 500. Only the sides that apply to the current position can be changed, the same as in the badge editor. |
| Padding | The space inside the badge on all four sides, from 0 to 500. |
| Background color | The background of a text badge with a solid background. |
| Text color | The text color of a text badge. |
| Font size | The text size of a text badge, from 1 to 200 px. |
| Products & conditions | Which products show the badge. See Change products and conditions. |
| Priority | A number from 0 to 100. Leave it empty for no priority. |
| Device | All devices, Desktop, or Mobile. |
| Start date and End date | When the badge starts and stops showing. The end date must be after the start date. |
Change the image of an image badge
Section titled “Change the image of an image badge”-
Click Change image
Section titled “Click Change image”In the first column of an image badge, click the Change image button next to the preview.
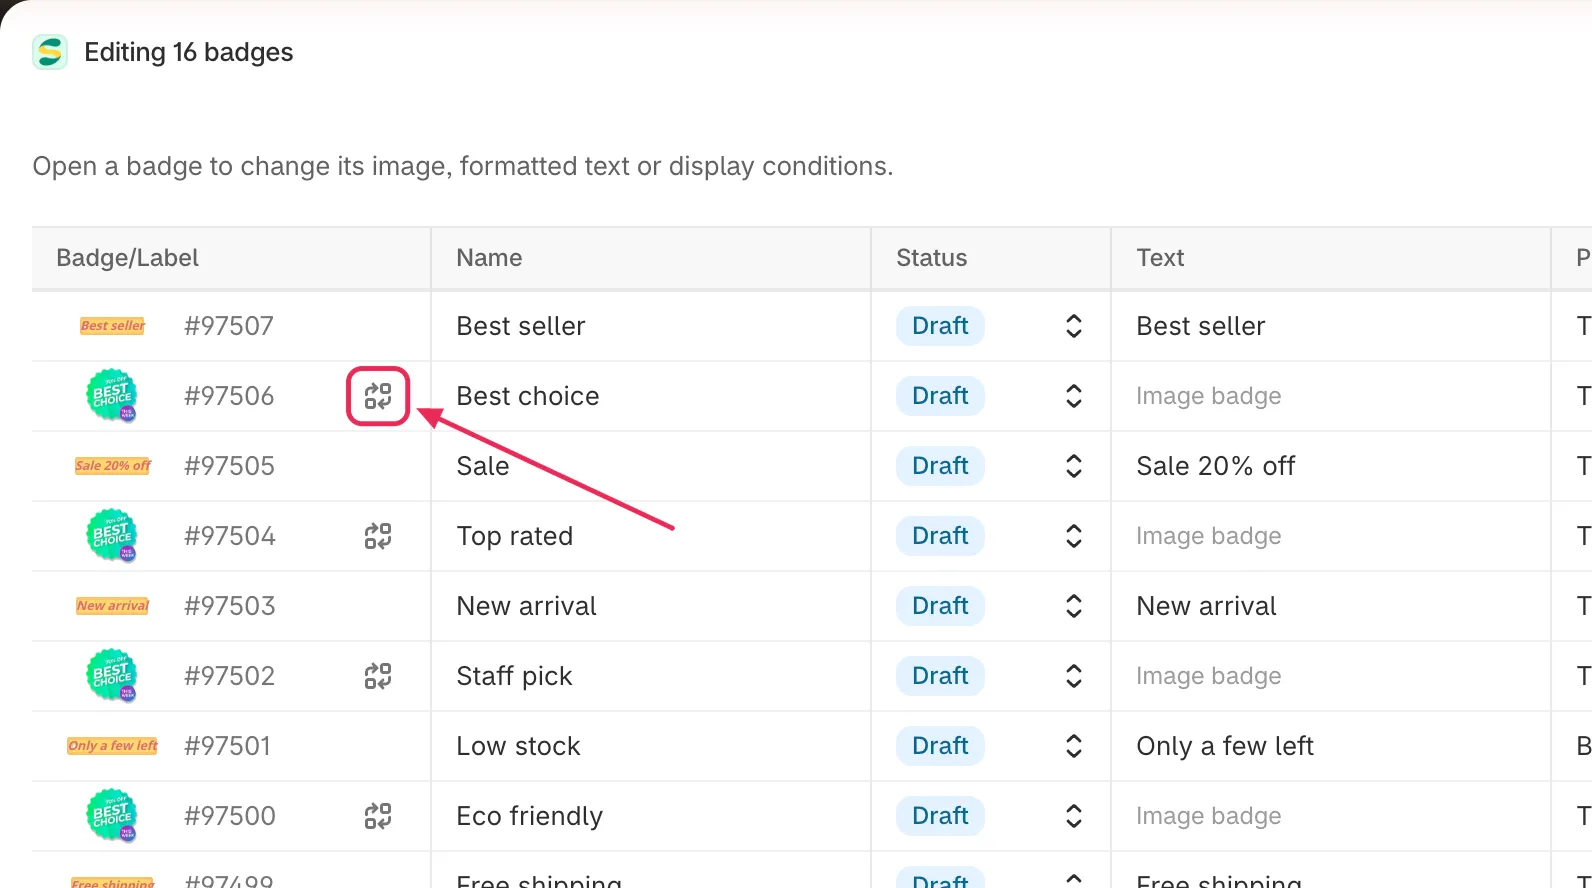
Image badges have a Change image button next to their preview.
-
Pick the new image
Section titled “Pick the new image”Choose an image from the library, or generate one with AI, the same as in the badge editor. The preview in the grid updates right away.
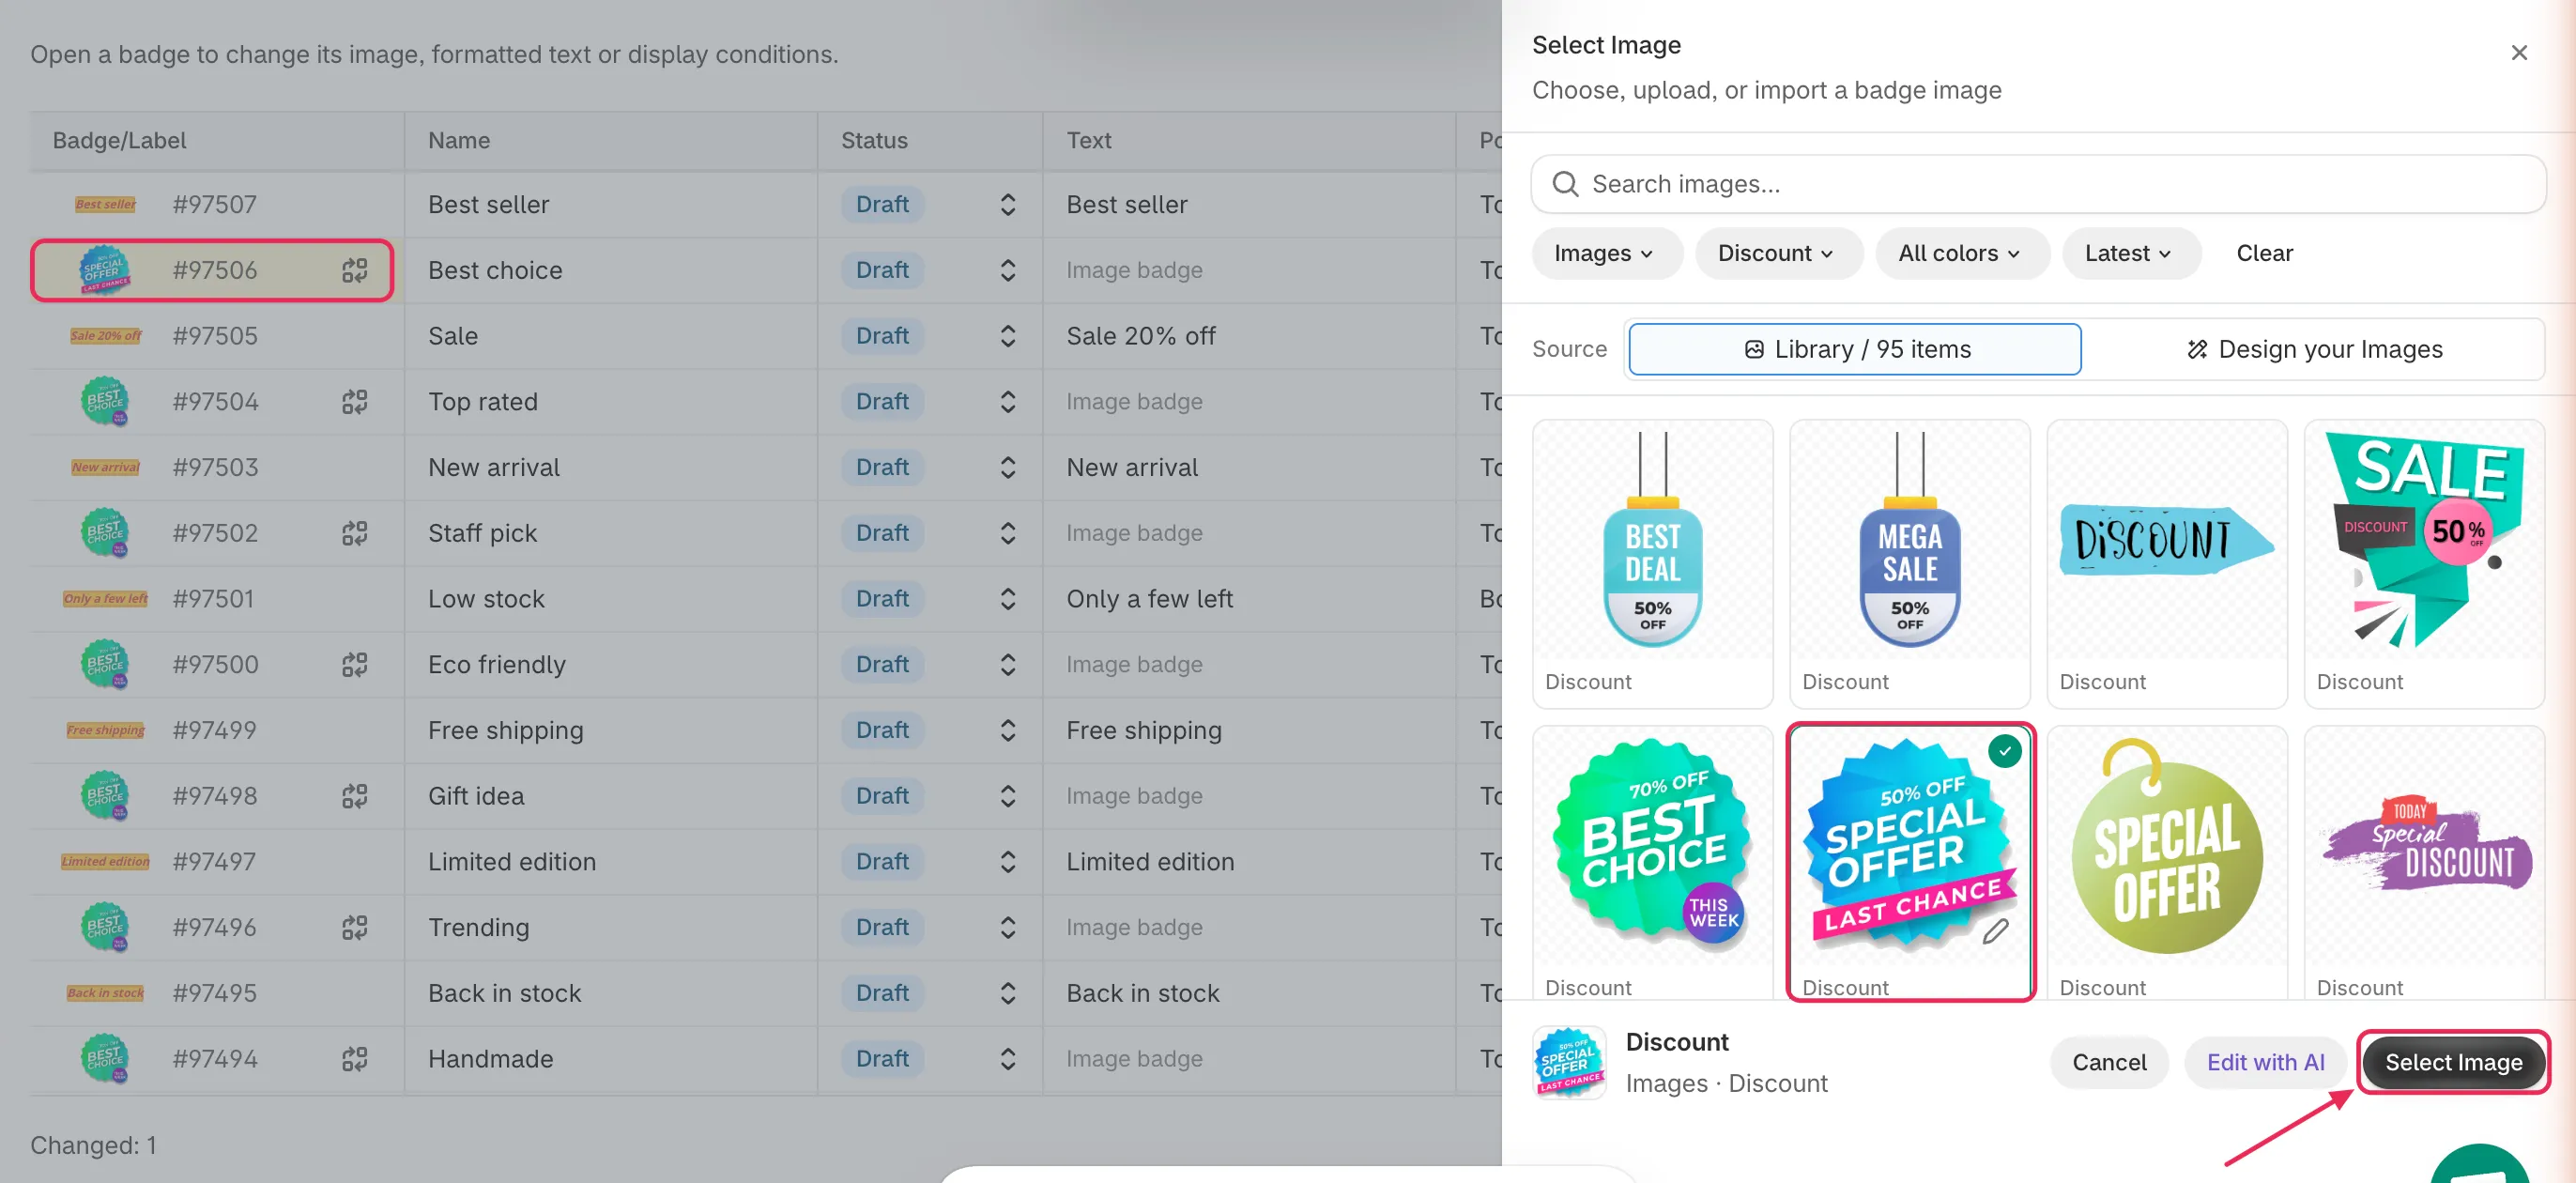
The same image picker as the badge editor.
Change products and conditions
Section titled “Change products and conditions”The Products & conditions cell sums up which products show the badge: All products, Specific with the number of products, or Conditions with a short list of the rules.
-
Click the cell
Section titled “Click the cell”Click the Products & conditions cell of the badge. A panel opens with the same options as the Products tab of the badge editor. Its title shows the badge’s preview, ID, and name.
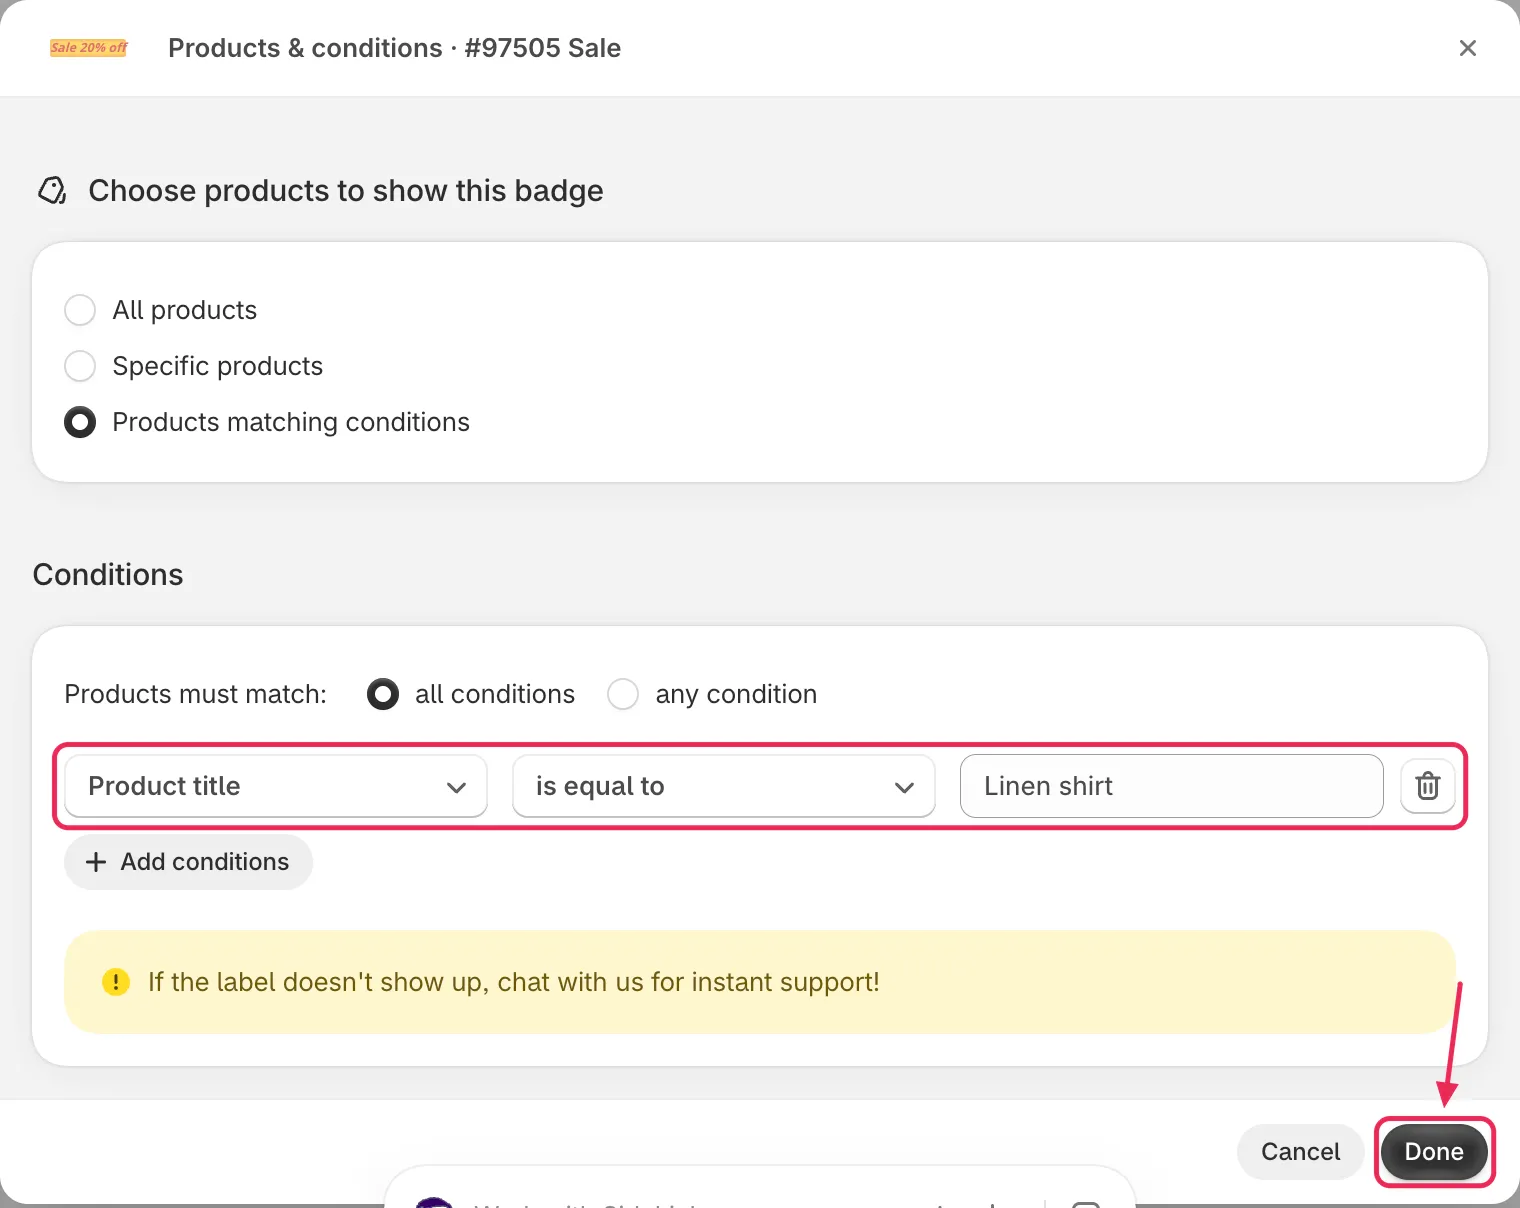
The panel has the same product options as the badge editor.
-
Change the products or conditions
Section titled “Change the products or conditions”Pick All products, choose specific products, or add, change, and remove conditions. See Target specific products for each option.
-
Click Done
Section titled “Click Done”Click Done to put the change in the grid, or Cancel to close the panel without changing anything. The change is saved only when you click Save.
Set one value for all badges
Section titled “Set one value for all badges”To give every badge in the grid the same value, set it from the column header instead of cell by cell.
-
Hover over the column header
Section titled “Hover over the column header”Move the pointer over the header of the column you want to change. A pencil icon appears next to the column name.
-
Click the pencil icon
Section titled “Click the pencil icon”A box titled Set column for all opens, for example Set status for all.
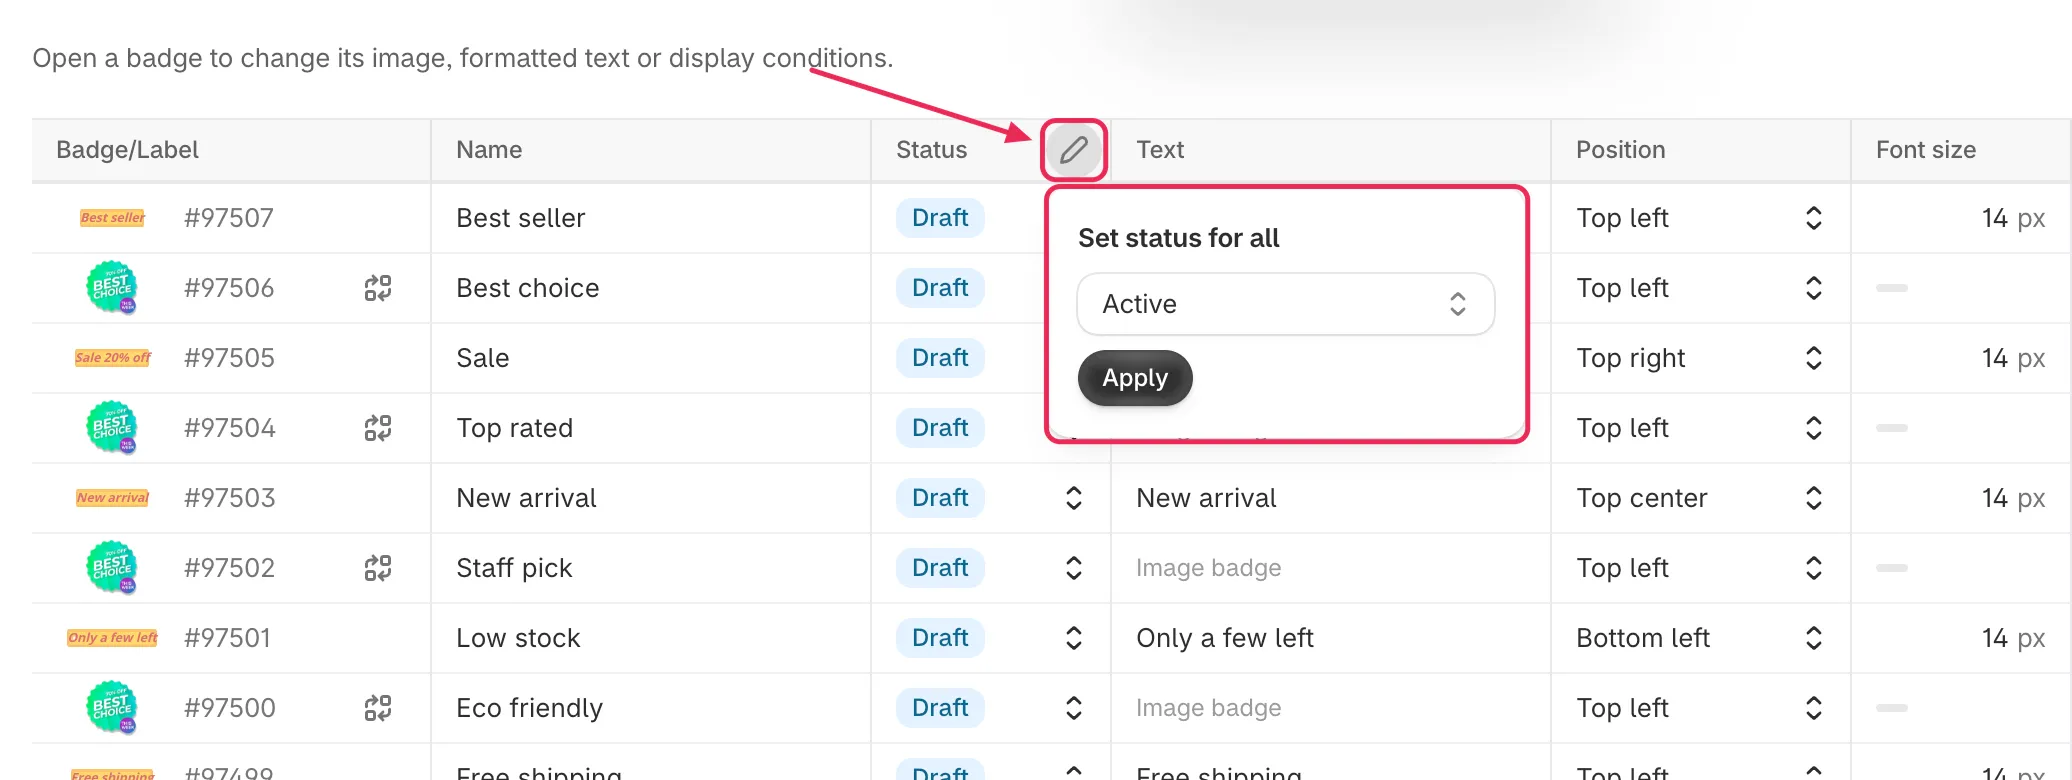
Hover over a column header and click the pencil icon.
-
Enter the value and click Apply
Section titled “Enter the value and click Apply”Enter or pick the value, then click Apply. Every badge in the grid that supports this setting gets the new value, and the changed cells are highlighted.
For Margin and Padding, leave a side empty to keep each badge’s own value for that side.
Add or remove products for all badges
Section titled “Add or remove products for all badges”In the Products & conditions column, the pencil icon opens a menu instead of a box:
- Add products to all — adds the products you pick to every badge that targets specific products. Each badge keeps the products it already had.
- Remove products from all — removes the products you pick from every badge that targets specific products.
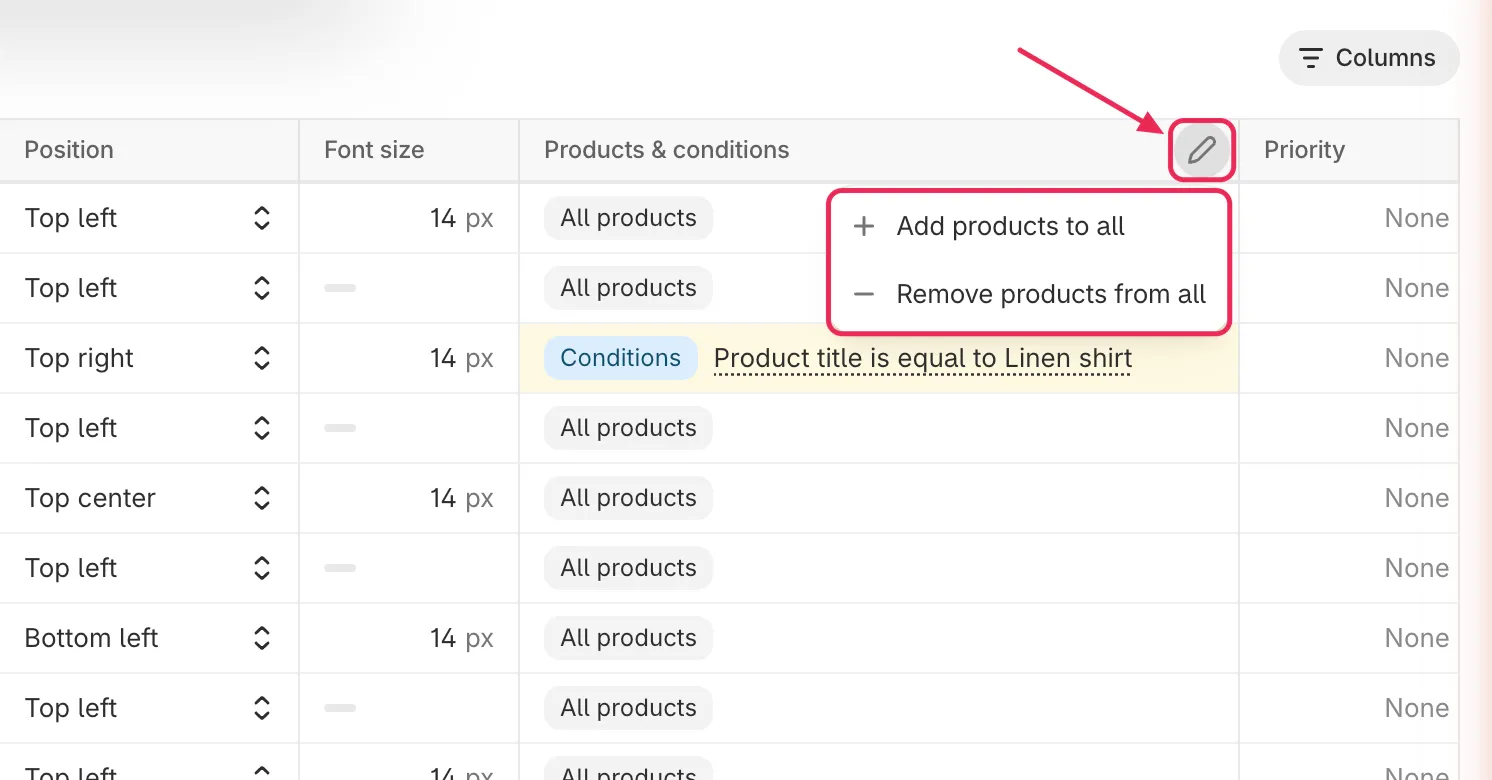
Add or remove products without replacing each badge’s own list.
Save your changes
Section titled “Save your changes”When you change a cell, a save bar appears at the top of the window.
-
Check the highlighted cells
Section titled “Check the highlighted cells”If a value isn’t valid, the cell gets a red border and the error appears under it. Fix the value to clear the error. With errors: N below the grid shows how many badges still need fixing.
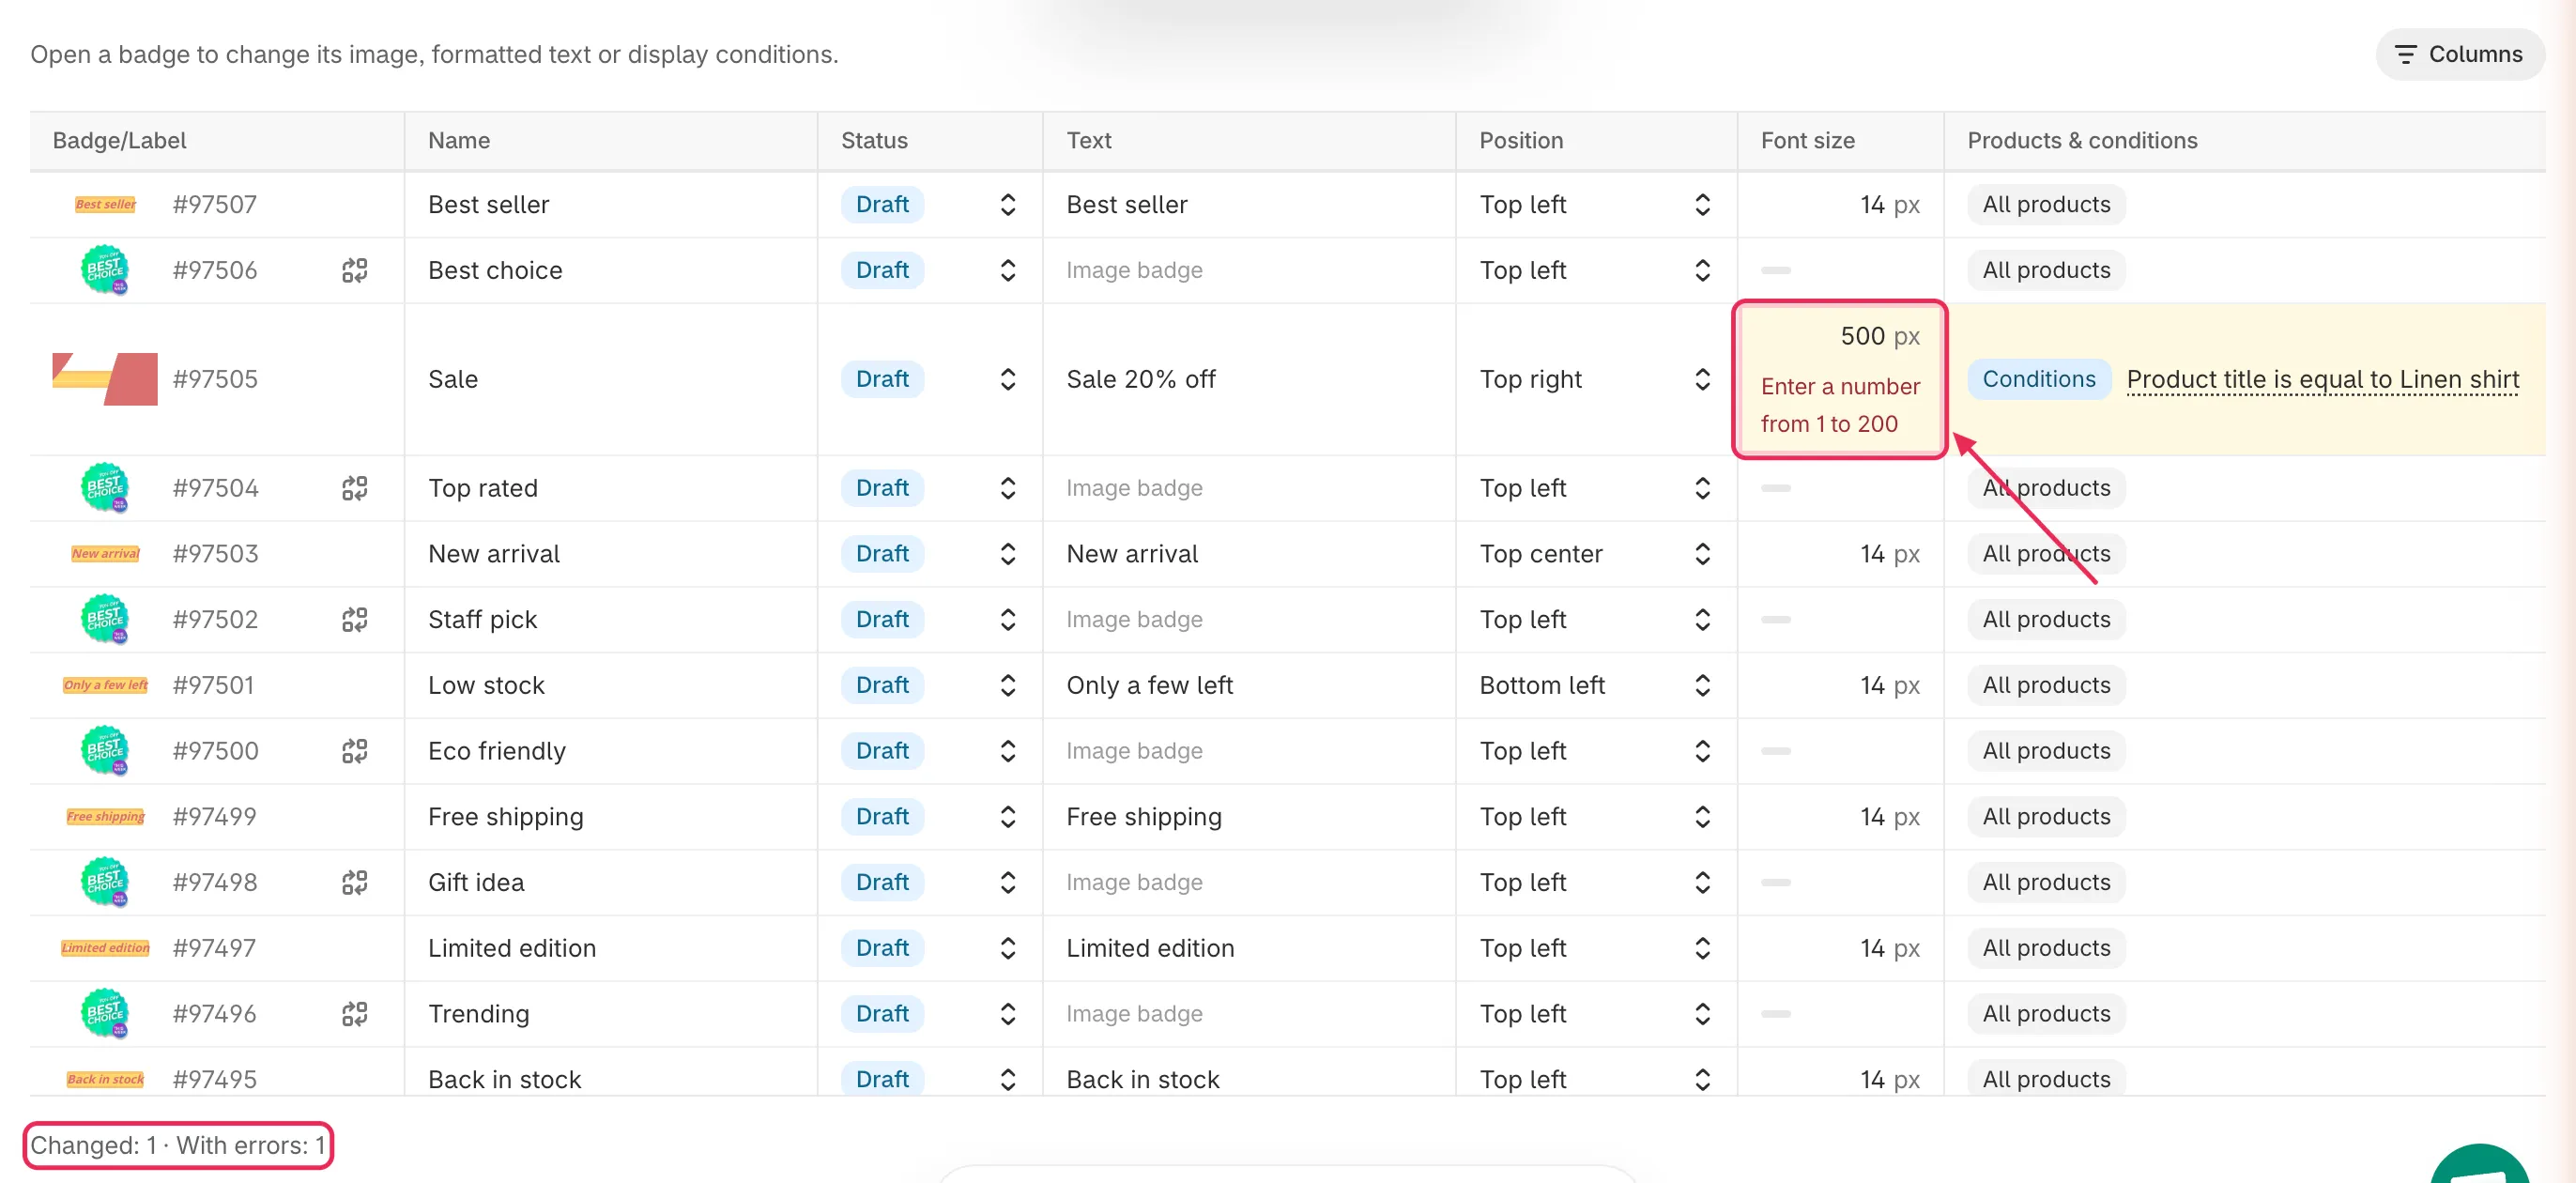
Fix every cell marked in red before you save.
-
Click Save
Section titled “Click Save”Click Save in the save bar. When the message Badge/Label updated appears, every changed badge is saved and your storefront starts showing the new settings.
To drop every unsaved change instead, click Discard.
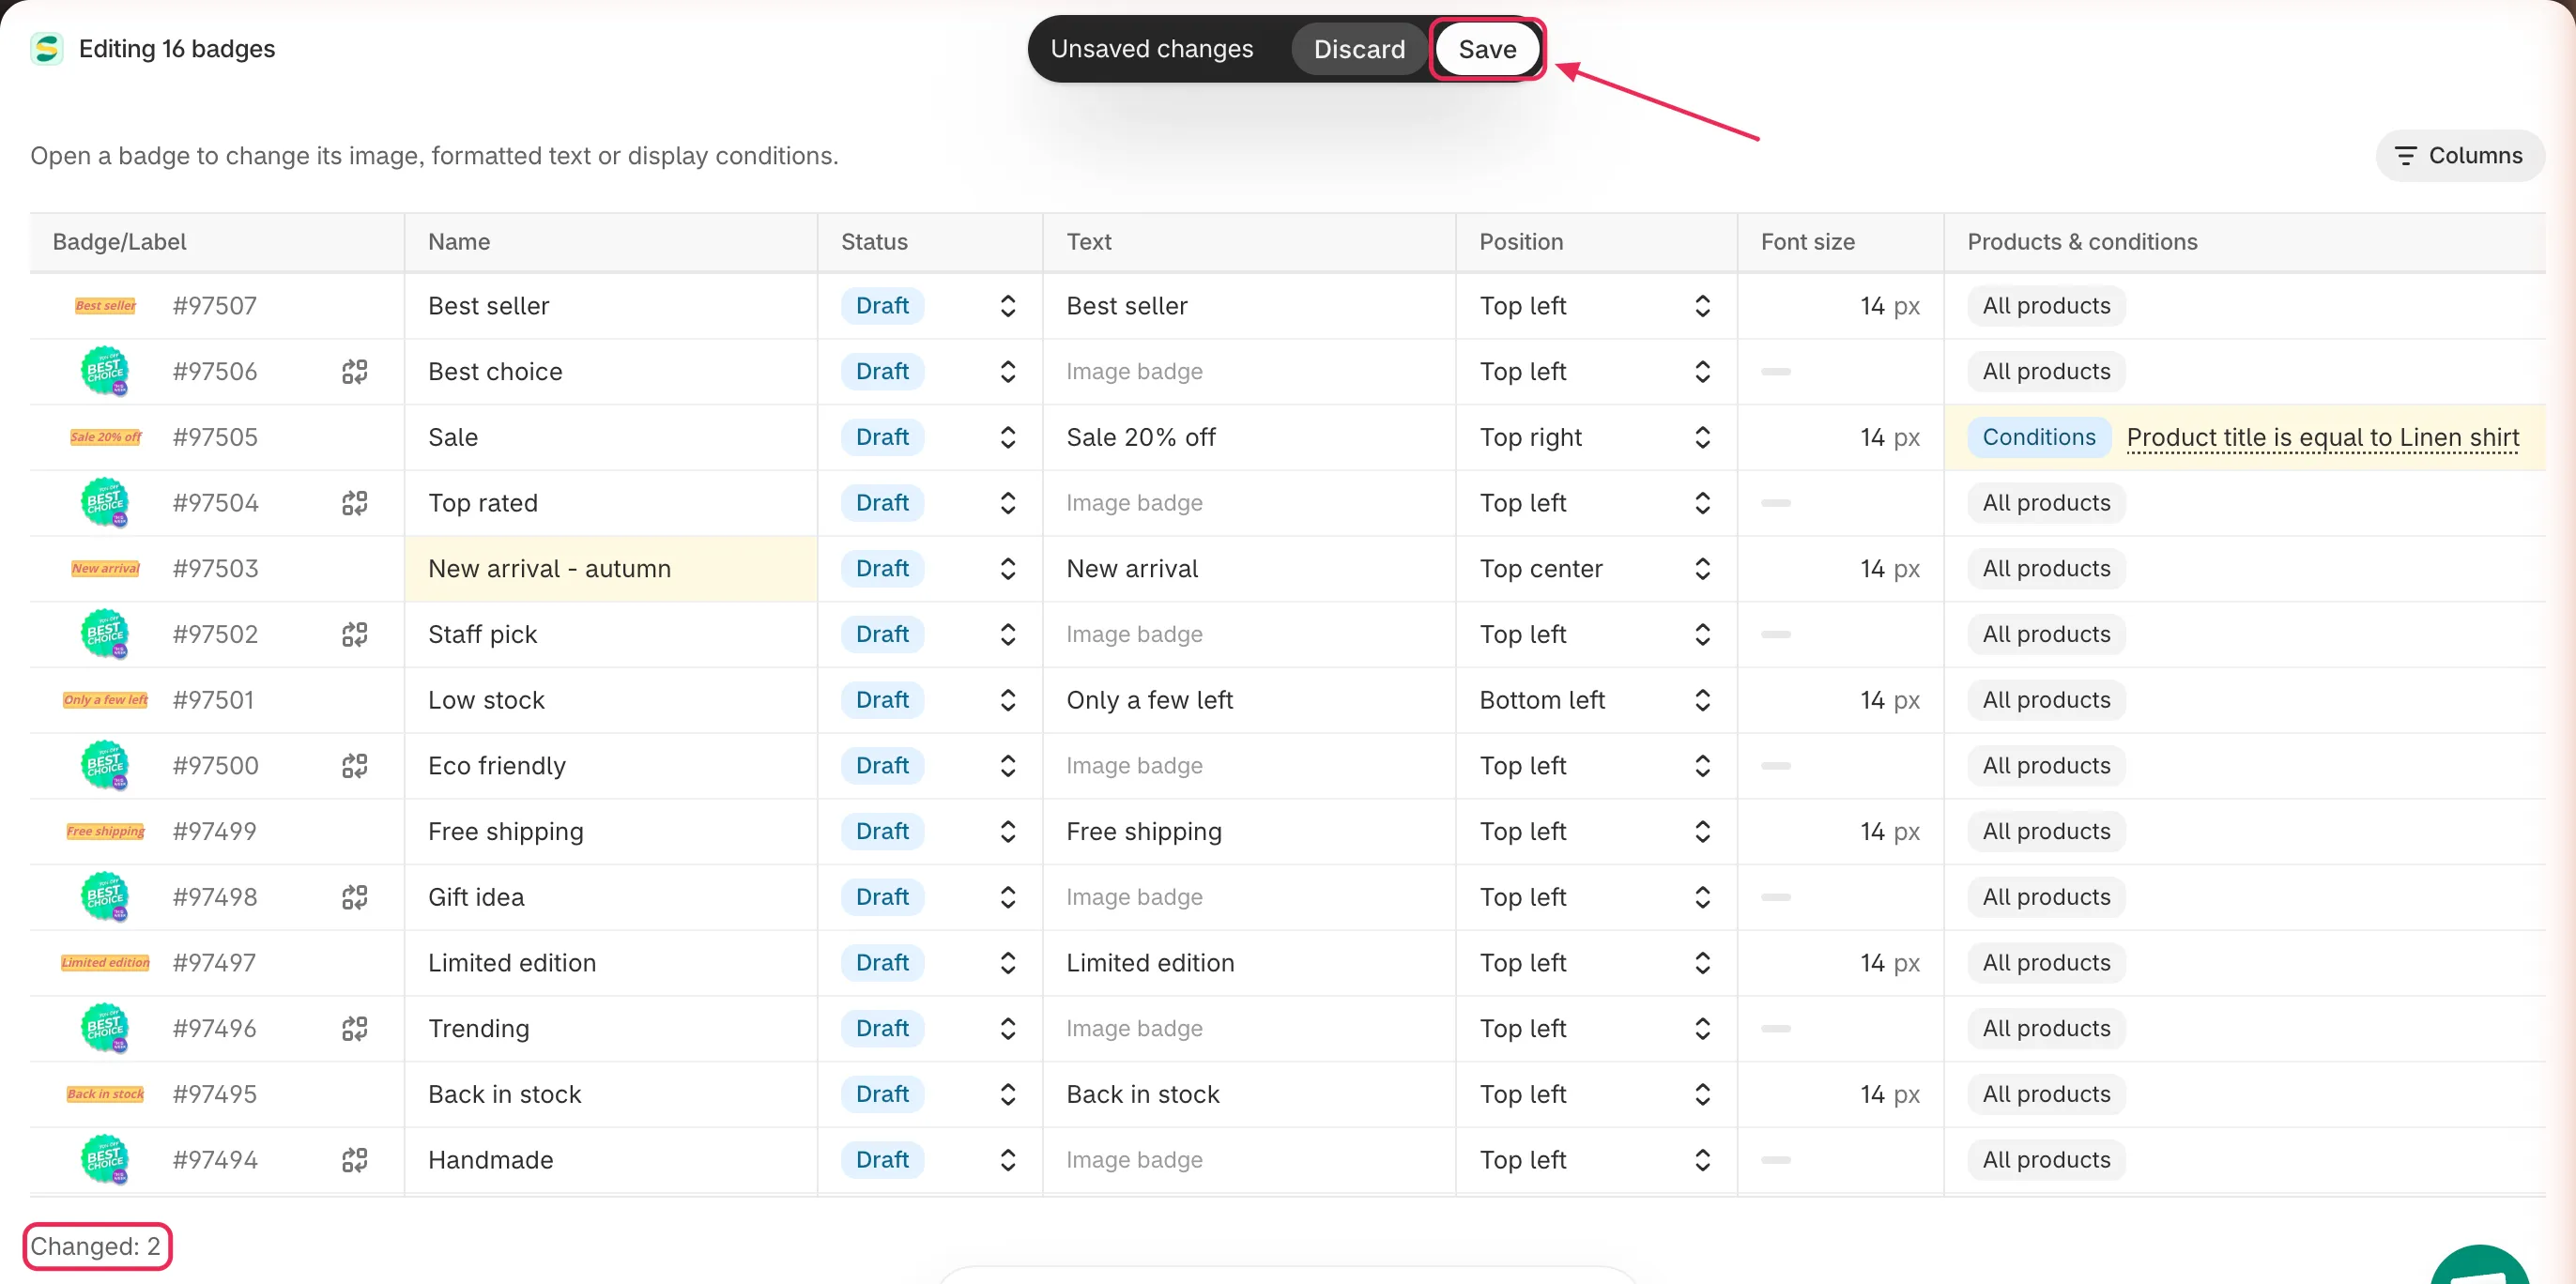
Save every changed badge at once, or discard all changes.
-
Close the bulk editor
Section titled “Close the bulk editor”Close the window to go back to Badges & Labels. The list reloads with your changes.
Cells you can’t edit here
Section titled “Cells you can’t edit here”Some settings are too detailed for a grid cell. They show a gray dash — hover over it to see the reason, then open the badge in the badge editor to change them.
| Reason | What it means |
|---|---|
| Image badge | The column only applies to text badges, such as Text, Text color, or Font size. |
| Formatted text, edit in editor | The text uses formatting from the editor, such as bold words or several lines. Editing it in a cell would remove that formatting. |
| No text | The badge has no text in this language. |
| Shape or image background | The text badge uses a shape or an image as its background, so it has no single background color. |
| Custom position | The badge uses a custom position set in the badge editor. |
| Different per page | The badge is placed differently on listing pages and the product page. Edit the Listing pages and Product page sub-rows instead. |
| No margin at this position | The current position has no margin to set, for example a badge in the center of the image. |
To change other settings, such as the shape, animation, custom CSS, or page display conditions, click the badge’s edit icon in the Badges & Labels list.
Troubleshooting
Section titled “Troubleshooting”The Bulk edit button doesn't appear
Select at least one badge first — the button is in the bulk action bar, which only appears when a badge is selected. If badges are selected and the button is still missing, your window is too narrow. Widen it or use a desktop screen.
The error "Your plan allows up to N products" appears under a Products & conditions cell
The badge targets more specific products than your plan allows. Remove some products from the badge, or upgrade your plan.
The error "needs the Sami discount condition" or "needs the Product review app condition" appears
The badge text uses a variable, such as a discount or review variable, that only works with a matching condition on the Products & conditions tab. Add that condition to the badge, or remove the variable from the text.
"Save or discard your changes first" appears
You clicked a link that leaves the bulk editor, such as an upgrade link, while you still have unsaved changes. Click Save or Discard, then try again.
Next steps
Section titled “Next steps”- Duplicate and manage badges — Change status, duplicate, or delete selected badges.
- Target specific products — Learn every product and condition option.
- Schedule badge visibility — Set recurring weekday schedules and countdowns in the badge editor.