
Automations and Shopify Flow
Choose which application events send emails and Shopify Flow triggers, and build Flow workflows that approve, reject or question applications.
Every time an application moves, Sami B2B Onboarding fires an event: received, revised, approved, rejected, and so on. On the Automations tab, each event has one switch. The switch controls the emails the app sends for that event and the Shopify Flow trigger it publishes. In Shopify Flow, you can start your own workflows from those triggers, and use the app’s actions to approve, reject or ask for more information.
The events
Section titled “The events”| Event | When it fires | Emails it sends |
|---|---|---|
| Application received | When a buyer submits an application | Application received (to the buyer), New application (to your team) |
| Application revised | When a buyer answers a request for information | Buyer resubmitted (to your team) |
| Application approved | When an application is approved, by a person, a rule or a Flow action | Account approved (to the buyer) |
| Revision requested | When you ask a buyer for more information | More information needed (to the buyer) |
| Application rejected | When an application is rejected | Application declined (to the buyer) |
| Company created | When an approval creates the Shopify company | None. It only publishes a Shopify Flow trigger. |
All six events are on when you install the app.
Turn an event on or off
Section titled “Turn an event on or off”-
Open the Automations tab
Section titled “Open the Automations tab”In the Shopify admin, open Sami B2B Onboarding, click Automation in the app menu, then click the Automations tab.
The Triggers card lists the six events. Each row shows:
- The event’s name and when it fires.
- What it does, for example “Emails: Application received (to the buyer), New application (to your team) · Publishes a Shopify Flow trigger”.
- How often it ran this month: No runs, 1 run this month or “12 runs this month”. Each email and each Flow trigger the event sent, or tried to send, counts as a run.
-
Flip the switch
Section titled “Flip the switch”Turn the switch at the end of the row off or on. The tab’s count shows how many events are on.
-
Click Save in the save bar. You see Automation saved.
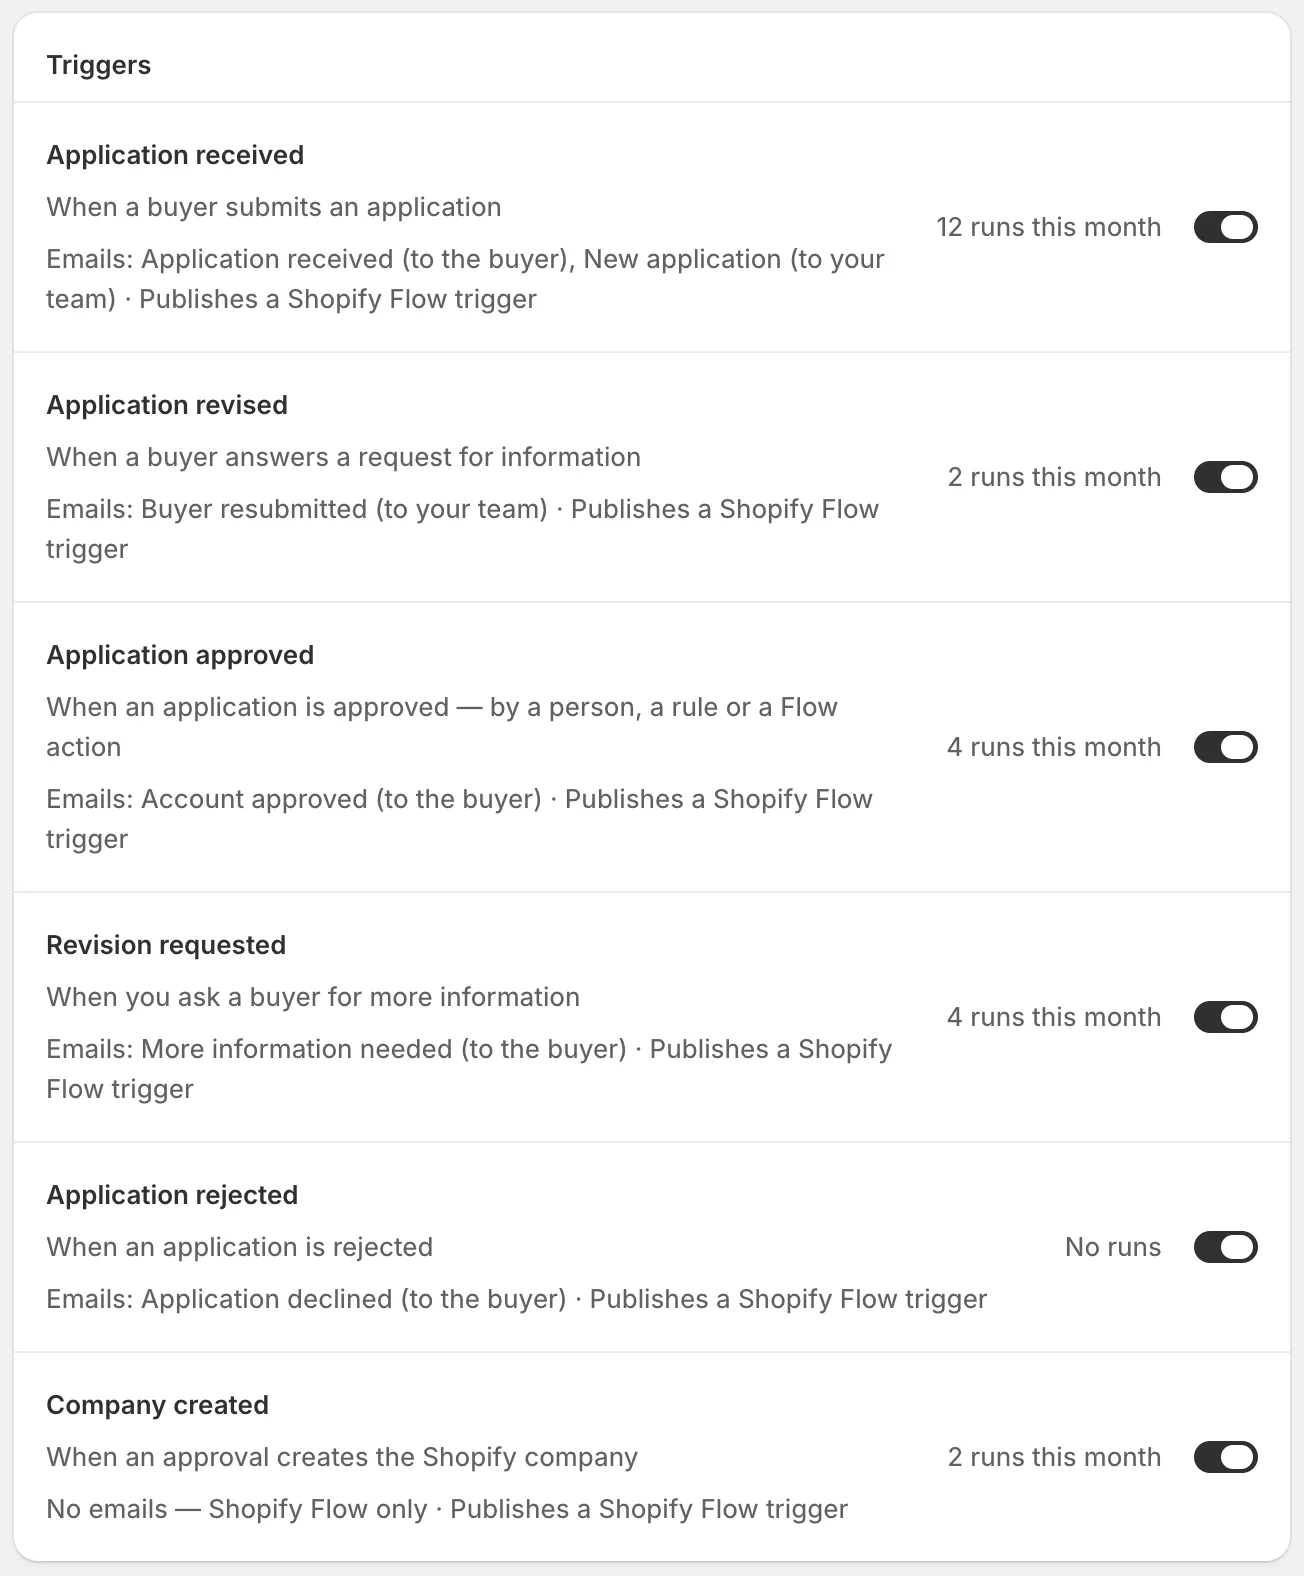
Each row says which emails the event sends and how often it ran this month.
An email goes out only when its event is on and the email itself is turned on. Each application email has its own switch in the form builder’s Email section, so you turn it on or off one form at a time. The Application declined email starts turned off, so buyers aren’t told about a rejection until you turn it on. See Edit email templates. The “to your team” emails go to the people in Choose who gets notified.
See what ran
Section titled “See what ran”The Recent runs card on the right of the Automations tab shows the last five things the app sent or wrote, newest first: emails, Shopify Flow triggers, and updates to the buyer’s Shopify customer and company. Each line gives the event and the company, then the result and the time, for example “Application received · Acme Supply Co.” and “Email sent”. The dot is green when it worked and red when it failed.
Click View all to open Settings › Activity log on its Emails view, with the full history. See Activity log.
The Shopify Flow card
Section titled “The Shopify Flow card”The Shopify Flow card sits above Recent runs. Its badge tells you how the last trigger went:
| Badge | What it means |
|---|---|
| Triggers available | The triggers are ready, and nothing has been published yet. The first application event will send one. |
| Published and a time, for example “Published 2 hours ago” | The last trigger reached Shopify Flow. The card names it and the company, for example “Last trigger: Application received · Acme Supply Co.” |
| Publish failed and a time | Shopify Flow didn’t take the last trigger. The card shows the reason. |
| Not connected | Shopify Flow triggers aren’t connected to this store yet. The switches control emails only. |
Unless the badge reads Not connected, the card also lists the actions a workflow can run, and has an Open Shopify Flow button that opens Shopify Flow in a new tab.
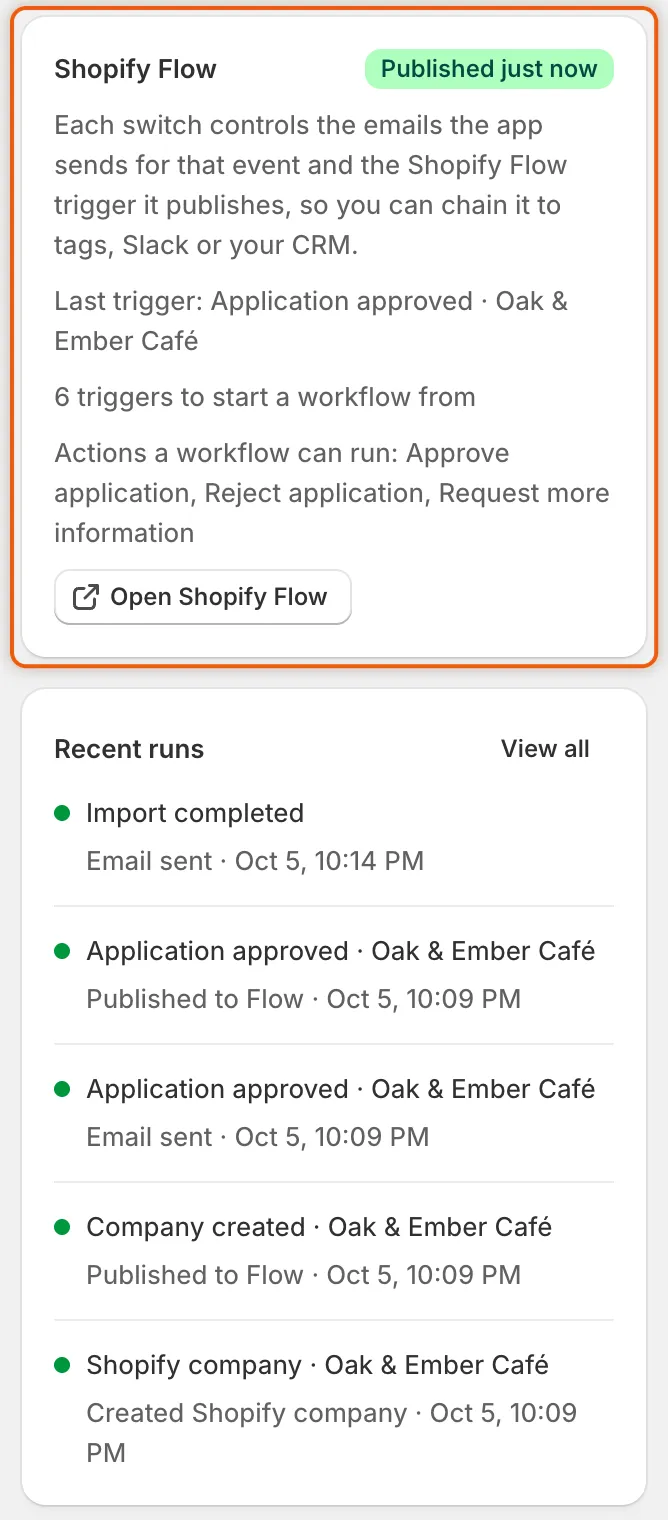
The badge shows how the last trigger went, and Open Shopify Flow takes you straight to Flow.
What the app gives Shopify Flow
Section titled “What the app gives Shopify Flow”In Shopify Flow, the app’s triggers and actions are listed under Sami B2B Onboarding.
Triggers. There’s one trigger for each event above, with the same name. Each trigger carries these details about the application:
| Detail | What it holds |
|---|---|
| Application ID | The application’s number in the app. Use it in the app’s Flow actions. |
| Reference | The application reference your team sees on the application. |
| Company name, Contact name, Contact email | From the buyer’s answers. |
| Country | The buyer’s two-letter country code, for example US. |
| Status | The application’s status. |
| Admin URL | A link to the application in the app, for messages to your team. |
The Company created trigger also carries the Shopify company, so a workflow can read it and use Shopify Flow’s own company actions on it. It’s published only when the approval created a company in Shopify.
Actions. A workflow can decide an application the way a reviewer does. The same emails and events follow.
| Action | Fields | What it does |
|---|---|---|
| Approve application | Application (required), Preset name | Approves the application, creates the Shopify company with the preset’s terms and emails the buyer. |
| Reject application | Application (required), Reason | Rejects the application. The reason is shown to the buyer in the decline email. |
| Request more information | Application (required), Message to the buyer | Asks the buyer for more information, with your message in the email. The application waits until they answer. |
In Application, use the trigger’s Application ID (the applicationId variable), or paste the reference shown on the application. Type Preset name exactly as the preset is named in the app. If you leave it empty, the application is approved without a preset’s terms. The default preset isn’t used.
Build a workflow: approve US applications
Section titled “Build a workflow: approve US applications”This workflow approves every application from the United States with the Wholesale standard preset.
-
Check the event is on
Section titled “Check the event is on”On Automation › Automations, make sure Application received is on. The Shopify Flow card’s badge shouldn’t read Not connected. If you don’t have Shopify Flow yet, install it from Shopify first. See Shopify Flow in the Shopify Help Center.
-
Start a workflow from the app’s trigger
Section titled “Start a workflow from the app’s trigger”Click Open Shopify Flow on the card. In Shopify Flow, click Create workflow, then Select a trigger. Search for
Application receivedand pick the one from Sami B2B Onboarding. -
Add a condition
Section titled “Add a condition”After the trigger, add a condition. Click Add a variable and choose
country, leave Equal to, and typeUS. Shopify Flow saves the workflow as you go. -
Add the Approve application action
Section titled “Add the Approve application action”On the condition’s true branch, add an action. Search for
Approve applicationand pick the one from Sami B2B Onboarding. Then fill in its fields:- Application: click Add variable under the field and choose
applicationId. The field then reads{{applicationId}}. - Preset name: type
Wholesale standard.
- Application: click Add variable under the field and choose
-
Turn on the workflow
Section titled “Turn on the workflow”Click Turn on workflow. Shopify Flow now runs it for every new application.
-
Test it
Section titled “Test it”Submit an application from your storefront as Acme Supply Co., with United States as the country. Once the workflow has run, the application’s status on Companies › Applications reads Approved, and Jordan Lee gets the Account approved email. The workflow’s run appears in Shopify Flow’s run history.
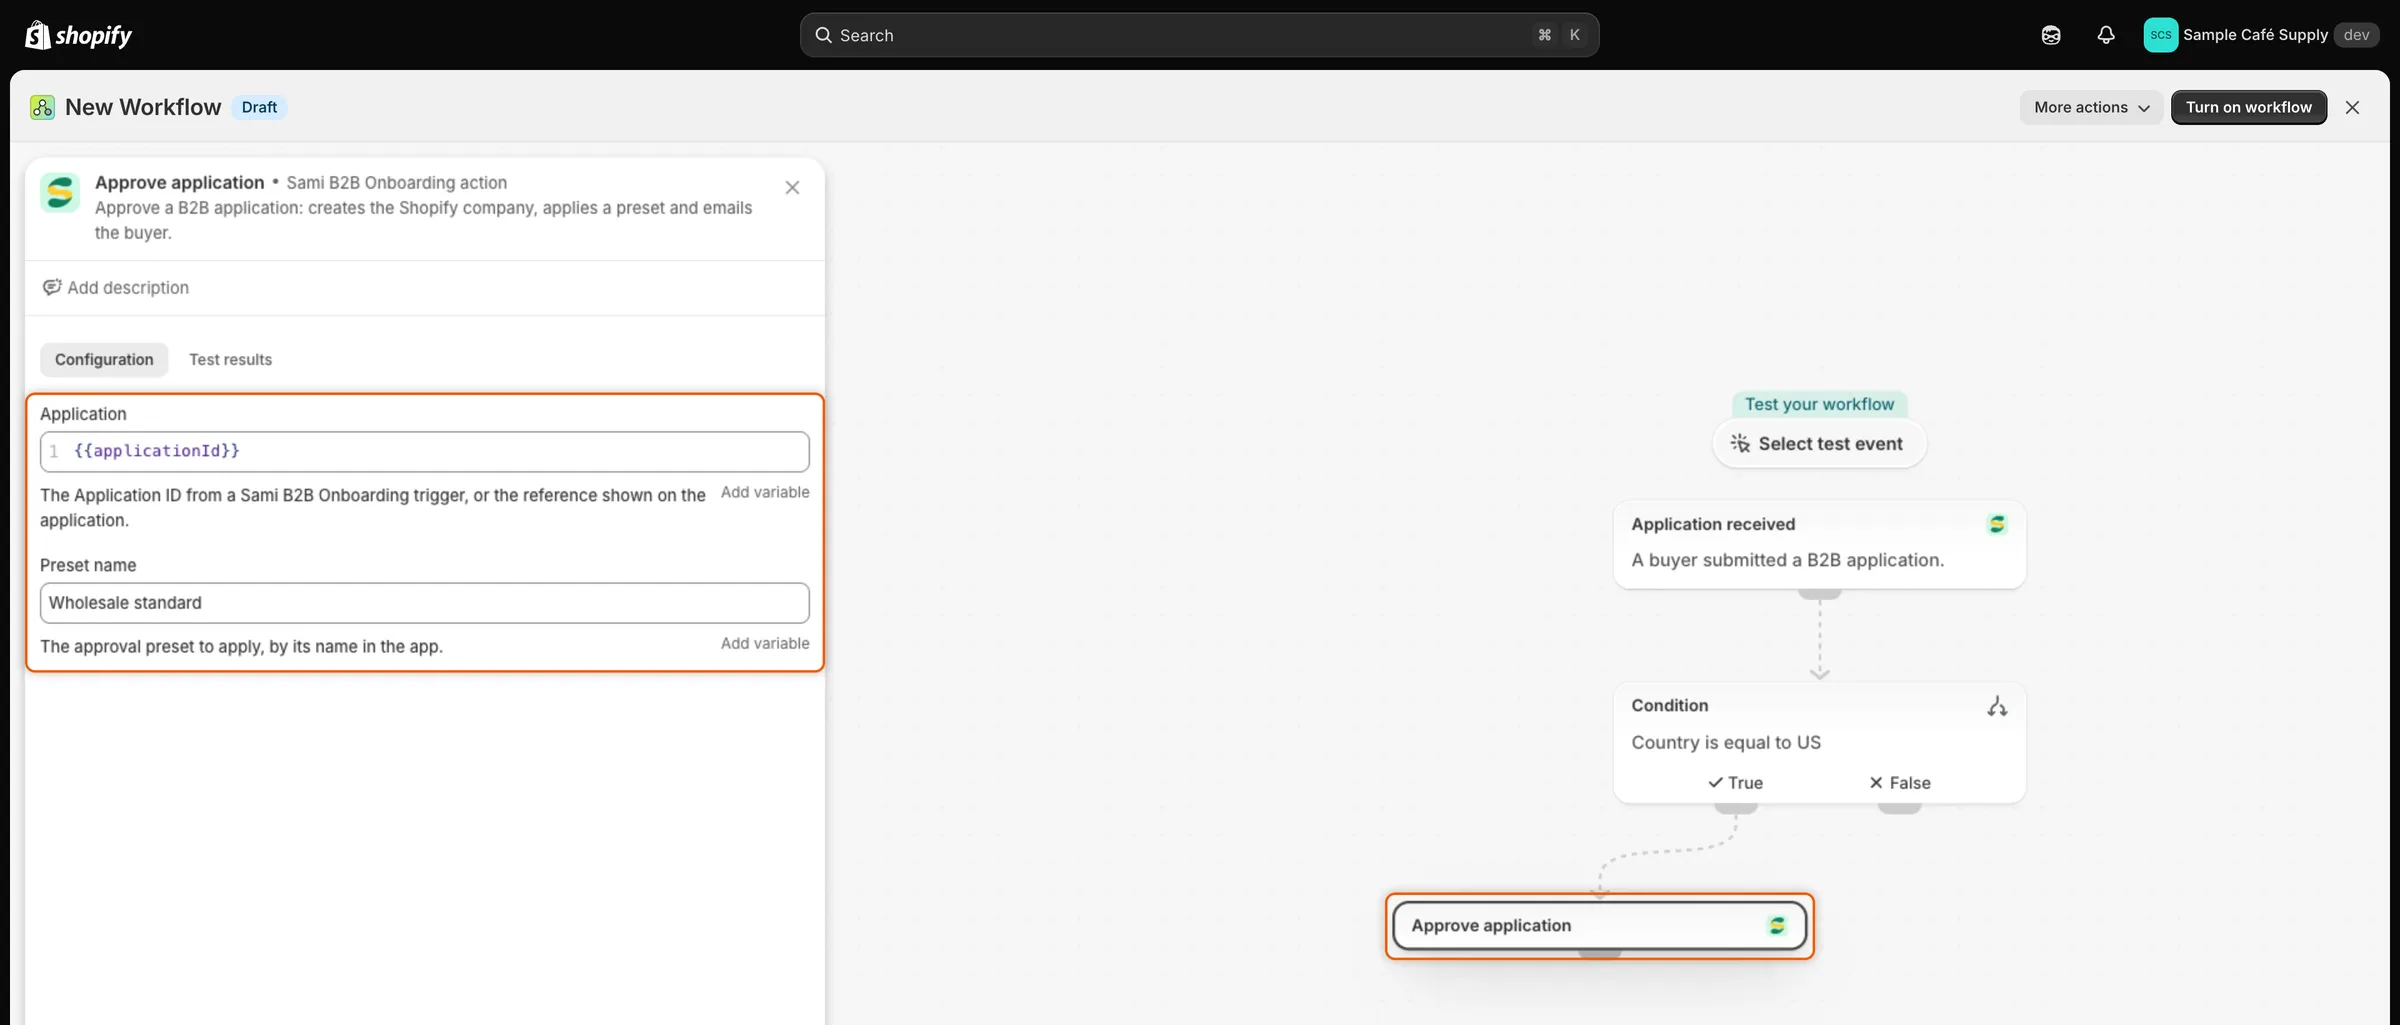
The workflow passes the trigger’s Application ID to the Approve application action.
When a Flow action can’t run
Section titled “When a Flow action can’t run”A step that can’t run fails on the workflow’s run in Shopify Flow, with one of these messages:
| Message | Why | What to do |
|---|---|---|
| No application matches that ID or reference. | The Application field is empty or wrong. | Use the trigger’s applicationId variable. |
| This application was already decided (…). | It was approved, rejected or closed before the step ran. | Nothing, or check which rule decided it. |
| Can’t approve until these answers are filled in: … | A required answer that’s mapped to Shopify is empty. | Ask the buyer for it, or fill it in on the application. |
| No preset is named “…”. | Preset name doesn’t match a preset. | Correct the name, or rename the preset. |
If the step asks for the decision the application already has, for example approving an approved application, it reports Already done. and doesn’t fail.
Next steps
Section titled “Next steps”- Edit email templates — turn emails on and change what they say.
- Rules that decide applications — decide applications inside the app, without Flow.
- Webhooks (Zapier, Make, n8n) — send application events to other tools.
- Activity log — see every email and trigger the app sent.