
Approval presets
Create approval presets that give each new company its catalog, payment terms, checkout, tax settings, contact role, tags and sales staff.
A preset is a named set of approval terms in Sami B2B Onboarding. When an application is approved with a preset, the app writes those terms to the buyer’s new Shopify company and its location. You don’t have to set the catalog, payment terms and tax settings by hand for each company.
You can use a preset in three places:
- When you approve an application yourself. The default preset is picked for you.
- In a rule that approves applications automatically.
- In the Approve application action of a Shopify Flow workflow.
Create a preset
Section titled “Create a preset”-
Open the Presets tab
Section titled “Open the Presets tab”In the Shopify admin, open Sami B2B Onboarding and click Automation in the app menu. The Presets tab opens first.
Click Create preset at the top of the page. If you have no presets yet, the button is in the middle of the page instead, under No presets yet. The New preset page opens, and the save bar appears at the top.
-
Name the preset
Section titled “Name the preset”- Name: what your team sees in the approve dialog and in rules, for example
Wholesale standard. A name is required. - Default preset: choose Yes to have this preset picked for you whenever you approve an application. Only one preset can be the default. Making this one the default takes the title from the one that had it.
- Description: an optional note. Only your team sees it.
- Name: what your team sees in the approve dialog and in rules, for example
-
Set pricing
Section titled “Set pricing”In the Pricing card on the right:
- Catalog: pick one of your B2B catalogs. Archived catalogs aren’t listed, and draft catalogs end in “(draft)”. If the note under Catalog reads “No B2B catalogs in this store yet”, create one in Shopify under Products › Catalogs first, then reload the page.
- Payment terms: pick No payment terms or one of your store’s payment terms, for example Net 30.
- Require deposit on orders created at checkout: appears once payment terms are chosen. Tick it and enter a Deposit from 1 to 99 percent of the order total, due at checkout.
-
Set checkout and tax
Section titled “Set checkout and tax”In the Checkout card:
- Allow customers to ship to any one-time address: tick it to let the company’s buyers type a shipping address at checkout instead of using the location’s address.
- Order submission: choose Automatically submit orders, or Submit all orders as drafts for review to have every order arrive as a draft order you review first.
In the Tax settings card, choose Collect tax, Collect tax unless exemptions apply or Don’t collect tax. With Collect tax unless exemptions apply, pick one or more Shopify tax exemptions under Exemptions. The buyer’s tax ID from the form is saved on the company location as well.
-
Set the customer
Section titled “Set the customer”In the Customer card:
- Default contact role: the role the buyer gets at their company location. Choose Location admin or Ordering only.
- Customer tags: type a tag and press
Enter, or pick one of your store’s existing tags from the suggestions. The tags are added to the buyer’s Shopify customer when an application is approved with this preset.
A new customer always gets the tags. A customer who already existed gets them only when the form’s Shopify panel has If the customer already exists set to Update with application data. A buyer who was signed in to their customer account when they applied doesn’t get them. See Existing Shopify customers.
-
Assign sales staff
Section titled “Assign sales staff”In the Assigned staff card, click Add staff and pick up to 10 people. On approval, they’re added as sales staff on the company’s location in Shopify. Staff whose Shopify permissions are limited to assigned locations see only their own companies and orders.
Only people who have opened the app can be picked. To add someone, give them access to the app in Shopify, then ask them to open it once.
-
Click Save in the save bar. You see Preset saved, and the page title changes to the preset’s name. To go back to the list, click Automation in the breadcrumb beside the title.
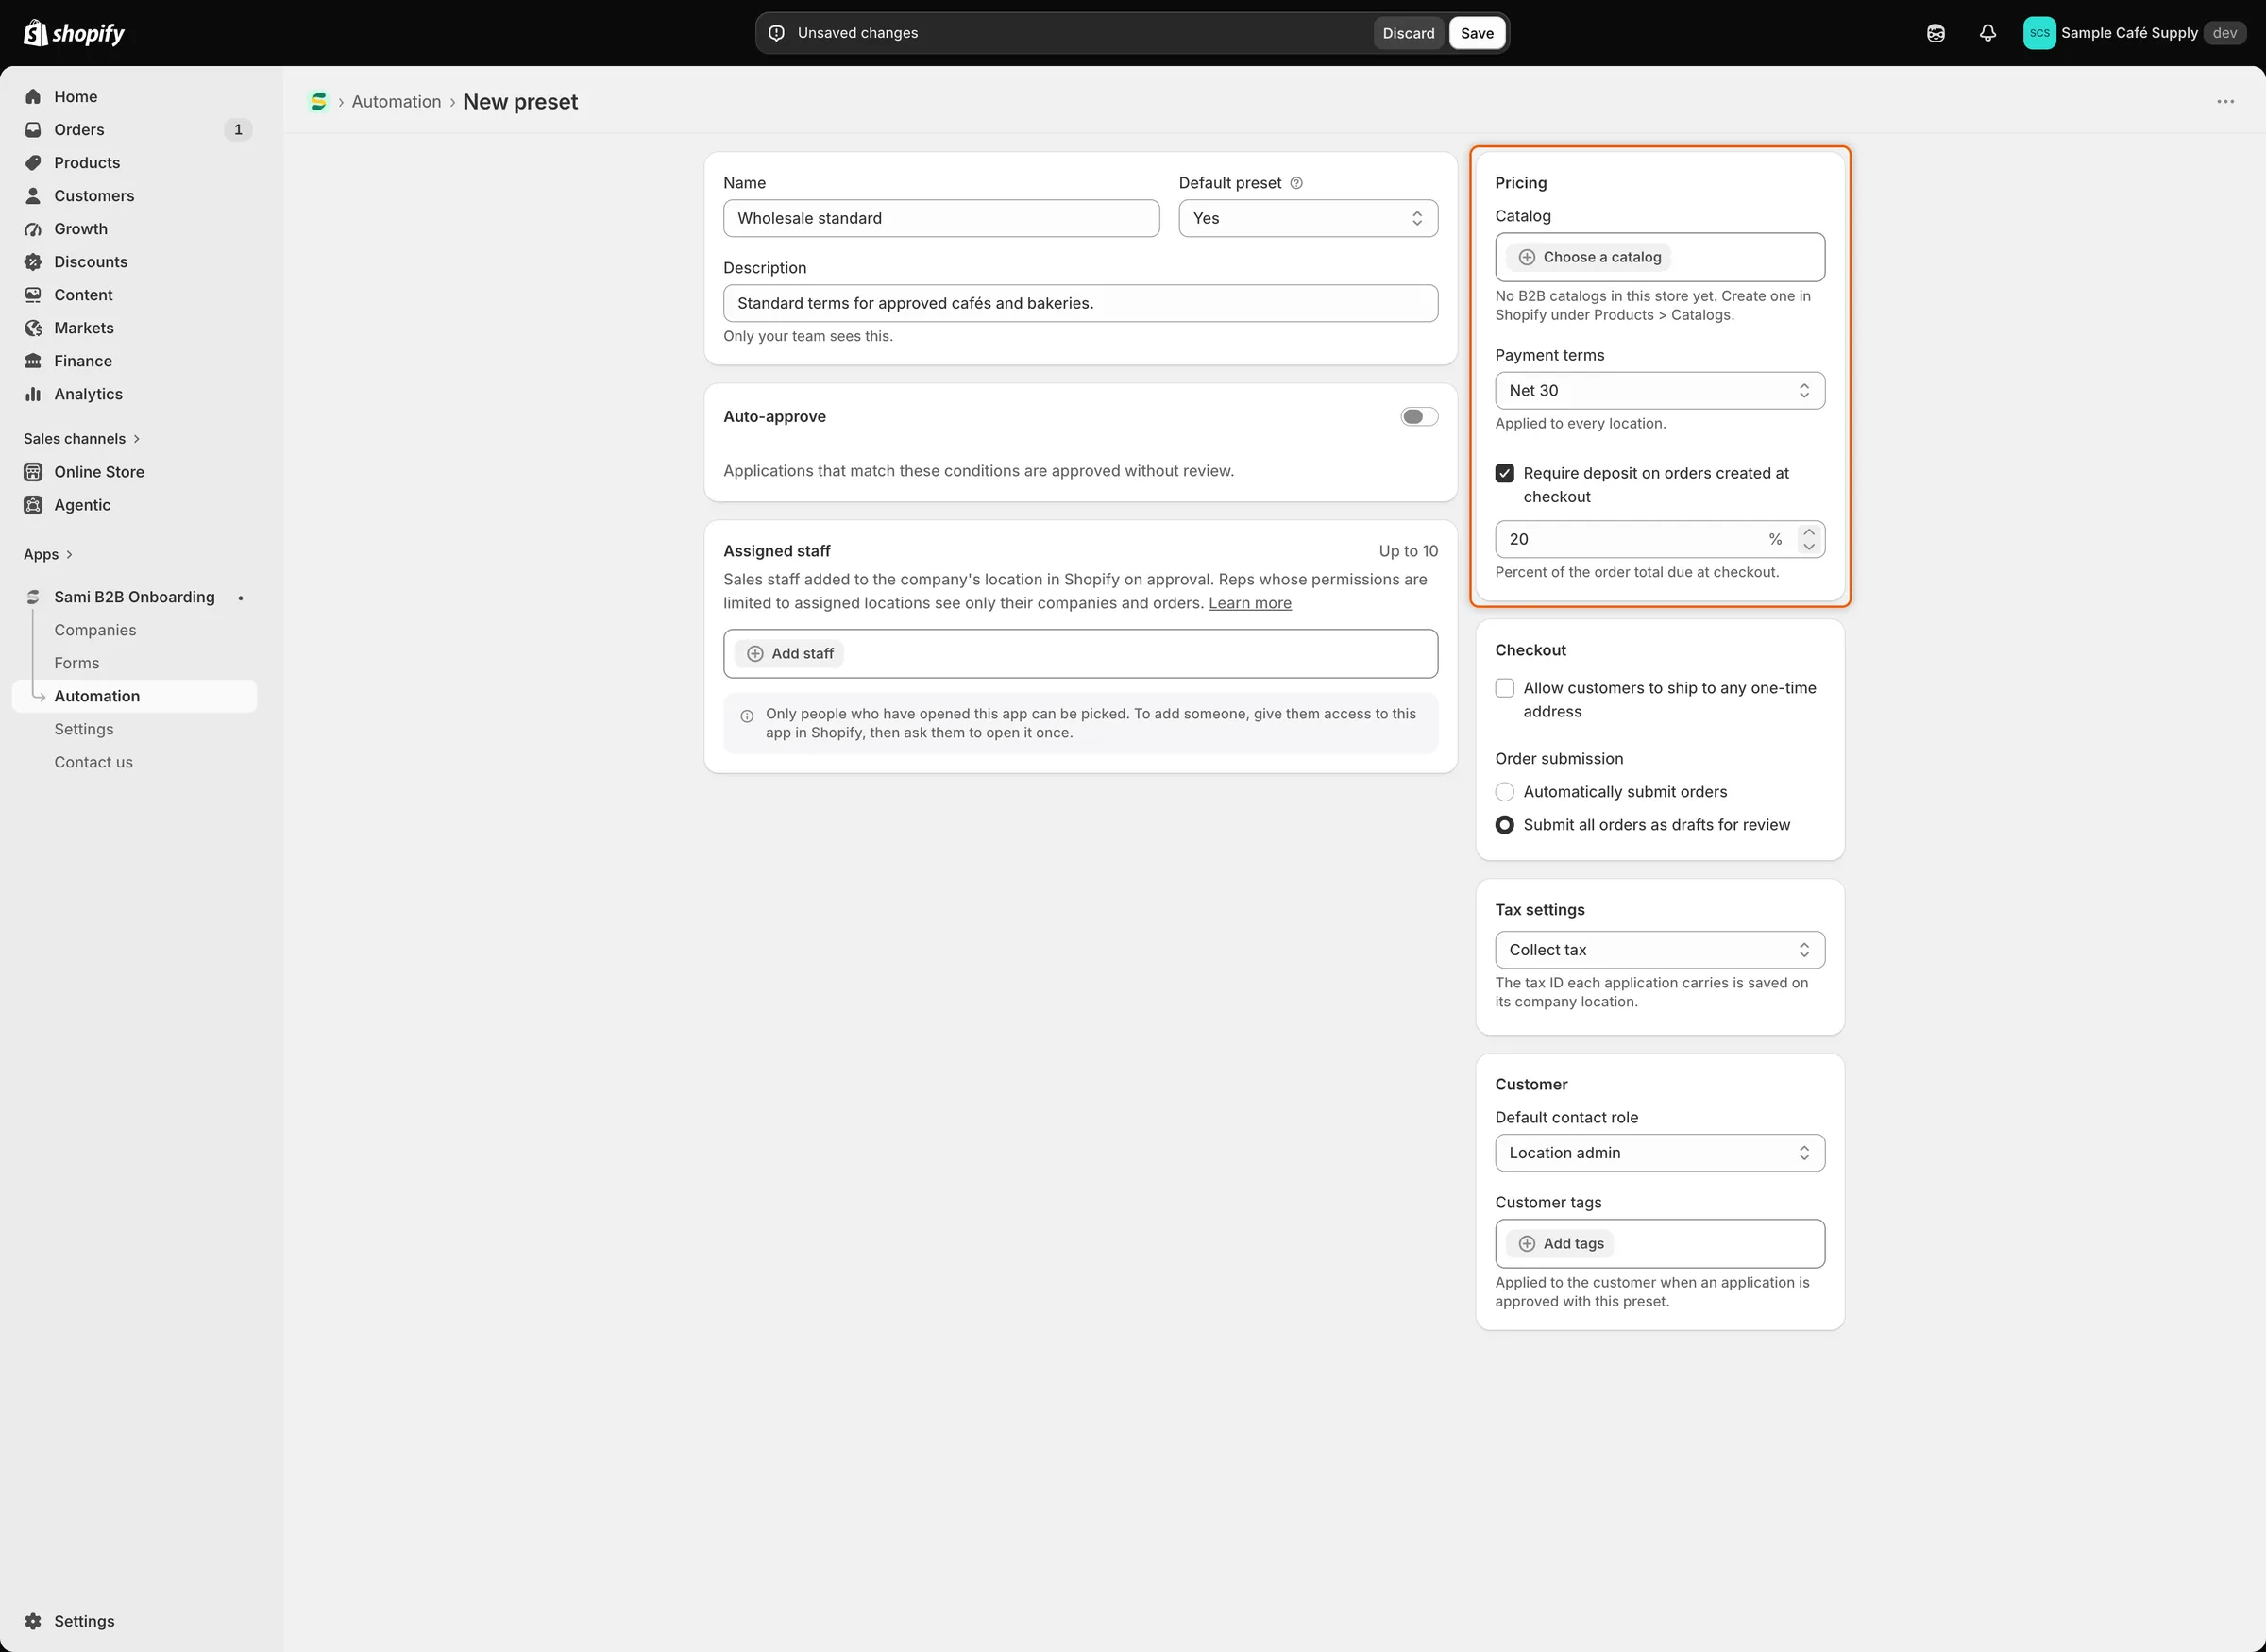
The deposit option appears only after you choose payment terms.
Preset settings
Section titled “Preset settings”| Setting | What it does | Default |
|---|---|---|
| Name | The name shown in the approve dialog, in rules and in Shopify Flow. | None (required) |
| Default preset | Picks this preset for you when you approve an application. | No |
| Description | A note for your team. | Empty |
| Catalog | The B2B catalog assigned to the company location. | None |
| Payment terms | The payment terms set on the company location. | No payment terms |
| Deposit | The percentage of the order total due at checkout (1–99). Only with payment terms. | Off |
| Allow customers to ship to any one-time address | Lets buyers enter a different shipping address at checkout. | Off |
| Order submission | Submit orders as usual, or as drafts for you to review. | Automatically submit orders |
| Tax settings | Collect tax, collect it unless exemptions apply, or don’t collect it. | Collect tax |
| Exemptions | The tax exemptions that apply. Only with Collect tax unless exemptions apply. | None |
| Default contact role | The buyer’s role at their company location. | Location admin |
| Customer tags | Tags added to the buyer’s Shopify customer on approval. | None |
| Assigned staff | Up to 10 people added as sales staff on the company location. | None |
To approve applications automatically with a preset, add a rule whose action is Approve automatically and choose the preset there. See Rules that decide applications.
Manage your presets
Section titled “Manage your presets”The Presets tab lists every preset. Type in the search box to find one by name or description, or click Sort to order the list by Name or Last updated. Two columns show where a preset is used:
- Companies: how many companies were approved with it.
- Rules: how many rules apply it.
Click a preset’s name to edit it. Changes apply to approvals from then on. Companies that were already approved keep the terms they got.
Click the … button at the end of a row for more actions:
- Set as default: makes this the default preset. You see Default preset updated, and the Default badge moves to this row.
- Duplicate: creates a copy with “copy” after its name, for example “Wholesale standard copy”, and opens it. Change what differs and save.
- Delete: asks you to confirm first (see below).
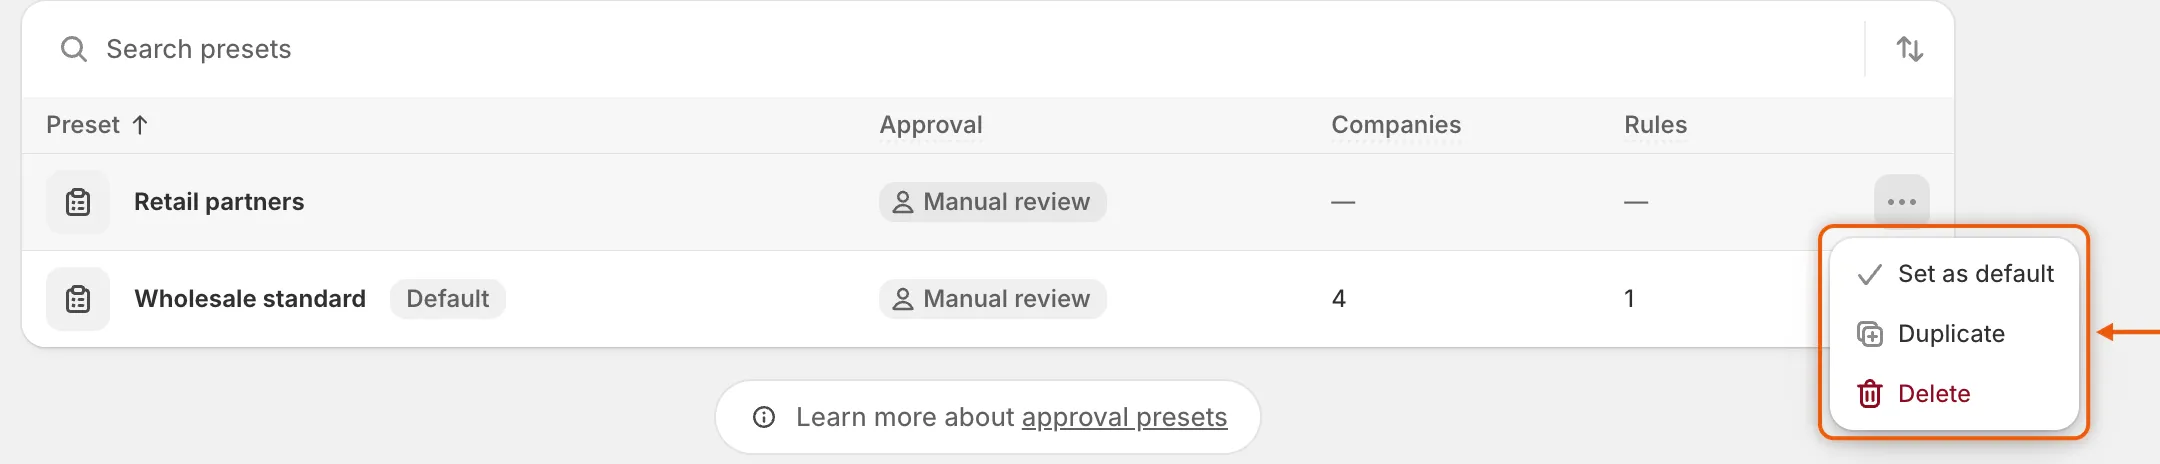
Each row’s … menu lets you make a preset the default, duplicate it or delete it.
Delete a preset
Section titled “Delete a preset”-
Open the delete dialog
Section titled “Open the delete dialog”On the Presets tab, click … on the preset’s row, then Delete.
-
Read what changes
Section titled “Read what changes”The dialog tells you:
- Companies already approved with the preset keep their terms in Shopify.
- If rules use the preset, those rules will approve without terms until you pick another preset. In the rule, the preset now reads Deleted preset.
- If it’s the default preset, the oldest remaining preset becomes the default. The dialog names it.
-
Confirm
Section titled “Confirm”Click Delete preset. You see Preset deleted, and the row leaves the list.
Next steps
Section titled “Next steps”- Rules that decide applications — approve applications automatically with this preset.
- Approve an application — see the default preset in the approve dialog.
- Manage a company — check the terms a company got after approval.