> For the complete documentation index, see [llms.txt](https://docs.samita.io/llms.txt). Markdown versions of documentation pages are available by appending `.md` to page URLs; this page is available as [Markdown](https://docs.samita.io/sami-b2b-onboarding/reviewing-applications/approve-an-application.md).

# Approve an application

Approve an application so the buyer gets a Shopify company, a customer and your wholesale terms.

Approving an application in Sami B2B Onboarding turns the buyer into a B2B customer. The app finds or creates the customer in Shopify, creates the company and its location with the terms you choose, marks the customer as approved and emails them.

{% hint style="info" %}
Before you start:

* Creating a company in Shopify needs a plan that includes B2B. Without it, approving still creates the customer and marks them approved, and the company is kept in the app only.
* Your own Shopify staff account needs the **Companies** and **Customers** permissions. Without them, **Approve** is turned off and a banner names the missing permission. The store owner can add it in Shopify under **Settings › Users**.
* A preset fills in the terms for you. Set one up first in [Approval presets](/sami-b2b-onboarding/automation/approval-presets.md).
  {% endhint %}

## Approve from the full application

Use the full page when you want to check or change the terms for this one company.

{% stepper %}
{% step %}

### Open the application

In the Shopify admin, open **Sami B2B Onboarding**, click **Companies** in the app menu and click the application's row, for example **Acme Supply Co.**
{% endstep %}

{% step %}

### Check the Approval card

The **Approval** card on the right lists the terms the approval will apply: **Preset**, **Catalog**, **Payment terms**, **Tax settings** and **Contact role**, plus any other term that's set. An undecided application with no saved terms starts from your default preset, if you have one.
{% endstep %}

{% step %}

### Change the terms for this company (optional)

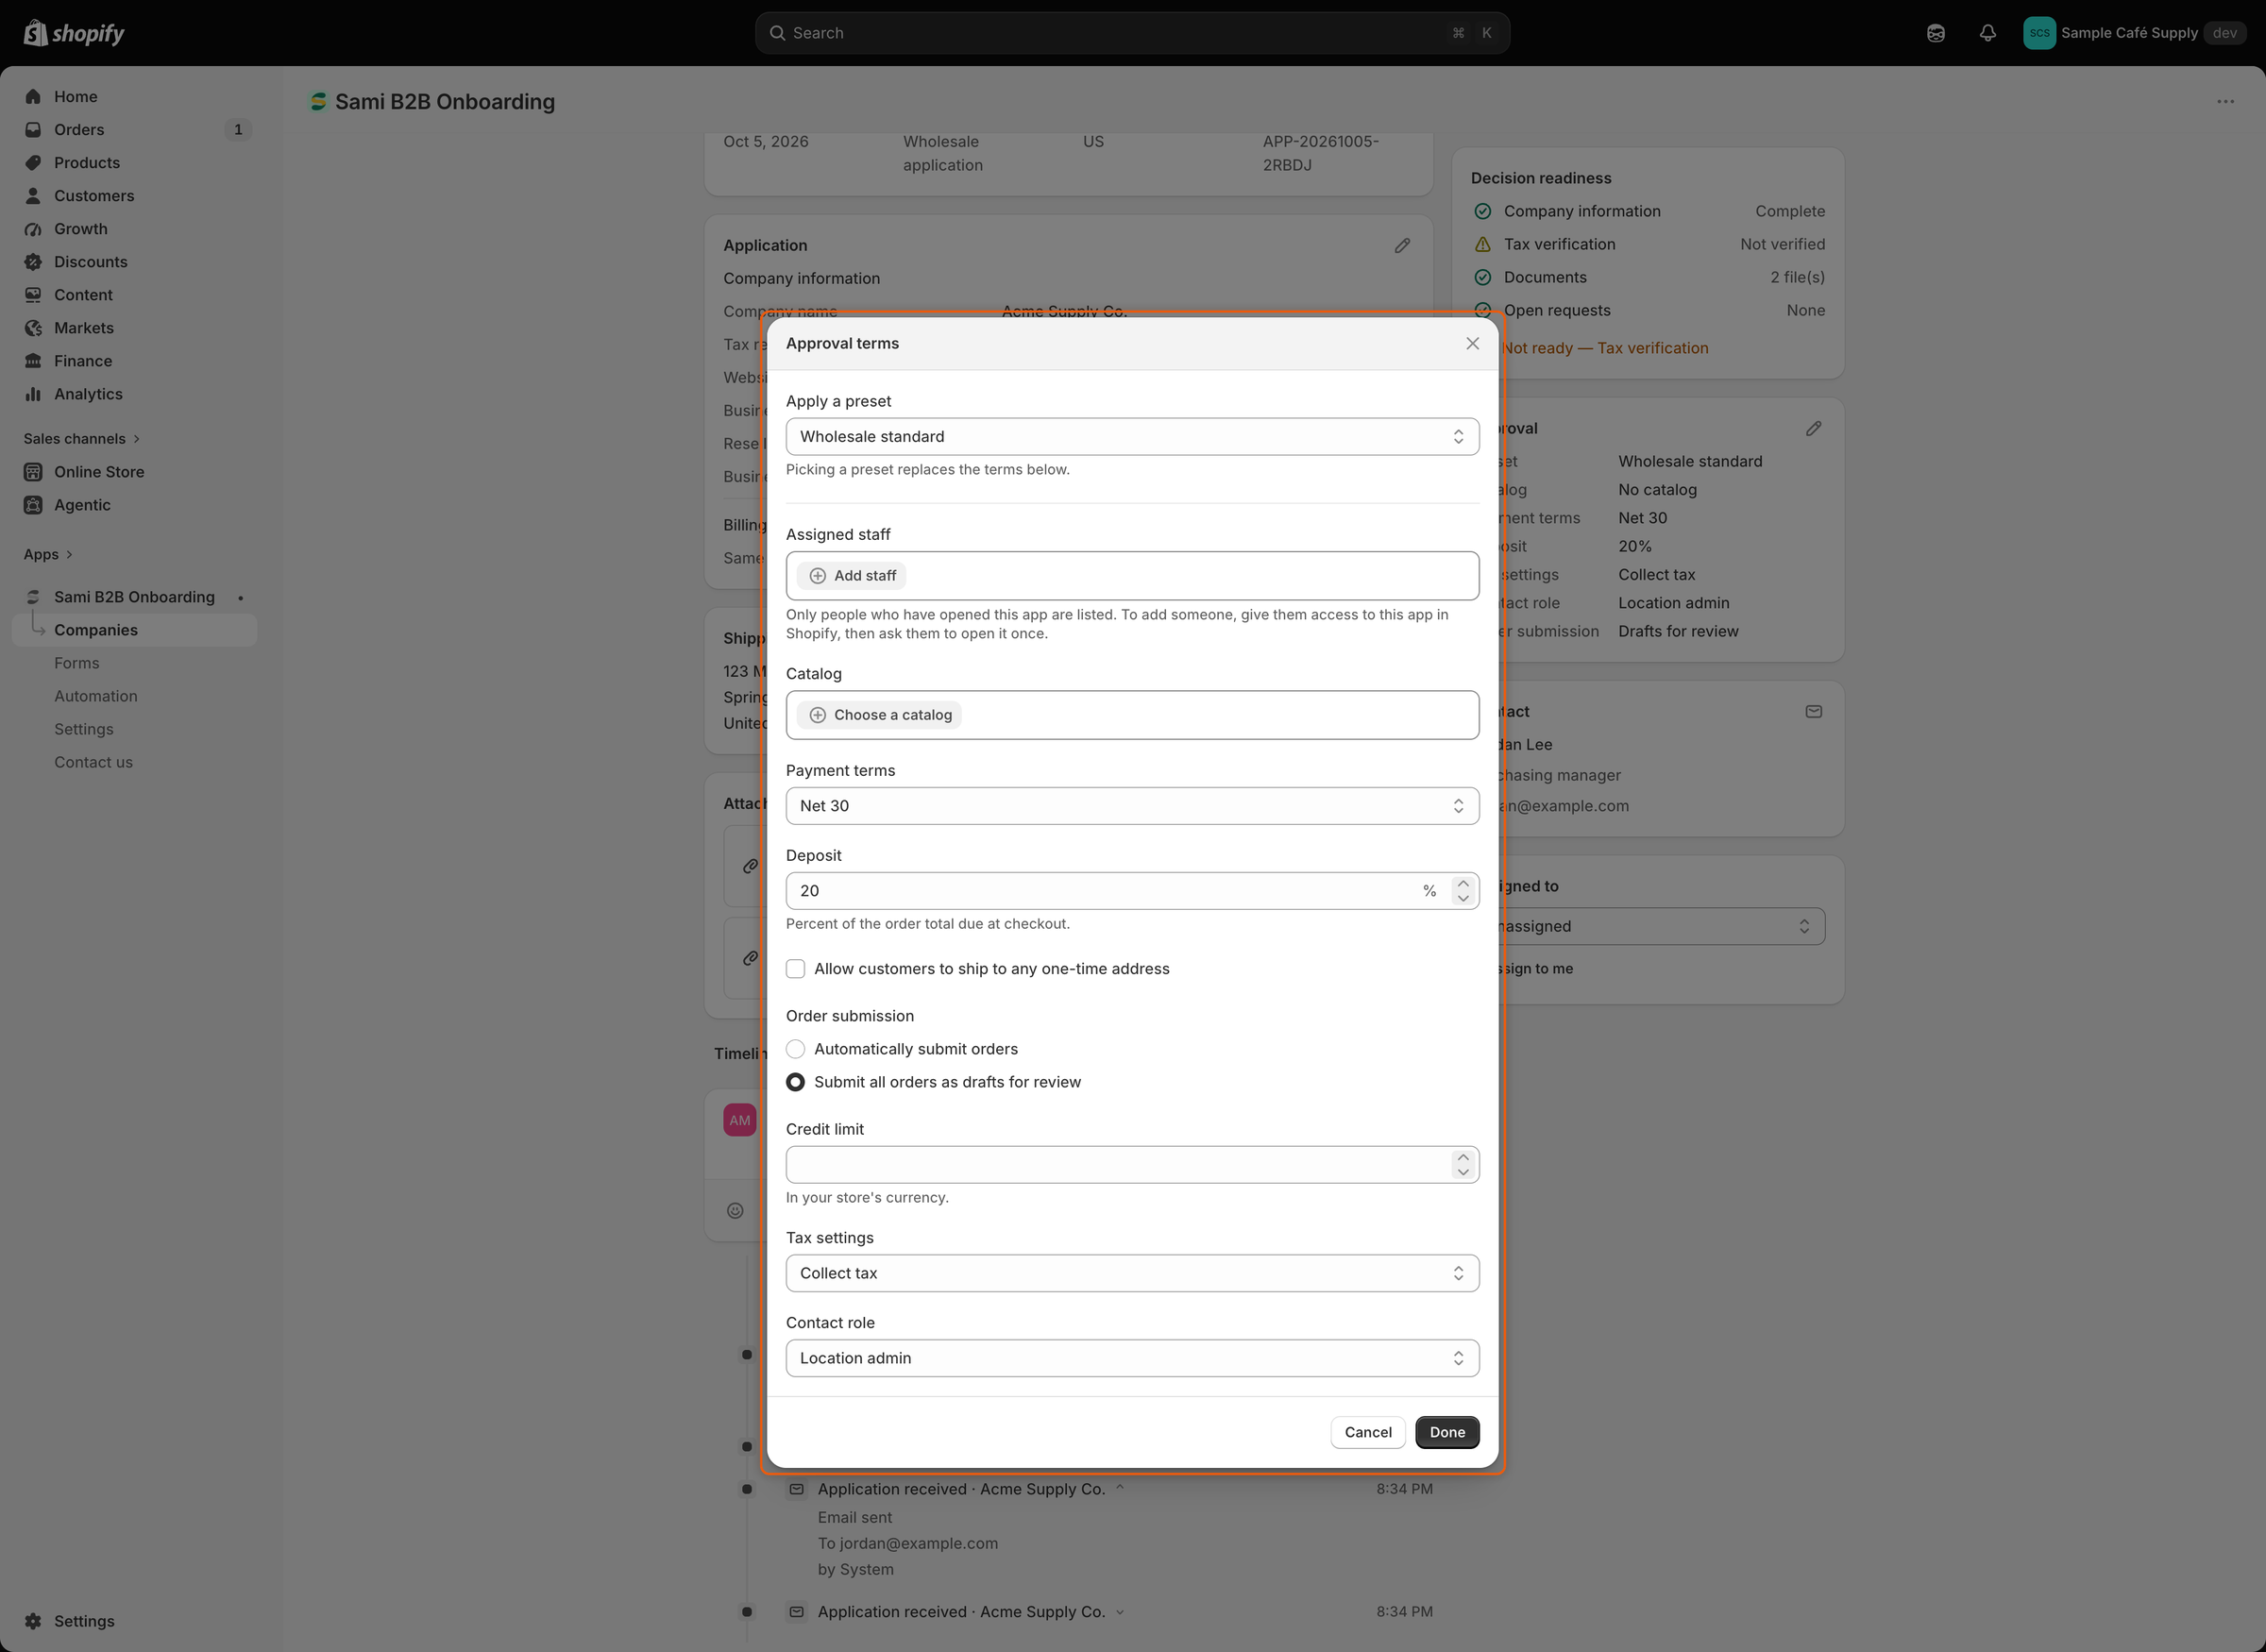
Click the pencil (**Edit approval terms**). In the **Approval terms** dialog, change what you need (see the table below) and click **Done**. Then click **Save** in the save bar. "Terms saved" confirms it.
{% endstep %}

{% step %}

### Approve

Click **Approve application** at the top of the page. If the summary reads **Ready to approve** and the application is neither **Needs info** nor flagged red as **Overdue** in the list, it's approved straight away, with no dialog. Otherwise a dialog, **Approve Acme Supply Co.**, says "Approving creates the company with the terms in the Approval card." Click **Approve application** in it.
{% endstep %}

{% step %}

### See the result

"Application approved" appears and the status changes to **Approved**. The Shopify steps and emails run in the background and take a few moments. Reload the page to see each of them on the timeline.
{% endstep %}
{% endstepper %}

<figure><img src="https://3844812229-files.gitbook.io/~/files/v0/b/gitbook-x-prod.appspot.com/o/spaces%2FRrf4pQPgjvb3GW7IN3Ci%2Fuploads%2Fgit-blob-007732af25d1acb781453b6265b12e23fd2f3bae%2Fscreenshot-applications-approval-terms-dialog.png?alt=media" alt="The Approval terms dialog with Wholesale standard under Apply a preset, no catalog chosen, Net 30 payment terms, a 20% deposit, Submit all orders as drafts for review, Collect tax and Location admin."><figcaption><p>Pick a preset, then change any term for this company only before you approve.</p></figcaption></figure>

### Approval terms

| Field                                               | What it sets                                                                                                                                                                                                                |
| --------------------------------------------------- | --------------------------------------------------------------------------------------------------------------------------------------------------------------------------------------------------------------------------- |
| **Apply a preset**                                  | Fills in the fields below from a preset. Picking a preset replaces the terms below, except **Credit limit**, which a preset doesn't hold.                                                                                   |
| **Assigned staff**                                  | Up to 10 staff members assigned to the company location in Shopify. Only people who have opened the app are listed.                                                                                                         |
| **Catalog**                                         | The catalog the company location buys from.                                                                                                                                                                                 |
| **Payment terms**                                   | One of your store's payment terms, or **No payment terms**.                                                                                                                                                                 |
| **Deposit**                                         | Appears once payment terms are chosen. The percent of the order total (1 to 99) due at checkout.                                                                                                                            |
| **Allow customers to ship to any one-time address** | Lets the company's buyers type a shipping address at checkout instead of using the location's address.                                                                                                                      |
| **Order submission**                                | **Automatically submit orders**, or **Submit all orders as drafts for review**.                                                                                                                                             |
| **Credit limit**                                    | An amount in your store's currency. It's kept with the company in the app and isn't sent to Shopify.                                                                                                                        |
| **Tax settings**                                    | **Collect tax**, **Collect tax unless exemptions apply** or **Don't collect tax**.                                                                                                                                          |
| **Exemptions**                                      | With **Collect tax unless exemptions apply**: the Shopify tax exemptions that apply.                                                                                                                                        |
| **Contact role**                                    | The buyer's role at the location: **Location admin**, **Ordering only** or **No role**. With **No role**, a buyer who has no role there yet still gets **Ordering only**, because a contact without a role can't check out. |

The tax ID the buyer gave on the form is saved as the location's tax ID. The preset's customer tags are added to the customer.

## Approve from the list

{% stepper %}
{% step %}

### Open the row menu

On the **Applications** tab, click **…** (More actions) at the end of the row and pick **Approve**.
{% endstep %}

{% step %}

### Pick a preset

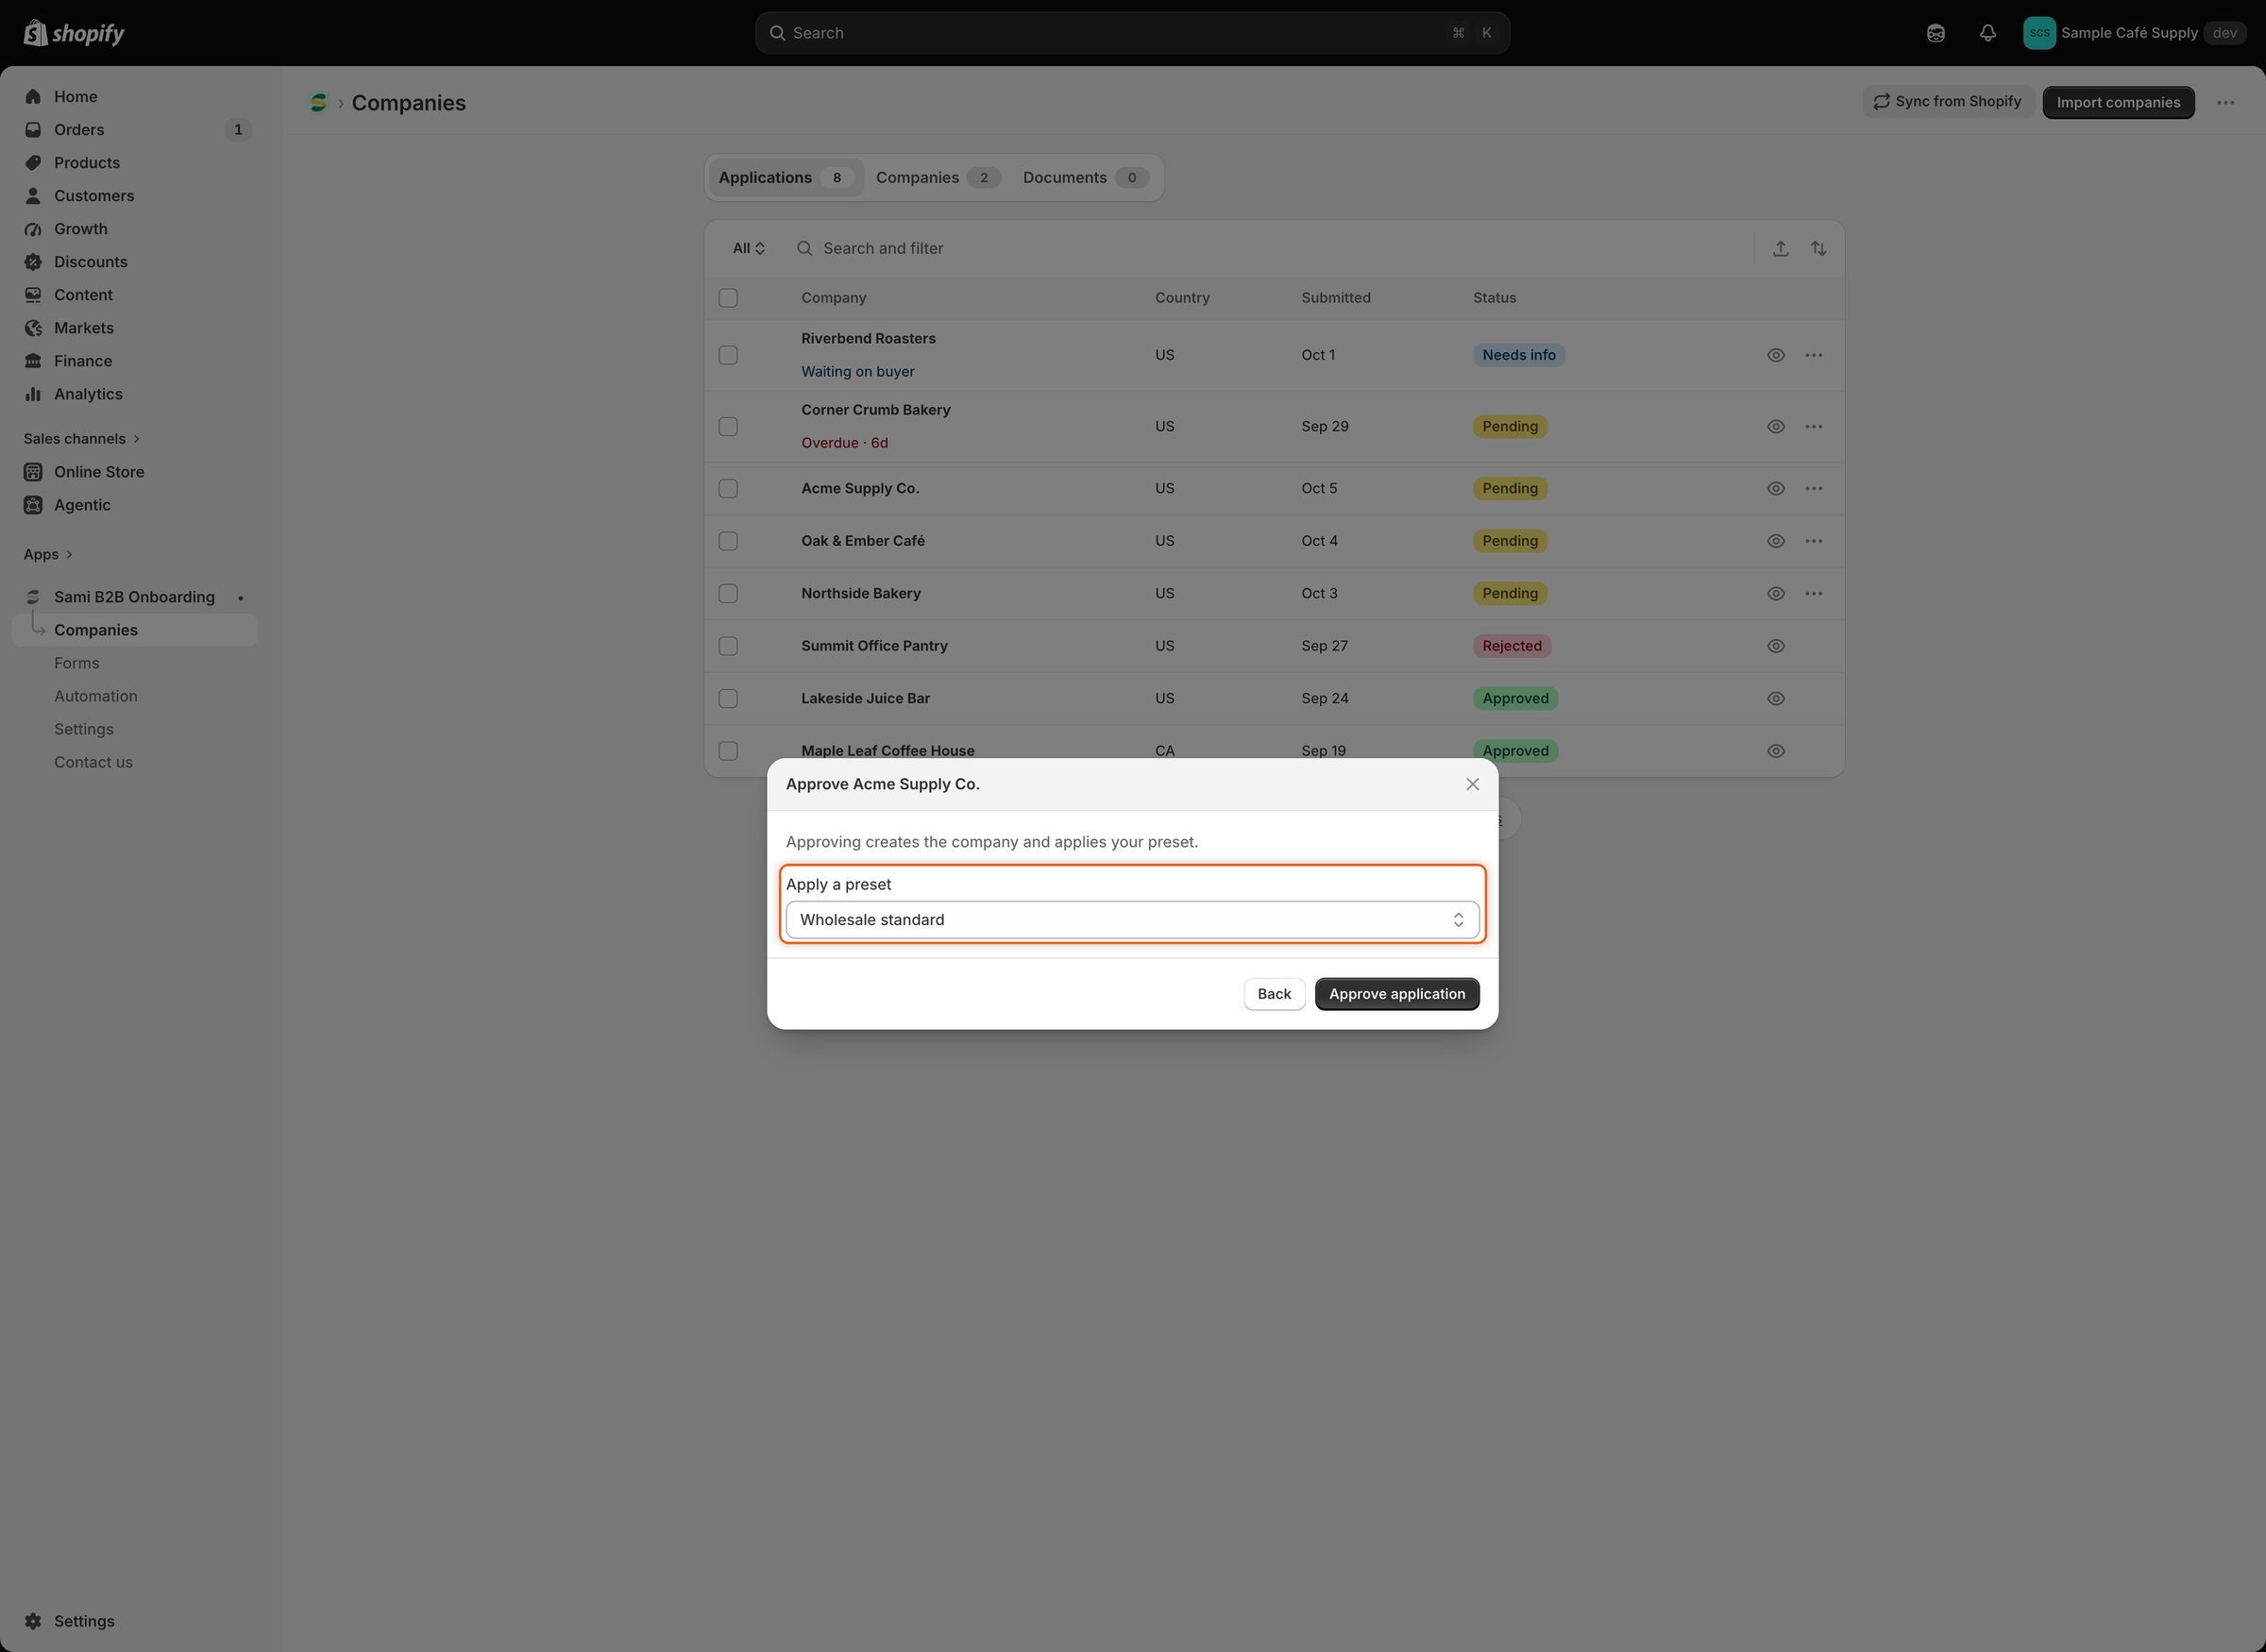
The **Approve Acme Supply Co.** dialog says "Approving creates the company and applies your preset." Your default preset is already picked under **Apply a preset**. Pick another one, or **No preset**.
{% endstep %}

{% step %}

### Confirm

Click **Approve application**. "Application approved" confirms it.
{% endstep %}
{% endstepper %}

The list applies the preset you pick, not terms you changed for this company. With **No preset**, it uses the terms saved on the application's **Approval** card, if any. To change terms for one company, approve from the full application.

<figure><img src="https://3844812229-files.gitbook.io/~/files/v0/b/gitbook-x-prod.appspot.com/o/spaces%2FRrf4pQPgjvb3GW7IN3Ci%2Fuploads%2Fgit-blob-7f051ab5e91667d4b5f19349d2c04dfae95b0597%2Fscreenshot-applications-approve-preset-dialog.png?alt=media" alt="The Approve Acme Supply Co. dialog over the Applications list, with Wholesale standard picked under Apply a preset and the Back and Approve application buttons."><figcaption><p>Approving from the list asks only for a preset; the default one is picked for you.</p></figcaption></figure>

{% hint style="warning" %}
If your form marks a mapped question as required for approval and the buyer left it blank, the approval is refused with "This application can't be approved until these answers are filled in:" and the list of answers. Fill them in with **Edit answers** on the full page, or ask the buyer with [Request more information](/sami-b2b-onboarding/reviewing-applications/request-more-information.md).
{% endhint %}

The **Buyer resubmitted** team email has an **Approve** button too. It opens the application with the approve dialog ready. It never approves on its own.

## What happens when you approve

1. **Customer**: the app finds the Shopify customer with the buyer's email, or creates one from the answers your form maps. See [Existing Shopify customers](/sami-b2b-onboarding/integrations/existing-shopify-customers.md) and [Map answers to Shopify](/sami-b2b-onboarding/application-forms/map-answers-to-shopify.md).
2. **Approved flag**: the customer's **B2B approved** metafield is turned on and the tag `b2b-approved` is added. Your store access rules and the checkout lock let this customer through. See [Block checkout until approved](/sami-b2b-onboarding/store-access/block-checkout-until-approved.md).
3. **Company**: the app creates the company in Shopify with the buyer as its main contact and a location with the shipping address your form maps. Then it applies the approval terms to that location. If Shopify refuses any part, the **Shopify company** entry on the timeline says which.
4. **Company in the app**: the company appears on the **Companies** tab with the status **Active**. The person assigned to the application becomes its sales rep and is added to the location's assigned staff in Shopify.
5. **Email**: the buyer gets the **Account approved** email ("Your business account is live"), with a **Start shopping wholesale** button. It goes out when the email is turned on in the form builder's **Email** section and **Application approved** is on under **Automation › Automations**. Both are on by default. See [Edit email templates](/sami-b2b-onboarding/settings/email-templates.md).
6. **Shopify Flow and integrations**: the **Application approved** and **Company created** triggers run, when they're turned on under **Automation › Automations**. Integrations you set to send approvals, such as [webhooks](/sami-b2b-onboarding/integrations/webhooks.md) or [Klaviyo](/sami-b2b-onboarding/integrations/klaviyo.md), get it too.
7. **Timeline**: the application's timeline shows "Approved Acme Supply Co." and an entry for each step, such as **Shopify customer**, **Shopify company** and the emails sent. Click an entry to see the result. If Shopify refused a step, the entry says why.

## Check the company in Shopify

{% stepper %}
{% step %}

### Open the company

In the app, click **Companies**, then the **Companies** tab, and click the company. Click **More actions › View in Shopify**. You can also go to **Customers › Companies** in the Shopify admin.
{% endstep %}

{% step %}

### Check what was applied

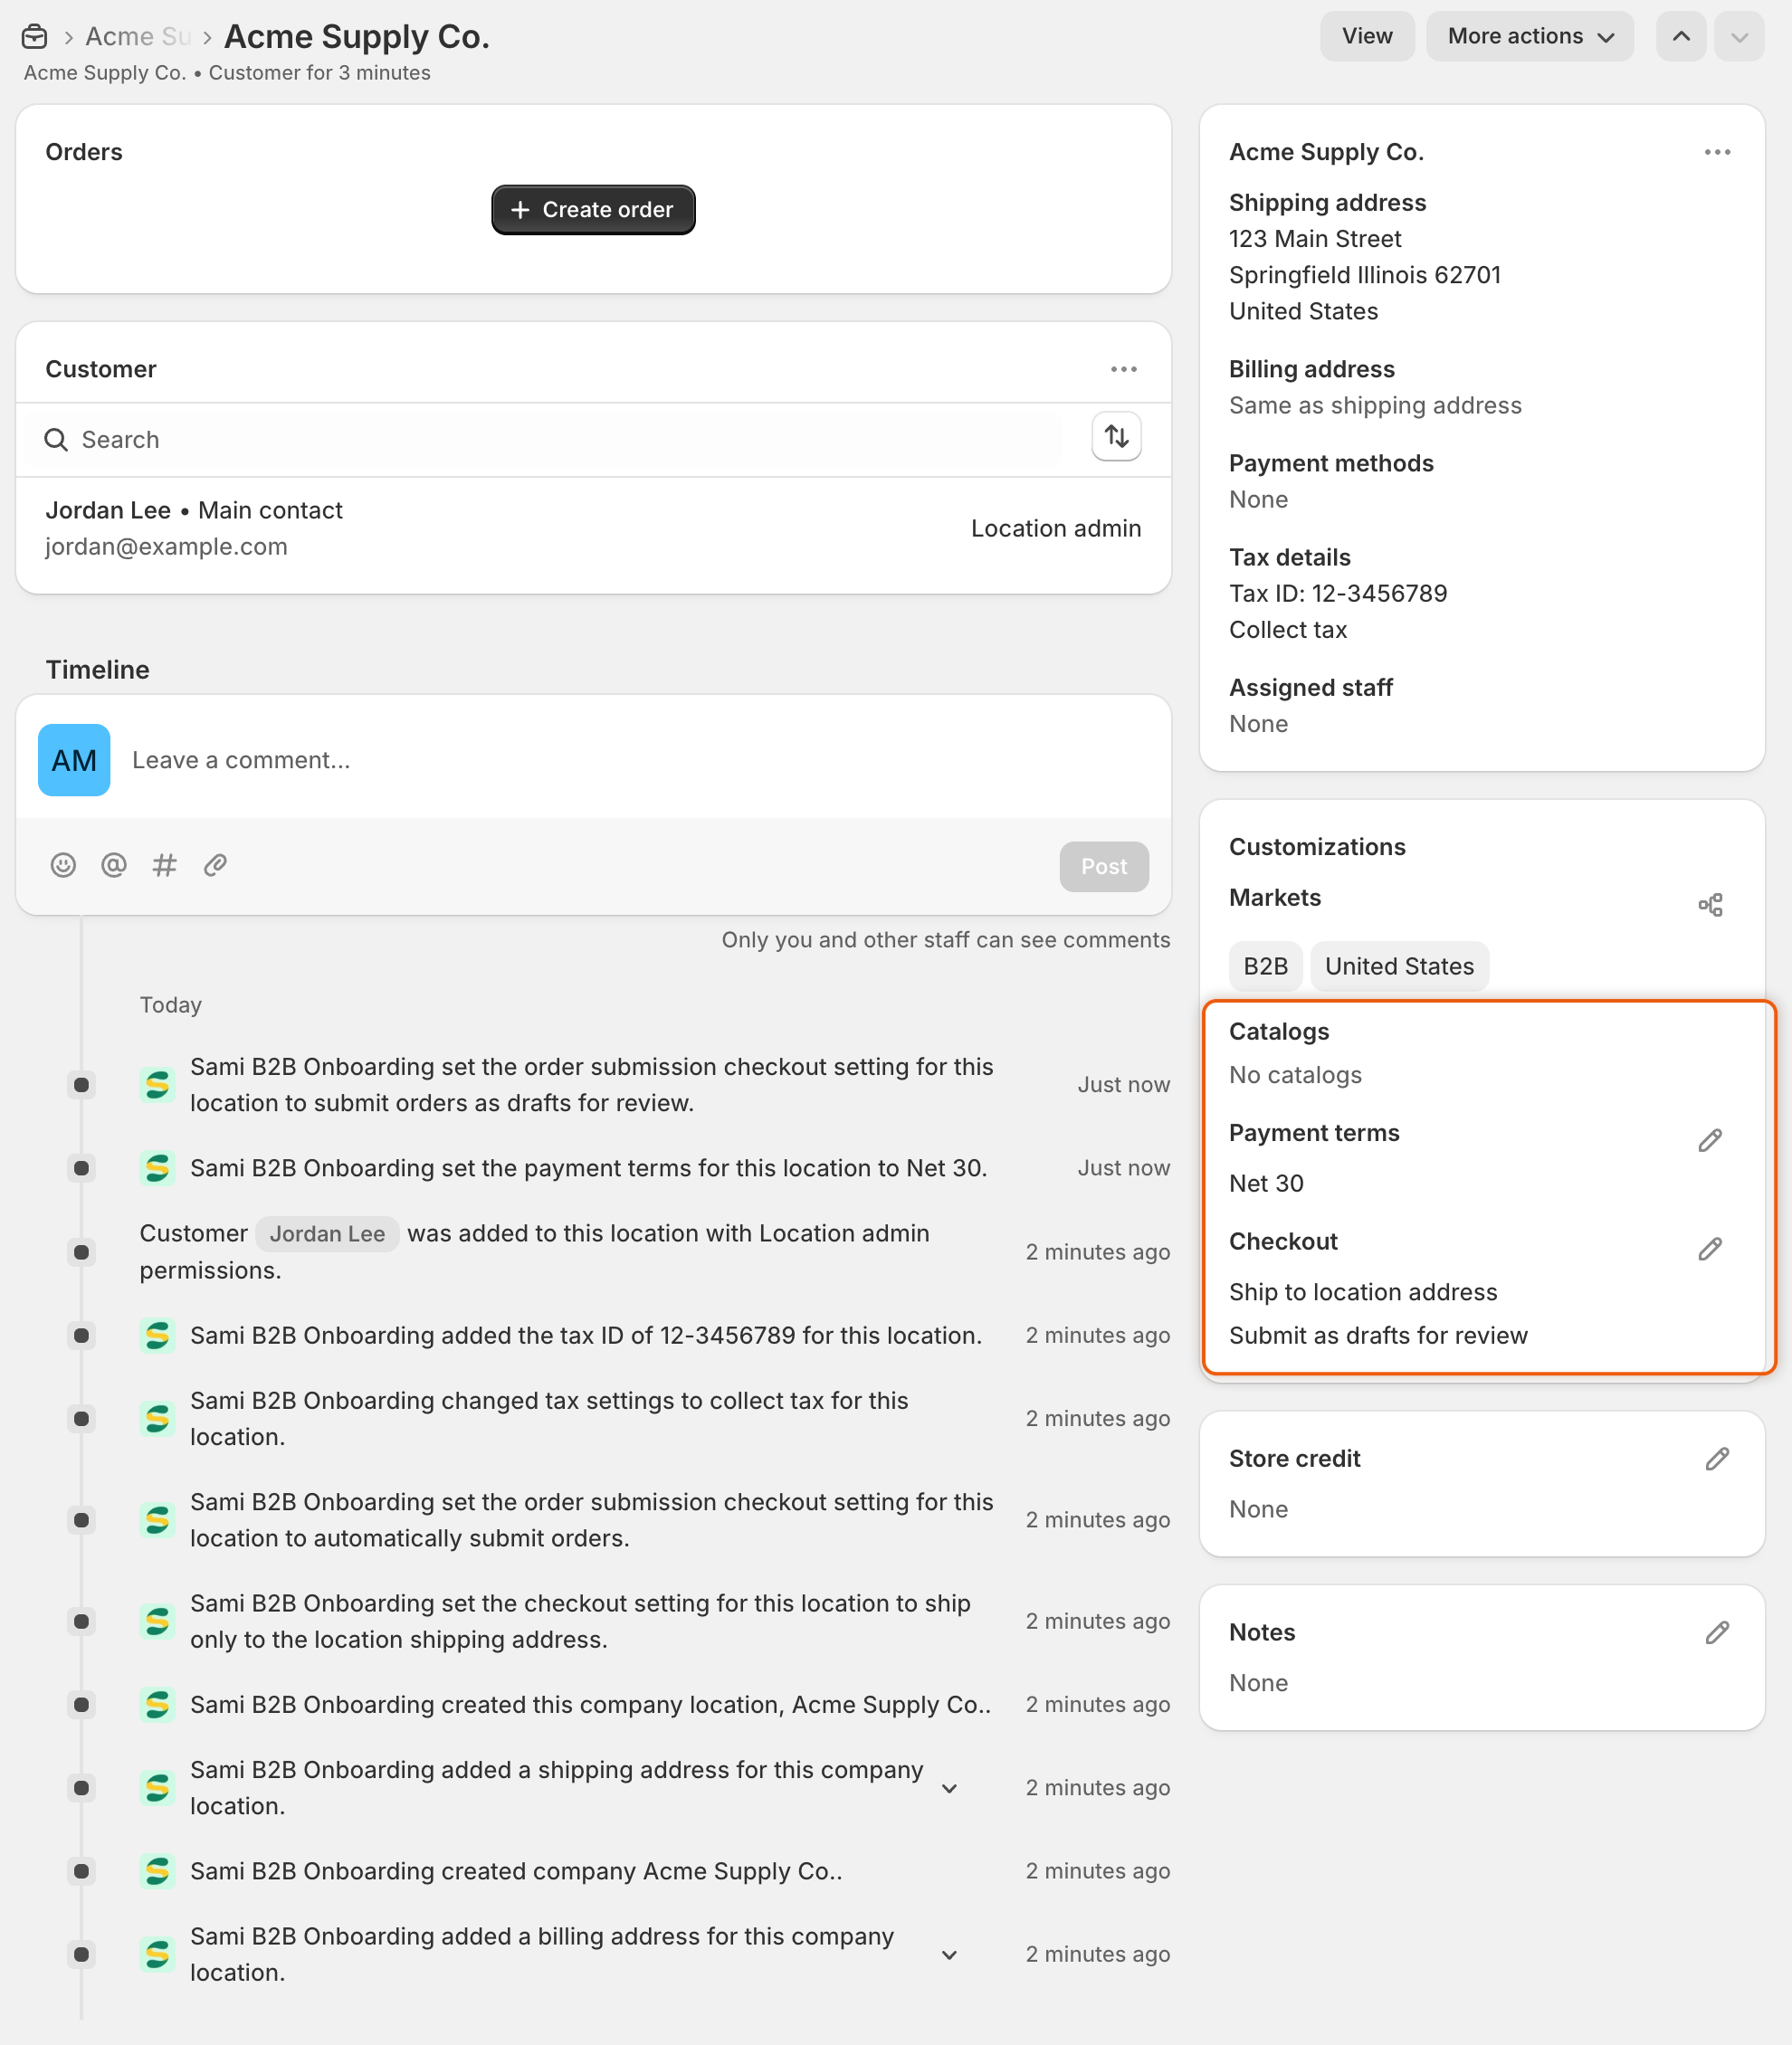
On the company's location, check the catalog, payment terms, checkout settings and tax details. Under the contact, check the buyer's role. On the customer's page, the **B2B approved** metafield is on.
{% endstep %}
{% endstepper %}

<figure><img src="https://3844812229-files.gitbook.io/~/files/v0/b/gitbook-x-prod.appspot.com/o/spaces%2FRrf4pQPgjvb3GW7IN3Ci%2Fuploads%2Fgit-blob-40b0c6265a1f191df1eecce902da66c6cf89d790%2Fscreenshot-shopify-approved-company-location.png?alt=media" alt="The Acme Supply Co. location in the Shopify admin, with Jordan Lee as main contact and Location admin, No catalogs, Net 30 payment terms, Submit as drafts for review, and Collect tax."><figcaption><p>The approval terms land on the company location in Shopify, and its timeline lists each change Sami B2B Onboarding made.</p></figcaption></figure>

## Add the buyer to a company you already have

When **Duplicate companies** is on in **Settings › Application rules**, with **When a match is found** set to **Offer to add the buyer to the existing company**, and an undecided application matches a company that exists in Shopify, you can add the buyer to that company instead of creating a second one.

{% stepper %}
{% step %}

### Compare the two

Open the application. The **Possible duplicate** card shows it side by side with the existing company and marks what matched.
{% endstep %}

{% step %}

### Add the buyer

Click **Add buyer to** followed by the company's name. The dialog explains that the buyer becomes a contact of that company in Shopify with the **Ordering only** role, that the application closes as approved, and that the company keeps its terms. Leave **Email the buyer that they're approved** ticked to send the **Account approved** email. When that email is off for the form, the tick is greyed out.
{% endstep %}

{% step %}

### Confirm

Click **Add buyer**. "Buyer added" confirms it. A banner on the application says no new company was created, with a **View company** button.
{% endstep %}
{% endstepper %}

## Change the terms after approval

{% stepper %}
{% step %}

### Edit the terms

Open the approved application and click the pencil on the **Approval** card. Change the terms in the **Approval terms** dialog and click **Done**.
{% endstep %}

{% step %}

### Save

Click **Save** in the save bar. "Company terms updated" confirms it. The app applies the new terms to the Shopify company location.
{% endstep %}
{% endstepper %}

This sends no email and runs no Flow trigger. The company keeps its status and sales rep. You need the **Companies** permission on your Shopify staff account. When the buyer joined an existing company, the card is locked and points you to that company's page. You can also change terms from the company's own page; see [Manage a company](/sami-b2b-onboarding/companies/manage-a-company.md).

## Next steps

* [Manage a company](/sami-b2b-onboarding/companies/manage-a-company.md) — see and change the company you just created.
* [Approval presets](/sami-b2b-onboarding/automation/approval-presets.md) — save the terms you use most.
* [Rules that decide applications](/sami-b2b-onboarding/automation/rules.md) — approve matching applications automatically.


---

# Agent Instructions
This documentation is published with GitBook. GitBook is the documentation platform designed so that both humans and AI agents can read, navigate, and reason over technical content effectively. Learn more at gitbook.com.

## Querying This Documentation
If you need additional information that is not directly available in this page, you can query the documentation dynamically by asking a question.

Perform an HTTP GET request on the current page URL with the `ask` query parameter, and the optional `goal` query parameter:

```
GET https://docs.samita.io/sami-b2b-onboarding/reviewing-applications/approve-an-application.md?ask=<question>&goal=<endgoal>
```

`ask` is the immediate question: it should be specific, self-contained, and written in natural language.
`goal` is optional and describes the broader end goal you are ultimately trying to accomplish on behalf of the user. GitBook uses it to tailor the answer towards what is most useful for that goal.

The response will contain a direct answer to the question and relevant excerpts and sources from the documentation.

Use this mechanism when the answer is not explicitly present in the current page, you need clarification or additional context, or you want to retrieve related documentation sections.