
View and edit a quote
Open a request from the Quotes page and use the quote detail page to price it, adjust the money and read everything the customer sent.
Every request lands in Quote list. Opening one gives you the quote detail page — the single screen where you price the request, change the products, leave notes for your staff and, when the customer agrees, turn it into an order.
Open a quote
Section titled “Open a quote”-
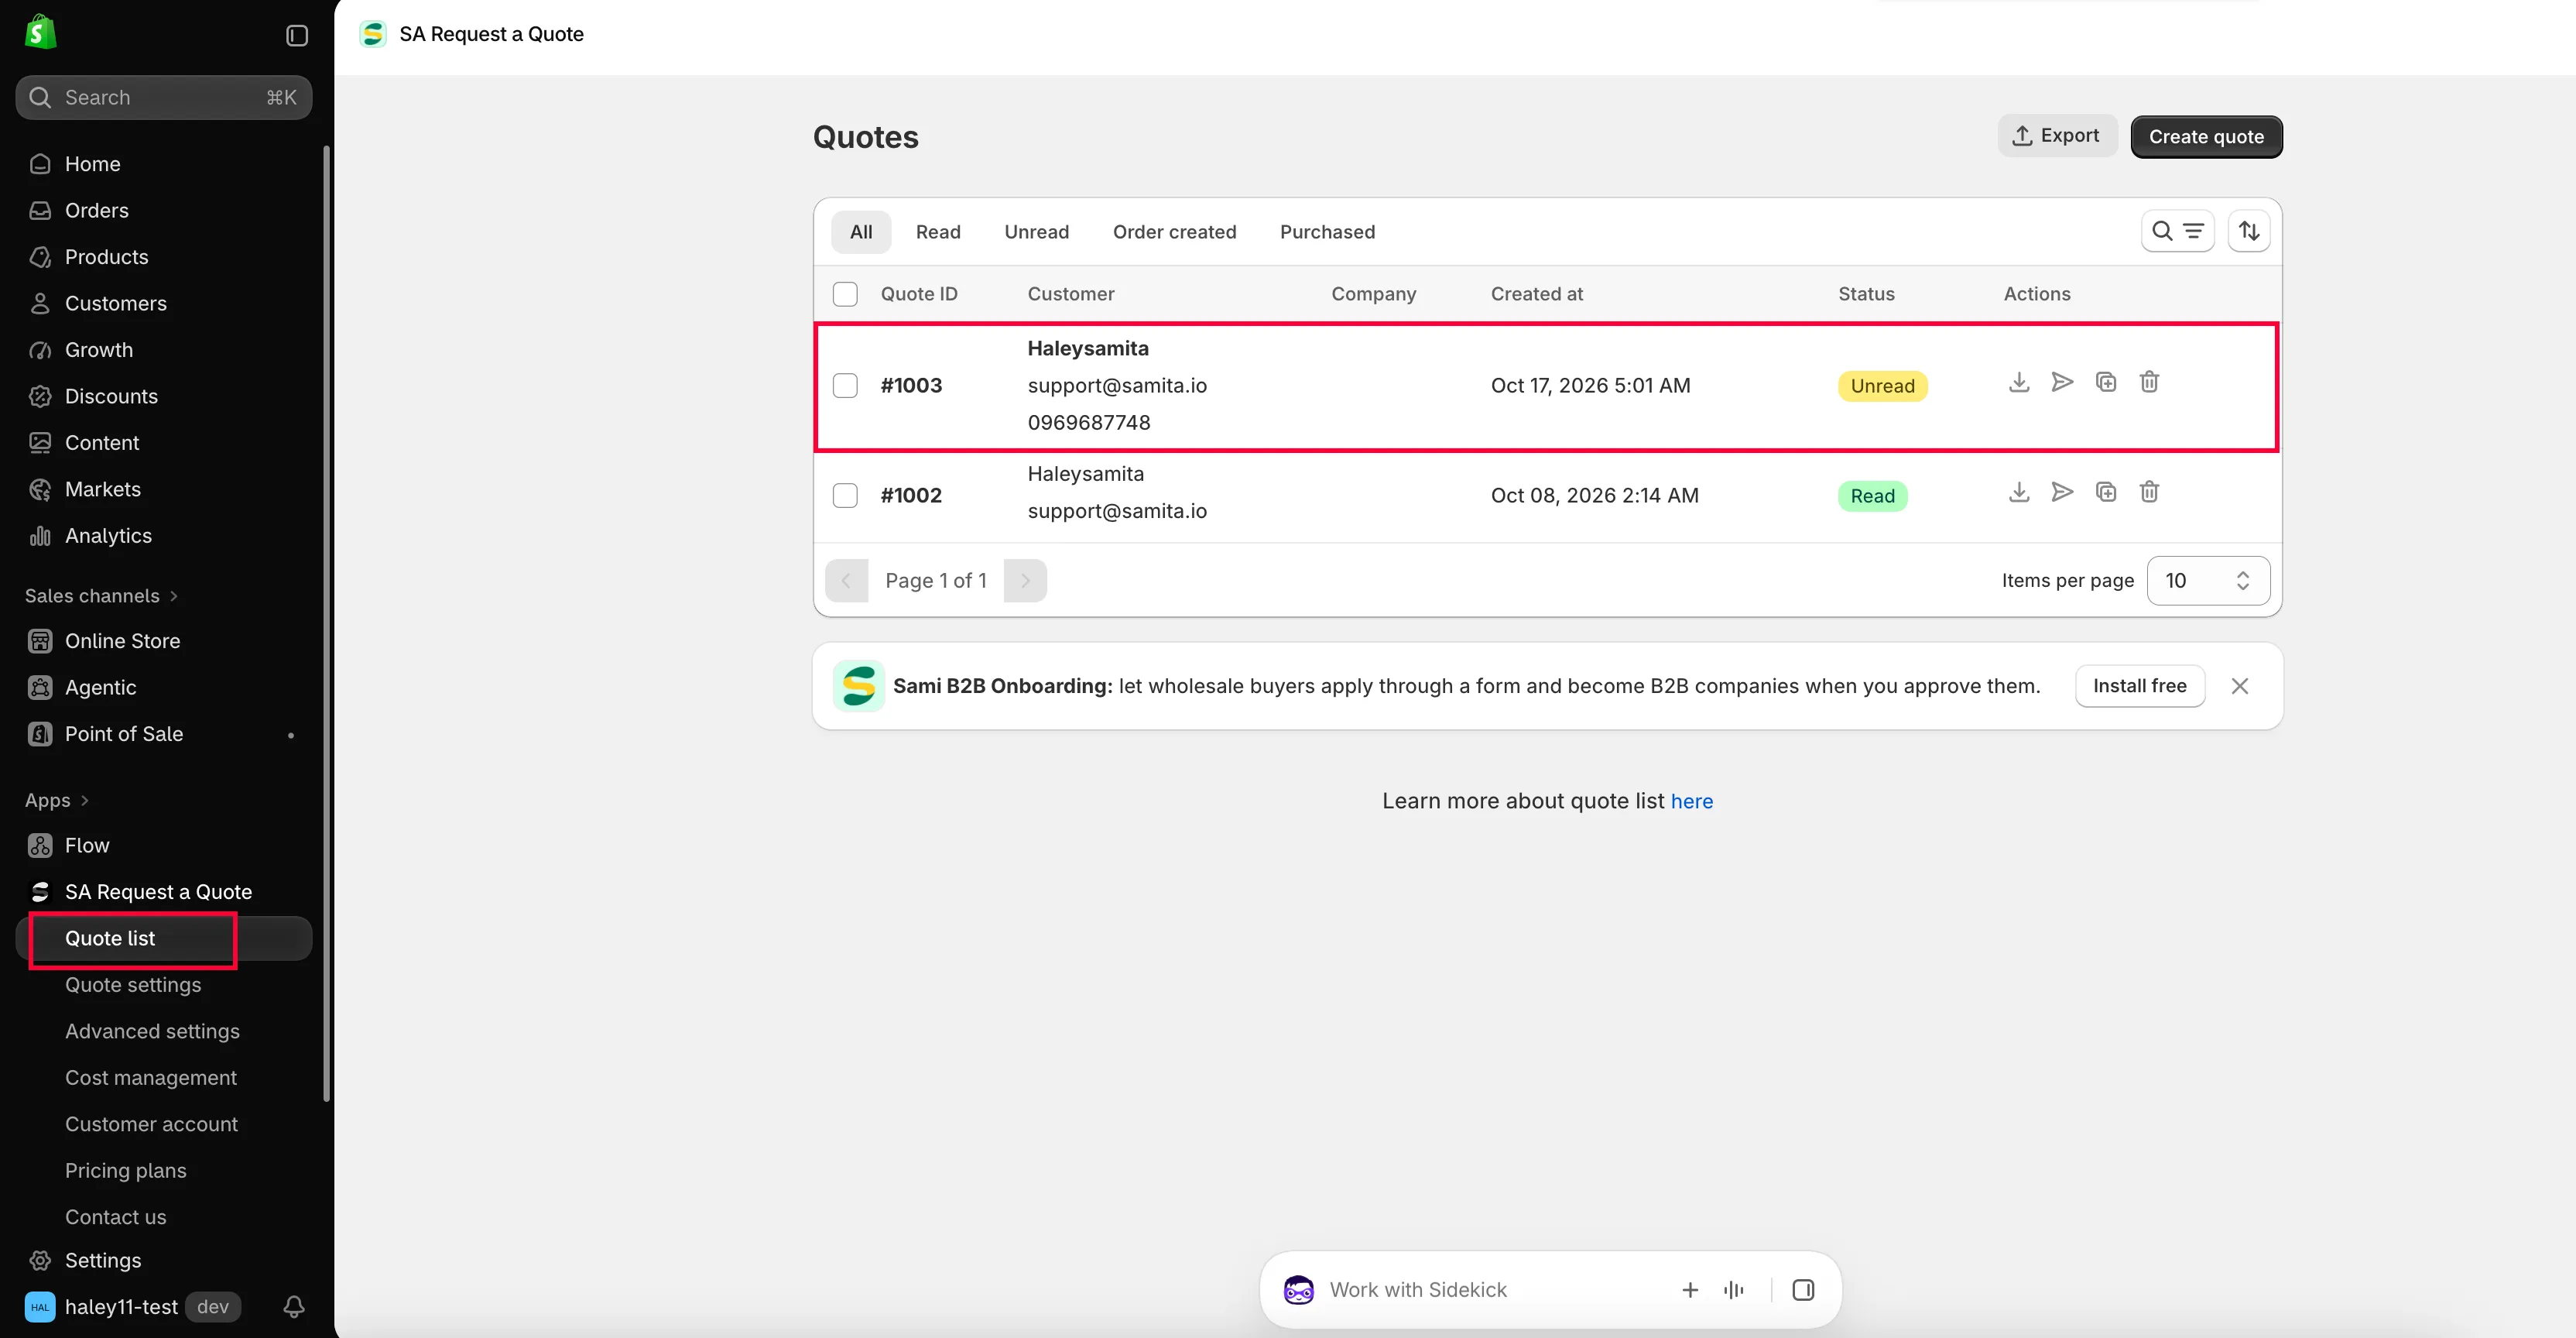
Go to Quote list
Section titled “Go to Quote list”Start on the app dashboard — the page you land on when you open SA Request a Quote from your Shopify admin — and click Quote list in the app navigation on the left. The page that opens is headed Quotes and lists every request your customers have sent.
-
Find the request
Section titled “Find the request”Start on the Unread tab — that is everything still waiting on you. All, Read, Order created and Purchased cover the rest.
If you are after one particular request, use the search and filter control next to the tabs, or the sort control beside it. The table shows Quote ID, Customer, Company, Created at, Status and Actions, so you can usually spot a quote by the customer name or the date it came in.
The Actions column at the end of each row holds four icon buttons. They are icons only, so hover one to see its name before you click: Print PDF, Resend email, Duplicate quote and Delete. Those four act on the row without opening the quote — see Download a quote as PDF, Send a quotation and Duplicate or delete a quote.
-
Click the quote
Section titled “Click the quote”Click anywhere on the row except the Actions icons. The detail page opens, headed Quote # and its number, with an Update line underneath showing when it last changed.
Two arrows sit at the top right of the detail page: they step to the previous and the next quote without going back to the list. The back arrow beside the title returns you to Quotes.
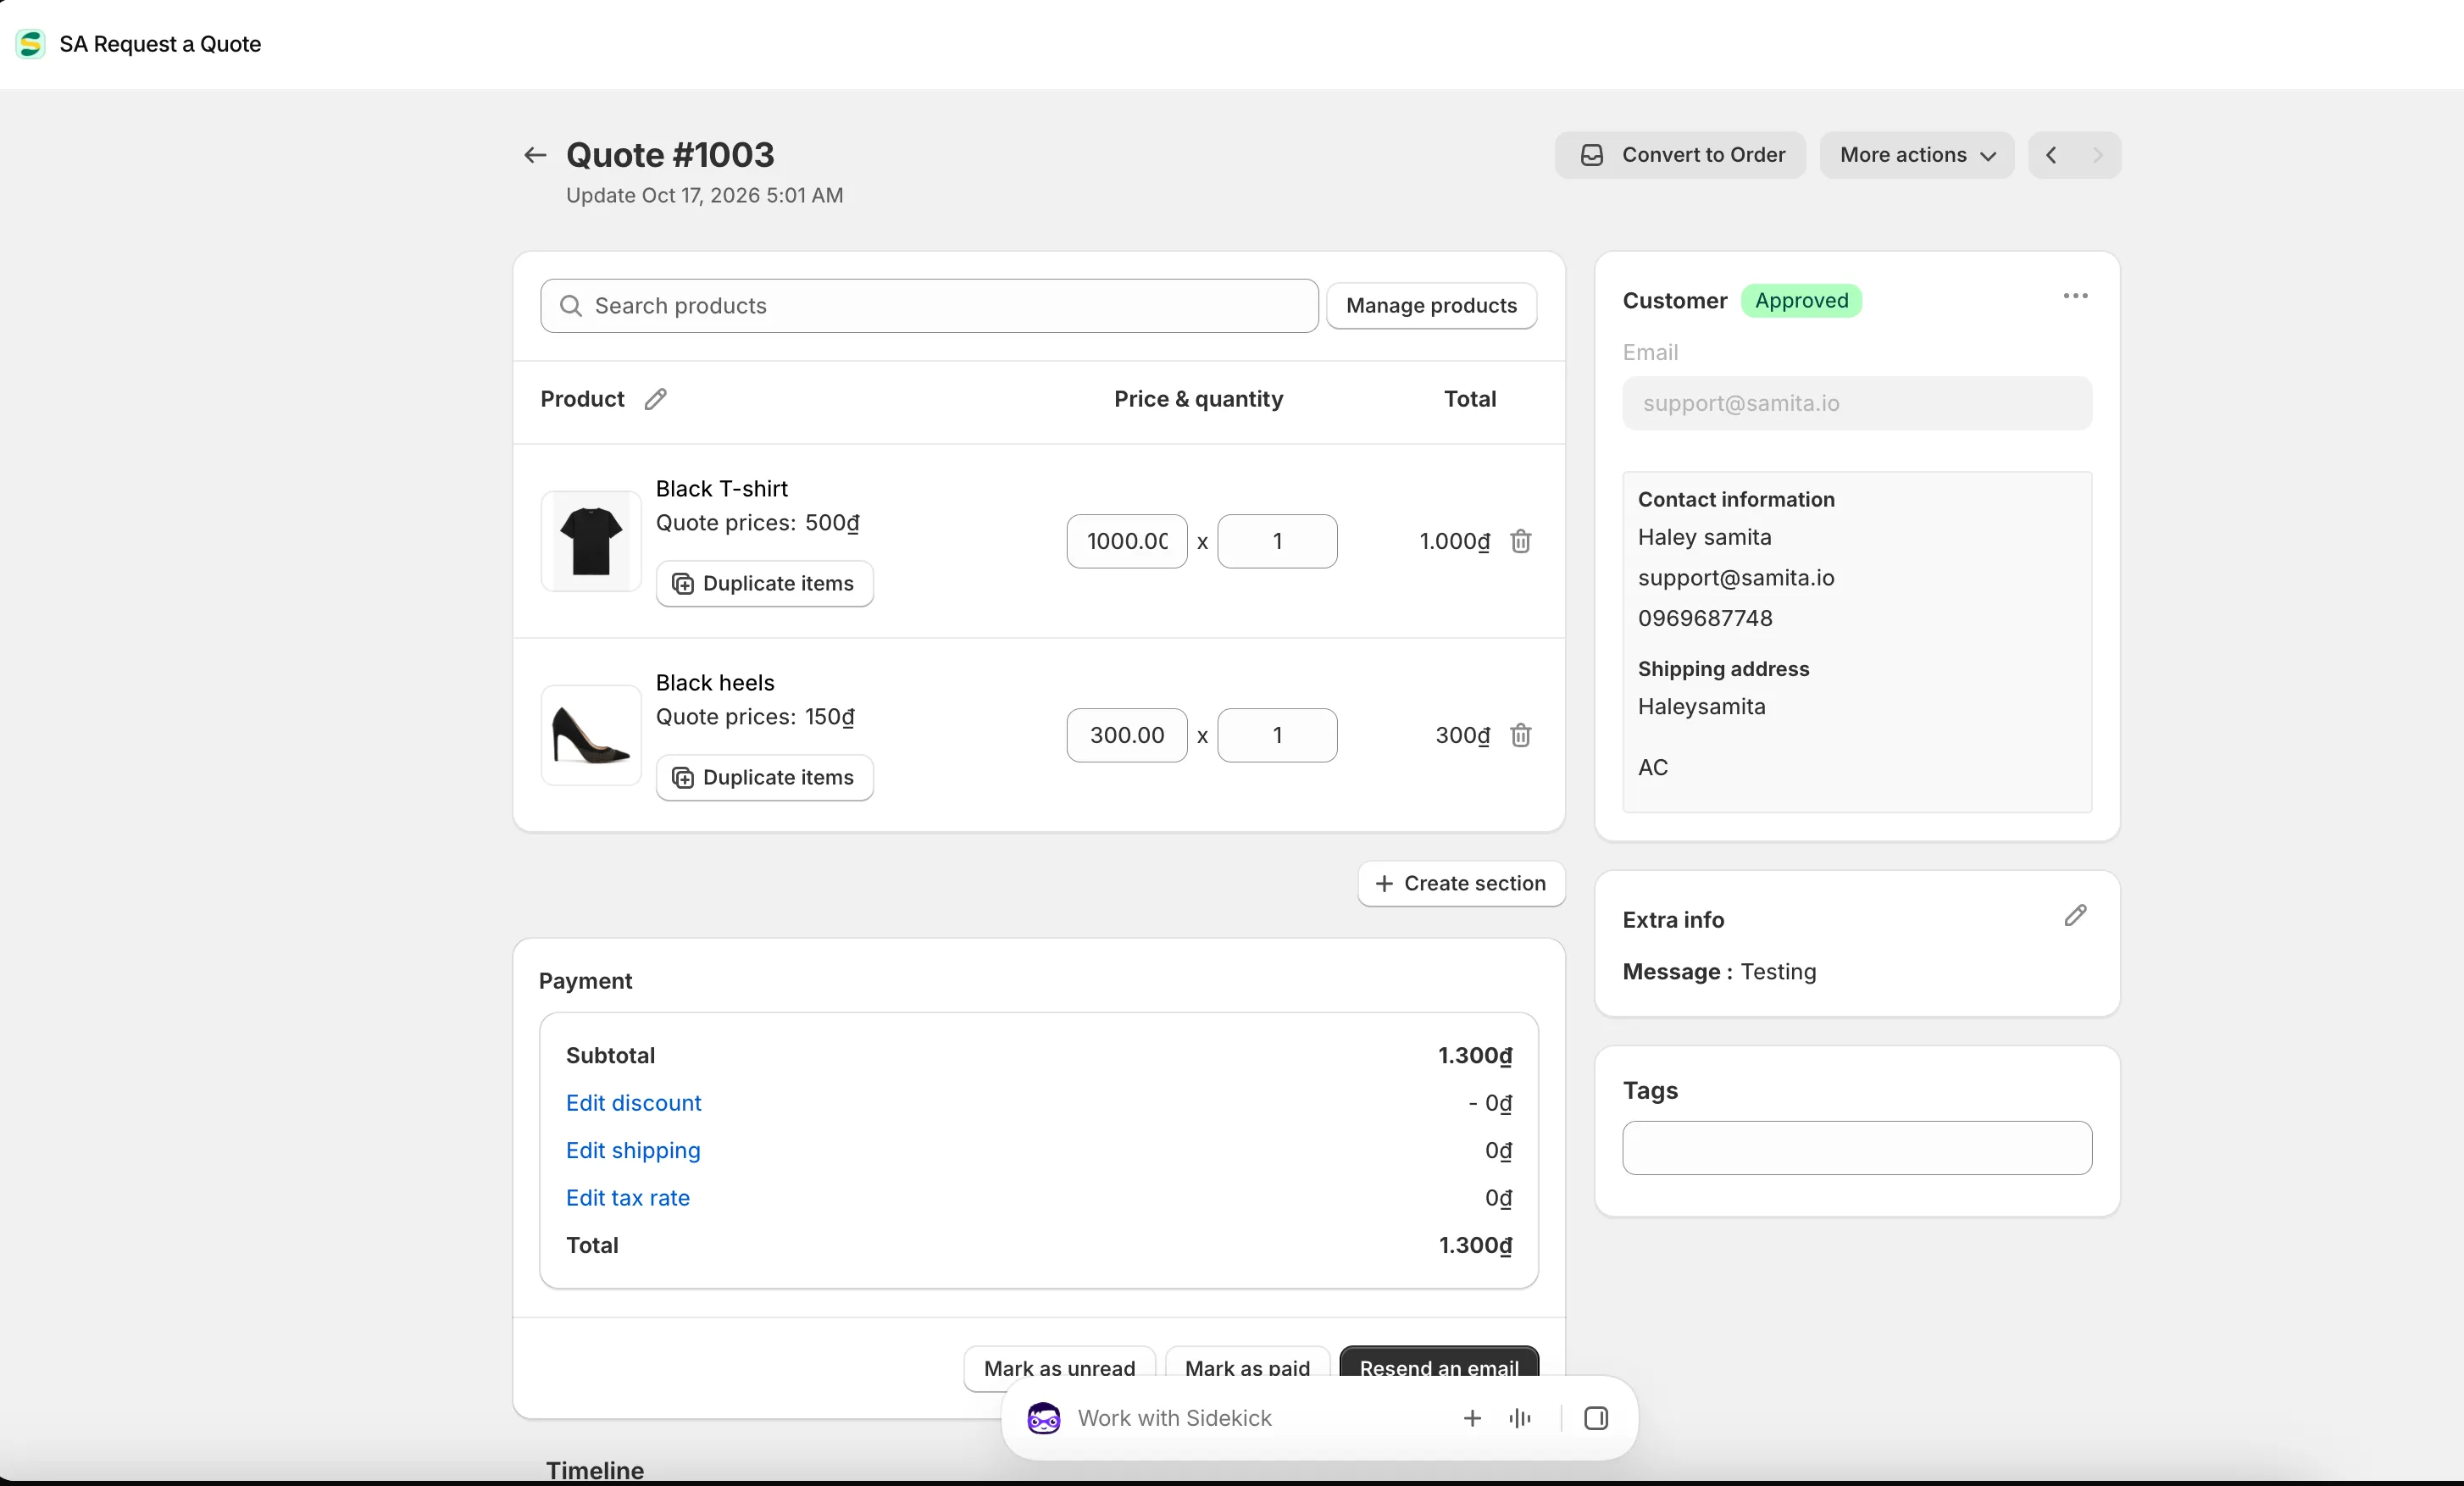
The quote detail page: products on the left, the customer’s answers on the right.
The products on the quote
Section titled “The products on the quote”The Products card opens with a search box carrying the placeholder Search products, and a Manage products button beside it. Both do the same job: they open Shopify’s product picker, where you can tick several products and variants at once and add them to the quote.
The lines underneath are laid out in three columns — Products, Price & quantity and Total:
| On each line | What it is for |
|---|---|
| The product name | A link that opens the product in your Shopify admin in a new tab. |
| Options and SKU | The exact variant the customer picked, so you price the right one. |
| Quote prices | The price the customer asked for, when your form let them name one. Shown for reference — it is not the price on the quote. |
| Note | Anything the customer typed against that individual line. |
| Price and quantity boxes | Type in the price and the quantity you are offering. The Total beside them recalculates as you type. |
| Duplicate items | Copy the line, for when the same product goes on the quote twice at two different prices. |
| The bin icon | Take the line off the quote. |
Grouping a long quote into sections
Section titled “Grouping a long quote into sections”Create section, below the products, splits the quote into named groups — phase one and phase two, or this site and that site. Each section gets its own title with a pencil icon for renaming it, its own Search products box and Manage products button, and a Clear group button for emptying it.
The Payment panel
Section titled “The Payment panel”Underneath the products sits Payment, which is where the money on the quote adds up:
| Row | What it is |
|---|---|
| Subtotal | The line totals added together. |
| Add discount / Edit discount | The discount coming off this quote. |
| Add shipping / Edit shipping | What you are charging for delivery. |
| Add tax rate / Edit tax rate | The tax applied to the quote. |
| Total | What the customer is being asked to pay. |
Each of those three links reads Add… while nothing has been set on this quote, and changes to Edit… once it has — so the wording itself tells you whether a discount, a shipping charge or a tax rate is already on the quote.
The three links relate to Cost management in the app navigation, which has its own Discount, Shipping and Tax tabs. Set your usual rules there once and you will have less to adjust on each individual quote — see Convert to a draft order.
Save the quote
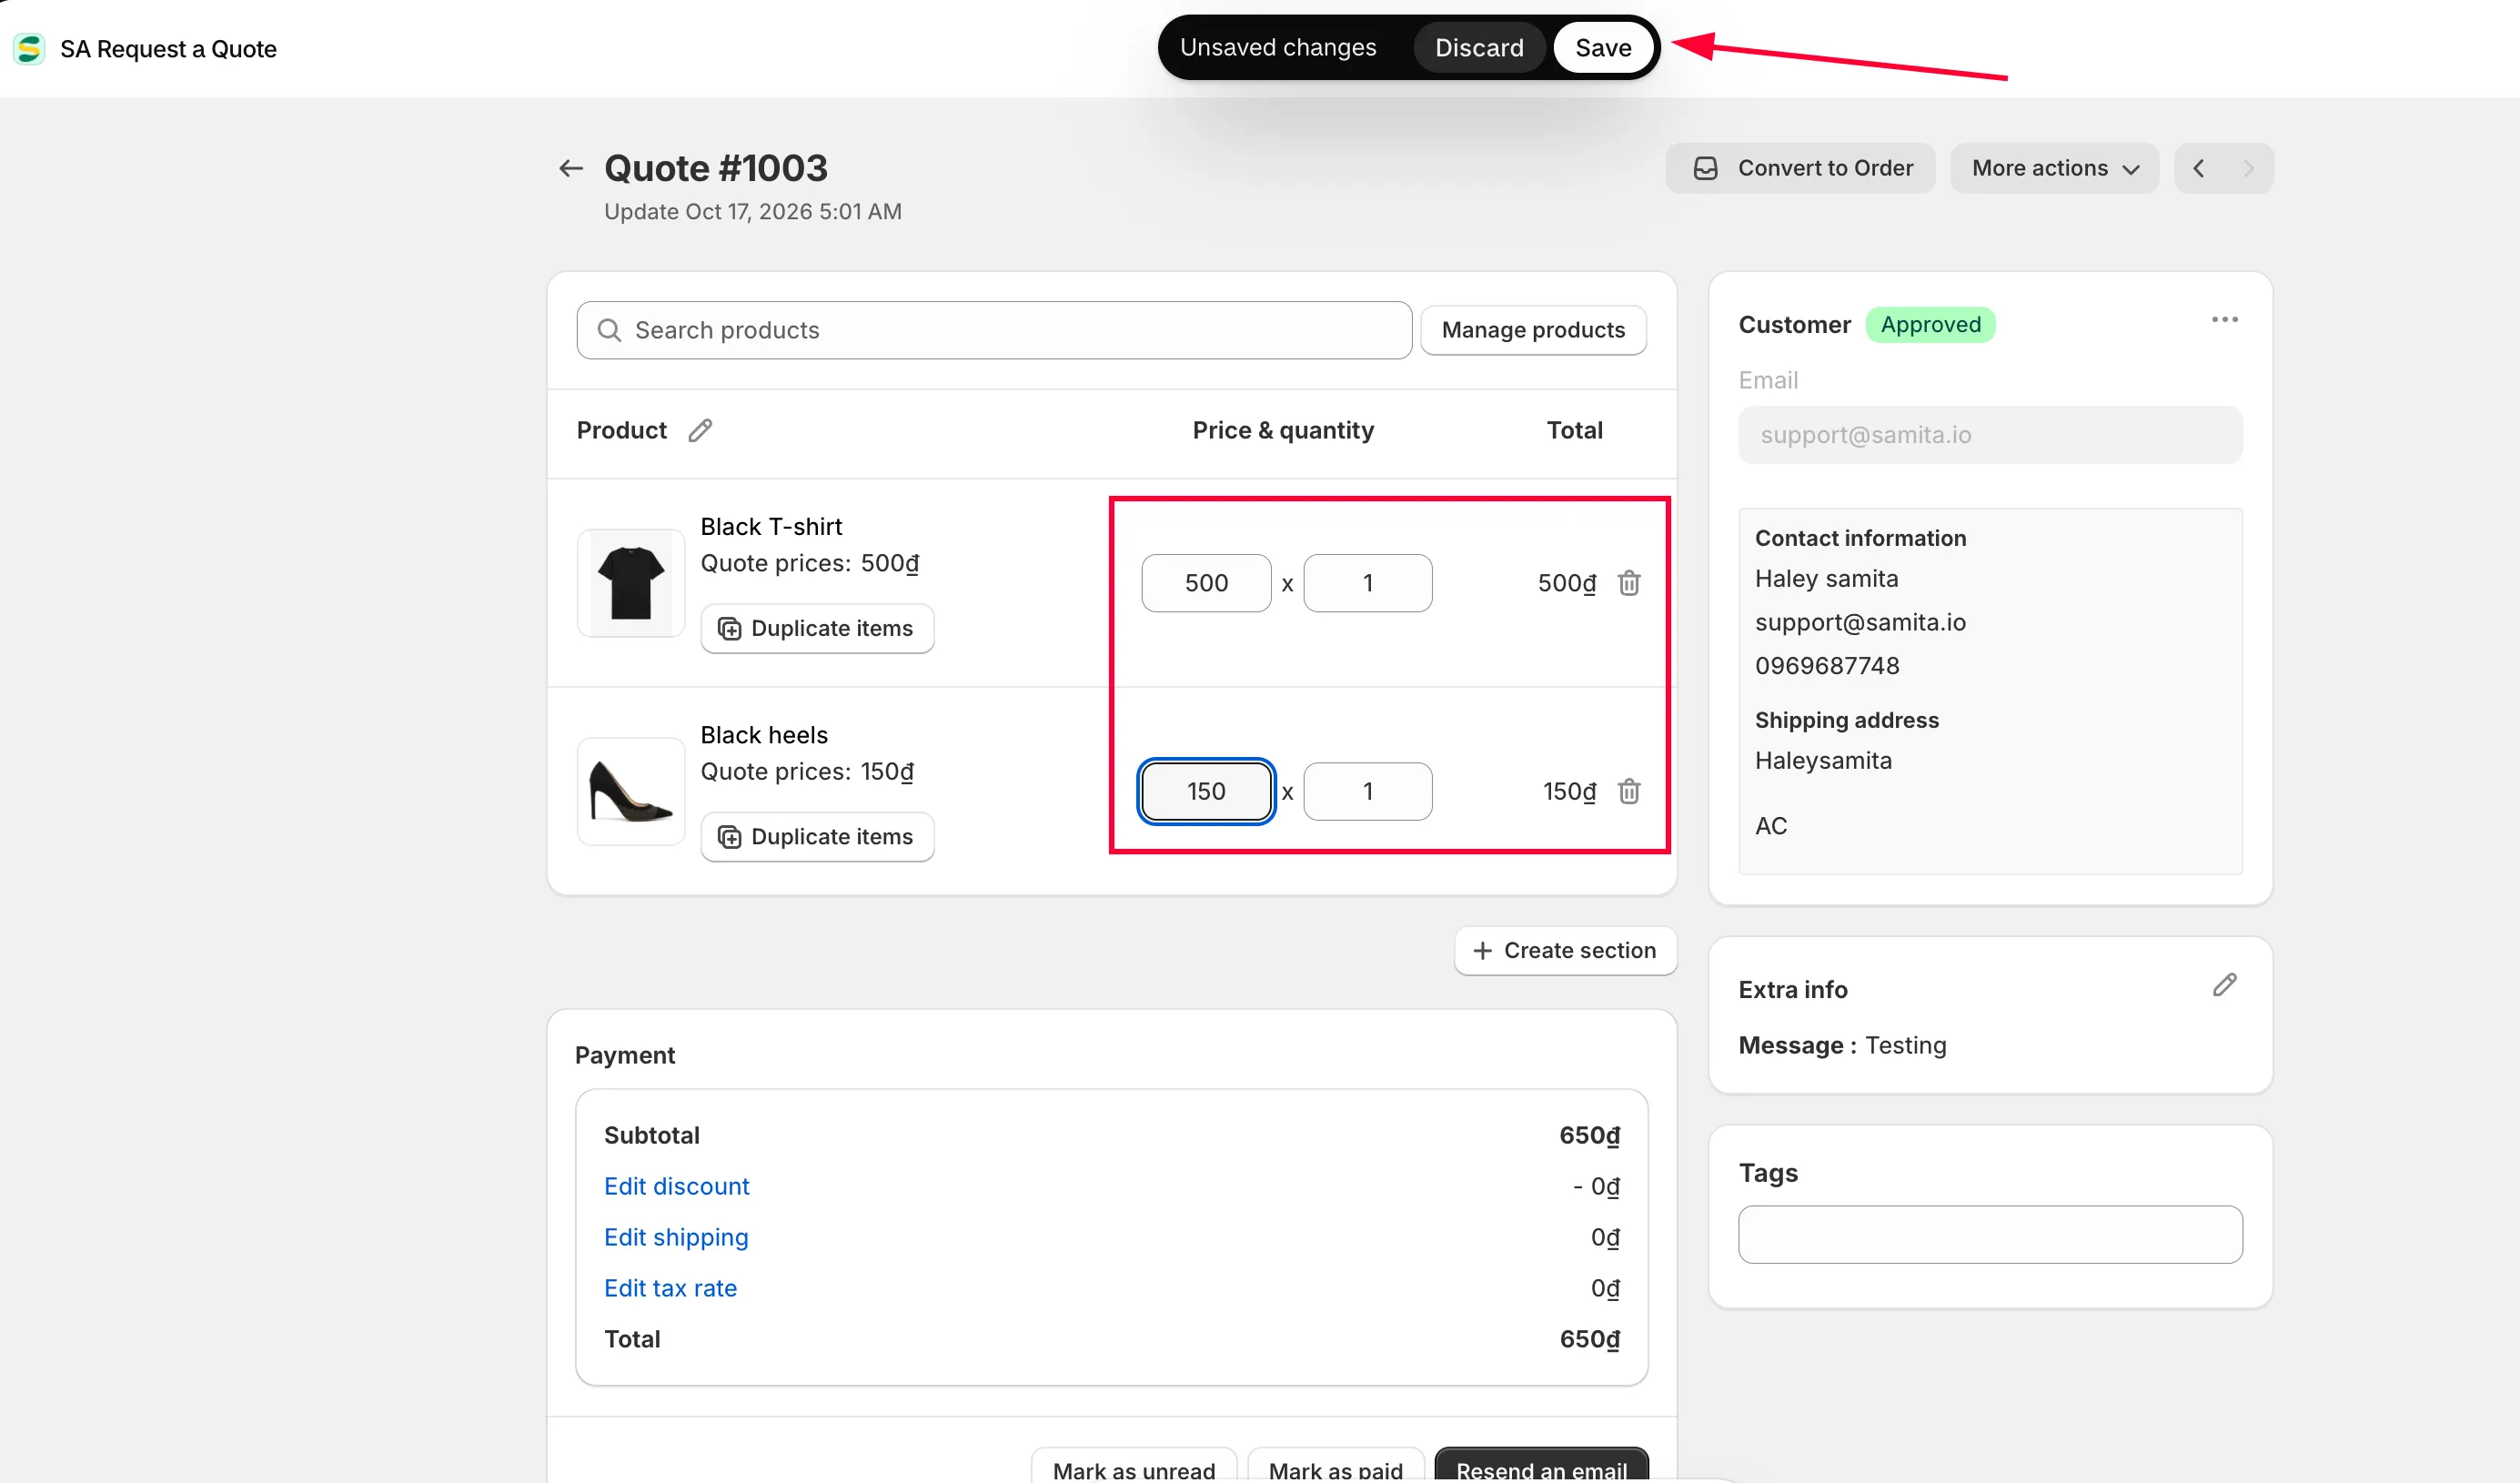
Section titled “Save the quote”Nothing you type on this page is stored until you save it.
-
Make your edits
Section titled “Make your edits”Change prices, quantities, sections, the discount, the shipping, the tax, the customer, the tags — as many as you like in one sitting.
-
Watch for the save bar
Section titled “Watch for the save bar”As soon as you change anything, Shopify’s save bar appears across the top of the admin with two buttons: Save and Discard changes.
-
Click Save
Section titled “Click Save”Save commits everything you changed. Discard changes throws it all away and puts the quote back the way it was.
The actions on the quote
Section titled “The actions on the quote”Three buttons sit at the bottom of the Payment panel:
| Button | When you would use it |
|---|---|
| Mark as unread | Put the quote back in the Unread tab so it stays on someone's list. |
| Mark as paid | Record that the customer has paid for this quote. |
| Resend an email | Send the quote to the customer again after you have changed it. |
Those three act immediately — they are not part of the save bar.
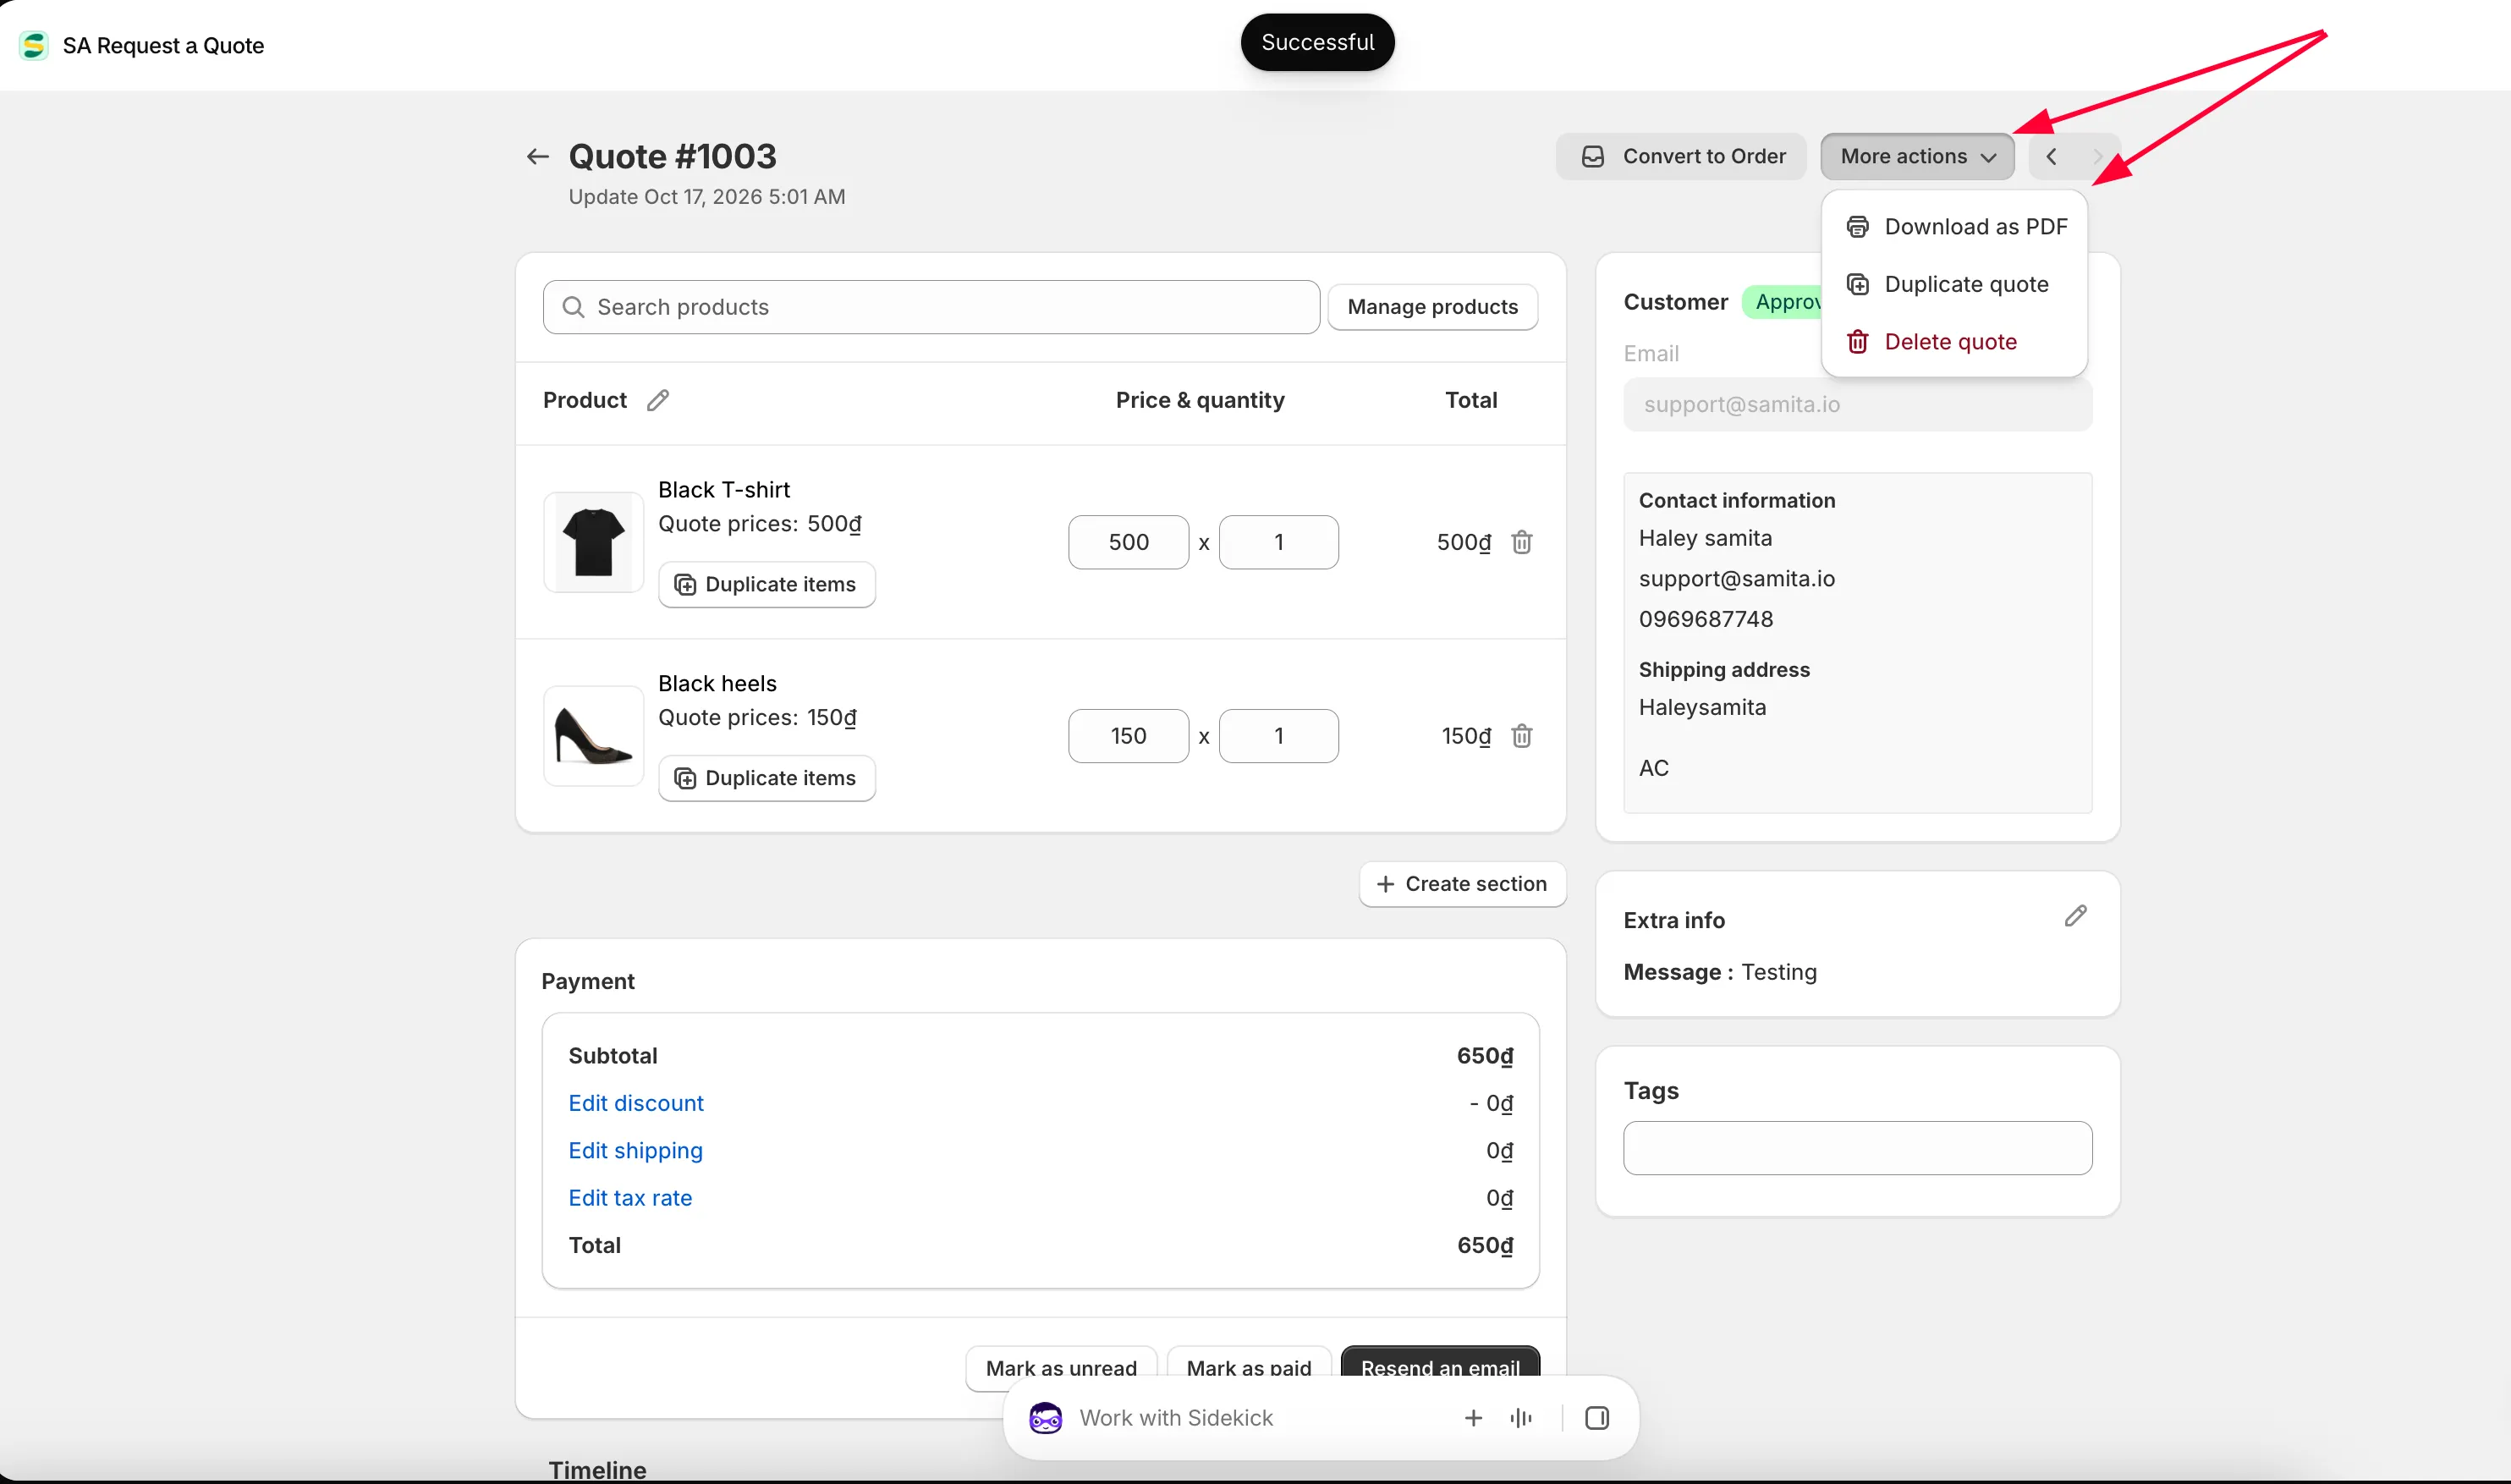
The buttons at the top of the page
Section titled “The buttons at the top of the page”| Control | What it does |
|---|---|
| Convert to Order | Turns the agreed quote into a Shopify draft order. It disappears once the quote has been converted — see Convert to a draft order. |
| More actions | A menu holding Download as PDF, Duplicate quote and Delete quote — see Download a quote as PDF and Duplicate or delete a quote. |
| Export invoice PDF | Appears only after the quote has been converted, and gives you the invoice document for the draft order — see Customize the invoice PDF. |
You do not have to open a quote to do most of this: the Actions column back on the Quotes page carries the same PDF, resend, duplicate and delete buttons as icons.
The Timeline
Section titled “The Timeline”Timeline, at the bottom of the page, keeps the history of the quote and gives you a comment box with a Post button.
What the customer sent you
Section titled “What the customer sent you”The right-hand column carries everything that came in with the request, in three cards.
Customer sits at the top, with a badge reading Pending or Approved, the name and the Email. Its Edit control opens a menu — Edit customer information, Edit shipping address and Edit billing address — so you can correct a typo in an address rather than emailing the buyer to ask again. If no customer is attached yet, the card shows a Search or create a customer box instead.
Additional details holds everything the customer typed into the rest of the form, label by label. If you renamed the Extra info section in the form builder, this card carries your title instead. When the form collected nothing extra, it reads “No extra info”.
Tags is your own filing: type a label and press it in, or pick from Frequently used tags.
| What arrives here | What it tells you |
|---|---|
| Contact information | First name, last name, email address, phone number and address — who to reply to. |
| Company information | Company name, which also fills the Company column back on the list. |
| Shipping address | Where the goods go, which often decides your delivery cost. |
| Billing address | Where the invoice goes, when it differs from the shipping address. |
| Payment terms | The terms the buyer is asking for, and any deposit. |
| Extra info | The free-text message and any files — usually where the useful detail is. |
| Tags | Your own labels for sorting and finding this quote later. |
Which of these actually appear depends on the form the customer filled in. To change what you collect, see Quote form overview.
Editing is not sending
Section titled “Editing is not sending”Changing a quote tells the customer nothing. When you are ready for them to see your price, use Resend an email — or the send email action on the row back in the list. See Send a quotation.
That is deliberate. You can work on a quote across several sittings without the customer seeing half-finished prices.
Next steps
Section titled “Next steps”- Send a quotation — email your priced quote to the customer
- Convert to a draft order — turn an accepted quote into an order
- Download a quote as PDF — send it as a document instead