> For the complete documentation index, see [llms.txt](https://docs.samita.io/llms.txt). Markdown versions of documentation pages are available by appending `.md` to page URLs; this page is available as [Markdown](https://docs.samita.io/sami-b2b-onboarding/application-forms/build-your-form.md).

# Build your form

Add fields, rows and pages to an application form, and set up each field in the builder.

The builder is where you decide what an application form asks. You add fields, group them into rows, split the form into pages and set up each field. The preview in the middle shows the form the way buyers see it on your store.

{% hint style="info" %}
To open the builder, go to **Forms** in Sami B2B Onboarding and click **Edit** beside a form, or click the form's name. Only staff with the admin role can edit forms.
{% endhint %}

## The builder at a glance

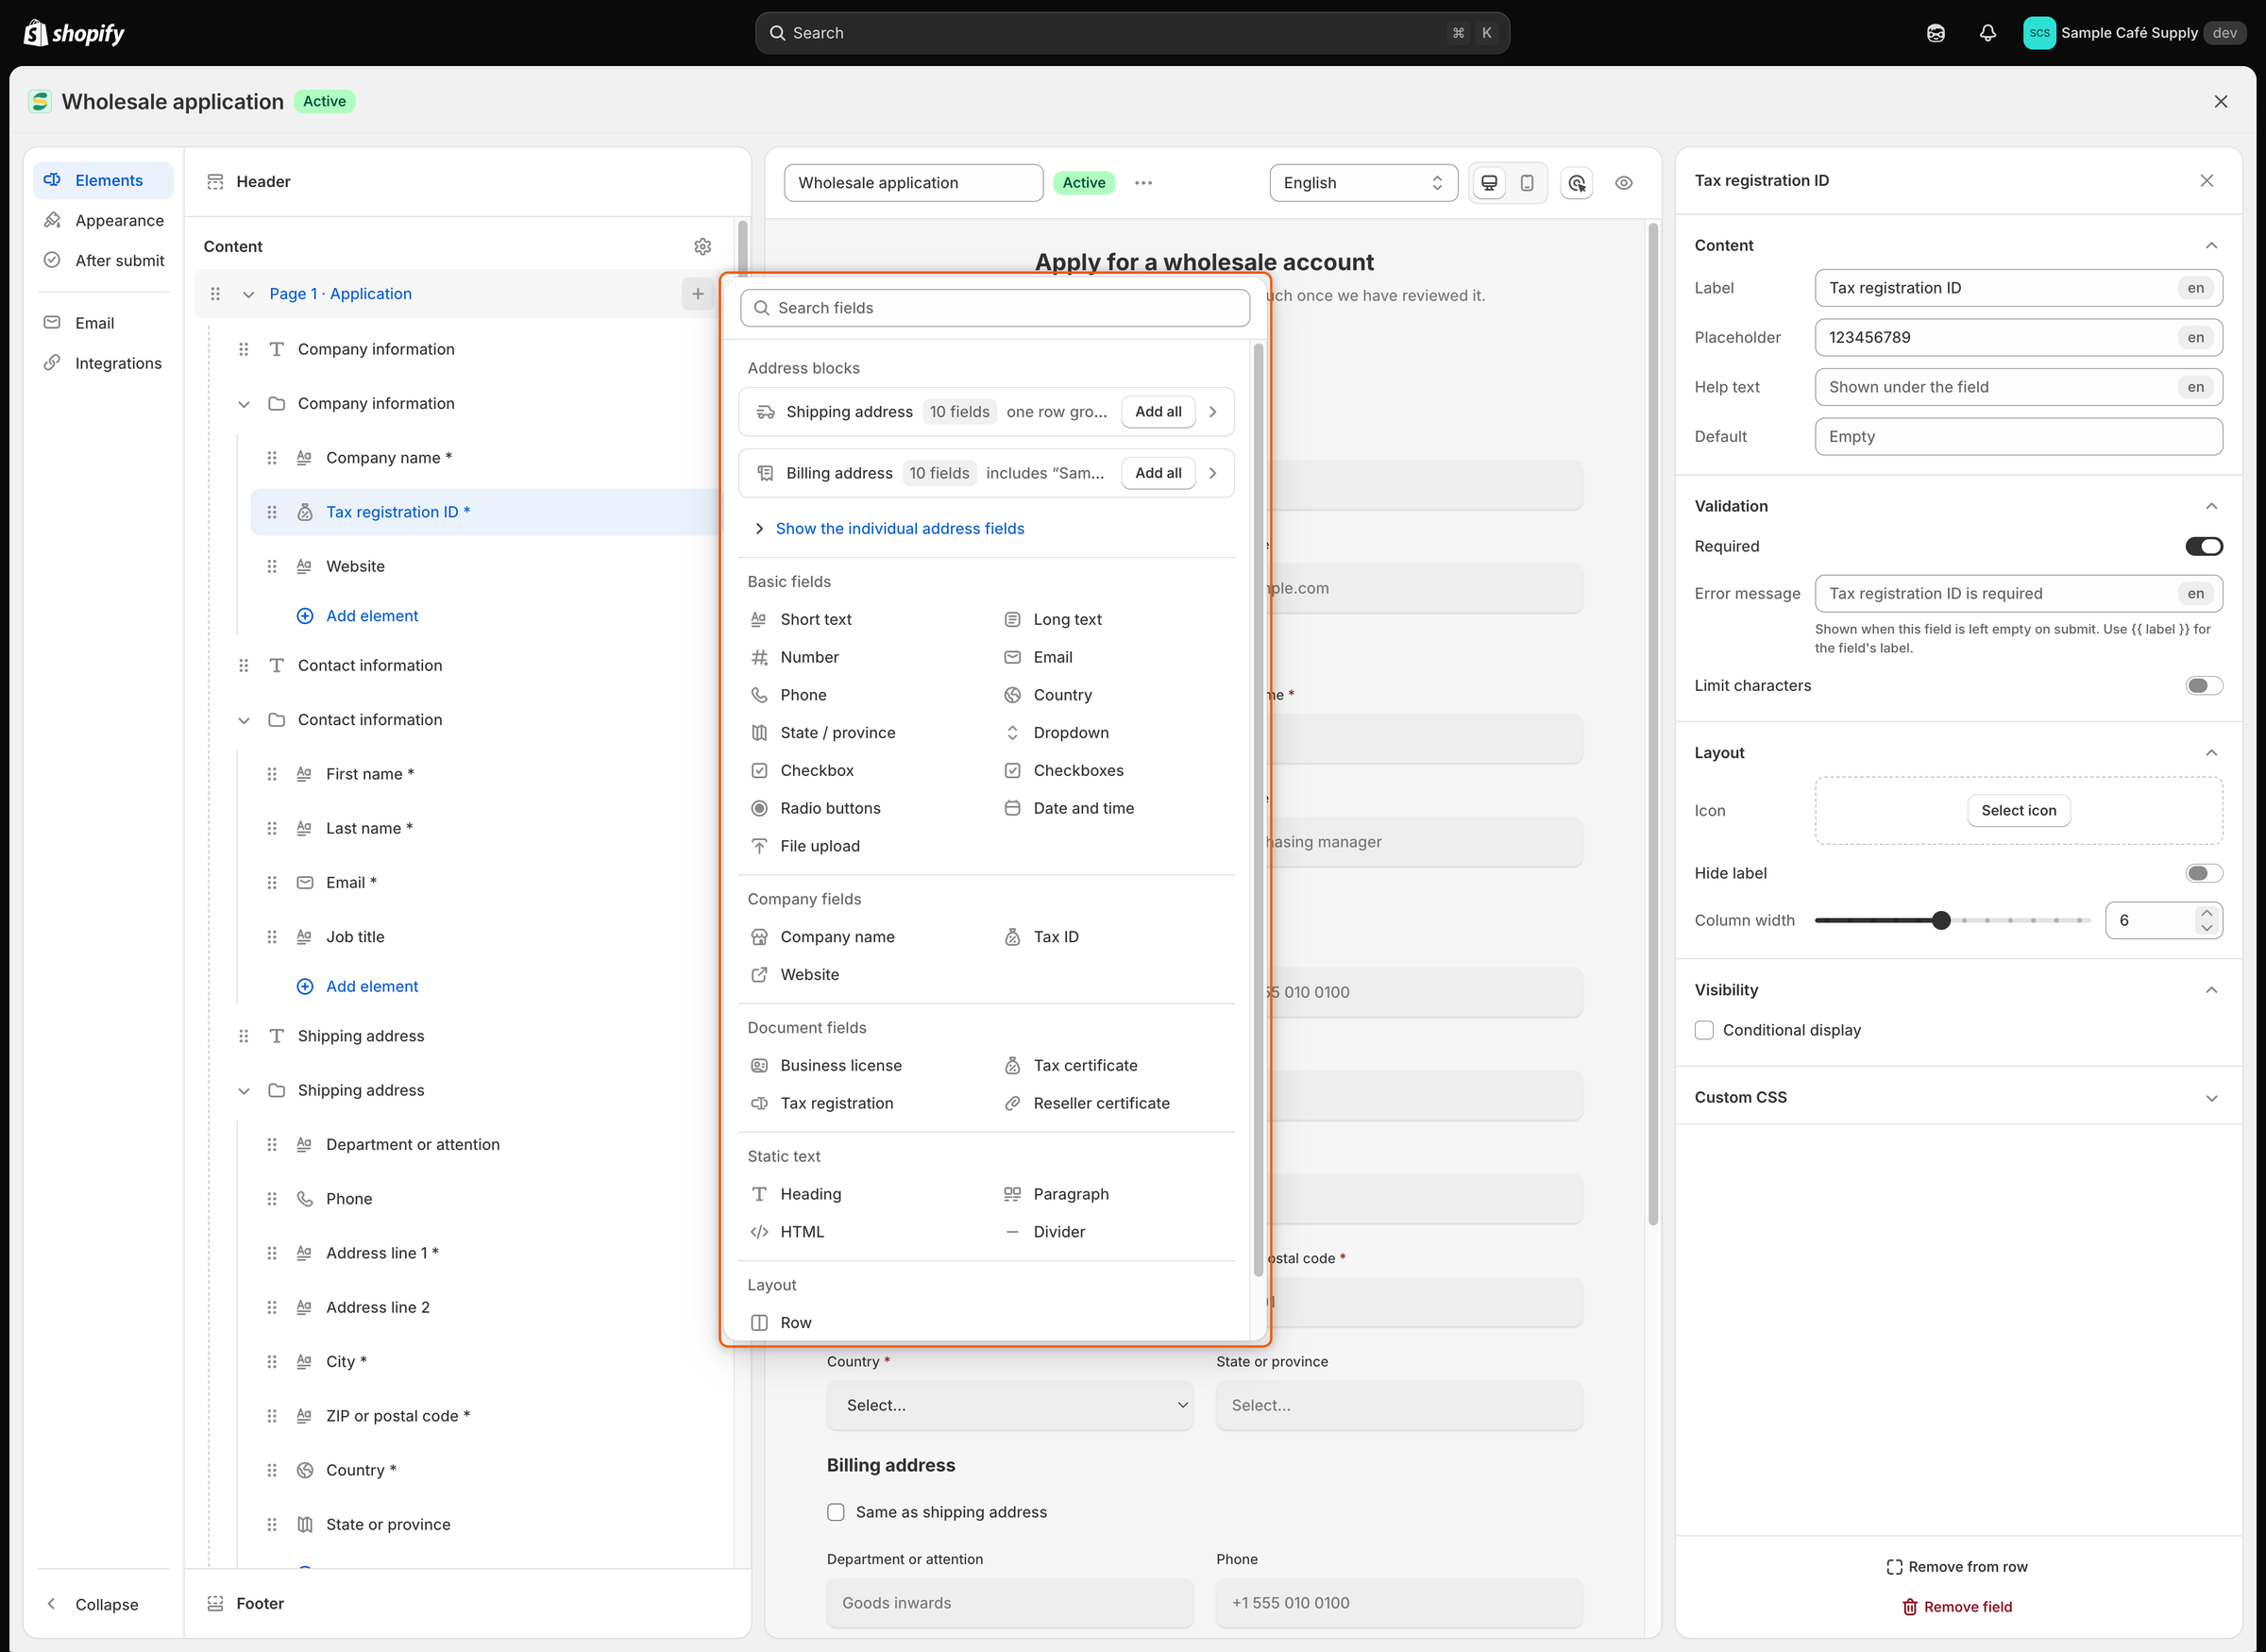
| Area           | Where             | What it's for                                                                                                                                                               |
| -------------- | ----------------- | --------------------------------------------------------------------------------------------------------------------------------------------------------------------------- |
| Section rail   | Far left          | Switches between **Elements**, **Appearance**, **After submit**, **Email** and **Integrations**. **Collapse** folds it down to icons.                                       |
| Elements panel | Left              | The form's outline: **Header** at the top, **Content**, each page with its fields and rows, **Add page**, and **Footer** at the bottom.                                     |
| Preview        | Middle            | The form as buyers see it. Click a field, a page heading, the header or the buttons to select it.                                                                           |
| Settings panel | Right             | Opens when you select something and shows its settings. Click **×** (Close) to close it.                                                                                    |
| Toolbar        | Above the preview | The **Form name** box, the **Active** or **Draft** badge, **…** (More actions), **Language**, the desktop and mobile preview buttons, the inspector button and **Preview**. |

<figure><img src="https://3844812229-files.gitbook.io/~/files/v0/b/gitbook-x-prod.appspot.com/o/spaces%2FRrf4pQPgjvb3GW7IN3Ci%2Fuploads%2Fgit-blob-8e4f943b2ae1625970261d8880353921a289b6b0%2Fscreenshot-builder-overview-elements-panel.png?alt=media" alt="The form builder with the Elements panel on the left, the form preview in the middle and the Company name settings on the right."><figcaption><p>The Elements panel lists every page, row and field in the order buyers meet them.</p></figcaption></figure>

The other sections of the rail have their own pages:

| Section          | What you set there                                                                     | Read more                                                                                                                                                         |
| ---------------- | -------------------------------------------------------------------------------------- | ----------------------------------------------------------------------------------------------------------------------------------------------------------------- |
| **Appearance**   | Layout, width, font, field style and colors.                                           | [Design the form](/sami-b2b-onboarding/application-forms/design-the-form.md)                                                                                      |
| **After submit** | The thank-you message, or a page to send buyers to.                                    | [After the buyer submits](/sami-b2b-onboarding/application-forms/after-the-buyer-submits.md)                                                                      |
| **Email**        | Who hears about this form, and this form's own version of each email.                  | [Edit email templates](/sami-b2b-onboarding/settings/email-templates.md) and [Choose who gets notified](/sami-b2b-onboarding/settings/notification-recipients.md) |
| **Integrations** | Where answers go in Shopify, plus Klaviyo, webhooks, address autocomplete and captcha. | [Map answers to Shopify](/sami-b2b-onboarding/application-forms/map-answers-to-shopify.md)                                                                        |

## Add a field

{% stepper %}
{% step %}

### Open the field list

Use whichever is closest:

* In the Elements panel, click **+** (**Add field**) beside the page's name, or **Add field** at the end of the page. Inside a row, click **Add element** to add the field to that row.
* In the preview, click **Add a field** at the end of the page.
* In the preview, point at the edge of a field and click the **+** that appears. Its tooltip says **Add field above**, **Add field below**, **Add field to the left** or **Add field to the right**. Left and right put the new field beside this one in a row.
  {% endstep %}

{% step %}

### Find the field

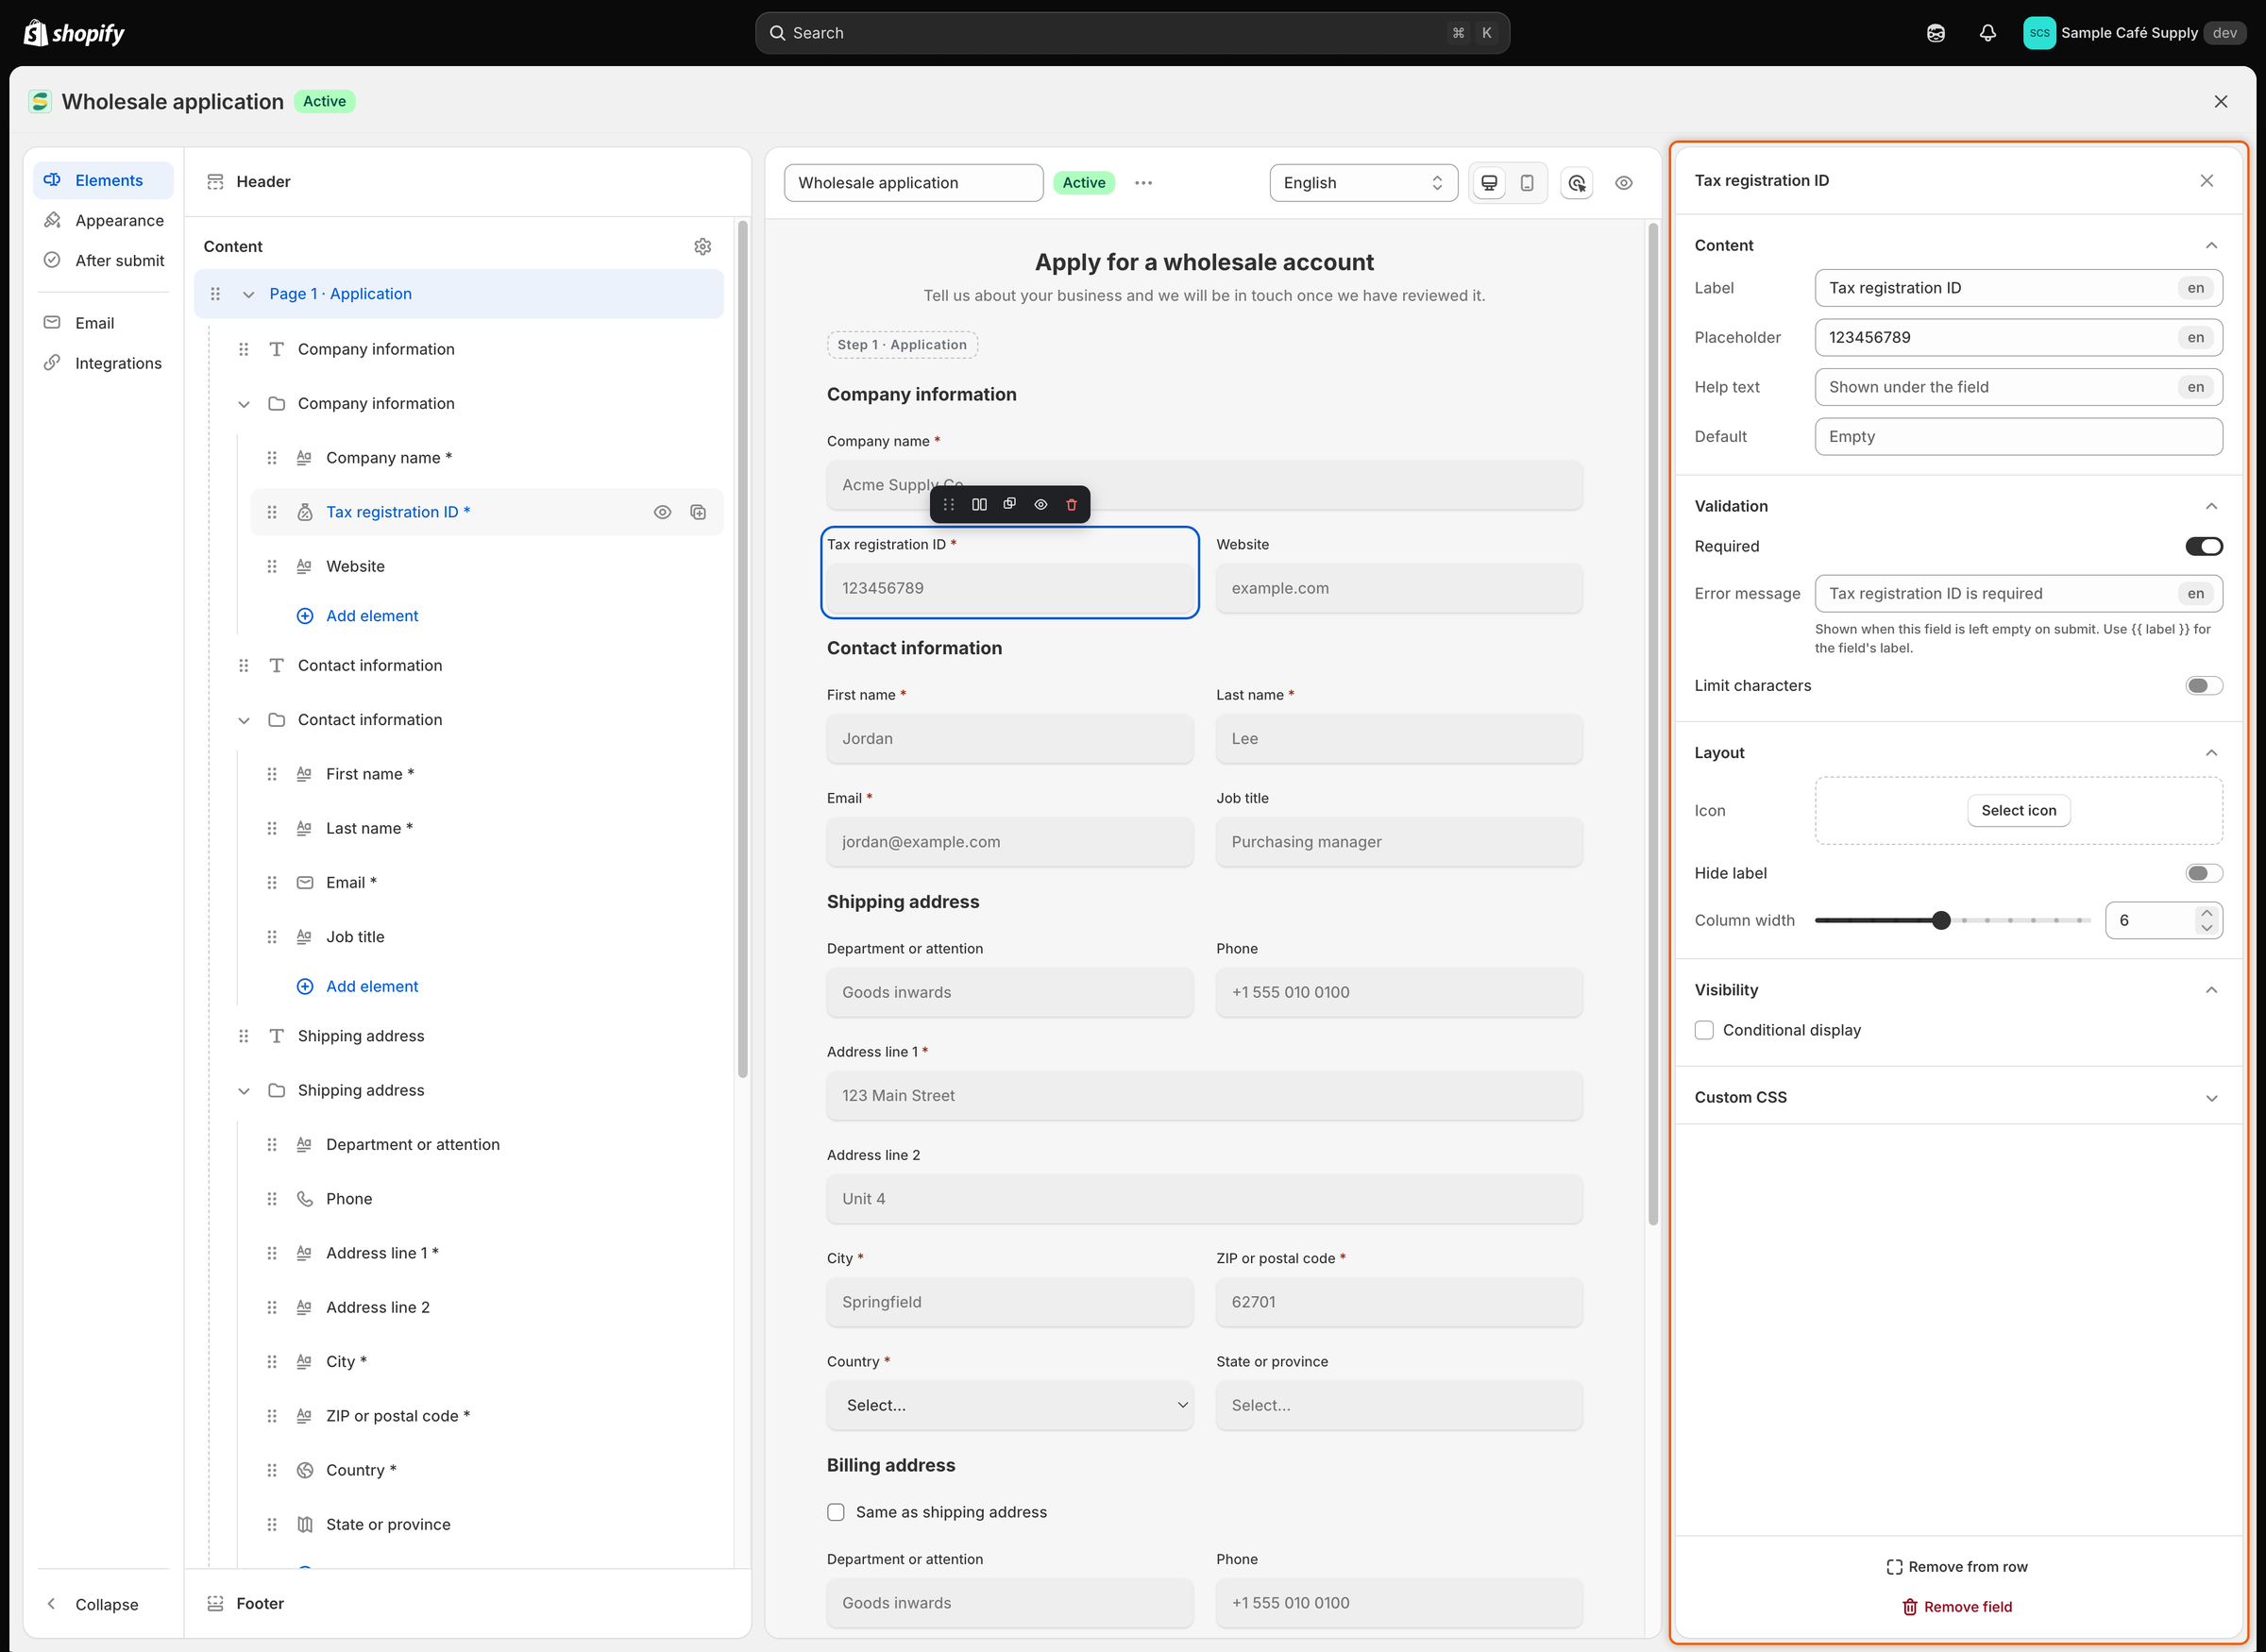
Scroll the list, or type in **Search fields** to narrow it.

<figure><img src="https://3844812229-files.gitbook.io/~/files/v0/b/gitbook-x-prod.appspot.com/o/spaces%2FRrf4pQPgjvb3GW7IN3Ci%2Fuploads%2Fgit-blob-f11a62bda2a6483b01d252315a0b455d3c4b3fa2%2Fscreenshot-builder-add-field-list.png?alt=media" alt="The list of fields to add, grouped into Address blocks, Basic fields, Company fields, Document fields, Static text and Layout."><figcaption><p>Fields are grouped by kind, and Add all on an address block adds a whole address in one click.</p></figcaption></figure>
{% endstep %}

{% step %}

### Add it

Click the field. It is added to the page and selected, and its settings open on the right. Give it a label and set it up (see [Field settings](#field-settings)).
{% endstep %}
{% endstepper %}

{% hint style="warning" %}
Every form keeps one **Email** field and one field saved as the company's name. The **Email** field can't be removed or hidden, and **Save** is refused with **Map a field to Company · Name.** if no field is saved as the company name.
{% endhint %}

## Fields you can add

| Group           | Field                                                                                     | What the buyer gets                                                                                                                                                                                                            |
| --------------- | ----------------------------------------------------------------------------------------- | ------------------------------------------------------------------------------------------------------------------------------------------------------------------------------------------------------------------------------ |
| Basic fields    | **Short text**                                                                            | A one-line text box.                                                                                                                                                                                                           |
|                 | **Long text**                                                                             | A text box for several lines.                                                                                                                                                                                                  |
|                 | **Number**                                                                                | A box that takes numbers only.                                                                                                                                                                                                 |
|                 | **Email**                                                                                 | A box that checks the answer looks like an email address.                                                                                                                                                                      |
|                 | **Phone**                                                                                 | A phone number box, with an optional country flag, dial code and number check.                                                                                                                                                 |
|                 | **Country**                                                                               | A list of countries.                                                                                                                                                                                                           |
|                 | **State / province**                                                                      | A list of the states or provinces of the country picked in the Country field before it on the page. It shows once the buyer picks a country that has states, and is a plain text box when no Country field comes before it.    |
|                 | **Dropdown**                                                                              | A list to pick one choice, or several with **Allow multiple choices**.                                                                                                                                                         |
|                 | **Checkbox**                                                                              | A single tick box, such as "I agree to the terms". When it is required, the buyer must tick it.                                                                                                                                |
|                 | **Checkboxes**                                                                            | A list of choices the buyer can tick any number of.                                                                                                                                                                            |
|                 | **Radio buttons**                                                                         | A list to pick one choice, with an optional **Other** choice the buyer types in.                                                                                                                                               |
|                 | **Date and time**                                                                         | A date picker, a time, or both.                                                                                                                                                                                                |
|                 | **File upload**                                                                           | An upload box. By default it takes PDF, JPG, JPEG and PNG files up to 10 MB.                                                                                                                                                   |
| Company fields  | **Company name**                                                                          | A text box saved as the company's name.                                                                                                                                                                                        |
|                 | **Tax ID**                                                                                | A text box for the company's tax or VAT number. The app's [tax ID checks](/sami-b2b-onboarding/automation/tax-id-checks.md) read this field.                                                                                   |
|                 | **Website**                                                                               | A text box for the company's website.                                                                                                                                                                                          |
| Document fields | **Business license**, **Tax certificate**, **Tax registration**, **Reseller certificate** | An upload box. The file is kept with the application as that type of document. See [Documents](/sami-b2b-onboarding/companies/documents.md).                                                                                   |
| Static text     | **Heading**                                                                               | A title with an optional caption under it.                                                                                                                                                                                     |
|                 | **Paragraph**                                                                             | Formatted text, such as instructions.                                                                                                                                                                                          |
|                 | **HTML**                                                                                  | Your own HTML markup.                                                                                                                                                                                                          |
|                 | **Divider**                                                                               | A horizontal line.                                                                                                                                                                                                             |
| Address blocks  | **Shipping address**                                                                      | Ten fields in one row: **Recipient / department**, **First name**, **Last name**, **Phone**, **Address line 1**, **Address line 2**, **City**, **Country**, **State / province** and **ZIP / postal code**. Click **Add all**. |
|                 | **Billing address**                                                                       | A **Same as shipping address** tick box, then ten billing fields (**Department / attention**, **Billing first name** and so on) in a row that is hidden while the box is ticked. Click **Add all**.                            |
| Layout          | **Row**                                                                                   | An empty row to put fields in. See [Group fields into rows](#group-fields-into-rows).                                                                                                                                          |

To add a single address field instead of a whole block, click **Show the individual address fields** under **Address blocks**. The fields an address block adds aren't saved to Shopify until you map them. See [Map answers to Shopify](/sami-b2b-onboarding/application-forms/map-answers-to-shopify.md).

## Field settings

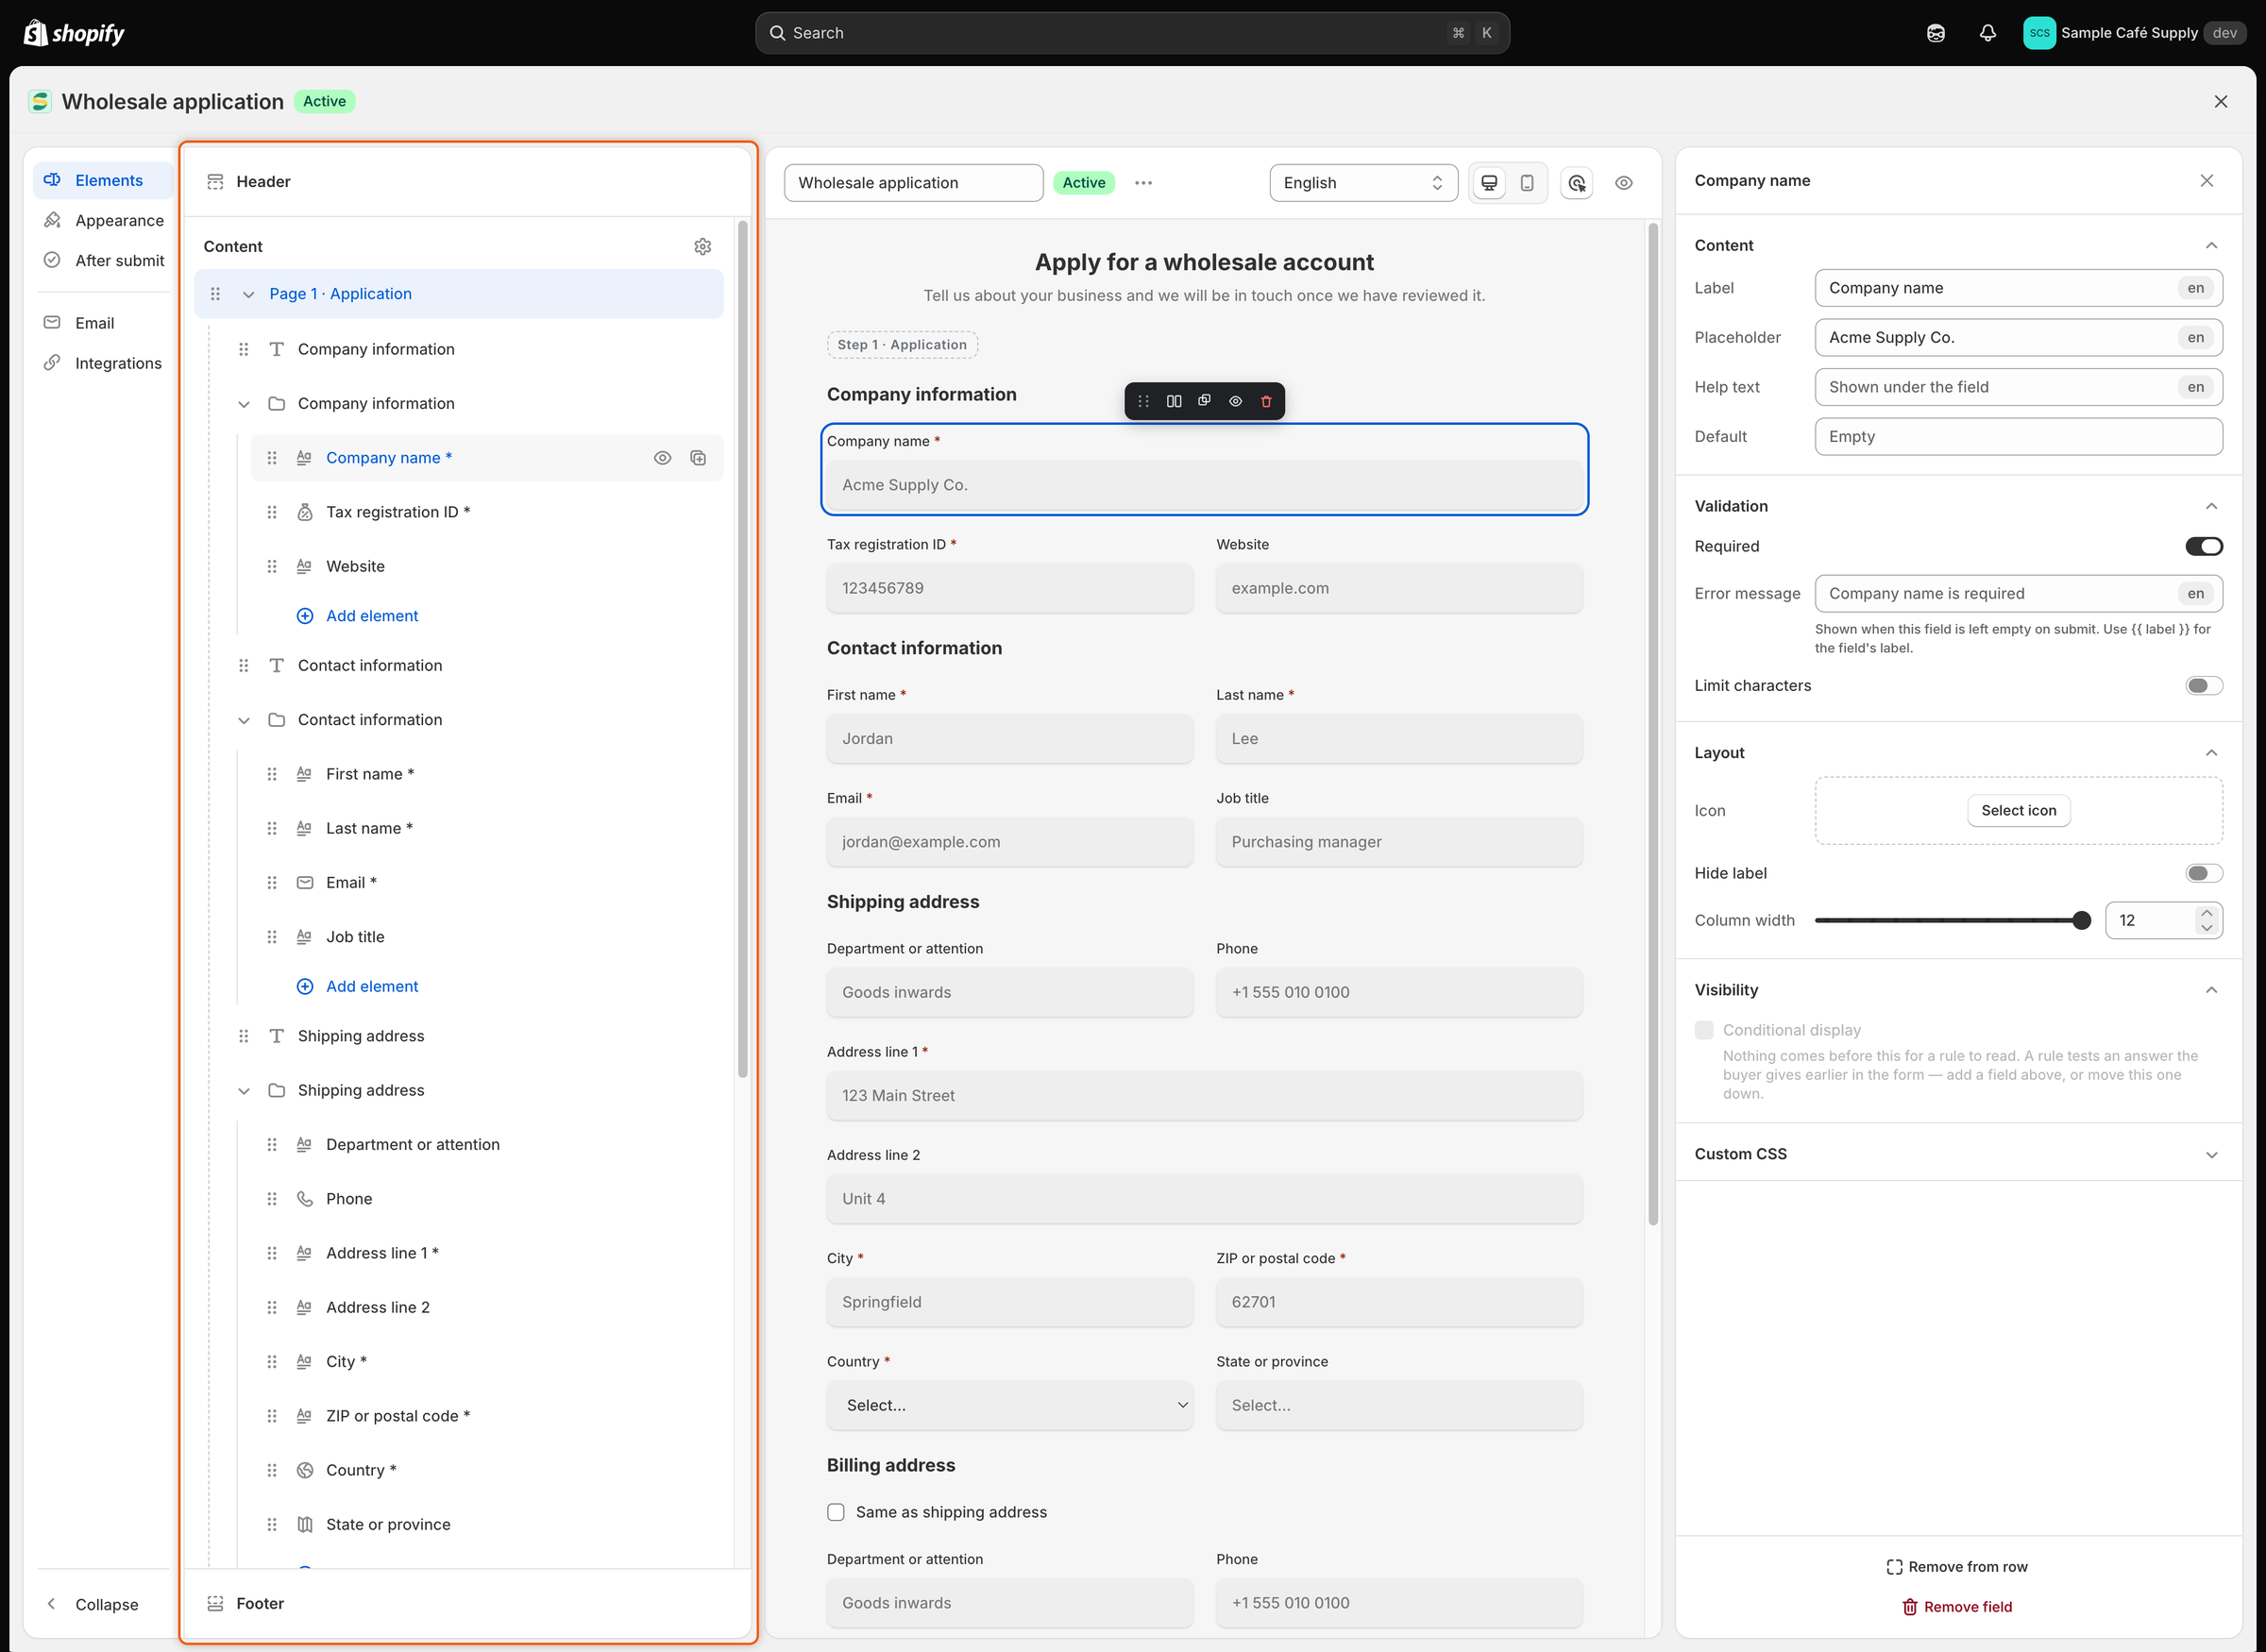
Click a field in the preview or in the Elements panel. Its settings open on the right in sections. You only see the sections that apply to that kind of field.

| Section           | Settings                                                                                                                                                                                                                                                                                                                                                                                                                                                                                                                                                                                     |
| ----------------- | -------------------------------------------------------------------------------------------------------------------------------------------------------------------------------------------------------------------------------------------------------------------------------------------------------------------------------------------------------------------------------------------------------------------------------------------------------------------------------------------------------------------------------------------------------------------------------------------- |
| **Content**       | **Label**, the question the buyer reads. **Placeholder**, the faint text inside an empty box. **Help text**, shown under the field. **Default**, an answer filled in when the form opens (for a single **Checkbox**: **Ticked by default**).                                                                                                                                                                                                                                                                                                                                                 |
| **Options**       | For **Dropdown**, **Checkboxes** and **Radio buttons**. Click **Add option** or **Change** to edit the choices: type each choice's **Label**, drag to reorder, **Add another option**, or **Bulk add** one choice per line. **Customer tags** are added to the Shopify customer when a buyer who picked that choice is approved (up to 40 characters each). Turn off **Use the label as the value** to store something other than what the buyer reads. A Dropdown also has **Allow multiple choices**. Radio buttons also have **Other option**, **Other label** and **Other placeholder**. |
| **Upload**        | For **File upload** and document fields. **Accepted**: **Only certain file types** (then list them in **File types**) or **Any file type**. **Max size**: 1 to 20 MB. **Allow more than one file**.                                                                                                                                                                                                                                                                                                                                                                                          |
| **Phone number**  | **Show country flag and dial code**. With it on: **Check the number is valid** and **Default country** (**From the buyer's browser** unless you pick one).                                                                                                                                                                                                                                                                                                                                                                                                                                   |
| **Date and time** | **Asks for**: **Date**, **Time** or **Date and time**. **Date format**, **Time format**, **Other language** for the date picker, and **Limit the range** with **Earliest** and **Latest**.                                                                                                                                                                                                                                                                                                                                                                                                   |
| **Validation**    | **Required**. With it on, **Error message**, shown when the field is left empty; type `{{ label }}` to include the field's label. **Limit characters** with **Min characters** and **Max characters**, for Short text, Long text, Email, Phone and Tax ID. Leave a limit blank for no limit.                                                                                                                                                                                                                                                                                                 |
| **Layout**        | **Icon**, drawn at the start of the box (not for Checkbox, Checkboxes, Radio buttons or uploads). **Hide label**, with **Keep the label's space** and **Still show the required mark**. **Column width**, from 1 to 12. **Number of options per line**, from 1 to 5, for Checkboxes and Radio buttons.                                                                                                                                                                                                                                                                                       |
| **Visibility**    | **Conditional display**: show, hide, require or disable the field based on earlier answers. See [Show, require or disable fields with rules](/sami-b2b-onboarding/application-forms/field-rules.md).                                                                                                                                                                                                                                                                                                                                                                                         |
| **Custom CSS**    | **Custom CSS class**, a class name you can style with your own theme CSS. Only plain class names are kept.                                                                                                                                                                                                                                                                                                                                                                                                                                                                                   |

For **Dropdown**, **Country** and **State / province**, the placeholder is the first line of the list, **Select…** by default. If you empty it, **Select…** comes back.

Static text has fewer settings. A **Heading** has its text in **Label**, plus **Caption** and **Heading tag** (Heading 1 to Heading 6). A **Paragraph** has **Text**, and **HTML** has **Markup**. Their **Label** is only the name you see in the Elements panel. All static text also has **Column width**, **Visibility** and **Custom CSS**.

<figure><img src="https://3844812229-files.gitbook.io/~/files/v0/b/gitbook-x-prod.appspot.com/o/spaces%2FRrf4pQPgjvb3GW7IN3Ci%2Fuploads%2Fgit-blob-9615467eff094f682e0c97625b6b3f295e52ff91%2Fscreenshot-builder-field-settings-panel.png?alt=media" alt="The settings panel for the Tax registration ID field, with the Content, Validation, Layout and Visibility sections open and Custom CSS collapsed."><figcaption><p>A field's settings are grouped into sections, from what the buyer reads to when the field shows.</p></figcaption></figure>

## Arrange fields

### Move a field

* **In the Elements panel:** drag a field by its handle. Drop it on another field to place it above or below, on a page's name to move it to the end of that page, or on a row's name to put it into that row.
* **In the preview:** click a field, then drag it by the handle at the left of its toolbar (**Drag to move this field**). Drop it on the top or bottom edge of another field to place it above or below. Drop it on the left or right edge to put the two side by side in a row.

### Set column widths

Widths are counted out of 12 columns, and every new field starts at 12, the full width. Fields that follow each other share a line when their widths fit, so two fields at 6 sit side by side and three at 4 make three columns.

* Drag **Layout › Column width** in the field's settings, or
* Click **Change width** on the selected field's toolbar in the preview. It steps through a third, a half and the full width.

When the form is narrower than 480 pixels, for example on a phone, every field takes the whole line.

### Group fields into rows

A row keeps fields together and can open them with a head: a label and a description above the fields. You can show, hide or move a whole row at once.

To make a row, do one of these:

* Open the field list and click **Row** under **Layout**. An empty row appears in the Elements panel. Click **Add element** inside it to add fields.
* Open the field list and click **Select fields** (shown when the page has two or more fields outside rows). Tick the fields in the Elements panel, then click **Group into row**.
* Add a field to the left or right of another, or drop one beside another in the preview.

Click the row's name in the Elements panel to open its settings:

| Setting                    | What it does                                                                                                                                                  |
| -------------------------- | ------------------------------------------------------------------------------------------------------------------------------------------------------------- |
| **Label**                  | The row's title. Buyers see it above the row's fields.                                                                                                        |
| **Hide the heading block** | Hides the label and description from buyers. They are kept and come back when you turn this off.                                                              |
| **Description**            | Text shown under the label.                                                                                                                                   |
| **Icon**                   | An icon beside the label.                                                                                                                                     |
| **Conditional display**    | Show or hide the whole row based on earlier answers. See [Show, require or disable fields with rules](/sami-b2b-onboarding/application-forms/field-rules.md). |
| **Ungroup row**            | Breaks the row up. Its fields stay on the page.                                                                                                               |

In the Elements panel, the row's eye icon hides all its fields and **Duplicate row** copies it. To take one field out of a row, select the field and click **Remove from row**.

The **Wholesale application** form uses rows with their heading block hidden, because each section already opens with a **Heading** field.

## Use several pages

{% stepper %}
{% step %}

### Add a page

Click **Add page** at the bottom of the Elements panel. A page named **Untitled page 2** is added and its settings open. Type a new **Page name** and press `Enter`.
{% endstep %}

{% step %}

### Turn pages into steps

Click **Content** in the Elements panel and turn on **Show step progress bar**. Choose **Step labels**: **Name and number**, **Name only** or **Number only**.

Buyers now see one page at a time with a step bar on top. Each page ends with a **Continue** button that checks the page's answers before moving on, and the last page ends with the submit button. Without the step bar, all pages show one after another on a single form.
{% endstep %}

{% step %}

### Choose whether buyers can go back

Every step after the first has a **Back** button, because **Let buyers go back a step** starts on. To change it, click **Footer** in the Elements panel. Turn **Let buyers go back a step** off to remove the button, or change **Back label**. These settings show only while the step bar is on and the form has two or more pages.
{% endstep %}
{% endstepper %}

Click a page's name in the Elements panel for its settings:

| Setting                         | What it does                                                                                                                                                                                                          |
| ------------------------------- | --------------------------------------------------------------------------------------------------------------------------------------------------------------------------------------------------------------------- |
| **Page name**                   | The page's name in the builder and in the step bar.                                                                                                                                                                   |
| **Hide the heading block**      | Starts the page at its first field. The heading and description are kept for later.                                                                                                                                   |
| **Heading** and **Description** | Shown at the top of the page.                                                                                                                                                                                         |
| **Continue button label**       | The text of the page's **Continue** button. Not shown on the last page.                                                                                                                                               |
| **Icon**                        | Replaces this step's number in the step bar. Shown only with the step bar on.                                                                                                                                         |
| **Header and footer**           | **Use custom header** and **Use custom footer** give this step its own header text and note. While buyers can go back, the custom footer also has **Show Back button on this step**. Shown only with the step bar on. |
| **Visibility**                  | Show or hide the whole page based on answers on earlier pages.                                                                                                                                                        |
| **Delete page**                 | Deletes the page and its fields. A form needs at least one page, and the page holding the **Email** field can't be deleted until you move that field.                                                                 |

## Header and footer

Click **Header** at the top of the Elements panel, or the heading in the preview:

* **Show store logo**, then **Upload image**: a .jpg, .png or .svg file up to 1 MB, about 200×60 pixels.
* **Heading** and **Subheading** at the top of the form.
* **Show this block** to show or hide the whole header.

Click **Footer** at the bottom of the Elements panel, or the buttons in the preview:

* **Submit label**, the text of the submit button.
* **Reset button** and **Reset label**, a button that clears the form.
* **Full-width buttons**, or **Alignment**: **Left**, **Center** or **Right**.
* **Note**, text shown with the buttons, and **Put the note above the buttons**.

## Hide, copy or remove a field

* **Hide this block** (the eye icon in the Elements panel or on the field's toolbar) takes the field off the form for buyers but keeps it, with its settings, in the builder. The field leaves the preview and is greyed out in the Elements panel. Click its eye there to bring it back.
* **Duplicate field** places a copy right after the field and selects it.
* **Remove field** (on the toolbar or at the bottom of the settings panel) deletes the field when you save.

## Preview the form

* **Desktop preview** and **Mobile preview** switch the width of the preview.
* The inspector button (the target icon) switches between editing and testing. The inspector is on when the builder opens, and the button reads **Deactivate inspector**: clicking selects things to edit, and rules don't run, so a field a rule would hide still shows. Click it to turn the inspector off and fill in the preview like a buyer: rules run, and **Continue** and the submit button check your answers. Nothing is sent. Click it again (**Activate inspector**) to go back to editing. The shortcut is `⌘` `Shift` `I` on Mac or `Ctrl` `Shift` `I` on Windows.
* **Language** shows the form in a language you have translated it into. Words not yet translated show in English. To translate, choose **Translate this form** from **…** (More actions), which opens [Translate](/sami-b2b-onboarding/settings/translate.md).
* **Preview** (the eye icon) opens the form's page on your store in a new tab. It works once the form is saved and published.

## Save your changes

Click **Save** in the save bar. A **Form saved** message appears, and if the form is **Active**, buyers get the new version straight away. **Discard** throws away everything since the last save.

If something needs fixing, the save is refused and a banner at the top of the preview lists each problem, such as **Enter a form name** or two fields saved to the same Shopify field. Where a line ends with an arrow button, click it to go straight to the field or setting.

## Next steps

* [Show, require or disable fields with rules](/sami-b2b-onboarding/application-forms/field-rules.md) — ask a question only when an earlier answer calls for it.
* [Map answers to Shopify](/sami-b2b-onboarding/application-forms/map-answers-to-shopify.md) — choose where each answer is saved on approval.
* [Design the form](/sami-b2b-onboarding/application-forms/design-the-form.md) — match the form to your store's look.
* [Create and publish a form](/sami-b2b-onboarding/application-forms/create-and-publish-a-form.md) — publish the form and check it on your store.


---

# Agent Instructions
This documentation is published with GitBook. GitBook is the documentation platform designed so that both humans and AI agents can read, navigate, and reason over technical content effectively. Learn more at gitbook.com.

## Querying This Documentation
If you need additional information that is not directly available in this page, you can query the documentation dynamically by asking a question.

Perform an HTTP GET request on the current page URL with the `ask` query parameter, and the optional `goal` query parameter:

```
GET https://docs.samita.io/sami-b2b-onboarding/application-forms/build-your-form.md?ask=<question>&goal=<endgoal>
```

`ask` is the immediate question: it should be specific, self-contained, and written in natural language.
`goal` is optional and describes the broader end goal you are ultimately trying to accomplish on behalf of the user. GitBook uses it to tailor the answer towards what is most useful for that goal.

The response will contain a direct answer to the question and relevant excerpts and sources from the documentation.

Use this mechanism when the answer is not explicitly present in the current page, you need clarification or additional context, or you want to retrieve related documentation sections.