> For the complete documentation index, see [llms.txt](https://docs.samita.io/llms.txt). Markdown versions of documentation pages are available by appending `.md` to page URLs; this page is available as [Markdown](https://docs.samita.io/sami-b2b-onboarding/companies/import-companies-from-csv.md).
# Import companies from a CSV file
Add the companies you already sell to from a CSV file, check the result, and fix the rows that were skipped.
If you keep your wholesale customers in a spreadsheet, you can bring them into Sami B2B Onboarding in one go. Each row of your file becomes a company on the **Companies** list, where you can give it a sales rep, keep notes about it, and export it.
{% hint style="warning" %}
**Imported companies are kept in this app only.** Nothing is created in Shopify: no company, no customer, no location. Their payment terms and catalog are recorded in the app but not applied at checkout, and checkout can't be held for them if you put them on hold. To bring in companies that already exist in Shopify, use [Sync from Shopify](/sami-b2b-onboarding/companies/sync-from-shopify.md) instead.
{% endhint %}
Only admins can import companies.
## File limits
| Limit | Value |
| --------------- | ---------------------------------------------- |
| File type | `.csv` |
| File size | Up to 20 MB |
| Rows per import | Up to 50,000. Rows after that aren't imported. |
| Layout | A header row, then one row per company |
## Import your file
{% stepper %}
{% step %}
### Open Import companies
In the Shopify admin, open **Sami B2B Onboarding** and click **Companies** in the app menu. Click **Import companies** at the top of the page. When the list is empty, the button is in the middle of the page instead, and on the **Applications** tab it reads **Import CSV**. You can also click the **Import companies** shortcut on **Home**.
The page shows your **Import history**, or **No imports yet** before your first import. The cards on the right explain how importing works and list the columns a row can hold.
{% endstep %}
{% step %}
### Download the template
In the **How it works** card, click **Download template**. The template has the header row and one example row for Acme Supply Co. Starting from it means every column is matched for you later.
{% endstep %}
{% step %}
### Fill it in
Add one row per company. **Company name** is the only required column. Any other cell can stay empty. Delete the example row before you import, or Acme Supply Co. is imported too. See the [columns](#columns-a-row-can-hold) below.
Save the file as CSV. If your spreadsheet app offers **CSV UTF-8**, choose it so accented names come through.
{% endstep %}
{% step %}
### Upload the file
Click **Start a new import** at the top of the page, or in the middle of the page before your first import. In the **Import companies from a CSV file** dialog, click **Add file** and choose your file, or drop it on the dialog. The dialog moves to **Match columns** by itself.
{% endstep %}
{% step %}
### Match columns
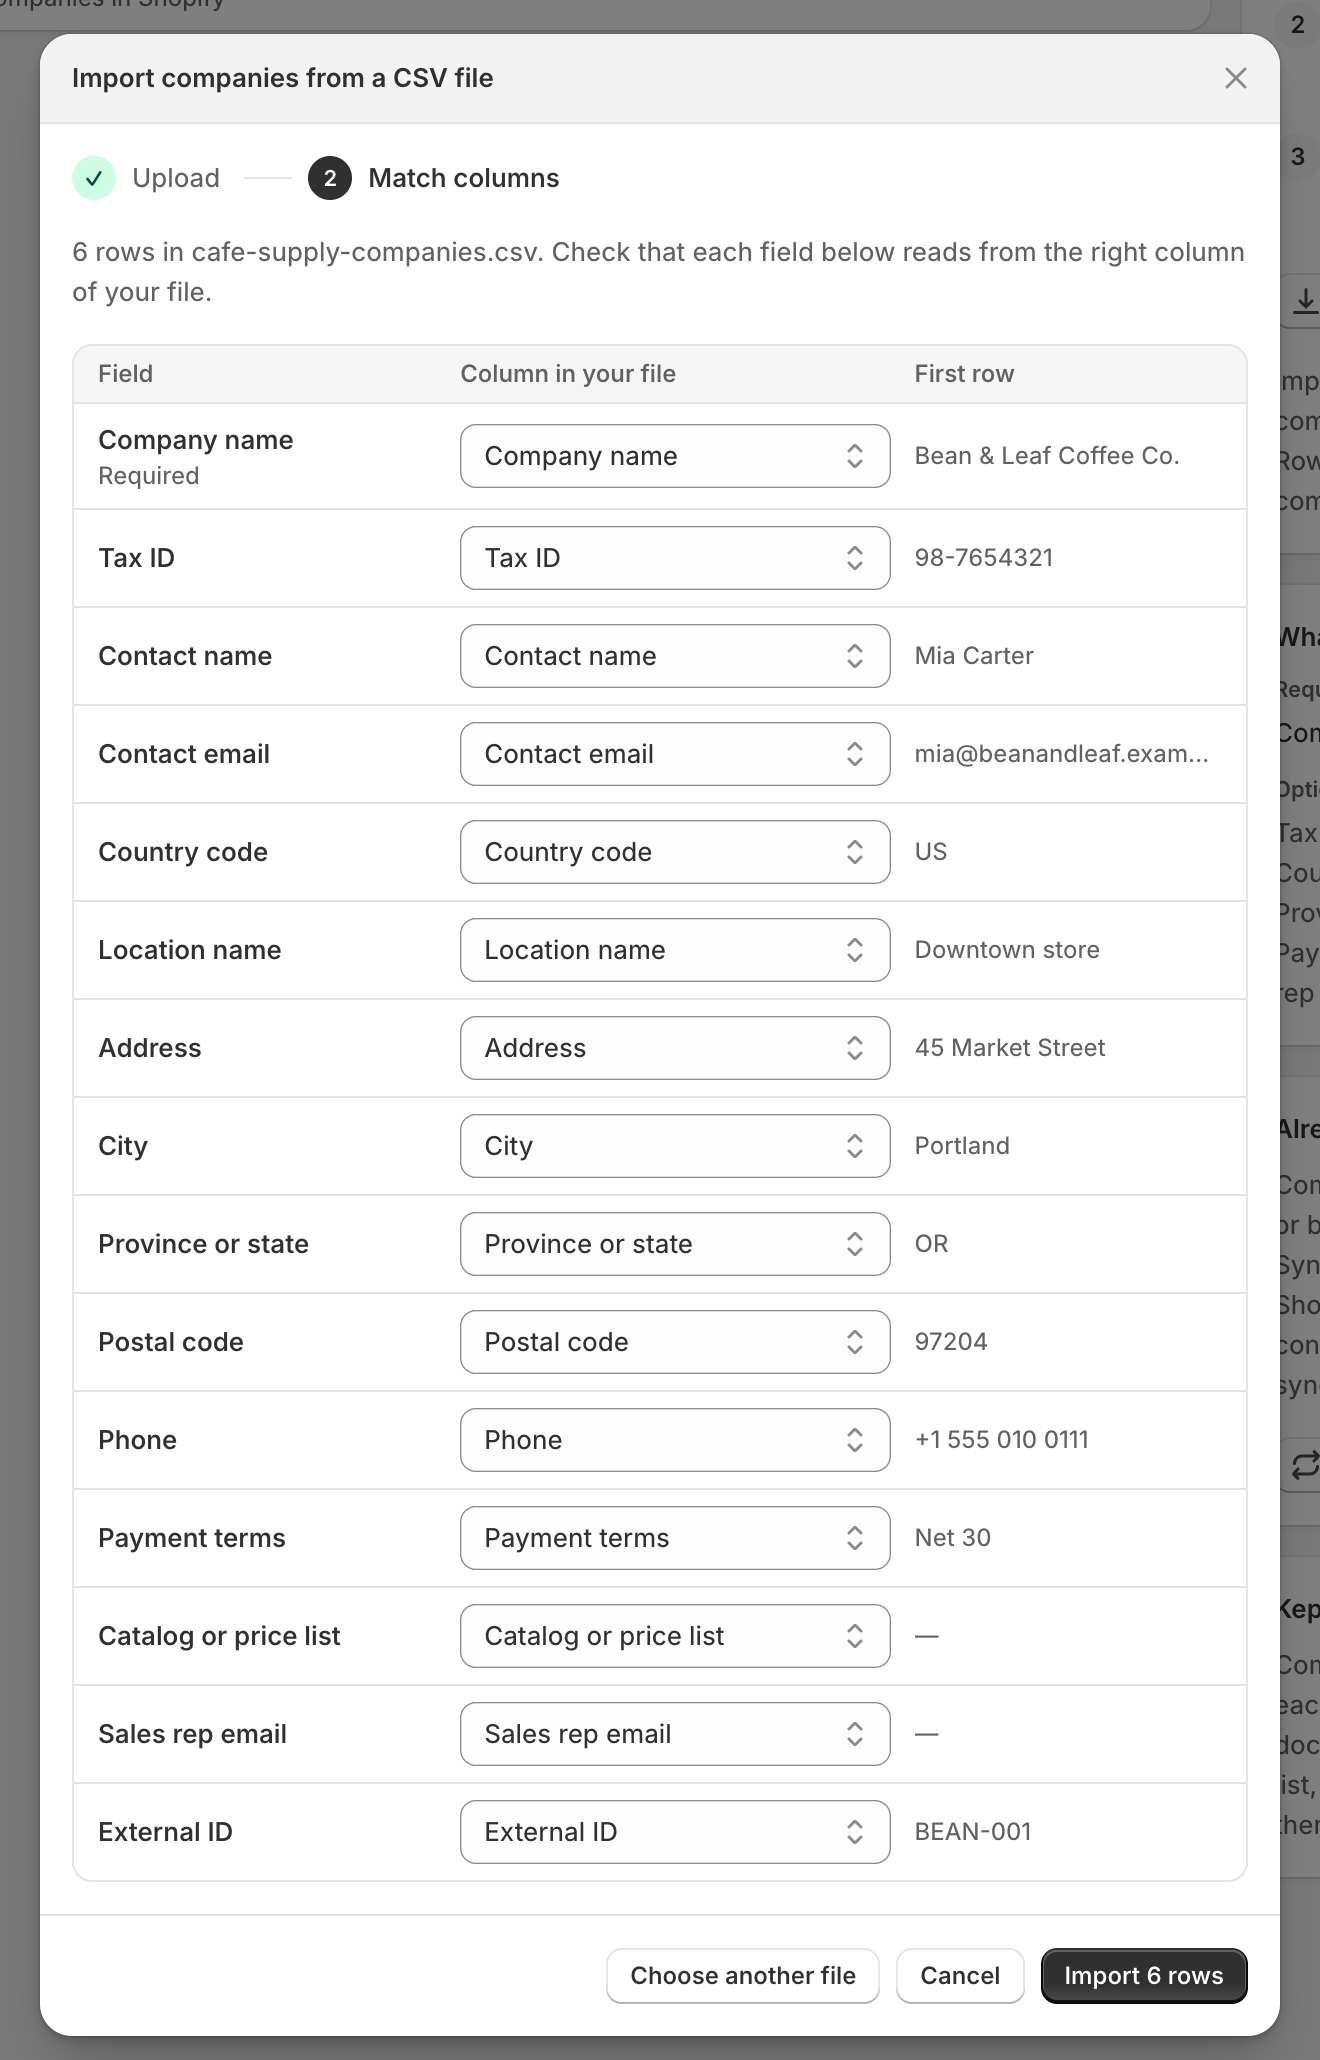
Each field the app understands is listed on the left. Beside it, **Column in your file** shows the column it reads from, and **First row** shows the value from your first row. Columns named as in the template are already matched.
Change a match with its dropdown, or pick **Don't import** to leave the field out. **Company name** must have a column. If it doesn't, the app asks you to pick one before it starts.
{% endstep %}
{% step %}
### Start the import
Click **Import** with the number of rows, for example **Import 120 rows**. The dialog closes, an **Import started** message appears, and a blue banner says the file is importing.
The import runs in the background, so you can leave the page. When it's done, the result shows in **Import history**, and the app emails your notification recipients the **Import completed** email, which is on by default. See [Choose who gets notified](/sami-b2b-onboarding/settings/notification-recipients.md).
{% endstep %}
{% endstepper %}
Check that each field reads from the right column, then click Import with the row count.
## Columns a row can hold
| Column | What to put in it |
| ------------------------- | --------------------------------------------------------------------------------------------------------------------------------------------------------------- |
| **Company name** | Required. The company's name, for example `Acme Supply Co.` |
| **Tax ID** | The company's tax or VAT number. |
| **Contact name** | The person you deal with, for example `Jordan Lee`. |
| **Contact email** | Their email address. A row with an email that isn't valid is skipped. |
| **Country code** | Two letters, for example `US`. |
| **Location name** | A name for the address, for example `Main warehouse`. |
| **Address** | The street address. |
| **City** | The city. |
| **Province or state** | The province or state, for example `IL`. |
| **Postal code** | The postal or ZIP code. |
| **Phone** | The company's phone number. |
| **Payment terms** | For example `Net 30`. Recorded in the app only. |
| **Catalog or price list** | For example `Wholesale price list`. Recorded in the app only. |
| **Sales rep email** | The email of the team member who looks after the company. They must have opened the app. See [Team and roles](/sami-b2b-onboarding/settings/team-and-roles.md). |
| **External ID** | Your own ID for the company, for example `ACME-001`. |
## Importing the same companies again
You can import an updated file as often as you like. A company that's already in the list is updated rather than added twice. Each row is matched by its **External ID**. A row without one is matched by its **Tax ID**, and a row without either by its **Company name**.
When a company is updated:
* Empty cells leave the details already recorded.
* Its status stays as it is, so a company on hold stays on hold.
* Its sales rep is set from **Sales rep email** every time. If that cell is empty, the column isn't imported, or the email isn't someone on your team, the company is left with no sales rep.
A CSV row only matches companies imported before. It never updates a company approved from an application or synced from Shopify.
## Check the result
Each import is a row in **Import history**, newest first:
| Column | What it shows |
| ----------- | ------------------------------------------------------------------------ |
| **Source** | The file name and its number of rows. |
| **Status** | **Queued**, **Importing**, **Finished**, **Rows skipped** or **Failed**. |
| **Result** | How many companies were created, updated and skipped. |
| **Started** | When the import started. |
The new companies are on the **Companies** tab, with "imported from a CSV" under their name on their page.
## Fix skipped rows
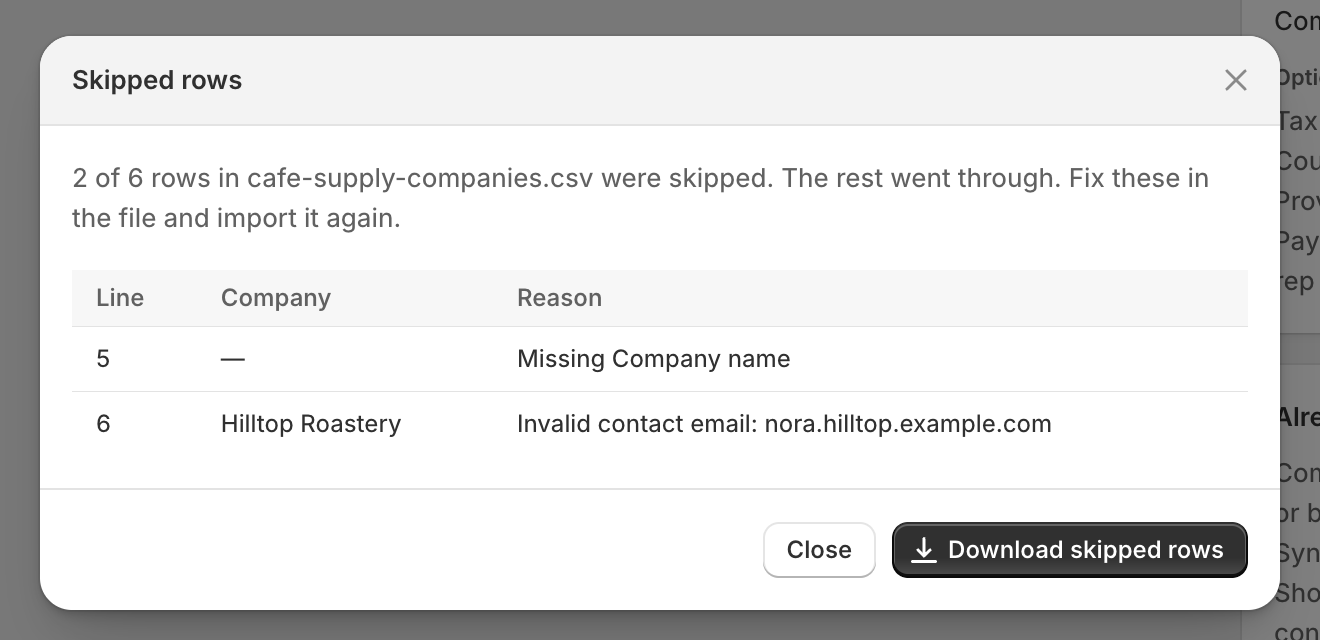
A row is skipped when **Company name** is empty, or when **Contact email** isn't a valid email address. The other rows still go through.
{% stepper %}
{% step %}
### See why rows were skipped
In **Import history**, click **View skipped rows** on the import. The **Skipped rows** dialog lists each skipped row with its **Line** in your file, its **Company** and the **Reason**, such as "Missing Company name".
{% endstep %}
{% step %}
### Download them
Click **Download skipped rows**. You get a CSV file with only those rows, in the template's columns, plus a **Line** and a **Reason** column at the front.
{% endstep %}
{% step %}
### Fix and import again
Correct the rows in that file and import it as before. The **Line** and **Reason** columns aren't matched to any field, so they're left out.
{% endstep %}
{% endstepper %}
Download the skipped rows, fix them, and import that file again.
If an import shows **Failed**, it stopped before the end of the file. Import the file again: rows that already went through are updated, not added twice. If it fails again, [contact support](/sami-b2b-onboarding/help/contact-support.md).
## Next steps
* [Manage a company](/sami-b2b-onboarding/companies/manage-a-company.md) — set sales reps and leave notes on the companies you imported.
* [Sync companies from Shopify](/sami-b2b-onboarding/companies/sync-from-shopify.md) — bring in the companies that already exist in Shopify.
* [Companies](/sami-b2b-onboarding/companies/companies.md) — search, filter and export the list.
---
# Agent Instructions
This documentation is published with GitBook. GitBook is the documentation platform designed so that both humans and AI agents can read, navigate, and reason over technical content effectively. Learn more at gitbook.com.
## Querying This Documentation
If you need additional information that is not directly available in this page, you can query the documentation dynamically by asking a question.
Perform an HTTP GET request on the current page URL with the `ask` query parameter, and the optional `goal` query parameter:
```
GET https://docs.samita.io/sami-b2b-onboarding/companies/import-companies-from-csv.md?ask=&goal=
```
`ask` is the immediate question: it should be specific, self-contained, and written in natural language.
`goal` is optional and describes the broader end goal you are ultimately trying to accomplish on behalf of the user. GitBook uses it to tailor the answer towards what is most useful for that goal.
The response will contain a direct answer to the question and relevant excerpts and sources from the documentation.
Use this mechanism when the answer is not explicitly present in the current page, you need clarification or additional context, or you want to retrieve related documentation sections.