> For the complete documentation index, see [llms.txt](https://docs.samita.io/llms.txt). Markdown versions of documentation pages are available by appending `.md` to page URLs; this page is available as [Markdown](https://docs.samita.io/sami-b2b-onboarding/settings/smtp.md).

# Send from your own address (SMTP)

Send the app's emails through your own mail server so buyers see your address, test the connection and switch back if you need to.

By default, Sami B2B Onboarding sends its emails through the app's own mail service, under your store's name. If you'd rather buyers see your own address, such as `sales@yourstore.com`, connect your own mail server (SMTP) in **Settings › Email**.

{% hint style="info" %}
Before you start, get these from your email provider: the SMTP server name, the port, the encryption type, and the username and password the mailbox signs in with. Many providers ask you to create an app password for this instead of using your normal password.
{% endhint %}

## Connect your mail server

{% stepper %}
{% step %}

### Open How your emails are sent

In the app, click **Settings**, then click **Email**. The first card is **How your emails are sent**.
{% endstep %}

{% step %}

### Pick your provider

Open the **Email service** list and pick your provider. The app fills in the server, port and encryption for you.

| Provider in the list            | SMTP host                            | Port | Encryption |
| ------------------------------- | ------------------------------------ | ---- | ---------- |
| **Google (Gmail or Workspace)** | `smtp.gmail.com`                     | 465  | SSL        |
| **Outlook / Microsoft 365**     | `smtp-mail.outlook.com`              | 587  | TLS        |
| **Brevo (formerly Sendinblue)** | `smtp-relay.brevo.com`               | 587  | TLS        |
| **SendGrid**                    | `smtp.sendgrid.net`                  | 587  | TLS        |
| **Mailgun**                     | `smtp.mailgun.org`                   | 587  | TLS        |
| **Amazon SES**                  | `email-smtp.us-east-1.amazonaws.com` | 587  | TLS        |
| **Elastic Email**               | `smtp.elasticemail.com`              | 2525 | TLS        |
| **Netcore (Pepipost)**          | `smtp.netcorecloud.net`              | 587  | TLS        |
| **Zoho ZeptoMail**              | `smtp.zeptomail.com`                 | 587  | TLS        |

If your provider isn't listed, pick **Another SMTP server** and fill in the boxes yourself. If your provider gave you different values, for example another region for Amazon SES, type over the ones the app filled in.
{% endstep %}

{% step %}

### Check the server details

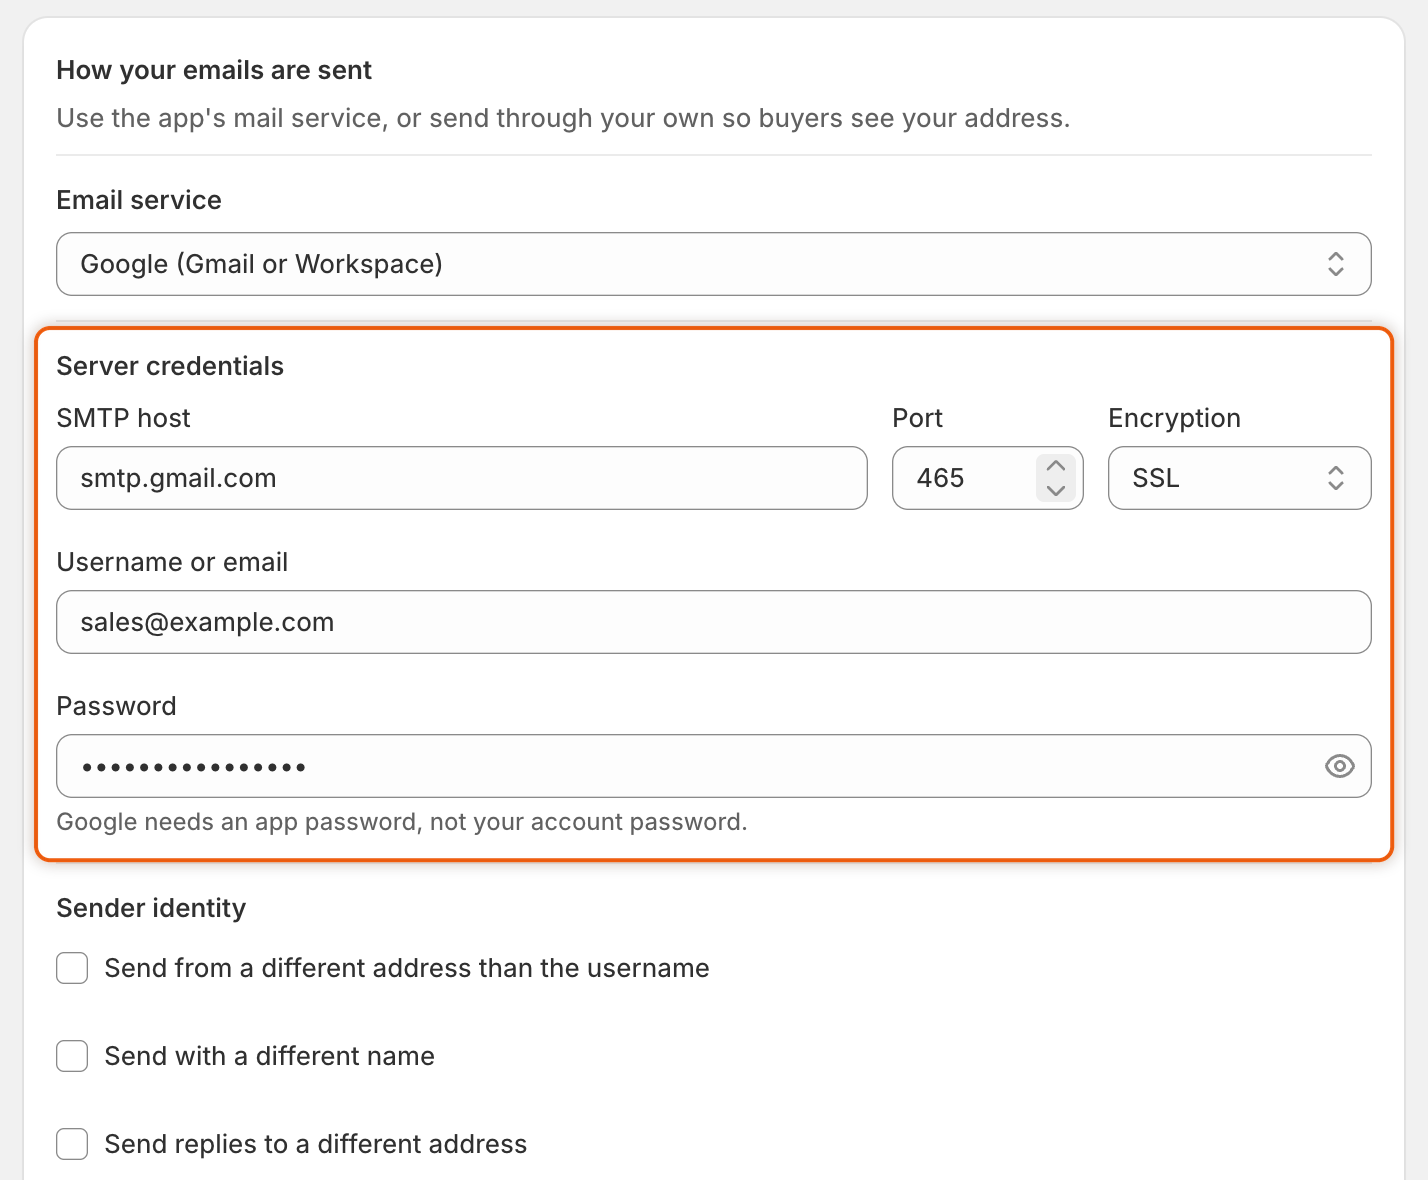
Under **Server credentials**, check **SMTP host**, **Port** and **Encryption**. **Encryption** can be **SSL**, **TLS** or **None**. Port 465 usually goes with **SSL** and port 587 with **TLS**. Use what your provider says.
{% endstep %}

{% step %}

### Enter the username and password

In **Username or email**, type the address or username your mailbox signs in with. In **Password**, type its password. If you picked Google, the box reminds you: "Google needs an app password, not your account password."

Once a password is saved, the box shows dots instead of it. The app never shows your password again. To change it, type the new one over the dots. For providers other than Google, the box also says "A password is saved. Type a new one to replace it."

<figure><img src="https://3844812229-files.gitbook.io/~/files/v0/b/gitbook-x-prod.appspot.com/o/spaces%2FRrf4pQPgjvb3GW7IN3Ci%2Fuploads%2Fgit-blob-7c20c9c0712b1d3006c472dcb45dd7e8c0f992b4%2Fscreenshot-email-smtp-server-credentials.png?alt=media" alt="The How your emails are sent card with Google chosen as the email service and the SMTP host, port, encryption, username and password boxes filled in."><figcaption><p>Picking a provider fills in the server, port and encryption, so you only add the username and password.</p></figcaption></figure>
{% endstep %}

{% step %}

### Set how your emails look to the recipient

Under **Sender identity**, emails are sent from the username's address unless you tick a box:

| Box                                                 | What it adds                                                                     | Use it when                                                                                              |
| --------------------------------------------------- | -------------------------------------------------------------------------------- | -------------------------------------------------------------------------------------------------------- |
| **Send from a different address than the username** | **From address**: the address buyers see.                                        | Your provider has verified that address for this mailbox. Any other address is refused by your provider. |
| **Send with a different name**                      | **From name**: the sender name, such as your store's name. Up to 100 characters. | You want a name to show instead of the bare address.                                                     |
| **Send replies to a different address**             | **Reply-to address**: where buyers' replies go.                                  | Replies should reach another inbox, such as your sales team's.                                           |

Untick a box to stop using its value.
{% endstep %}

{% step %}

### Save

Click **Save** in the save bar. If something is missing or doesn't look right, the save stops and the box says what to fix, for example "Enter a port between 1 and 65535." From now on, every email the app sends goes through your server.
{% endstep %}
{% endstepper %}

## Send a test email

Test your settings right after saving them, so you find out before a buyer does.

{% stepper %}
{% step %}

### Enter your address

At the bottom of **How your emails are sent**, under **Send a test**, type your own email address.
{% endstep %}

{% step %}

### Click Send

Click **Send**. A "Test email sent" message appears, and an email with the subject "Your B2B app email settings work" arrives in your inbox. It lists the server and sender it was sent with.

If the server refuses, a red banner says why and what to check:

| Banner                                                                                                                         | What to check                                                  |
| ------------------------------------------------------------------------------------------------------------------------------ | -------------------------------------------------------------- |
| "The mail server rejected that username or password. For Google you need an app password, not your account password."          | The username and password.                                     |
| "The connection couldn't be secured. Check the encryption setting matches the port your provider gave you."                    | **Encryption** and **Port** together.                          |
| "Couldn't reach that server. Check the host name and port."                                                                    | **SMTP host** and **Port**.                                    |
| "The mail server refused the test email. Check these settings with your email provider, or contact us and we'll look into it." | Ask your provider, or click **Contact support** on the banner. |

<figure><img src="https://3844812229-files.gitbook.io/~/files/v0/b/gitbook-x-prod.appspot.com/o/spaces%2FRrf4pQPgjvb3GW7IN3Ci%2Fuploads%2Fgit-blob-12399ffdc0bb2566b6382647b8703972e656f656%2Fscreenshot-email-smtp-send-test.png?alt=media" alt="The Send a test row with an email address typed in, a Send button and the note 1 of 5 test emails used today."><figcaption><p>Each test counts toward your daily allowance, shown under the box.</p></figcaption></figure>
{% endstep %}
{% endstepper %}

You can send 5 test emails a day, failed ones included. The note under the box shows how many you've used, for example "2 of 5 test emails used today", and **Send** is greyed out once you reach the limit.

You can also test settings before you save them. Only a test of the saved settings clears the "haven't been tested" warning described below, so save first, then test.

## Read the email health banner

When you open **Settings › Email**, a banner at the top may warn you about your mail. No banner means there is nothing to fix.

| Banner                                      | What it means                                                                                                                            | What to do                                                                                                                                                                         |
| ------------------------------------------- | ---------------------------------------------------------------------------------------------------------------------------------------- | ---------------------------------------------------------------------------------------------------------------------------------------------------------------------------------- |
| **These mail settings haven't been tested** | Your own server is saved, but no test of the saved settings has gone through. Changing the host, port or username also brings this back. | Send a test email.                                                                                                                                                                 |
| **Emails are failing to send**              | The most recent emails in the last 7 days were refused by your mail server. The banner says how many in a row and shows the last reason. | Check your settings with your provider and send a test. The banner clears once the next real email to a buyer or your team goes through. A successful test email doesn't clear it. |
| **Your mail credentials can't be read**     | The app can no longer read your saved password. Meanwhile, emails go out through the app's own mail service.                             | Type your SMTP password again and click **Save**.                                                                                                                                  |

The banner is checked when the page opens. After you fix something, open **Settings › Email** again to see it clear.

{% hint style="warning" %}
While your own server is in use, the app doesn't fall back to its own mail service when your server refuses an email. That email isn't sent. Check the banner, or the **Emails** view of the [Activity log](/sami-b2b-onboarding/settings/activity-log.md), after any change to your mailbox or password.
{% endhint %}

## Switch back to the app's mail service

{% stepper %}
{% step %}

### Pick the app's mail service

In **Settings › Email**, open the **Email service** list and pick **The app's mail service**.
{% endstep %}

{% step %}

### Save

Click **Save** in the save bar.
{% endstep %}
{% endstepper %}

Emails go out through the app's service again, under your store's name, with replies going to your store's contact email in Shopify.

## Next steps

* [Choose who gets notified](/sami-b2b-onboarding/settings/notification-recipients.md) — decide who on your team receives each email.
* [Edit email templates](/sami-b2b-onboarding/settings/email-templates.md) — change what each email says.
* [Activity log](/sami-b2b-onboarding/settings/activity-log.md) — see every email the app sent and why one didn't go out.
* [Contact support](/sami-b2b-onboarding/help/contact-support.md) — get help when your server keeps refusing emails.


---

# Agent Instructions
This documentation is published with GitBook. GitBook is the documentation platform designed so that both humans and AI agents can read, navigate, and reason over technical content effectively. Learn more at gitbook.com.

## Querying This Documentation
If you need additional information that is not directly available in this page, you can query the documentation dynamically by asking a question.

Perform an HTTP GET request on the current page URL with the `ask` query parameter, and the optional `goal` query parameter:

```
GET https://docs.samita.io/sami-b2b-onboarding/settings/smtp.md?ask=<question>&goal=<endgoal>
```

`ask` is the immediate question: it should be specific, self-contained, and written in natural language.
`goal` is optional and describes the broader end goal you are ultimately trying to accomplish on behalf of the user. GitBook uses it to tailor the answer towards what is most useful for that goal.

The response will contain a direct answer to the question and relevant excerpts and sources from the documentation.

Use this mechanism when the answer is not explicitly present in the current page, you need clarification or additional context, or you want to retrieve related documentation sections.
