> For the complete documentation index, see [llms.txt](https://docs.samita.io/llms.txt). Markdown versions of documentation pages are available by appending `.md` to page URLs; this page is available as [Markdown](https://docs.samita.io/sami-b2b-onboarding/getting-started/quickstart.md).

# Quickstart

Set the app up and approve a test application, from opening the app to a buyer who can check out.

This guide sets up Sami B2B Onboarding and runs one test application all the way through. You turn on the app embed, check the ready-made form, choose who can buy, then apply as a test buyer and approve yourself. At the end, the test buyer has a company in Shopify, has the approval email in their inbox, and can check out on your store.

{% hint style="info" %}
Before you start, make sure you're an admin in the app. The store owner always is. You'll also need an email inbox you can open, because the test buyer's emails go there.
{% endhint %}

## Set up and approve your first application

{% stepper %}
{% step %}

### Open the app

In Shopify admin, click **Apps**, then **Sami B2B Onboarding**.

The app opens on **Home**. You see a search box and three setup cards: **Turn on the app embed**, **Publish a registration form** and **Decide who can browse and buy**. The app's menu in the Shopify sidebar holds **Companies**, **Forms**, **Automation**, **Settings** and **Contact us**.
{% endstep %}

{% step %}

### Turn on the app embed

The app embed puts your application form and your access rules on the storefront.

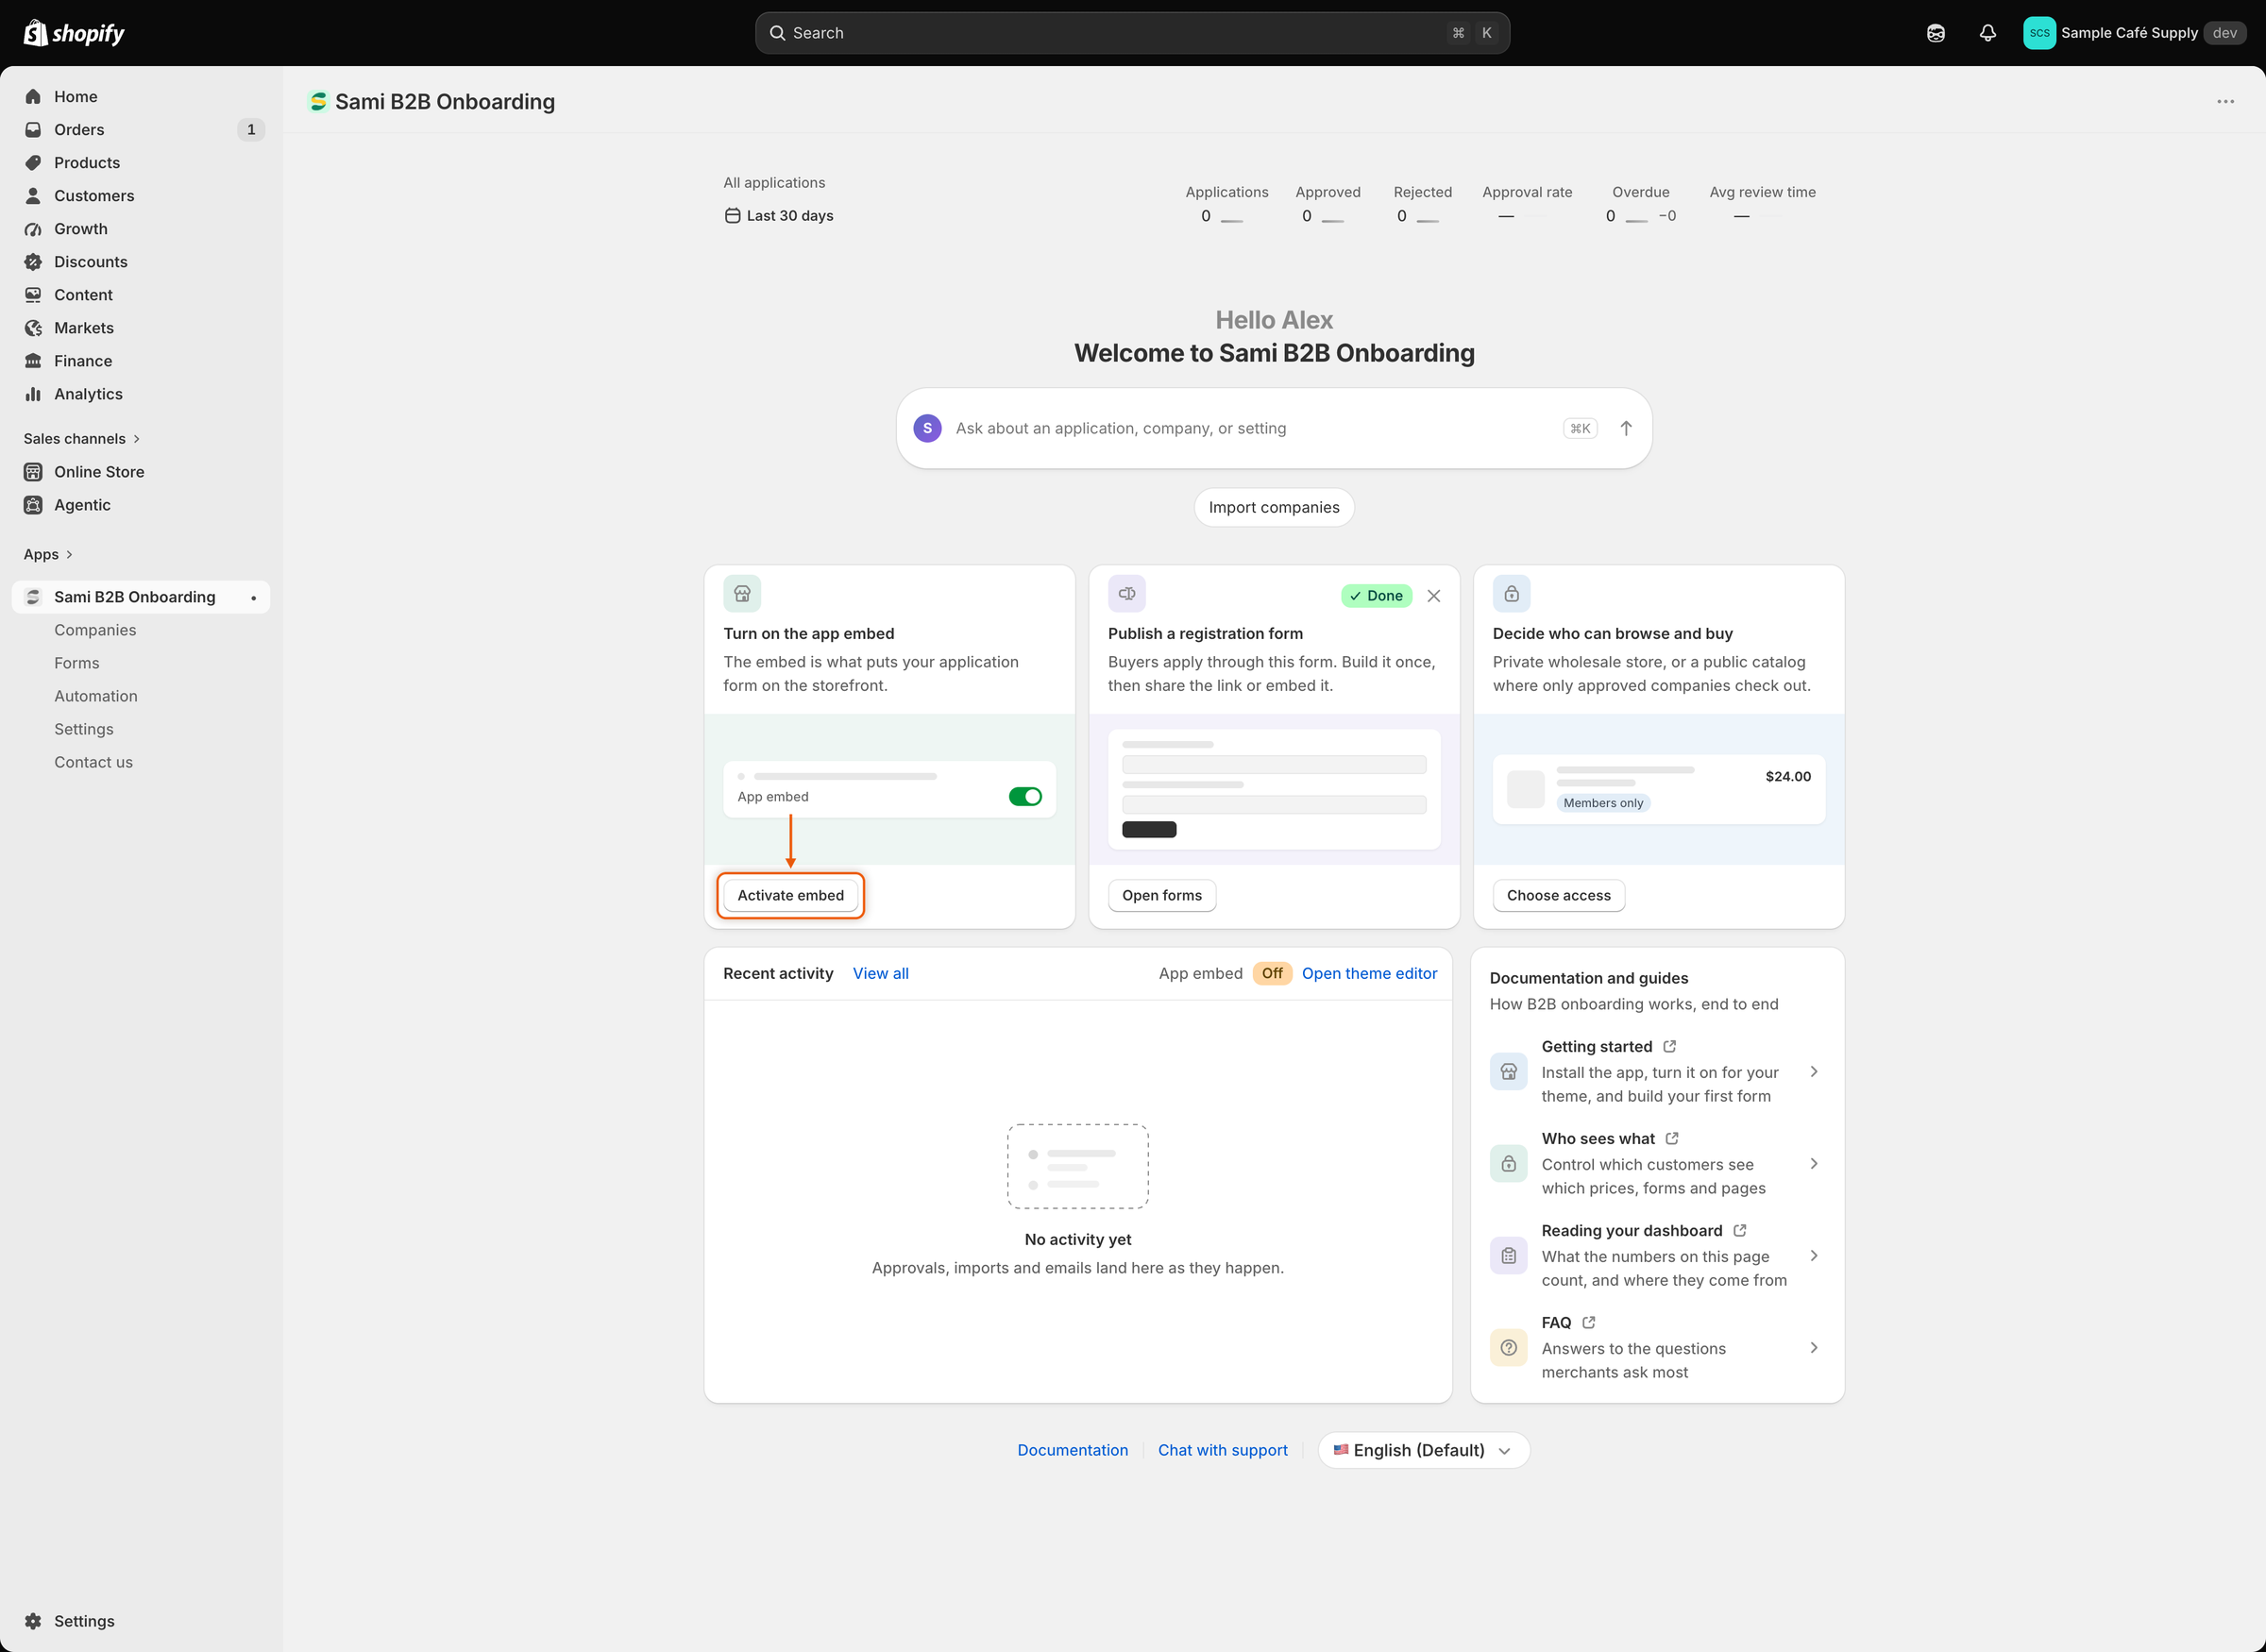
1. On the **Turn on the app embed** card, click **Activate embed**. Shopify's theme editor opens in a new tab. The **Sami B2B Onboarding** app embed is already switched on.
2. Click **Save** in the theme editor, then close that tab.

Back in the app, the card shows **Done**. In the **Recent activity** card, **App embed** reads **On**.

<figure><img src="https://3844812229-files.gitbook.io/~/files/v0/b/gitbook-x-prod.appspot.com/o/spaces%2FRrf4pQPgjvb3GW7IN3Ci%2Fuploads%2Fgit-blob-f947c4728f2bb161d067dba214099b72cd5cd5fa%2Fscreenshot-home-quickstart-embed-card.png?alt=media" alt="The Home page&#x27;s setup cards, with the Activate embed button on the Turn on the app embed card."><figcaption><p>Click Activate embed to open the theme editor with the app embed already switched on.</p></figcaption></figure>
{% endstep %}

{% step %}

### Check your application form

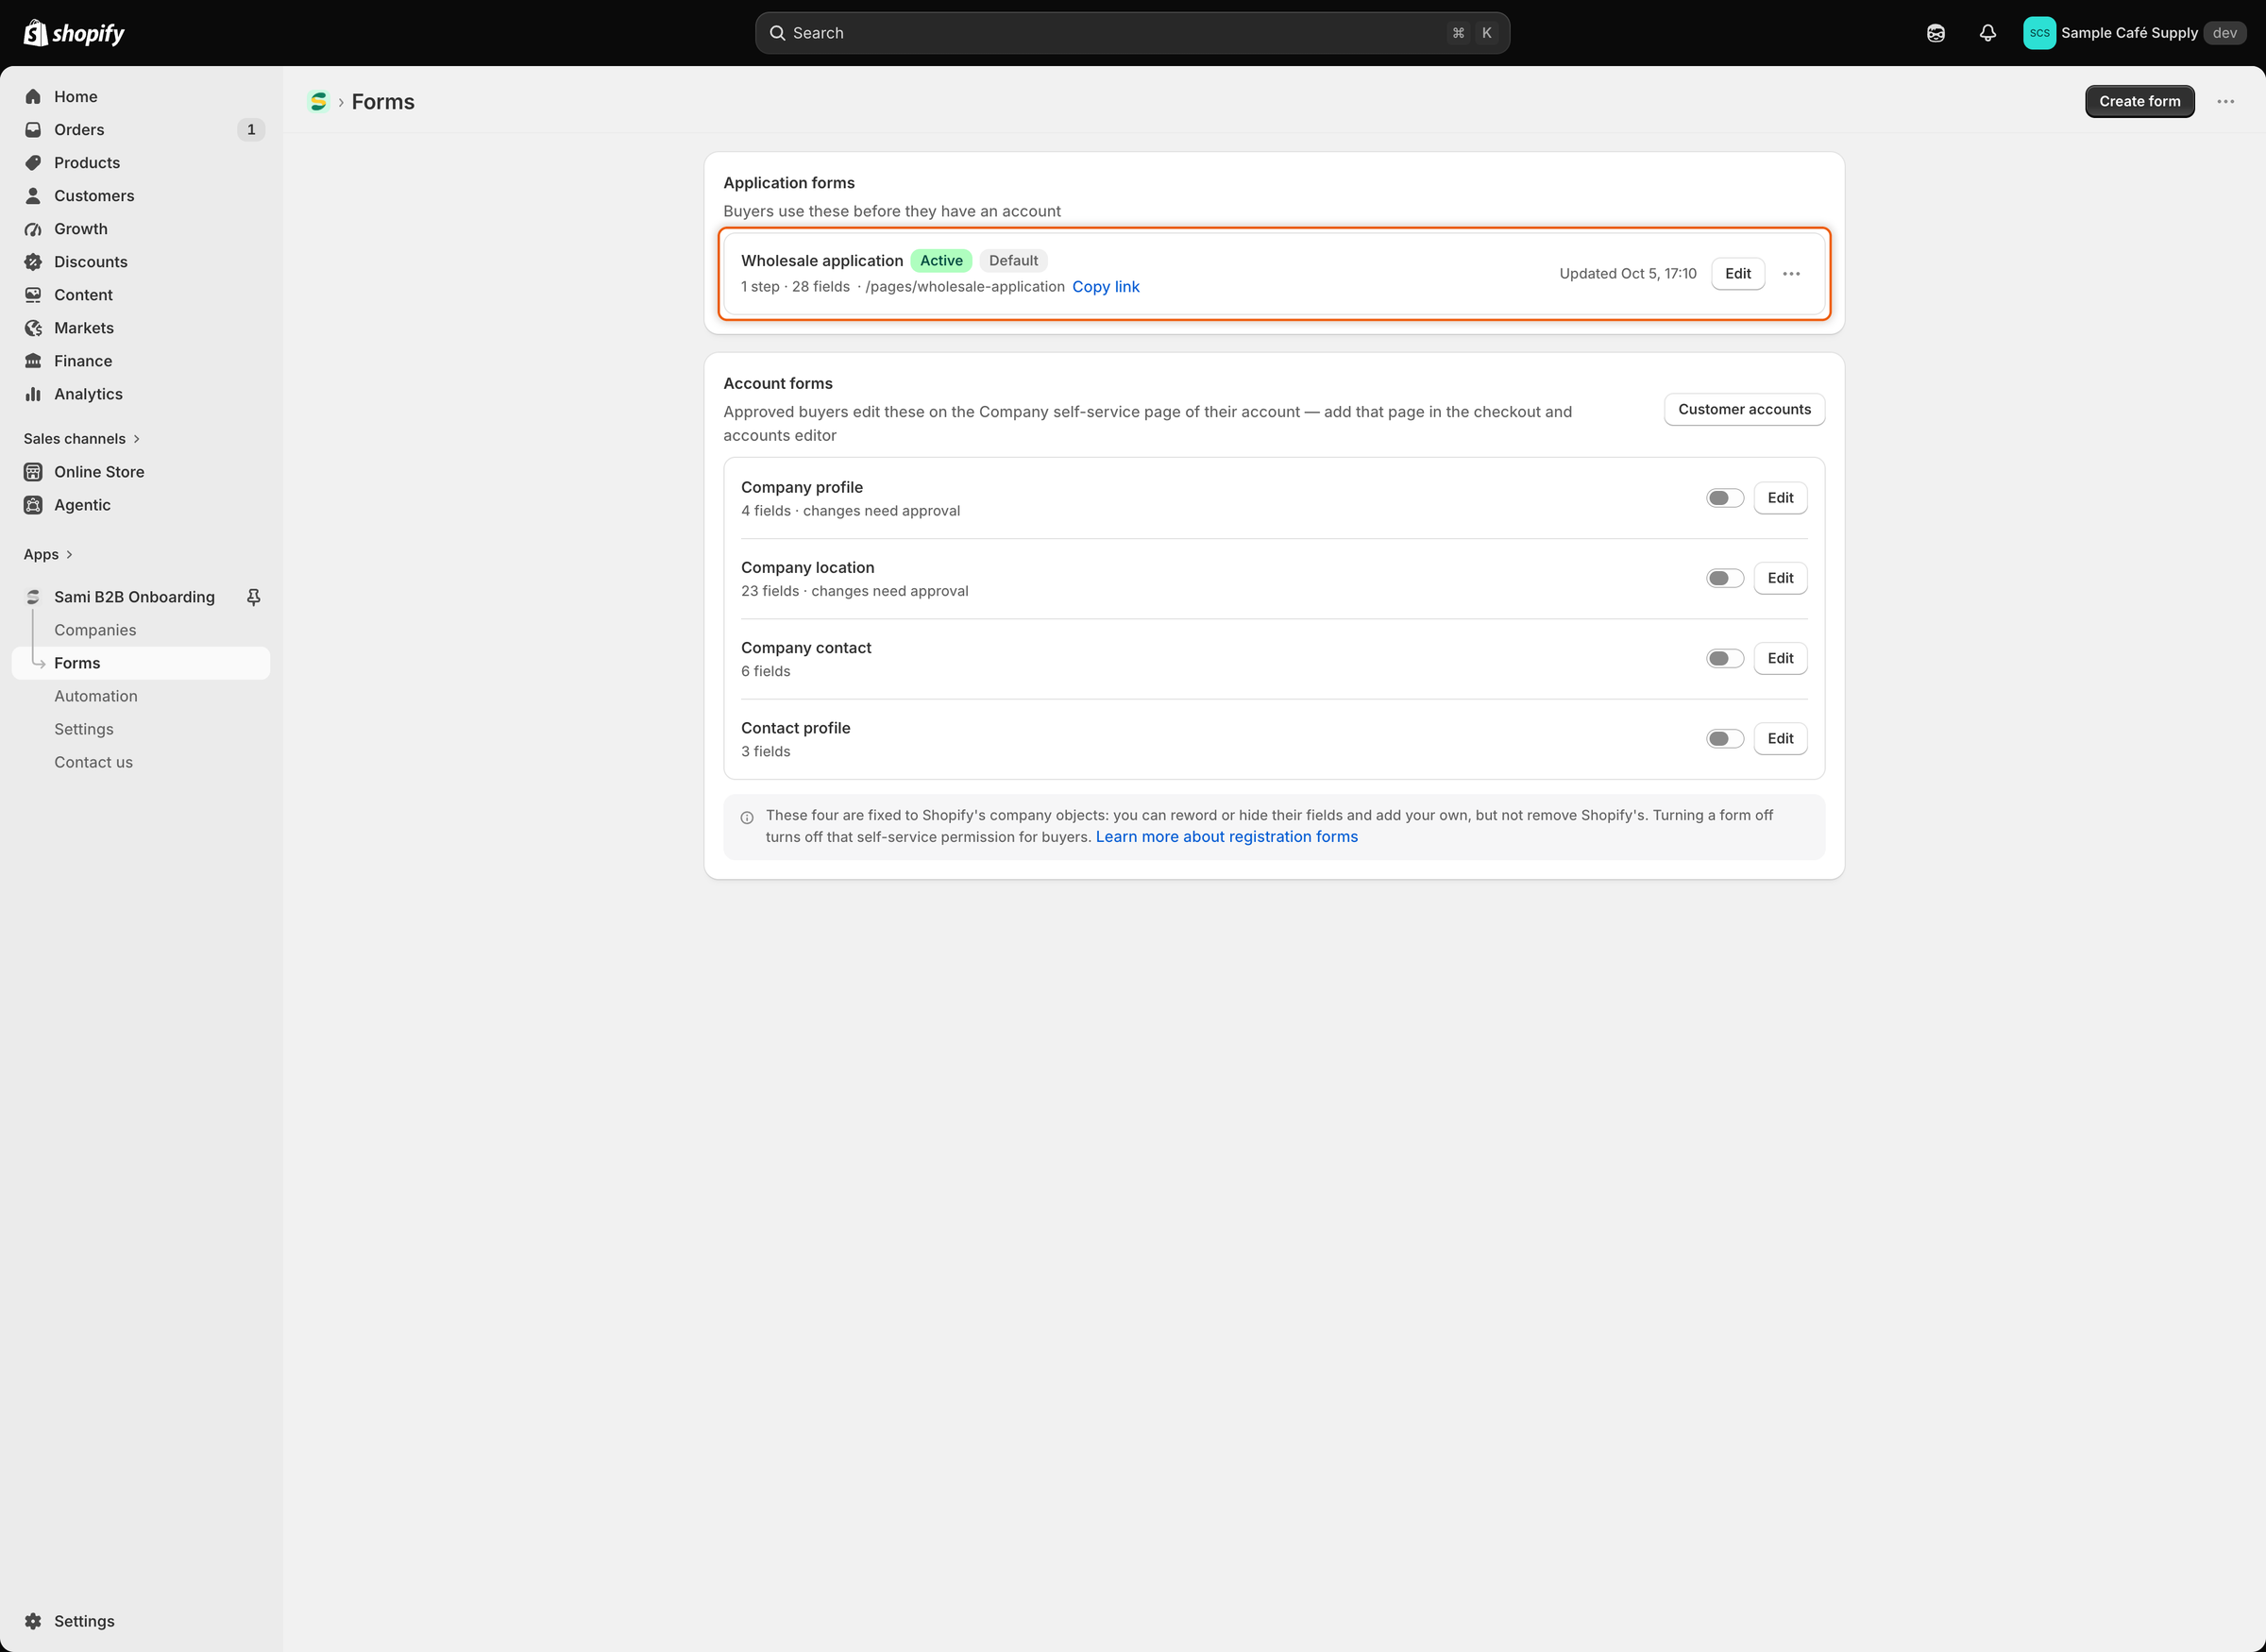
On the **Publish a registration form** card, click **Open forms**. You can also click **Forms** in the app menu.

Under **Application forms**, you see **Wholesale application** with the **Active** and **Default** badges. The app created this form when you installed it. It's already published. The app also created a page on your store that shows it. The page's address appears under the form name, usually `/pages/wholesale-application`.

The form asks for the company, the contact person, a shipping address and a billing address. Its answers are already mapped to the Shopify customer and company, so you don't need to change anything for this test.

<figure><img src="https://3844812229-files.gitbook.io/~/files/v0/b/gitbook-x-prod.appspot.com/o/spaces%2FRrf4pQPgjvb3GW7IN3Ci%2Fuploads%2Fgit-blob-382a73517fca4559d6658e2ab772a2e3746ebe00%2Fscreenshot-forms-quickstart-wholesale-form.png?alt=media" alt="The Forms page listing the Wholesale application form with Active and Default badges and its page address."><figcaption><p>The Wholesale application form is already published, and its page address is listed under its name.</p></figcaption></figure>
{% endstep %}

{% step %}

### Choose who can browse and buy

Go back to **Home**. On the **Decide who can browse and buy** card, click **Choose access**. This opens **Settings › Access**.

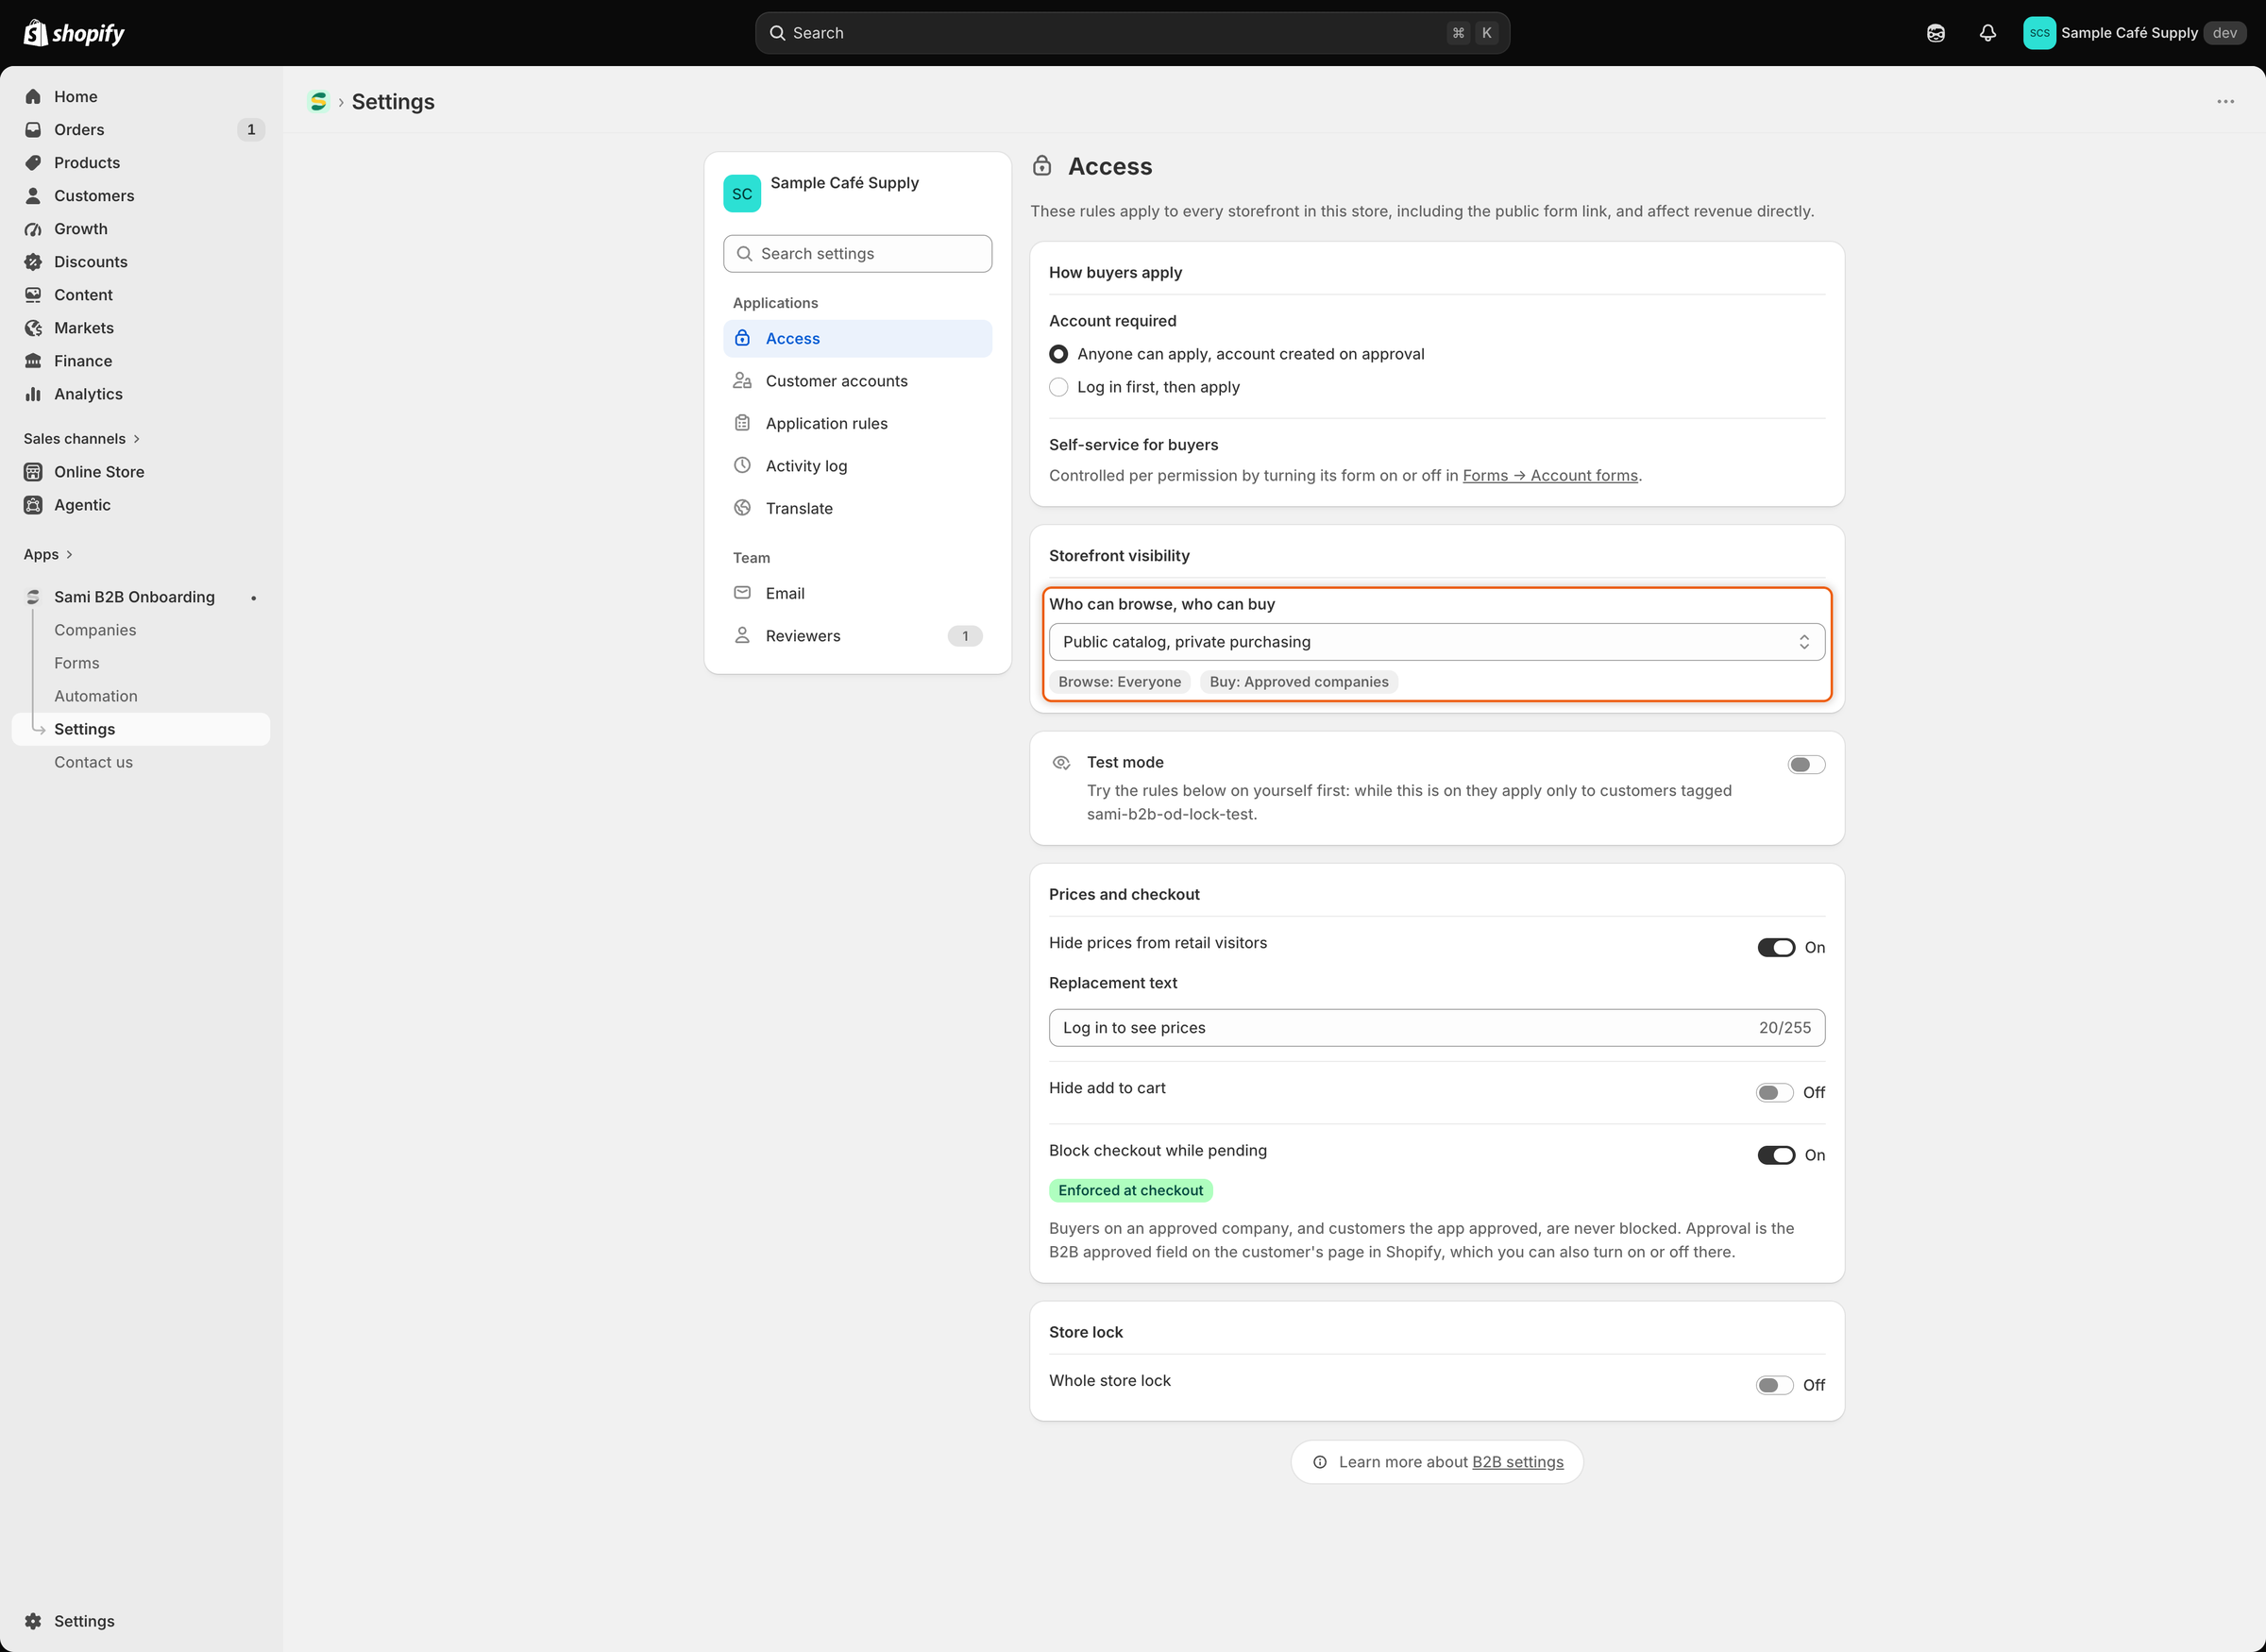
Under **Storefront visibility**, **Who can browse, who can buy** starts on **Public catalog, private purchasing**: everyone can browse, and only approved companies can buy. Keep it for this guide. The three options are:

| Option                                 | Browse             | Buy                |
| -------------------------------------- | ------------------ | ------------------ |
| **Private wholesale store**            | Approved companies | Approved companies |
| **Public catalog, private purchasing** | Everyone           | Approved companies |
| **Public catalog, public purchasing**  | Everyone           | Everyone           |

1. Under **Prices and checkout**, turn on **Hide prices from retail visitors**. **Block checkout while pending** is already on. Keep it on.
2. Click **Save** in the save bar.

The save bar only appears after you change a setting. Nothing changes on your storefront until you save, and that includes the checkout block. After you save, the setup card on Home shows **Done**.

{% hint style="warning" %}
If your store already sells to retail customers, turn on **Test mode** on this page first. While it's on, these rules apply only to logged-in customers tagged `sami-b2b-od-lock-test`, and everyone else shops as normal. See [Test your access rules](/sami-b2b-onboarding/store-access/test-mode.md).
{% endhint %}

<figure><img src="https://3844812229-files.gitbook.io/~/files/v0/b/gitbook-x-prod.appspot.com/o/spaces%2FRrf4pQPgjvb3GW7IN3Ci%2Fuploads%2Fgit-blob-087357358921cdb849a118354e5cbf151bb7176e%2Fscreenshot-settings-quickstart-visibility.png?alt=media" alt="The Storefront visibility section with Public catalog, private purchasing selected and badges reading Browse: Everyone and Buy: Approved companies."><figcaption><p>The badges under the select sum up who can browse and who can buy.</p></figcaption></figure>
{% endstep %}

{% step %}

### Submit a test application

1. Go to **Forms** and click **Copy link** beside **Wholesale application**.
2. Open a private browser window, so you're not signed in to your store as a customer. Paste the link. If your store has a password page, enter the store password first.
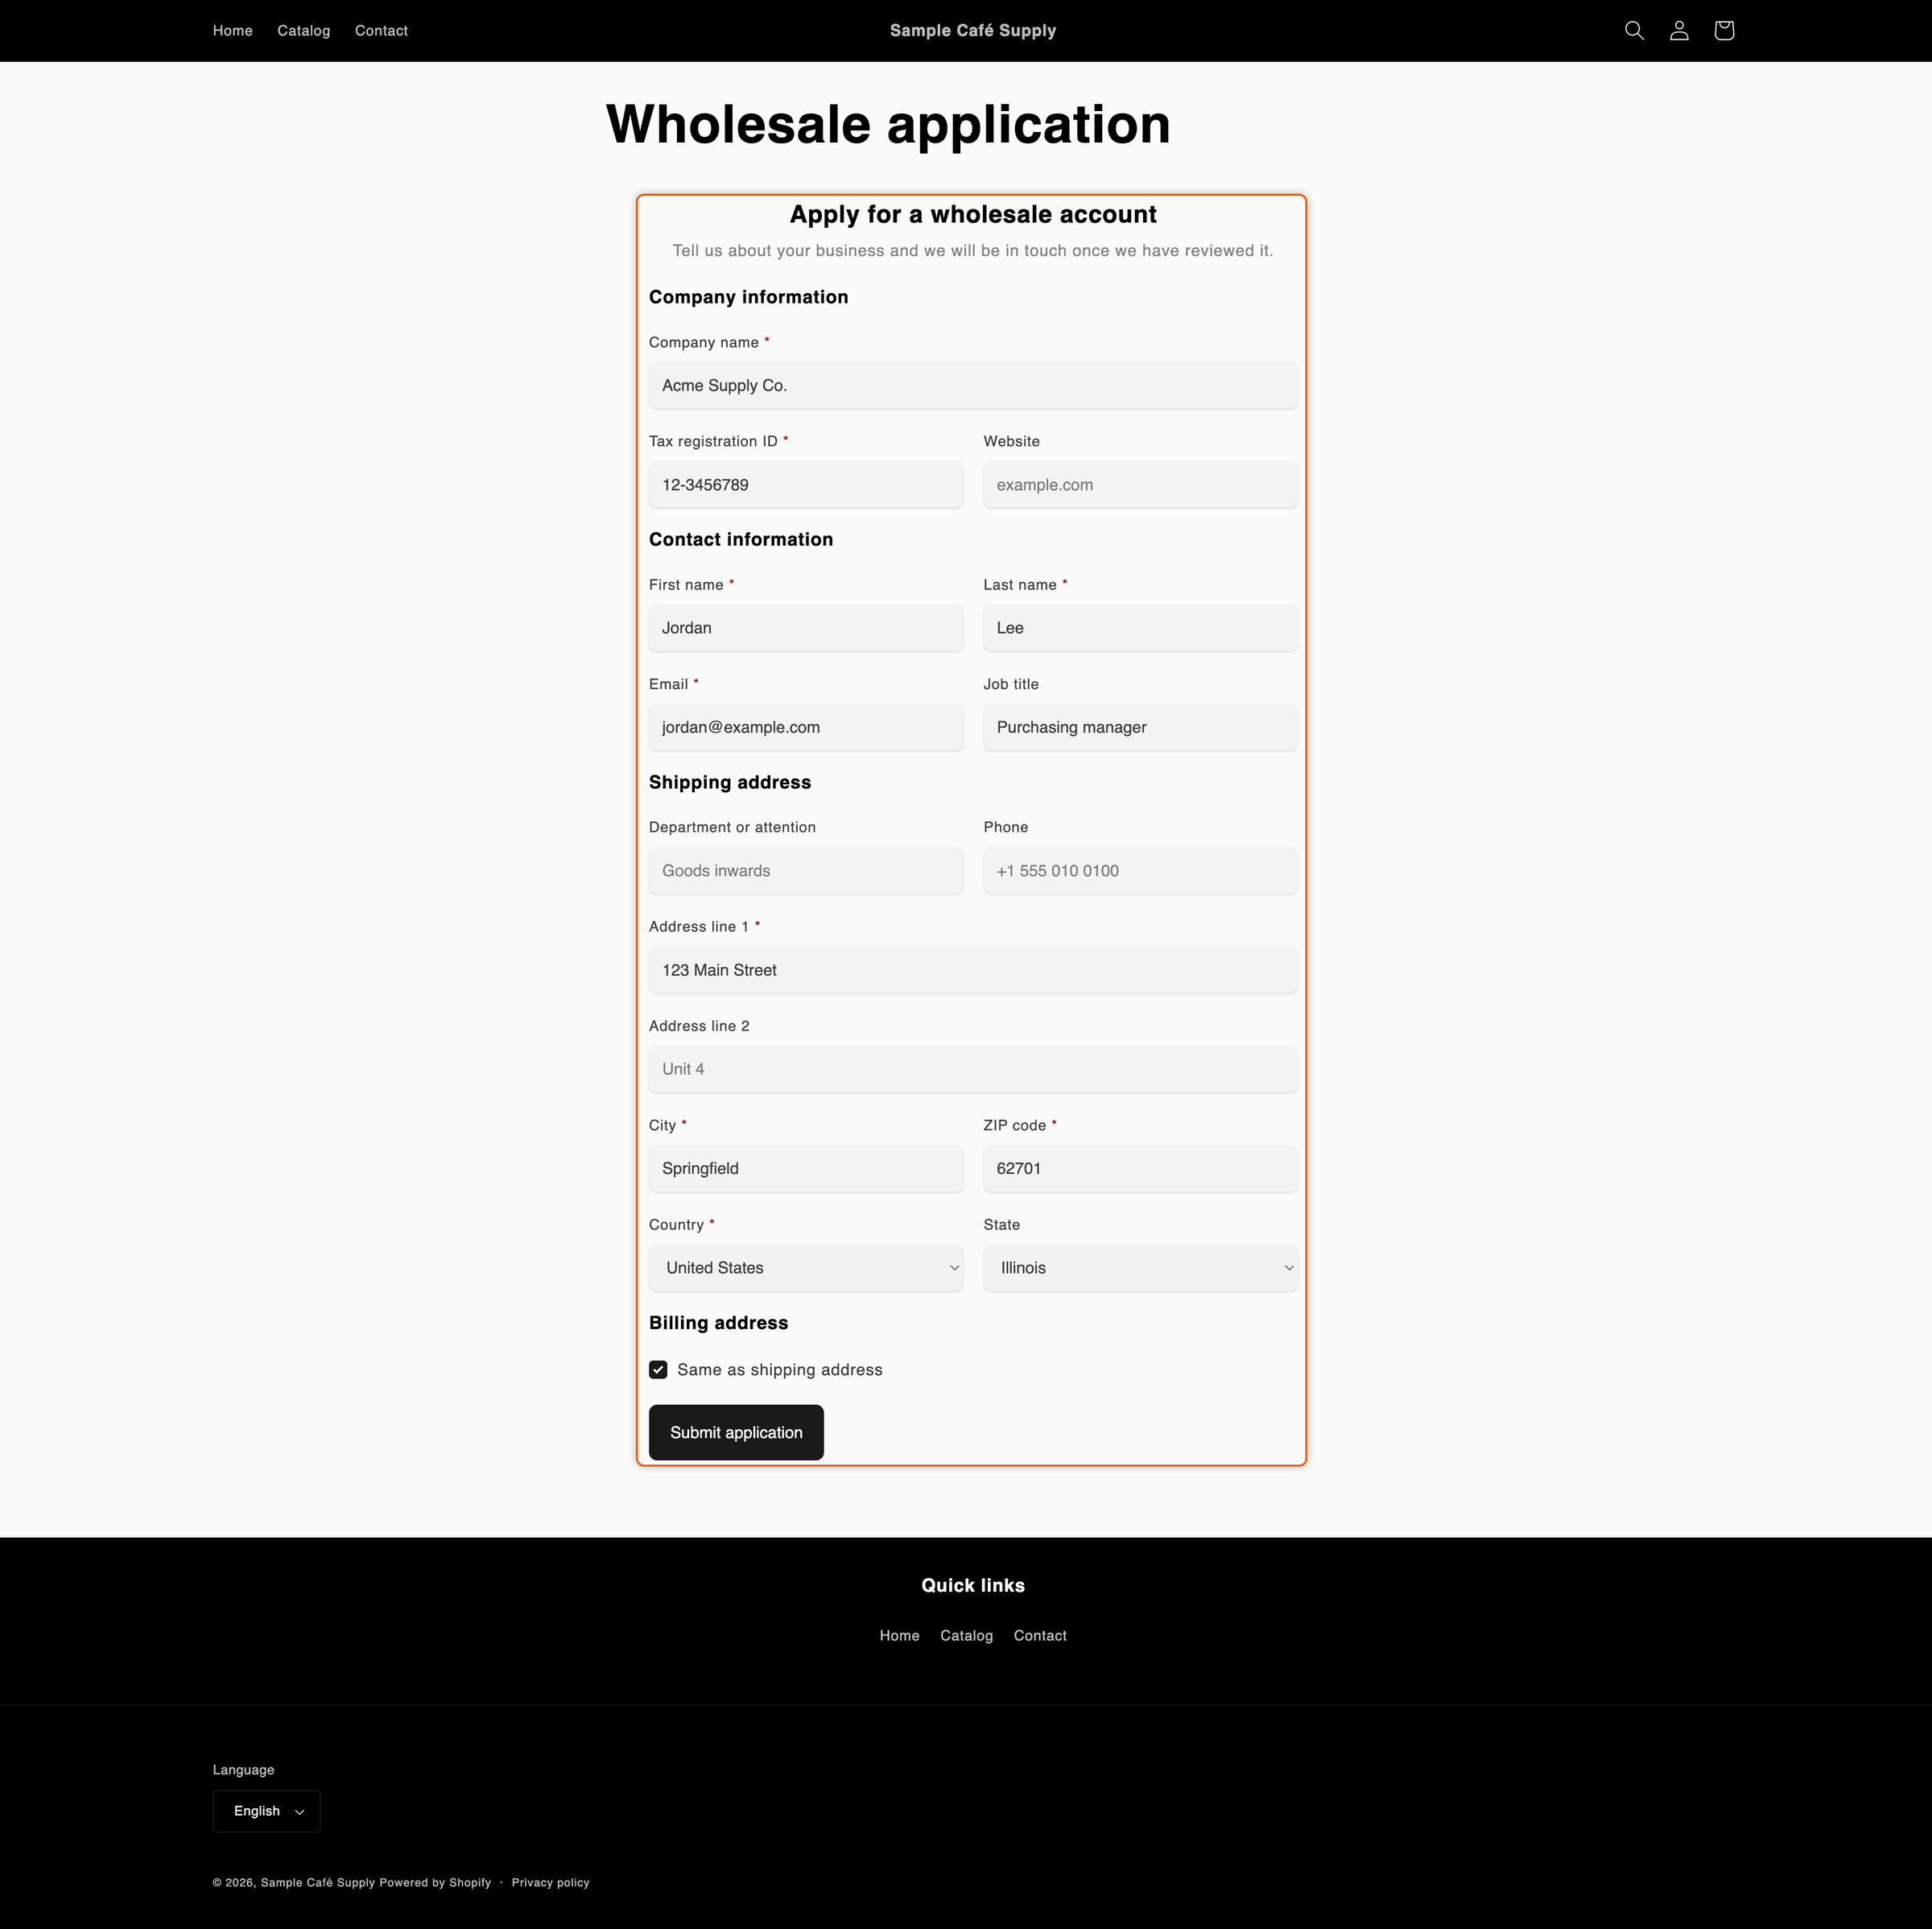
3. The form opens under the heading **Apply for a wholesale account**. Fill it in:
   * **Company name**: Acme Supply Co.
   * **Tax registration ID**: 12-3456789
   * **First name**: Jordan, **Last name**: Lee
   * **Email**: an address you can open
   * Under **Shipping address**: **Address line 1** 123 Main Street, **City** Springfield, **ZIP code** 62701, **Country** United States, **State** Illinois. The address labels follow the country, so with United States picked they read **ZIP code** and **State**.
   * Under **Billing address**, tick **Same as shipping address**.
4. Click **Submit application**.

The form is replaced by a **Thank you** message. The buyer's inbox gets **We got your application**, and the app emails you **New B2B application from Acme Supply Co.**

<figure><img src="https://3844812229-files.gitbook.io/~/files/v0/b/gitbook-x-prod.appspot.com/o/spaces%2FRrf4pQPgjvb3GW7IN3Ci%2Fuploads%2Fgit-blob-efb5f3cf6b037267d25682648ee1b1210039a4d4%2Fscreenshot-storefront-quickstart-filled-form.png?alt=media" alt="The Wholesale application page on the storefront, filled in for Acme Supply Co."><figcaption><p>The test application, filled in and ready to submit.</p></figcaption></figure>
{% endstep %}

{% step %}

### Approve the application

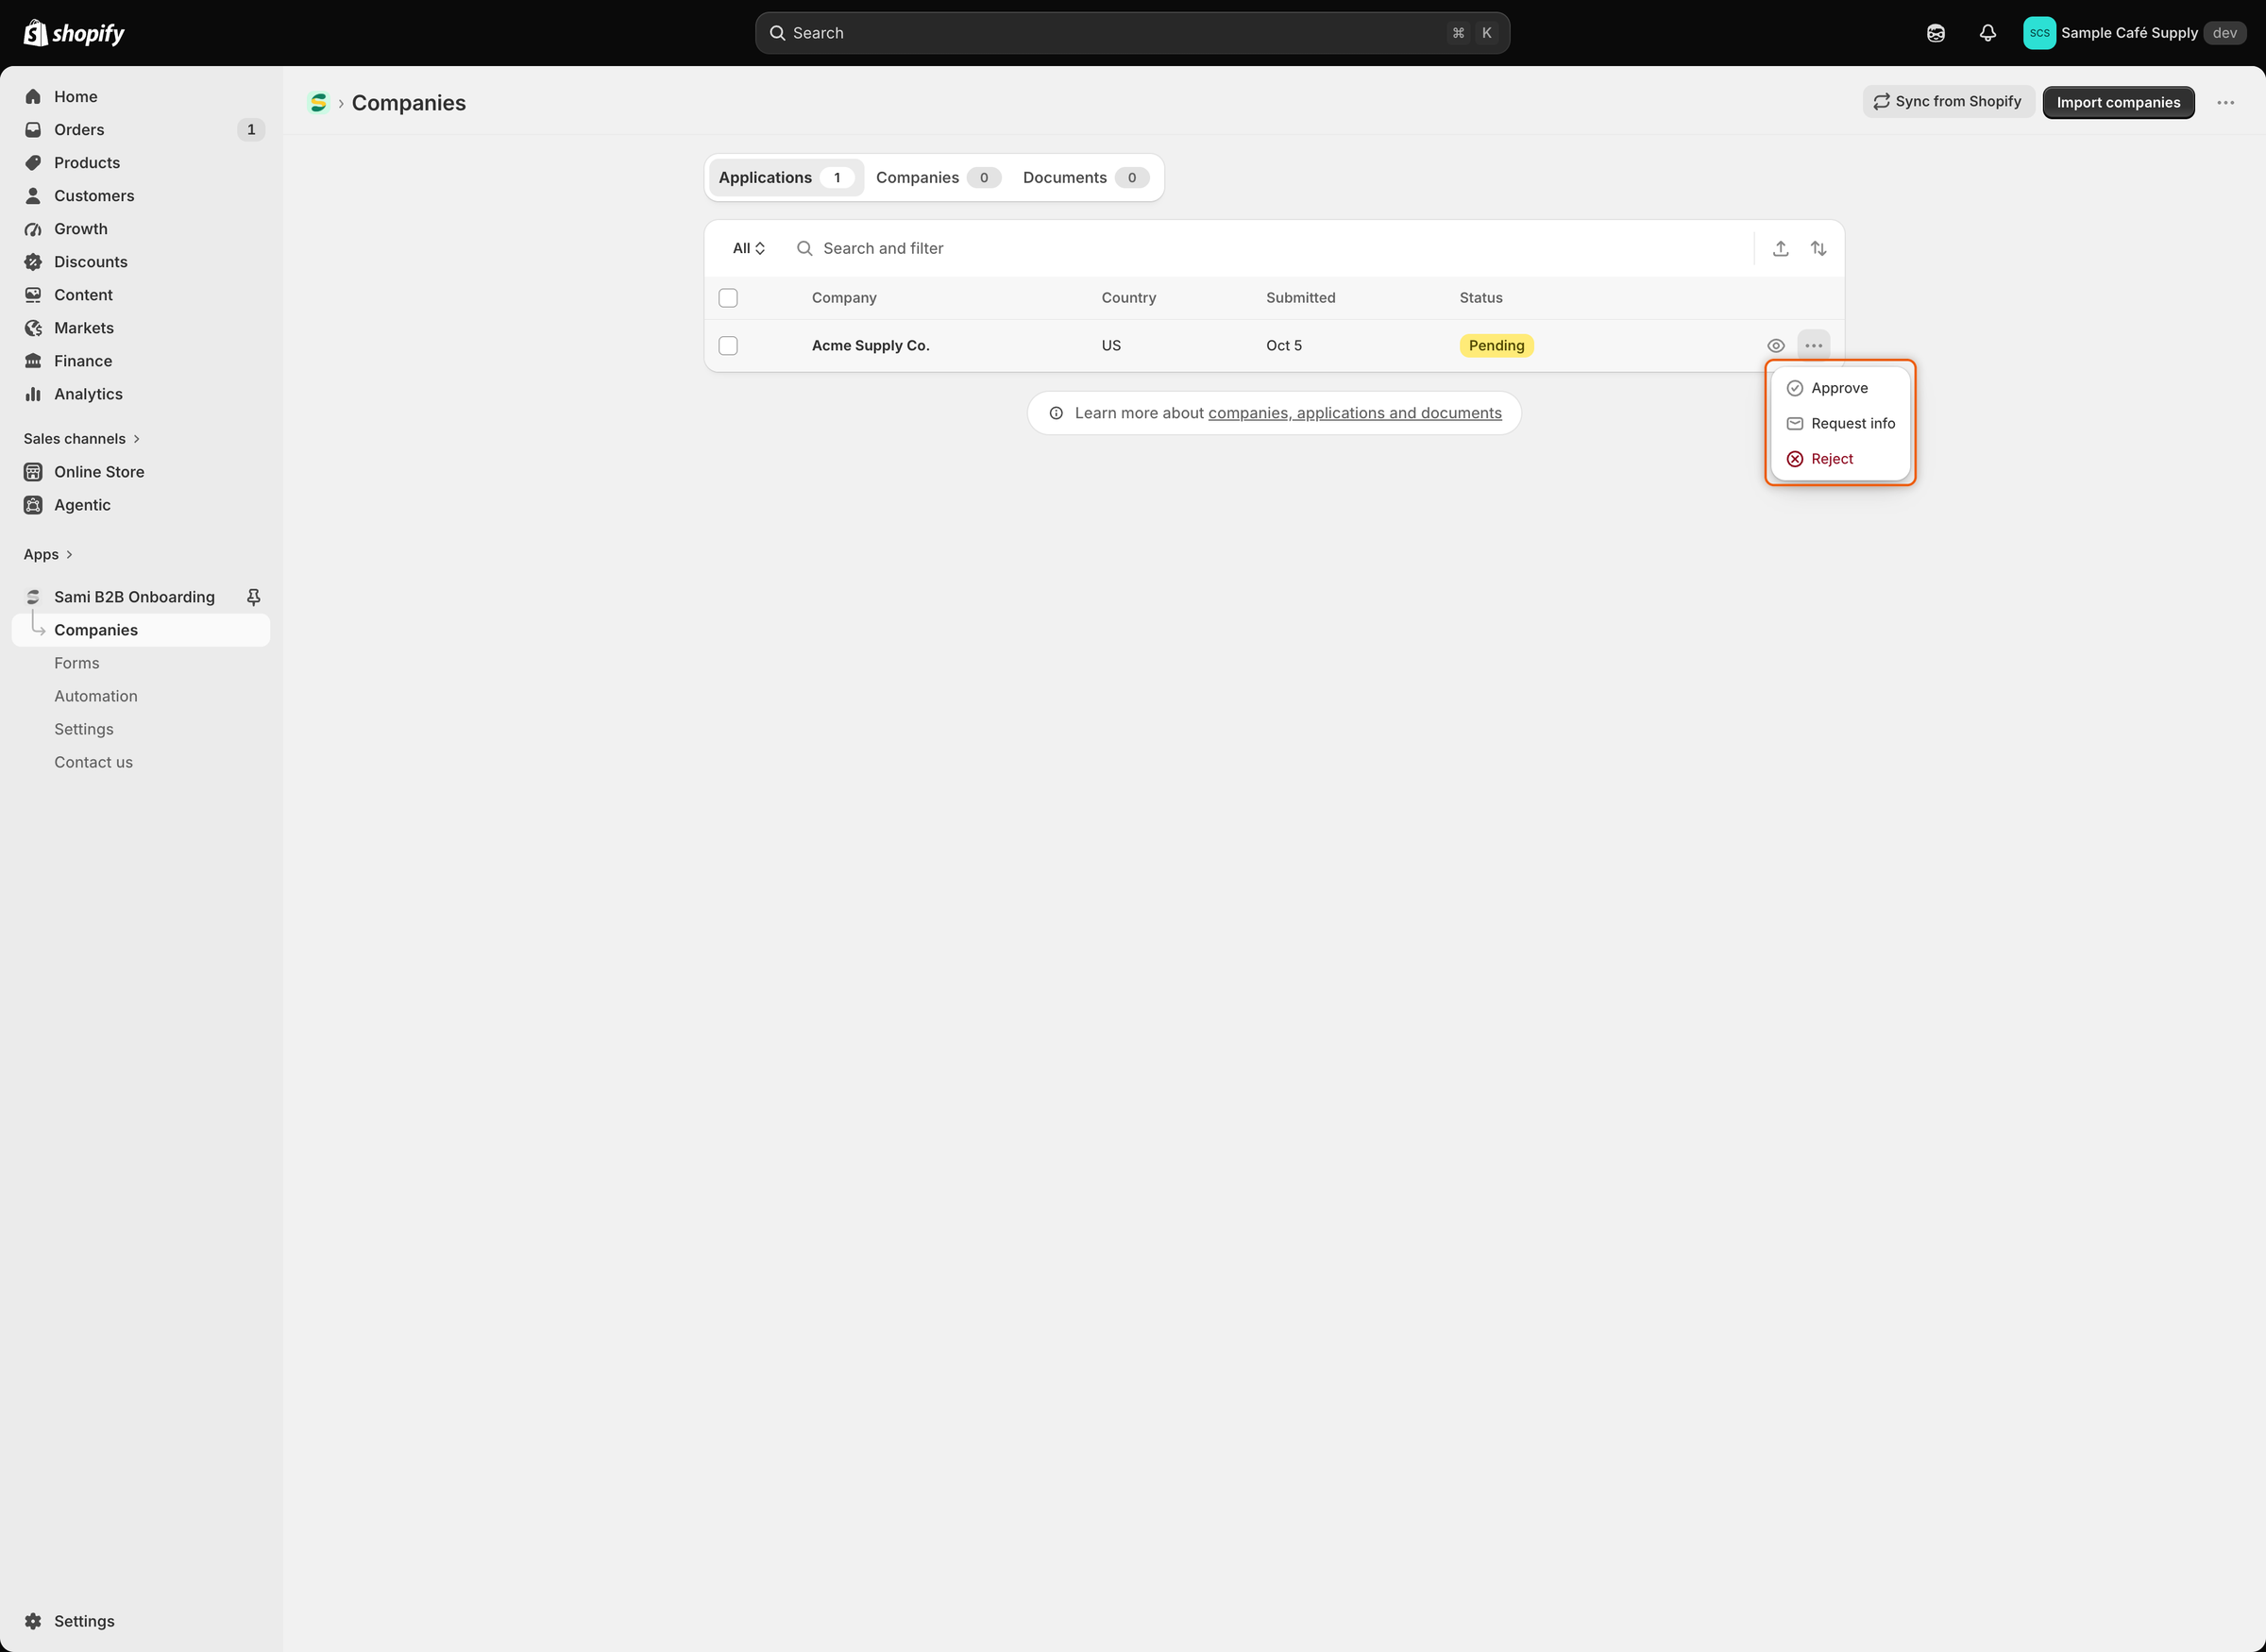
1. In the app, click **Companies**. The **Applications** list shows **Acme Supply Co.** with the **Pending** status. To read the answers first, click the company name to open the full application, then come back to the list.
2. At the end of its row, click **…** (More actions), then click **Approve**.
3. The **Approve Acme Supply Co.** dialog opens. In **Apply a preset**, pick an approval preset if you have one. A preset holds the terms the company gets, such as its catalog and payment terms. If you don't have one yet, leave **No preset**.
4. Click **Approve application**.

The status changes to **Approved**.

<figure><img src="https://3844812229-files.gitbook.io/~/files/v0/b/gitbook-x-prod.appspot.com/o/spaces%2FRrf4pQPgjvb3GW7IN3Ci%2Fuploads%2Fgit-blob-eef03d576cb8e41fe122d796e72d15902b5a27ce%2Fscreenshot-applications-quickstart-row-menu.png?alt=media" alt="The Applications list with Acme Supply Co. in Pending and its row menu open, showing Approve, Request info and Reject."><figcaption><p>Each row's … menu holds the three decisions, so you can approve without leaving the list.</p></figcaption></figure>
{% endstep %}

{% step %}

### See the result

Shortly after you approve, you can see the result in three places.

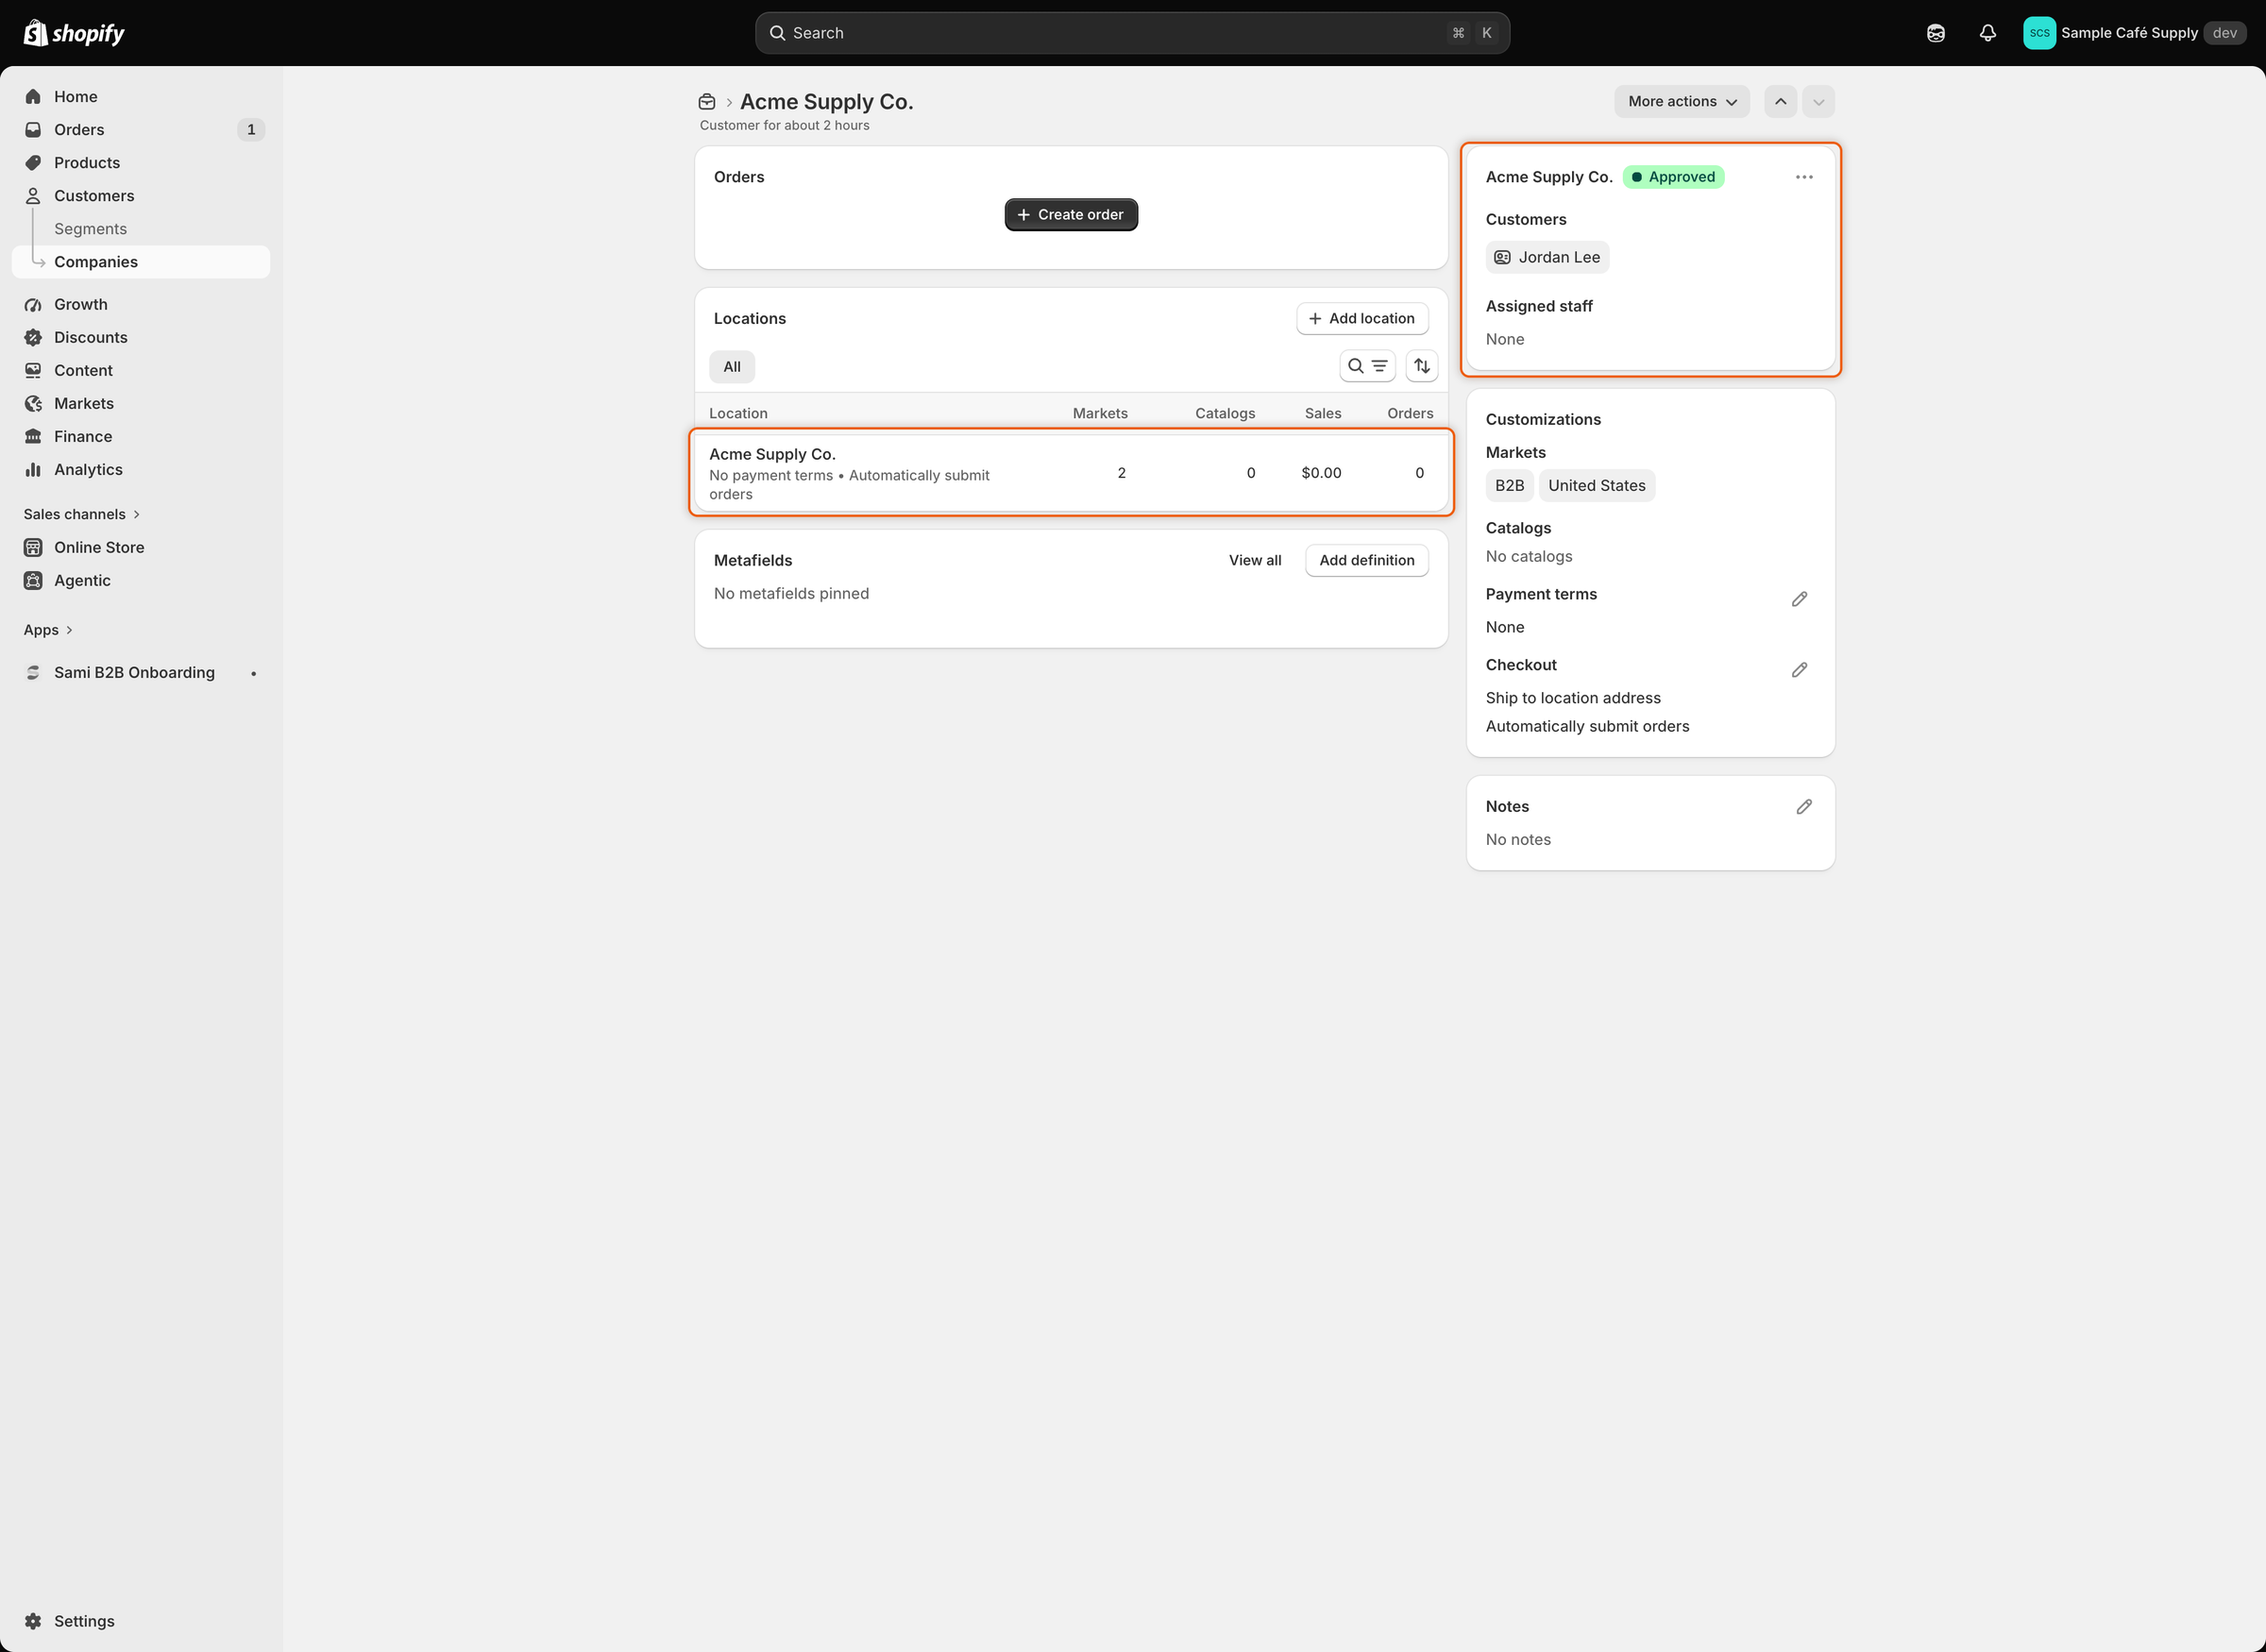
* **In Shopify.** Go to **Customers › Companies** in Shopify admin. **Acme Supply Co.** is listed. Open it: Jordan Lee is under **Customers**, and the company has a location named **Acme Supply Co.** at 123 Main Street. On Jordan Lee's customer page, **B2B approved** is set.
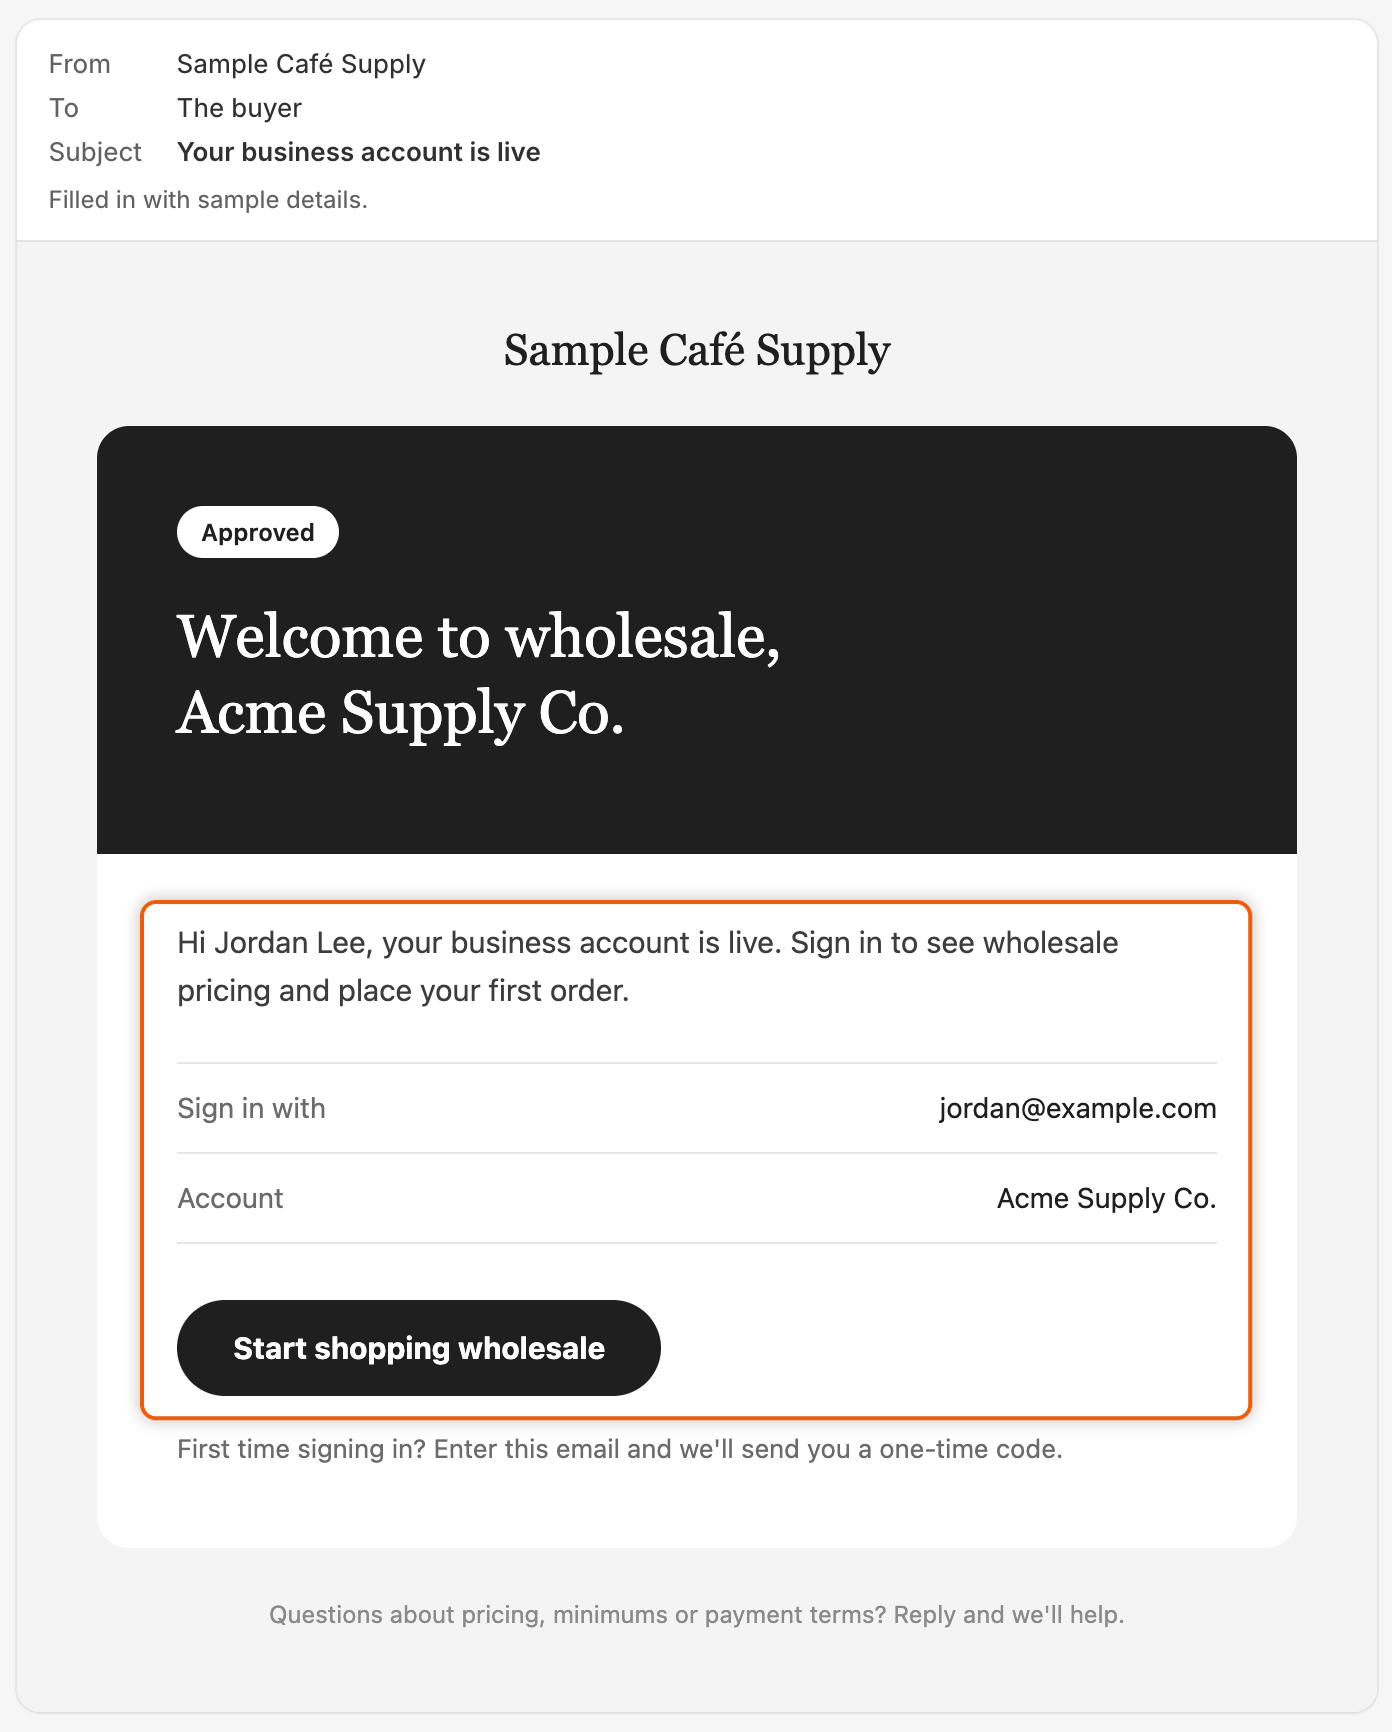
* **In the inbox.** The buyer gets **Your business account is live**, with a **Start shopping wholesale** button.
* **On your storefront.** In the private window, sign in to your store's customer account with the buyer's email. With Shopify's customer accounts, the buyer gets a one-time sign-in code by email. Once signed in, the buyer sees prices and can check out. A visitor who isn't signed in can browse, but sees **Log in to see prices** instead of prices, and checkout stops them with a message that their account is still being reviewed. If you turned on **Test mode**, these limits apply only to customers with the test tag.

On **Home**, **Recent activity** now lists the latest events for **Acme Supply Co.**, such as the approval and the emails sent. For the full history, open **Settings › Activity log**.

If your Shopify plan doesn't include B2B, Shopify doesn't create the company. The customer is still created and marked **B2B approved**, and the company stays in the app's **Companies** list.

<figure><img src="https://3844812229-files.gitbook.io/~/files/v0/b/gitbook-x-prod.appspot.com/o/spaces%2FRrf4pQPgjvb3GW7IN3Ci%2Fuploads%2Fgit-blob-c5c4c25cc51acb4a5f2e29603a5544c892c01963%2Fscreenshot-shopify-quickstart-acme-company.png?alt=media" alt="The Acme Supply Co. company page in Shopify admin, marked Approved, with Jordan Lee under Customers and one location named Acme Supply Co."><figcaption><p>Approval created the company in Shopify, with the buyer listed under Customers and a location for the company.</p></figcaption></figure>

<figure><img src="https://3844812229-files.gitbook.io/~/files/v0/b/gitbook-x-prod.appspot.com/o/spaces%2FRrf4pQPgjvb3GW7IN3Ci%2Fuploads%2Fgit-blob-7bd4a10807c9f3659704103886eb6acb34e4309c%2Fscreenshot-email-quickstart-account-live.png?alt=media" alt="A preview of the Your business account is live email from Sample Café Supply, welcoming Acme Supply Co. to wholesale, with sign-in details and a Start shopping wholesale button."><figcaption><p>The buyer learns their account is live and how to sign in.</p></figcaption></figure>
{% endstep %}
{% endstepper %}

## Next steps

* [Build your form](/sami-b2b-onboarding/application-forms/build-your-form.md) — change the questions the form asks.
* [Approval presets](/sami-b2b-onboarding/automation/approval-presets.md) — save the catalog, payment terms and tax settings that approval applies.
* [Store access](/sami-b2b-onboarding/store-access/store-access.md) — hide prices, lock the store or block checkout.
* [Your Home page](/sami-b2b-onboarding/getting-started/your-home-page.md) — read the numbers and find the work waiting for you.


---

# Agent Instructions
This documentation is published with GitBook. GitBook is the documentation platform designed so that both humans and AI agents can read, navigate, and reason over technical content effectively. Learn more at gitbook.com.

## Querying This Documentation
If you need additional information that is not directly available in this page, you can query the documentation dynamically by asking a question.

Perform an HTTP GET request on the current page URL with the `ask` query parameter, and the optional `goal` query parameter:

```
GET https://docs.samita.io/sami-b2b-onboarding/getting-started/quickstart.md?ask=<question>&goal=<endgoal>
```

`ask` is the immediate question: it should be specific, self-contained, and written in natural language.
`goal` is optional and describes the broader end goal you are ultimately trying to accomplish on behalf of the user. GitBook uses it to tailor the answer towards what is most useful for that goal.

The response will contain a direct answer to the question and relevant excerpts and sources from the documentation.

Use this mechanism when the answer is not explicitly present in the current page, you need clarification or additional context, or you want to retrieve related documentation sections.