> For the complete documentation index, see [llms.txt](https://docs.samita.io/llms.txt). Markdown versions of documentation pages are available by appending `.md` to page URLs; this page is available as [Markdown](https://docs.samita.io/sami-b2b-onboarding/application-forms/map-answers-to-shopify.md).

# Map answers to Shopify

Choose which Shopify customer, company, address and metafield each answer fills when you approve an application.

Mapping tells Sami B2B Onboarding where each answer on your form belongs. When you approve an application, the app uses it to create the Shopify customer and company with the buyer's details already filled in, so nobody has to retype them.

## What mapping does

* **It fills in the application.** The fields mapped to the company's name, the buyer's first and last name and the email give each application its company name, contact name and email in **Companies › Applications**. The buyer's emails from the app go to that email address.
* **It fills in Shopify when you approve.** Nothing is written to Shopify when a buyer submits. When you, or a rule, approve the application, the app creates the customer (or finds the one with the same email), then creates the company and its first location from the mapped answers.
* **It files documents.** Uploads from document fields are filed by document type. See [Files as documents](#files-as-documents).

The catalog, payment terms and contact role don't come from the form. They come from the approval preset you pick when you approve. See [Approval presets](/sami-b2b-onboarding/automation/approval-presets.md).

{% hint style="warning" %}
Creating a company in Shopify needs a plan that includes B2B. Without it, approval still creates the customer and marks them as approved, but no company is made.
{% endhint %}

{% hint style="info" %}
Each application keeps the mapping it was submitted with. A change you save now applies to applications submitted after it, not to the ones already waiting.
{% endhint %}

## Open the Shopify panel

{% stepper %}
{% step %}

### Open the form

Go to **Forms** and click **Edit** beside the form. The builder opens.
{% endstep %}

{% step %}

### Open Integrations

In the rail on the left, click **Integrations**. Under **Connected apps**, click **Manage** on the **Shopify** row.

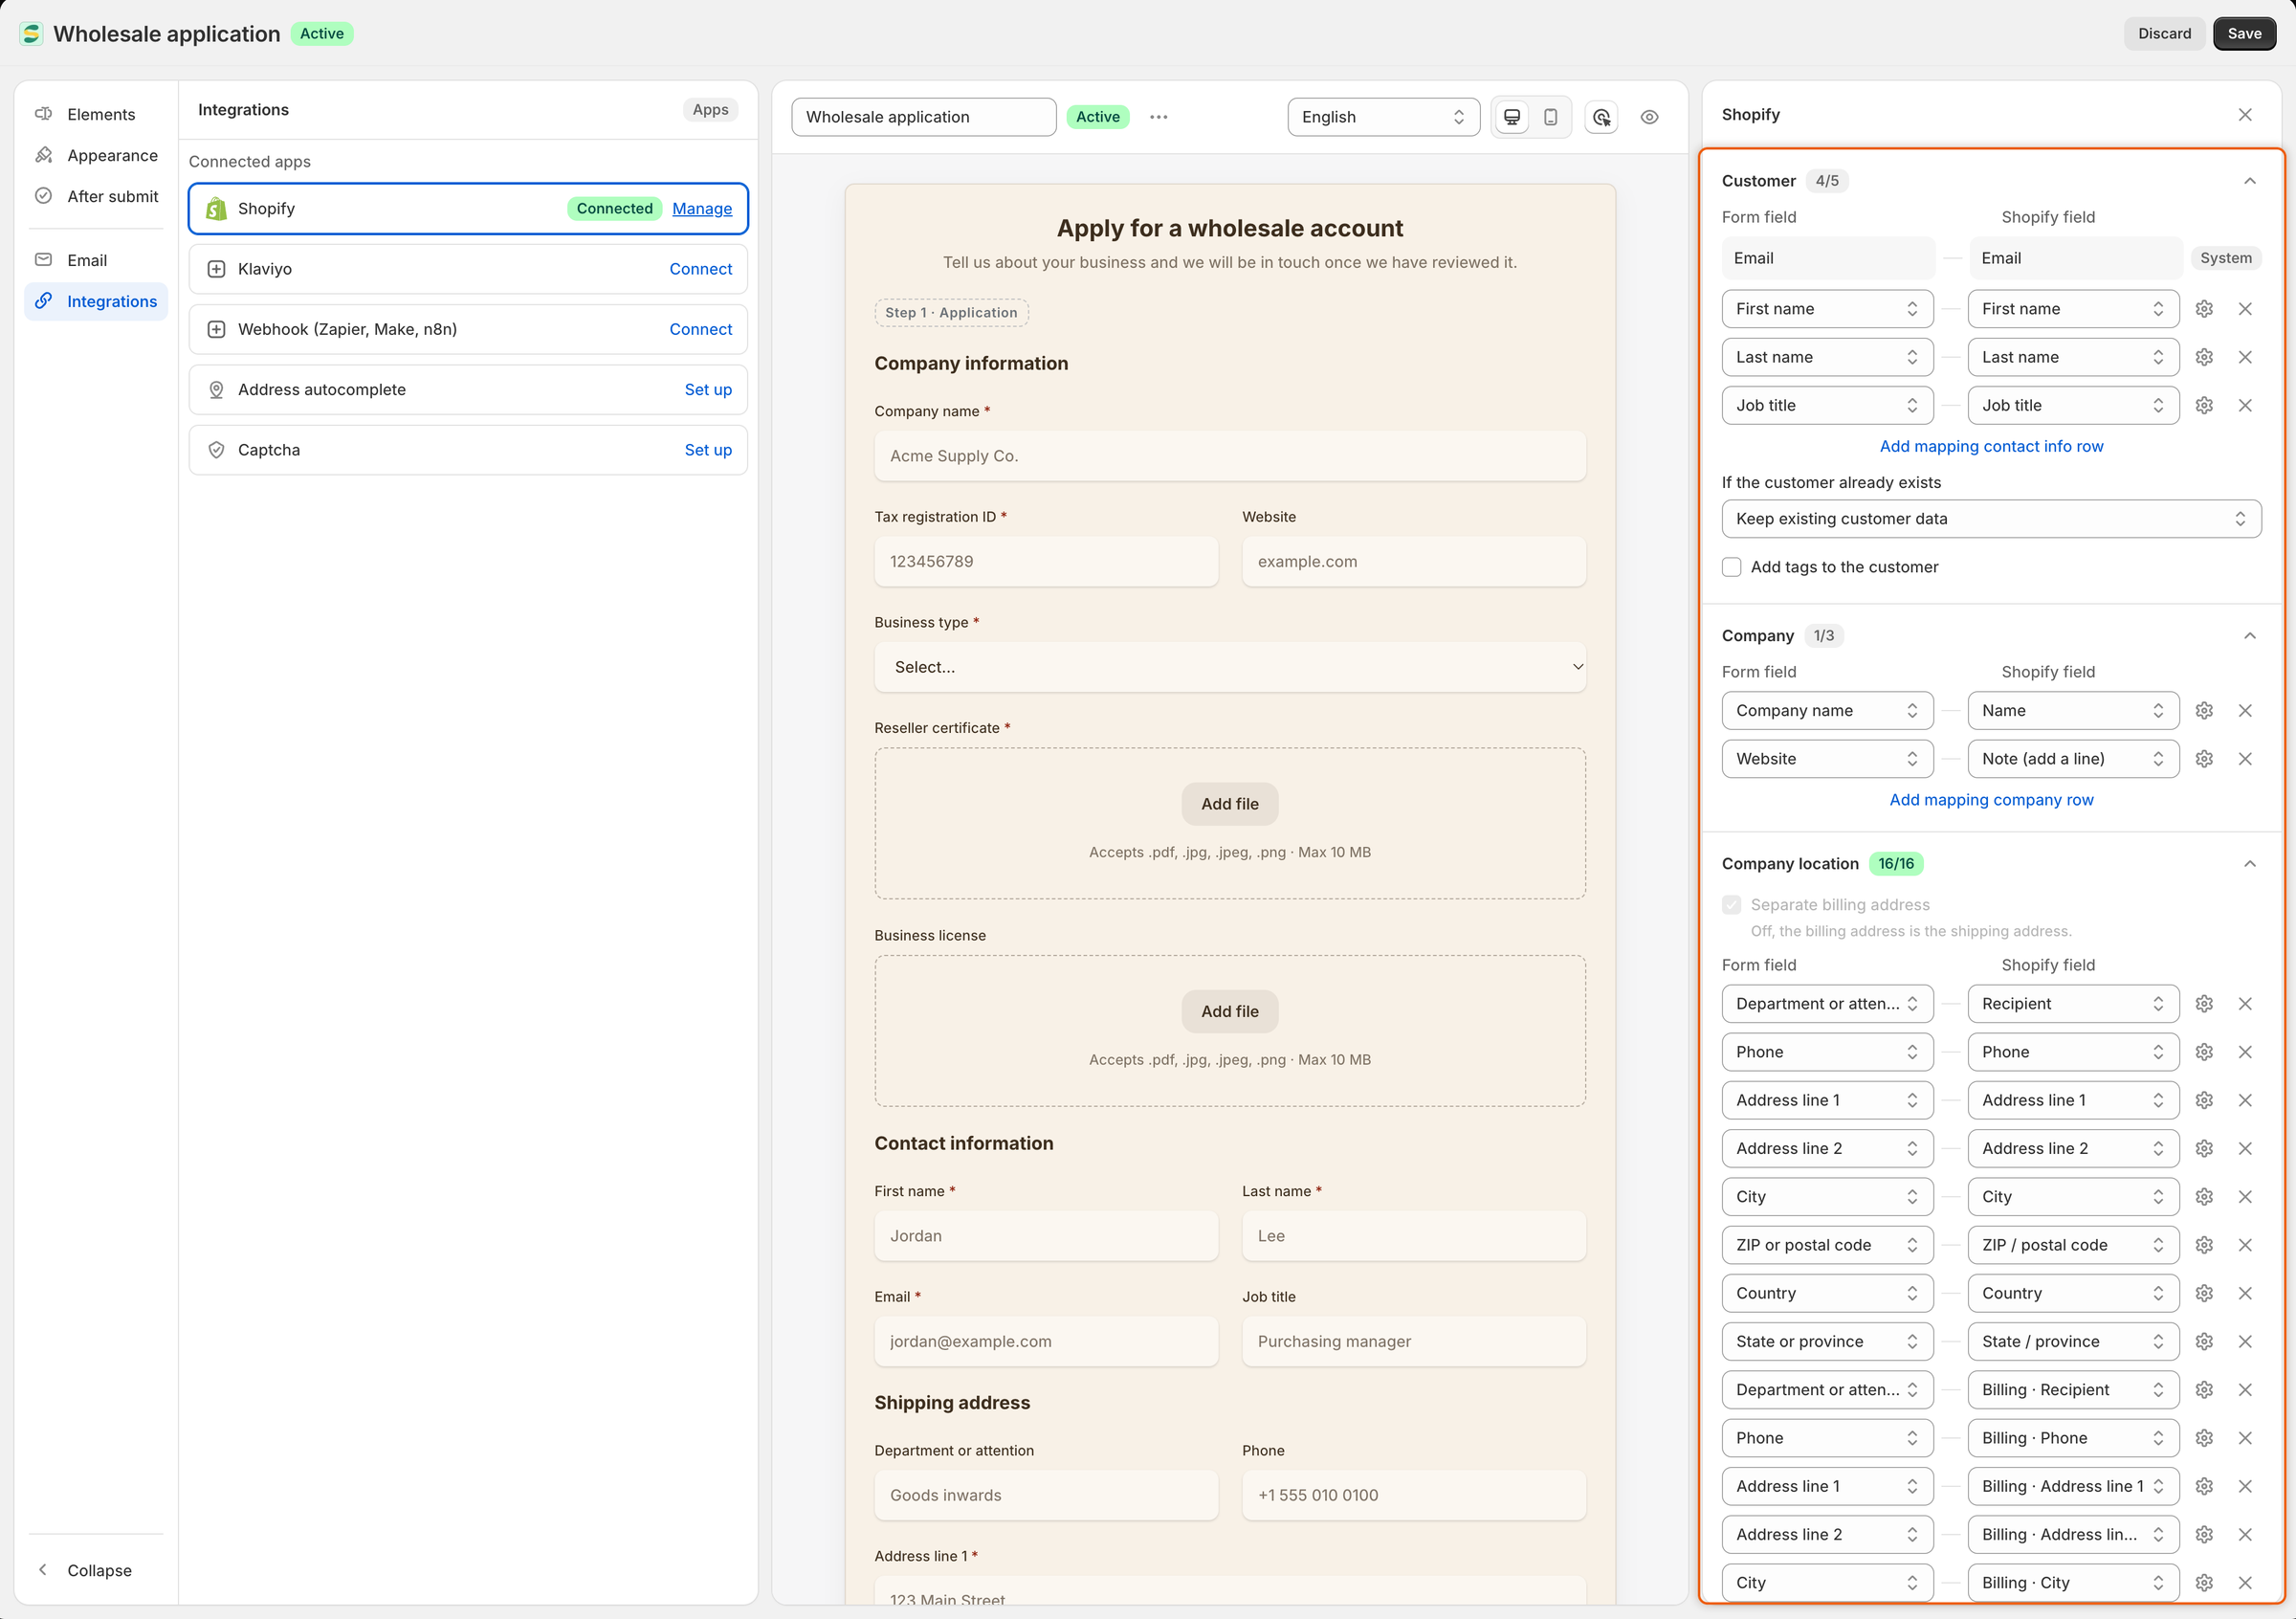
The **Shopify** panel opens with four sections: **Customer**, **Company**, **Company location** and **Metafields**. The badge beside each section's title counts how many of its Shopify fields have an answer mapped to them, for example **4/5**. The badge turns green when all of them do.

<figure><img src="https://3844812229-files.gitbook.io/~/files/v0/b/gitbook-x-prod.appspot.com/o/spaces%2FRrf4pQPgjvb3GW7IN3Ci%2Fuploads%2Fgit-blob-12c2ded91aee4211515d04e7a8b0584a94eab42c%2Fscreenshot-builder-mapping-shopify-panel.png?alt=media" alt="The Shopify panel in the form builder, pairing each form field with a Shopify field under Customer (4/5), Company (1/3) and Company location (16/16)."><figcaption><p>Each row pairs a field on your form with the Shopify field its answer fills.</p></figcaption></figure>
{% endstep %}
{% endstepper %}

## What the default form already maps

The **Wholesale application** form the app creates at install comes mapped, so approving it gives you a complete company with no setup.

| Field on the form              | Section          | Shopify field                          |
| ------------------------------ | ---------------- | -------------------------------------- |
| Company name                   | Company          | **Name**                               |
| Website                        | Company          | **Note (add a line)**                  |
| First name                     | Customer         | **First name**                         |
| Last name                      | Customer         | **Last name**                          |
| Email                          | Customer         | **Email** (marked **System**)          |
| Job title                      | Customer         | **Job title**                          |
| Department or attention        | Company location | **Recipient**                          |
| Phone                          | Company location | **Phone**                              |
| Address line 1, Address line 2 | Company location | **Address line 1**, **Address line 2** |
| City                           | Company location | **City**                               |
| ZIP or postal code             | Company location | **ZIP / postal code**                  |
| Country                        | Company location | **Country**                            |
| State or province              | Company location | **State / province**                   |

The billing address fields are mapped the same way, to the **Billing ·** fields.

Two fields aren't mapped, on purpose:

* **Tax registration ID** needs no mapping. On approval, the app adds the buyer's tax ID to the company location as its tax registration ID.
* **Same as shipping address** hides the billing fields when the buyer ticks it. With no billing address, the company location uses the shipping address for billing too.

## Map a field

{% stepper %}
{% step %}

### Add a row in the right section

Pick the section for the Shopify field: **Customer** for the buyer, **Company** for the business, **Company location** for its addresses. At the bottom of that section, click **Add mapping contact info row**, **Add mapping company row** or **Add mapping address row**.

A new row appears with two dropdowns: **Form field** on the left and **Shopify field** on the right.
{% endstep %}

{% step %}

### Choose the form field

In the left dropdown, pick the question on your form. A field that is already mapped somewhere else shows it after its name, for example **Website — now Company · Note (add a line)**. Picking it replaces that mapping with this one.
{% endstep %}

{% step %}

### Choose the Shopify field

In the right dropdown, pick where the answer goes. The list only shows Shopify fields that can hold this kind of answer, and it leaves out the ones another row already fills. As soon as both dropdowns are set, the row is part of the mapping.
{% endstep %}

{% step %}

### Choose what happens when the answer is empty (optional)

Click the settings button near the end of the row, just before the **X**. See [When an answer is empty](#when-an-answer-is-empty).
{% endstep %}

{% step %}

### Save

Click **Save** in the save bar. The builder checks the mapping first. See [Checks before the form saves](#checks-before-the-form-saves).
{% endstep %}
{% endstepper %}

To change a row, pick another field or Shopify field in it. To remove a row, click the **X** at its end.

## Shopify fields you can map to

| Section          | Shopify field                                                                                                                        | What the answer fills                                                                                                                                                           |
| ---------------- | ------------------------------------------------------------------------------------------------------------------------------------ | ------------------------------------------------------------------------------------------------------------------------------------------------------------------------------- |
| Customer         | **Email** (**System**)                                                                                                               | The Shopify customer's email, and the address the buyer's emails go to. This row is fixed: it shows your form's email field, or **Add the email field** when the form has none. |
| Customer         | **First name**, **Last name**, **Phone**                                                                                             | The Shopify customer's name and phone number.                                                                                                                                   |
| Customer         | **Job title**                                                                                                                        | Usually not saved in Shopify. The job title only reaches the company contact when the app couldn't create the customer first. The answer always stays on the application.       |
| Customer         | **Tags (add)**                                                                                                                       | Adds the answer as tags on the Shopify customer, when the app creates the customer or updates one with **Update with application data**. Several fields can share it.           |
| Company          | **Name**                                                                                                                             | The Shopify company's name and the application's company name. Every form needs one field here.                                                                                 |
| Company          | **External ID**                                                                                                                      | The company's external ID in Shopify.                                                                                                                                           |
| Company          | **Note**                                                                                                                             | The company's note in Shopify.                                                                                                                                                  |
| Company          | **Note (add a line)**                                                                                                                | Adds a line to the company's note that reads "question: answer". Several fields can share it, and any answer fits, even a file upload (as the file's name).                     |
| Company location | **Recipient**, **Address line 1**, **Address line 2**, **City**, **State / province**, **ZIP / postal code**, **Country**, **Phone** | The shipping address of the company's first location. The shipping **Phone** is also the location's phone.                                                                      |
| Company location | **Billing ·** the same parts                                                                                                         | The location's billing address. Shown when **Separate billing address** is on.                                                                                                  |
| Metafields       | **Customer ·** or **Company ·** and the definition's name                                                                            | That metafield on the Shopify customer or company. See [Map an answer to a metafield](#map-an-answer-to-a-metafield).                                                           |

The **Company** section also lists **Tags (add)**, but answers mapped there aren't saved in Shopify. To tag the buyer from an answer, use **Tags (add)** under **Customer**.

The company location is created only when the shipping address has at least **Address line 1** and a country. A billing address without them is left out, and the location uses the shipping address for billing.

Not every answer fits every Shopify field:

* A single answer, such as text, a number, a date or one choice, fits the fields above.
* Several choices (**Checkboxes**, or a **Dropdown** with **Allow multiple choices**) fit **Note**, **Note (add a line)**, the customer's **Tags (add)** and list or multi-line metafields.
* A single checkbox is saved as **Yes** or **No**. It fits **Note**, **Note (add a line)** and true-or-false or multi-line metafields.
* A **File upload** only fits **Note (add a line)**. To file the upload as a document, use a document field instead.

To tag buyers by the choice they pick, give that choice **Customer tags** in the field's options. See [Build your form](/sami-b2b-onboarding/application-forms/build-your-form.md).

## When an answer is empty

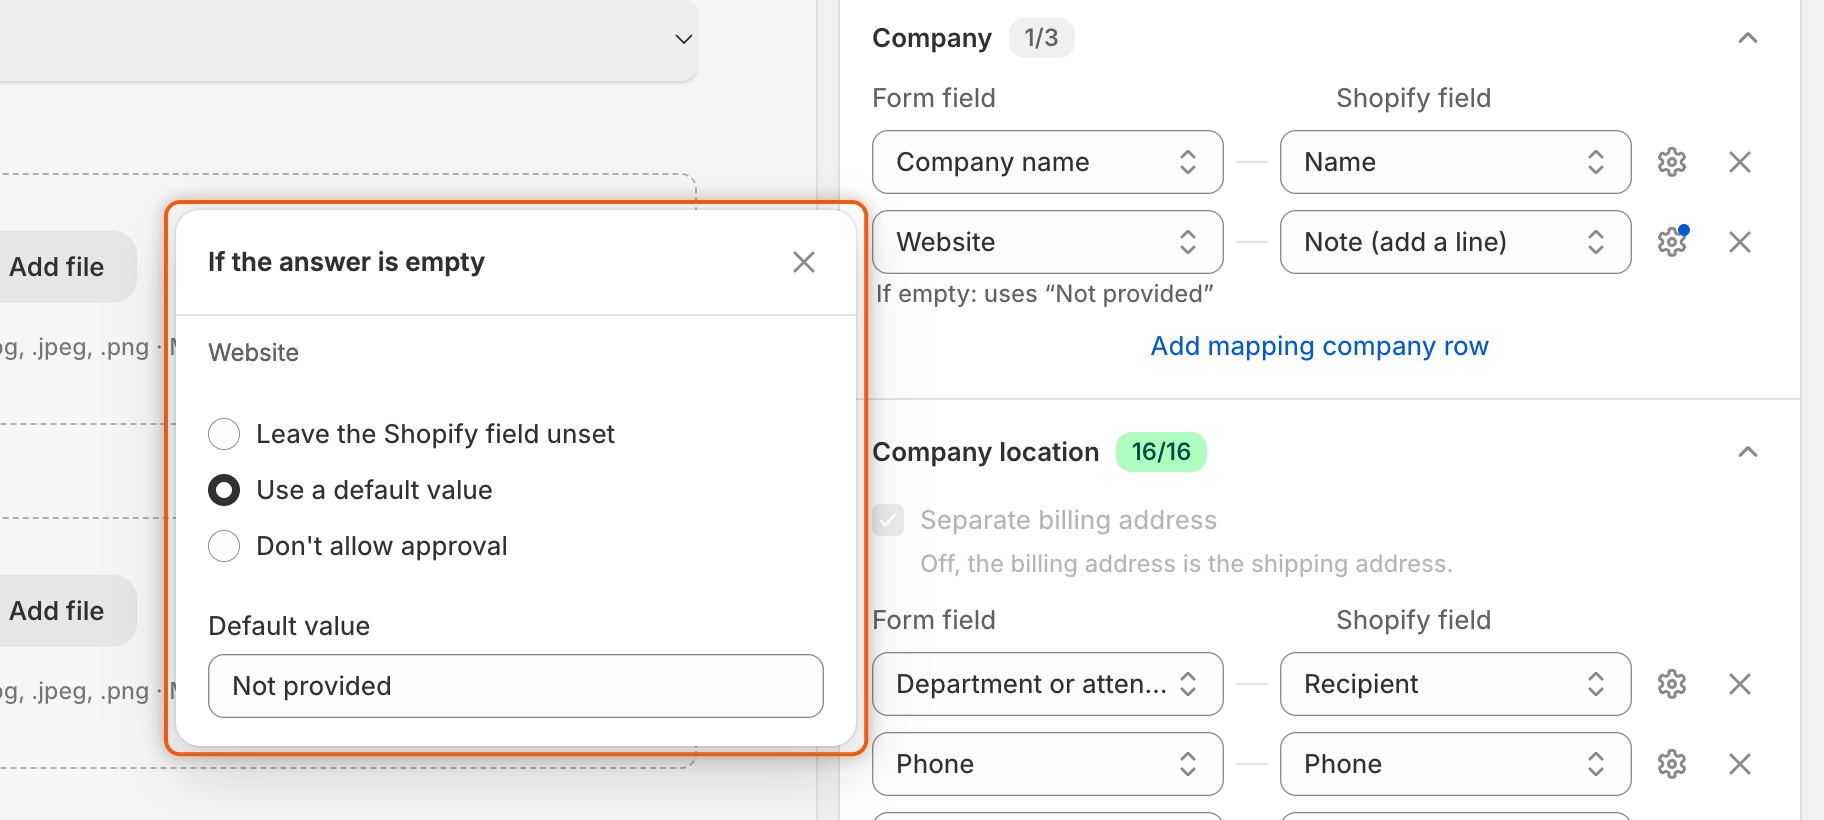
Click the settings button near the end of a mapped row, just before the **X**. The **If the answer is empty** panel opens beside the list.

| Option                            | What happens                                                                                                                                                                                                    |
| --------------------------------- | --------------------------------------------------------------------------------------------------------------------------------------------------------------------------------------------------------------- |
| **Leave the Shopify field unset** | Nothing is written to that Shopify field. This is the default.                                                                                                                                                  |
| **Use a default value**           | The text you type in **Default value** is written instead, for example `Not provided`. The row then reads **If empty: uses “Not provided”**. For a field with several choices, separate the values with commas. |
| **Don't allow approval**          | The application can't be approved until someone fills the answer in. The row reads **If empty: approval waits until it's filled in**.                                                                           |

<figure><img src="https://3844812229-files.gitbook.io/~/files/v0/b/gitbook-x-prod.appspot.com/o/spaces%2FRrf4pQPgjvb3GW7IN3Ci%2Fuploads%2Fgit-blob-6b197d7a81d15045af8193c050eaa7207f09d226%2Fscreenshot-builder-mapping-if-empty.png?alt=media" alt="The If the answer is empty panel for Website, with Use a default value selected and Not provided as the default value, beside the Website row that now reads If empty: uses “Not provided”."><figcaption><p>Pick what Shopify gets when the buyer leaves this answer blank.</p></figcaption></figure>

With **Don't allow approval**, an application with that answer blank shows **Required answers** with **Missing:** and the field's name in its **Decision readiness** card. Approving it is refused, with the list of answers that are missing. A rule that would approve it leaves it in the queue instead. Fill the answer in on the application (the **Edit answers** pencil on its answers card), then approve. See [Review an application](/sami-b2b-onboarding/reviewing-applications/review-an-application.md).

## Settings for the customer

Below the **Customer** rows:

| Setting                            | What it does                                                                                                                                                                                                                                                                                                                                                                            |
| ---------------------------------- | --------------------------------------------------------------------------------------------------------------------------------------------------------------------------------------------------------------------------------------------------------------------------------------------------------------------------------------------------------------------------------------- |
| **If the customer already exists** | The app looks for a Shopify customer with the buyer's email. **Keep existing customer data** (the default) links the application to that customer and changes nothing else on them. **Update with application data** writes the mapped name, phone, tags and customer metafields over theirs, and keeps the tags they already had. Either way, approval marks the customer as approved. |
| **Add tags to the customer**       | Tick it and type one or more tags. They are added, on top of the approval preset's tags, when the app creates the customer or updates one with **Update with application data**. To tag from an answer, map a field to **Tags (add)**.                                                                                                                                                  |

An application sent by a signed-in customer is already linked to that customer's account, so approving it doesn't change their customer data. It still marks them as approved.

## Billing address

In **Company location**, **Separate billing address** decides whether billing fields are offered at all. Off, the billing address is the shipping address and only shipping fields are listed. On, the **Billing ·** fields are added. While any billing field is mapped, the box stays ticked.

## Map an answer to a metafield

Use a metafield for an answer that has no Shopify field of its own, such as how many cafés the buyer runs. The **Metafields** section lists your store's customer and company metafield definitions that an answer can be saved in. With none, it reads **No definitions in this store yet**.

{% stepper %}
{% step %}

### Add a metafield row

In the **Metafields** section, click **Add mapping metafield row**.
{% endstep %}

{% step %}

### Pick the field and the metafield

In **Form field**, pick the question. In **Shopify field**, pick the definition. Each one reads **Customer ·** or **Company ·** followed by its name, so you can see which object it's saved on.
{% endstep %}

{% step %}

### Save

Click **Save** in the save bar. On approval, the answer is saved in that metafield on the customer or the company.
{% endstep %}
{% endstepper %}

### Create a definition for an answer

When the right definition doesn't exist yet, create it from the panel.

{% stepper %}
{% step %}

### Open the panel

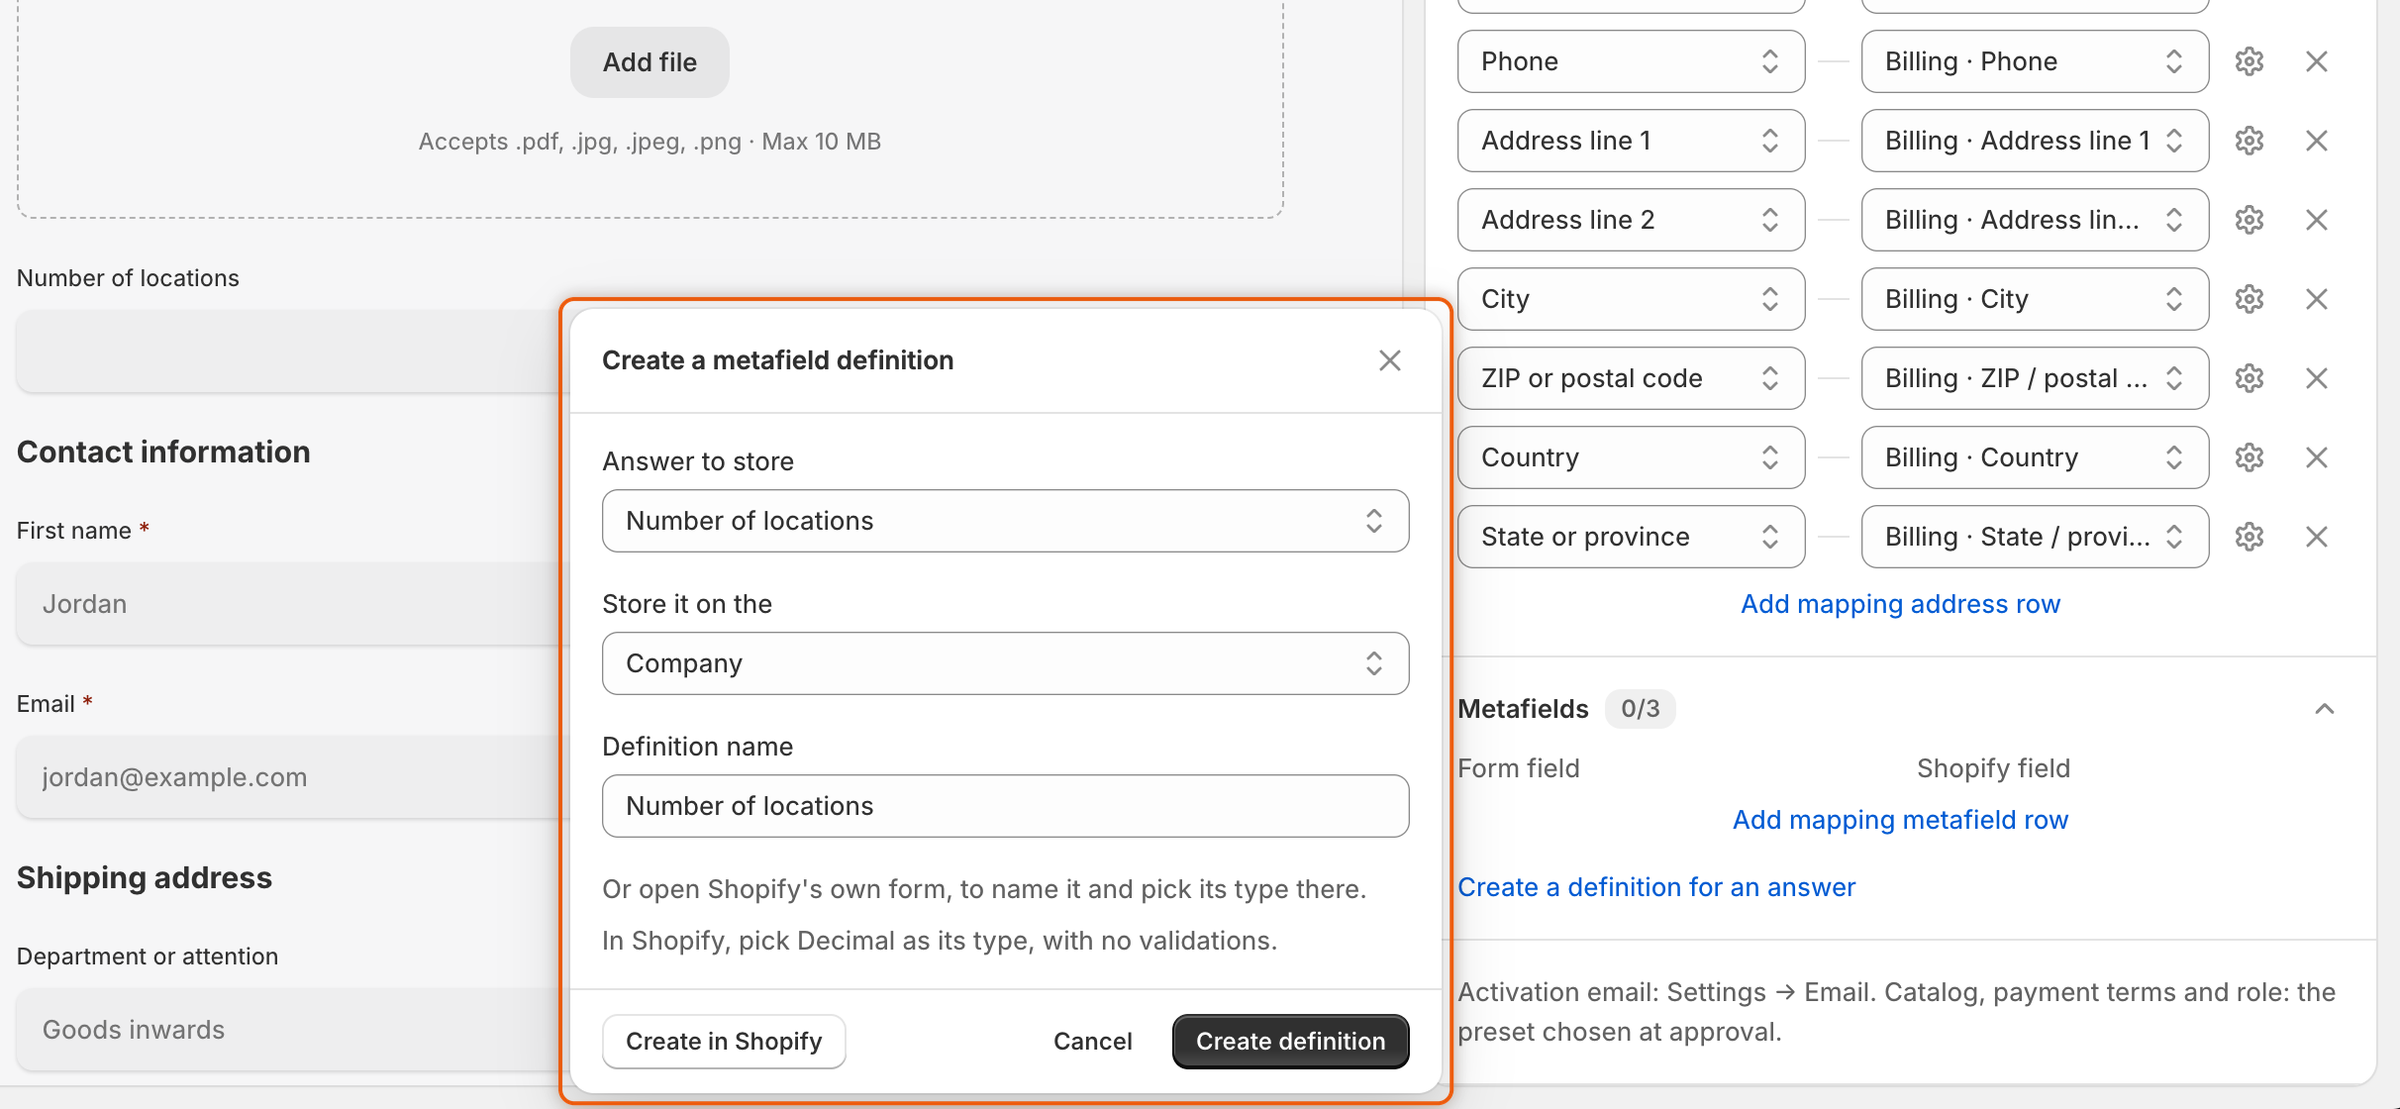
At the bottom of the **Metafields** section, click **Create a definition for an answer**. The **Create a metafield definition** panel opens.
{% endstep %}

{% step %}

### Fill it in

* **Answer to store**: the field whose answer it holds. If that field is already mapped, the box says its mapping moves to the new definition.
* **Store it on the**: **Customer** or **Company**.
* **Definition name**: filled with the field's label. Change it if you like.

<figure><img src="https://3844812229-files.gitbook.io/~/files/v0/b/gitbook-x-prod.appspot.com/o/spaces%2FRrf4pQPgjvb3GW7IN3Ci%2Fuploads%2Fgit-blob-b937160d2cdb9189b2f679e2a4a3576719948deb%2Fscreenshot-builder-mapping-create-definition.png?alt=media" alt="The Create a metafield definition panel set to store the Number of locations answer on the Company, named Number of locations, with Create in Shopify, Cancel and Create definition buttons."><figcaption><p>The app can create a metafield definition that fits the answer and map the field to it in one step.</p></figcaption></figure>
{% endstep %}

{% step %}

### Create it

Click **Create definition**. The app creates the definition in Shopify with a type that fits the answer, maps the field to it, and shows **Definition created**. Click **Save** in the save bar to keep the mapping.
{% endstep %}
{% endstepper %}

The type the app picks:

| Form field                                                        | Metafield type             |
| ----------------------------------------------------------------- | -------------------------- |
| **Checkboxes**, or a **Dropdown** with **Allow multiple choices** | A list of single line text |
| A single **Checkbox**                                             | True or false              |
| **Number**                                                        | Decimal                    |
| **Long text**                                                     | Multi-line text            |
| Any other field                                                   | Single line text           |

To name the definition and pick its type yourself, click **Create in Shopify** instead. Shopify's own form opens, and the panel tells you which type to choose for this answer. When you save Shopify's form, the field is mapped to the new definition if its answer fits. If it doesn't, the panel reads "This field can't be kept under the metafield you created. Check its type and validations in Shopify."

A **File upload** field can't be saved in a metafield.

### Which metafields are offered

A definition is listed only when all of these are true:

* Its type is one an answer can be written as: single line text, multi-line text, decimal, date, true or false, or a list of single line text.
* The app may write to it. Definitions that belong to another app, or to Shopify itself, aren't offered.
* The answer fits its type and its validation rules. A definition with a rule such as a character limit, a pattern or a range isn't offered. The one exception is a list of allowed values that holds every choice of a **Dropdown**, **Radio buttons** or **Checkboxes** field.

| Form field                                                                         | Metafield types it fits                    |
| ---------------------------------------------------------------------------------- | ------------------------------------------ |
| **Short text**, **Email**, **Phone**, a one-choice **Dropdown**, **Radio buttons** | Single line text, multi-line text          |
| **Long text**                                                                      | Multi-line text                            |
| **Number**                                                                         | Decimal, single line text, multi-line text |
| **Date and time** with **Asks for** set to **Date**                                | Date, single line text, multi-line text    |
| **Checkboxes**, a multi-choice **Dropdown**                                        | List of single line text, multi-line text  |
| A single **Checkbox**                                                              | True or false, multi-line text             |

### Warnings about mapped metafields

If a definition changes in Shopify after you map it, the builder warns you in three places. The warnings don't stop you saving.

* A banner over the preview: **Shopify may refuse some mapped answers**, with an **Open Shopify mapping** button.
* A **Check mappings** badge on the **Shopify** row in **Integrations**.
* A note under the row, which says what is wrong:

| Note                                                                                                                     | What to do                                                                       |
| ------------------------------------------------------------------------------------------------------------------------ | -------------------------------------------------------------------------------- |
| That metafield isn't in Shopify any more, so Shopify refuses this answer when an application is approved.                | Map the field to another definition, or remove the row.                          |
| This app can't write to that metafield, so the answer is never saved there.                                              | Map the field to a definition of your own.                                       |
| That metafield takes a different kind of answer, so Shopify may refuse this one when an application is approved.         | Change the definition's type in Shopify, or pick another definition.             |
| That metafield has rules in Shopify this answer can't keep to, so Shopify may refuse it when an application is approved. | Remove the definition's validation rules in Shopify, or pick another definition. |

## Checks before the form saves

The builder refuses to save, and lists the problem in a banner, until:

* The form has exactly one applicant's email field (the field on the **Email** row marked **System**), and it isn't hidden: **Add the applicant's email field.**, **Only one field can be the applicant's email.**, **The email field can't be hidden.**
* A field is mapped to the company's name: **Map a field to Company · Name.**
* No two fields fill the same Shopify field, for example **“Company name” and “Website” are mapped to the same Shopify field.** **Note (add a line)** and **Tags (add)** are the exceptions: any number of fields can share them.

Click a problem in the banner to open the Shopify panel.

## Files as documents

To file an upload as a document, add the field from **Add field › Document fields**: **Business license**, **Tax certificate**, **Tax registration** or **Reseller certificate**. When the buyer submits, each upload from one of these fields is filed under that document type. You find it on the application and under **Companies › Documents**. An upload from a plain **File upload** field stays with the application's answers.

## Next steps

* [Build your form](/sami-b2b-onboarding/application-forms/build-your-form.md) — add the fields you want to map, and give choices their own customer tags.
* [Approve an application](/sami-b2b-onboarding/reviewing-applications/approve-an-application.md) — see the customer and company the mapping creates.
* [Approval presets](/sami-b2b-onboarding/automation/approval-presets.md) — set the catalog, payment terms and role an approval applies.
* [Documents](/sami-b2b-onboarding/companies/documents.md) — review the files buyers send from document fields.


---

# Agent Instructions
This documentation is published with GitBook. GitBook is the documentation platform designed so that both humans and AI agents can read, navigate, and reason over technical content effectively. Learn more at gitbook.com.

## Querying This Documentation
If you need additional information that is not directly available in this page, you can query the documentation dynamically by asking a question.

Perform an HTTP GET request on the current page URL with the `ask` query parameter, and the optional `goal` query parameter:

```
GET https://docs.samita.io/sami-b2b-onboarding/application-forms/map-answers-to-shopify.md?ask=<question>&goal=<endgoal>
```

`ask` is the immediate question: it should be specific, self-contained, and written in natural language.
`goal` is optional and describes the broader end goal you are ultimately trying to accomplish on behalf of the user. GitBook uses it to tailor the answer towards what is most useful for that goal.

The response will contain a direct answer to the question and relevant excerpts and sources from the documentation.

Use this mechanism when the answer is not explicitly present in the current page, you need clarification or additional context, or you want to retrieve related documentation sections.