> For the complete documentation index, see [llms.txt](https://docs.samita.io/llms.txt). Markdown versions of documentation pages are available by appending `.md` to page URLs; this page is available as [Markdown](https://docs.samita.io/sami-b2b-onboarding/application-forms/field-rules.md).

# Show, require or disable fields with rules

Show, hide, require or grey out a field, or show or hide a row or a page, based on what the buyer answered earlier in the form.

A rule changes part of an application form based on an answer the buyer already gave. Use rules to ask a question only when it applies, for example a reseller certificate only from resellers, so every buyer sees a shorter form.

{% hint style="info" %}
Rules are set in the builder. Go to **Forms** in Sami B2B Onboarding and click **Edit** beside the form. The steps below use the **Wholesale application** form the app creates at install.
{% endhint %}

## How rules work

Each field, row or page can have one rule, set under **Conditional display**. A rule has two parts:

* **What it does.** You pick one action in **When the conditions match**.
* **When it does it.** One or more conditions, each made of a field, a test and an answer, such as **Business type** **is** **Reseller**.

A field's rule can do one of these things:

| When the conditions match | What happens                                                                   | When they don't match                          |
| ------------------------- | ------------------------------------------------------------------------------ | ---------------------------------------------- |
| **Show this**             | The field shows.                                                               | The field is hidden.                           |
| **Hide this**             | The field is hidden.                                                           | The field shows.                               |
| **Make this required**    | The buyer must answer the field.                                               | The field follows its own **Required** switch. |
| **Make this optional**    | The buyer can leave the field empty.                                           | The field follows its own **Required** switch. |
| **Disable this**          | The field is greyed out. The buyer can't type in it, and it is never required. | The buyer can fill it in.                      |

The list also offers **Enable this**. Buyers can always fill in a field unless a **Disable this** rule greys it out, so **Enable this** doesn't change the field.

A few things to know before you start:

* **A rule reads earlier answers only.** It can test fields above it on the same page and fields on earlier pages. Headings, paragraphs, HTML and dividers can't be tested.
* **Rows and pages only show or hide.** Their rule offers **Show** and **Hide**, and none of the other choices.
* **One action per rule.** A field can't be shown by one rule and required by another. To ask for something only sometimes and make it required when it's asked, turn on the field's **Required** switch and give it a **Show this** rule. A hidden field is never required.
* **The preview ignores rules while you edit.** With the inspector on, a field a rule would hide still shows, so you can select it. Click the inspector button (**Deactivate inspector**) to fill in the preview like a buyer and watch the rules work.

## Example: ask resellers for a certificate

This example adds a **Business type** question to the **Wholesale application** and shows a **Reseller certificate** upload only when the buyer picks **Reseller**.

{% stepper %}
{% step %}

### Add the Business type question

In the preview, point at the bottom edge of the **Website** field and click the **+** that appears (**Add field below**). Under **Basic fields**, click **Dropdown**.

In the field's settings, under **Content**, change **Label** to `Business type`.
{% endstep %}

{% step %}

### Add its choices

Under **Options**, click **Add option**. The **Edit options — Business type** window opens with one choice, **New option**.

1. Replace **New option** with `Café`.
2. Click **Add another option** and type `Bakery` in place of **New option**.
3. Click **Add another option** again and type `Reseller` in place of **New option**.
4. Click **Done**.

Under **Validation**, turn on **Required**.
{% endstep %}

{% step %}

### Add the certificate upload

Point at the bottom edge of **Business type** and click **+**. Under **Document fields**, click **Reseller certificate**.

Under **Validation**, turn on **Required**. The rule you add next decides when the field shows, and it is only required while it shows.
{% endstep %}

{% step %}

### Turn on Conditional display

With **Reseller certificate** still selected, go to **Visibility** and tick **Conditional display**.

* In **When the conditions match**, choose **Show this**.
* Leave **If other fields must match** on **all conditions**.

The **Conditions** card says **No conditions yet** and **Until you add one, this always shows.** Click **Add condition**.
{% endstep %}

{% step %}

### Set the condition

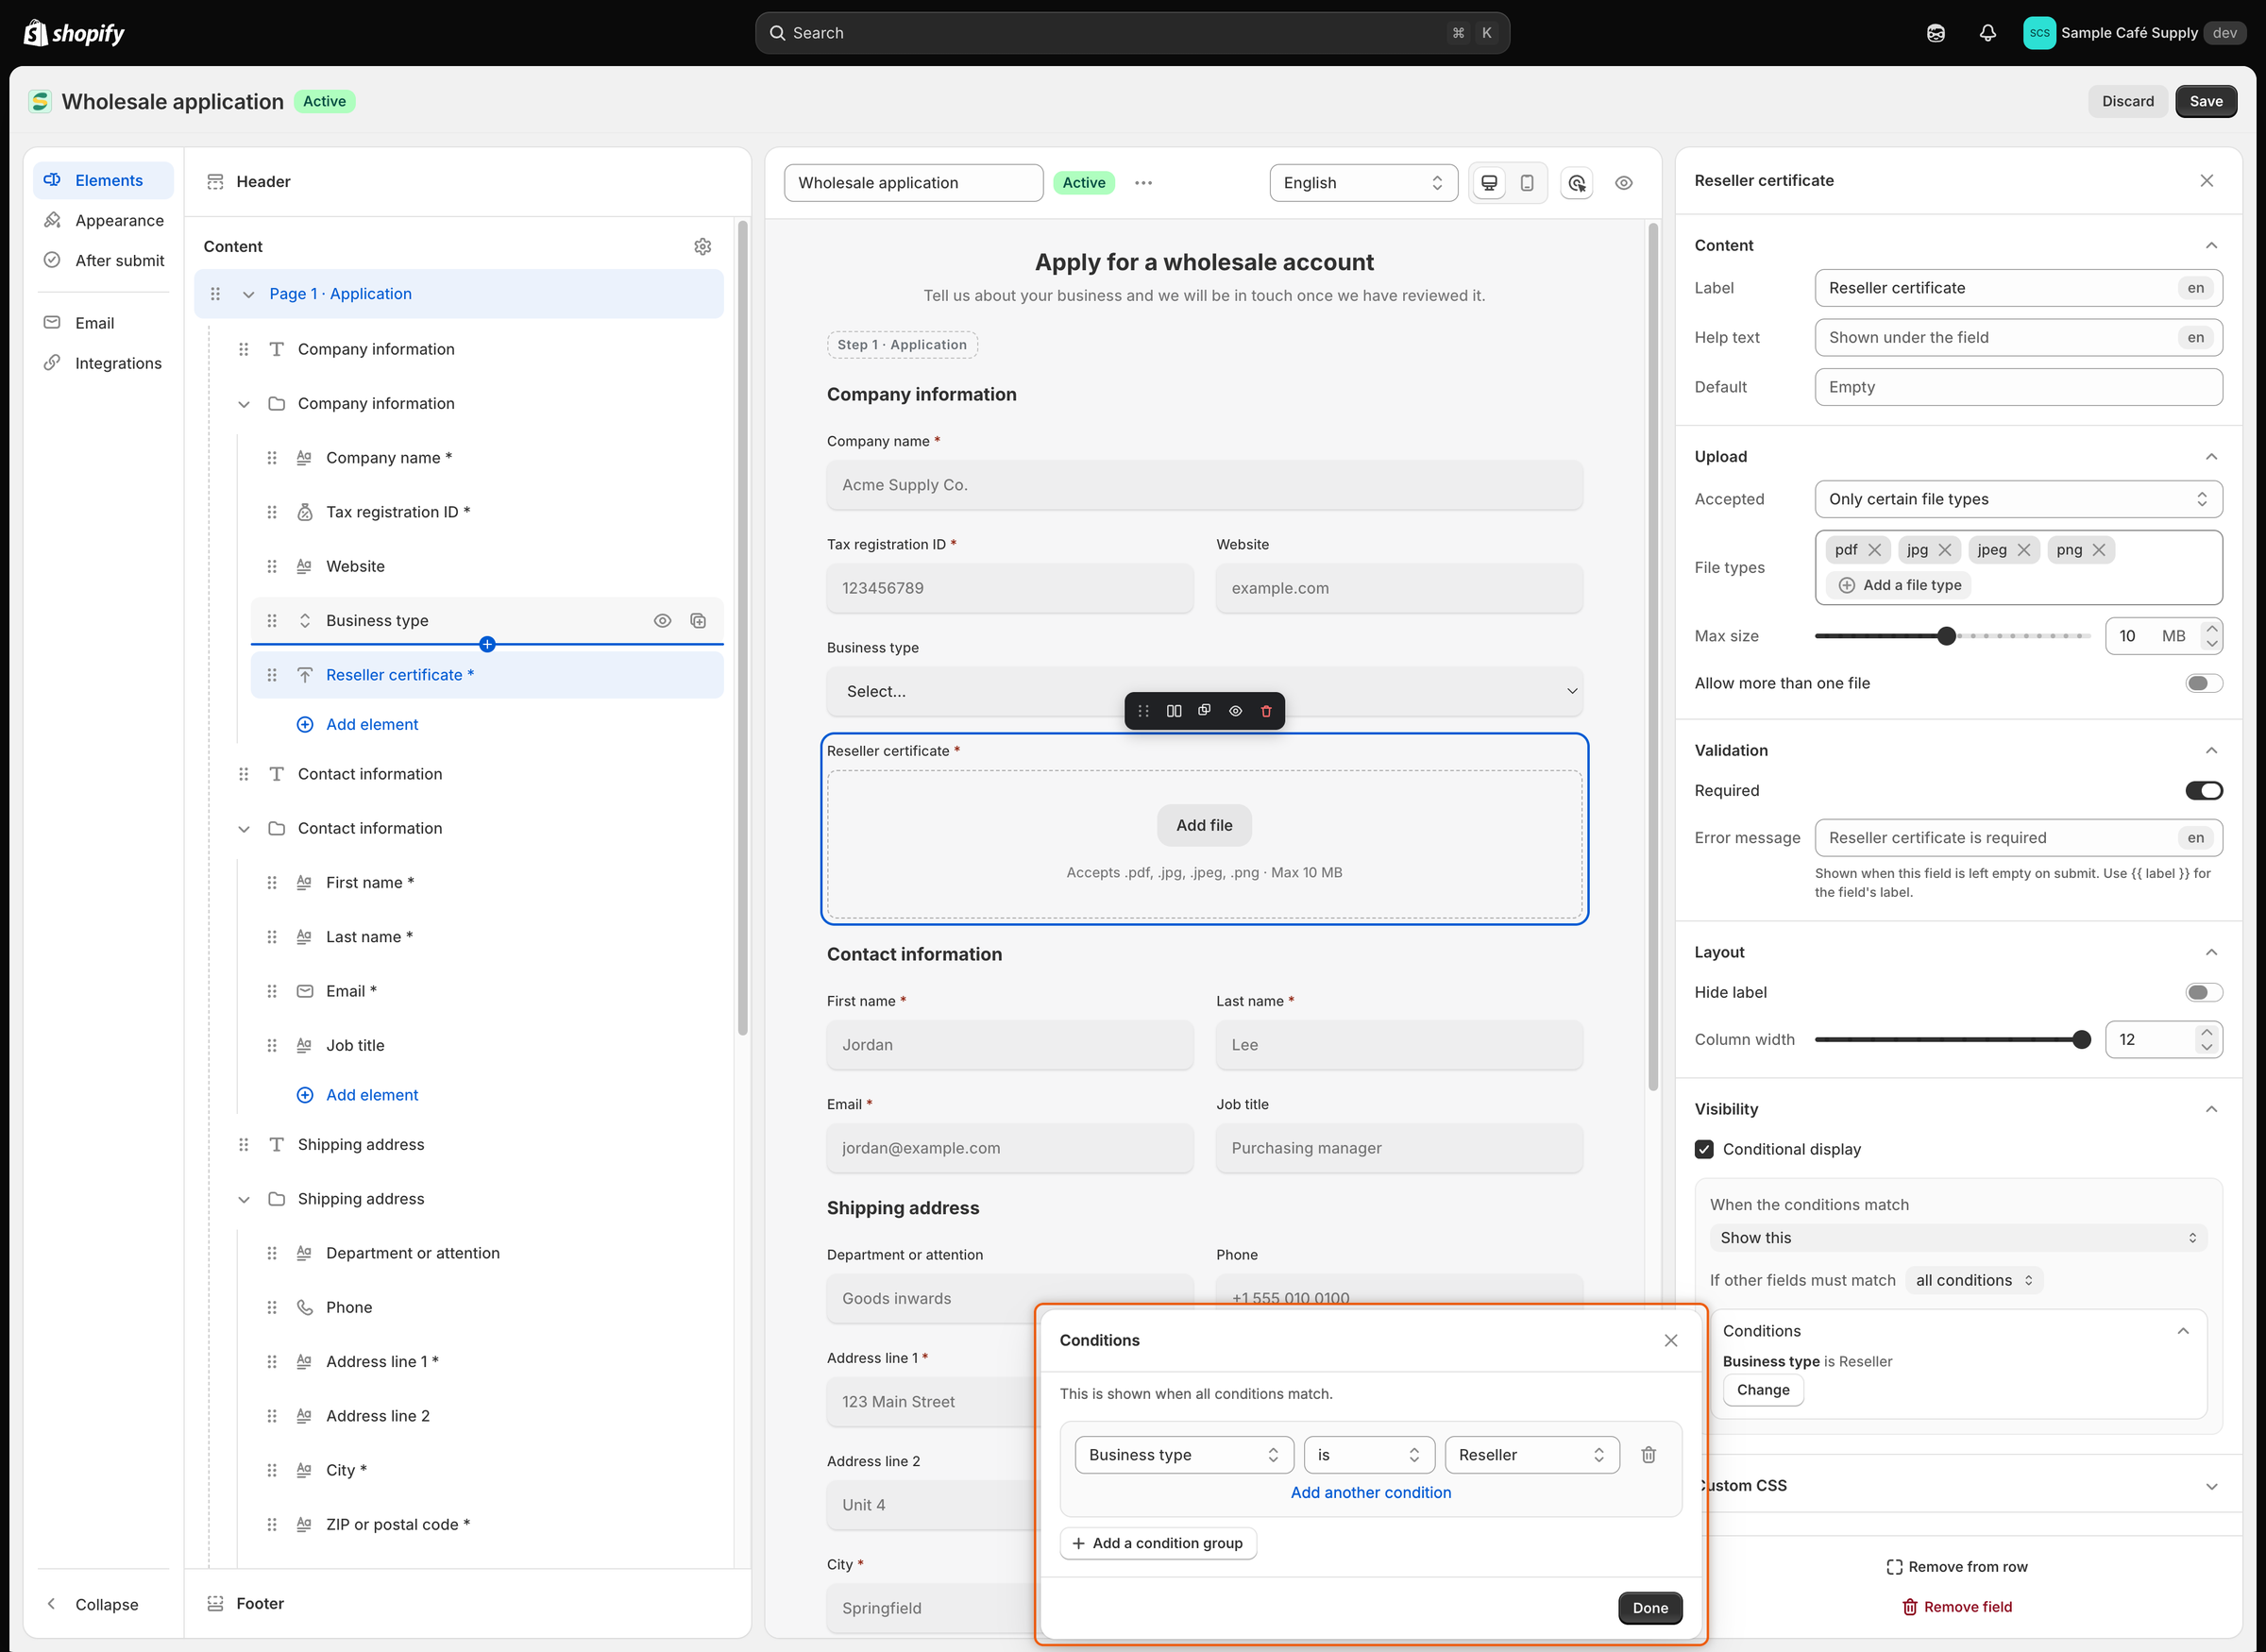
In the **Conditions** window:

1. In the first list, choose **Business type**.
2. Leave the test on **is**.
3. In the last list, choose **Reseller**.
4. Click **Done**.

The **Conditions** card now reads **Business type is Reseller**.

<figure><img src="https://3844812229-files.gitbook.io/~/files/v0/b/gitbook-x-prod.appspot.com/o/spaces%2FRrf4pQPgjvb3GW7IN3Ci%2Fuploads%2Fgit-blob-04d70639e6c6c5b64ee0994a47f38b99ff979a61%2Fscreenshot-builder-rules-conditions-window.png?alt=media" alt="The Conditions window with one condition, Business type is Reseller, and the Done button."><figcaption><p>A condition names an earlier field, a test and the answer to look for.</p></figcaption></figure>
{% endstep %}

{% step %}

### Test it in the preview

Click the inspector button in the toolbar (**Deactivate inspector**). **Reseller certificate** disappears from the preview. Choose **Reseller** in **Business type** and it appears. Choose **Café** and it goes again.

Click the inspector button again (**Activate inspector**) to go back to editing.
{% endstep %}

{% step %}

### Save and check your store

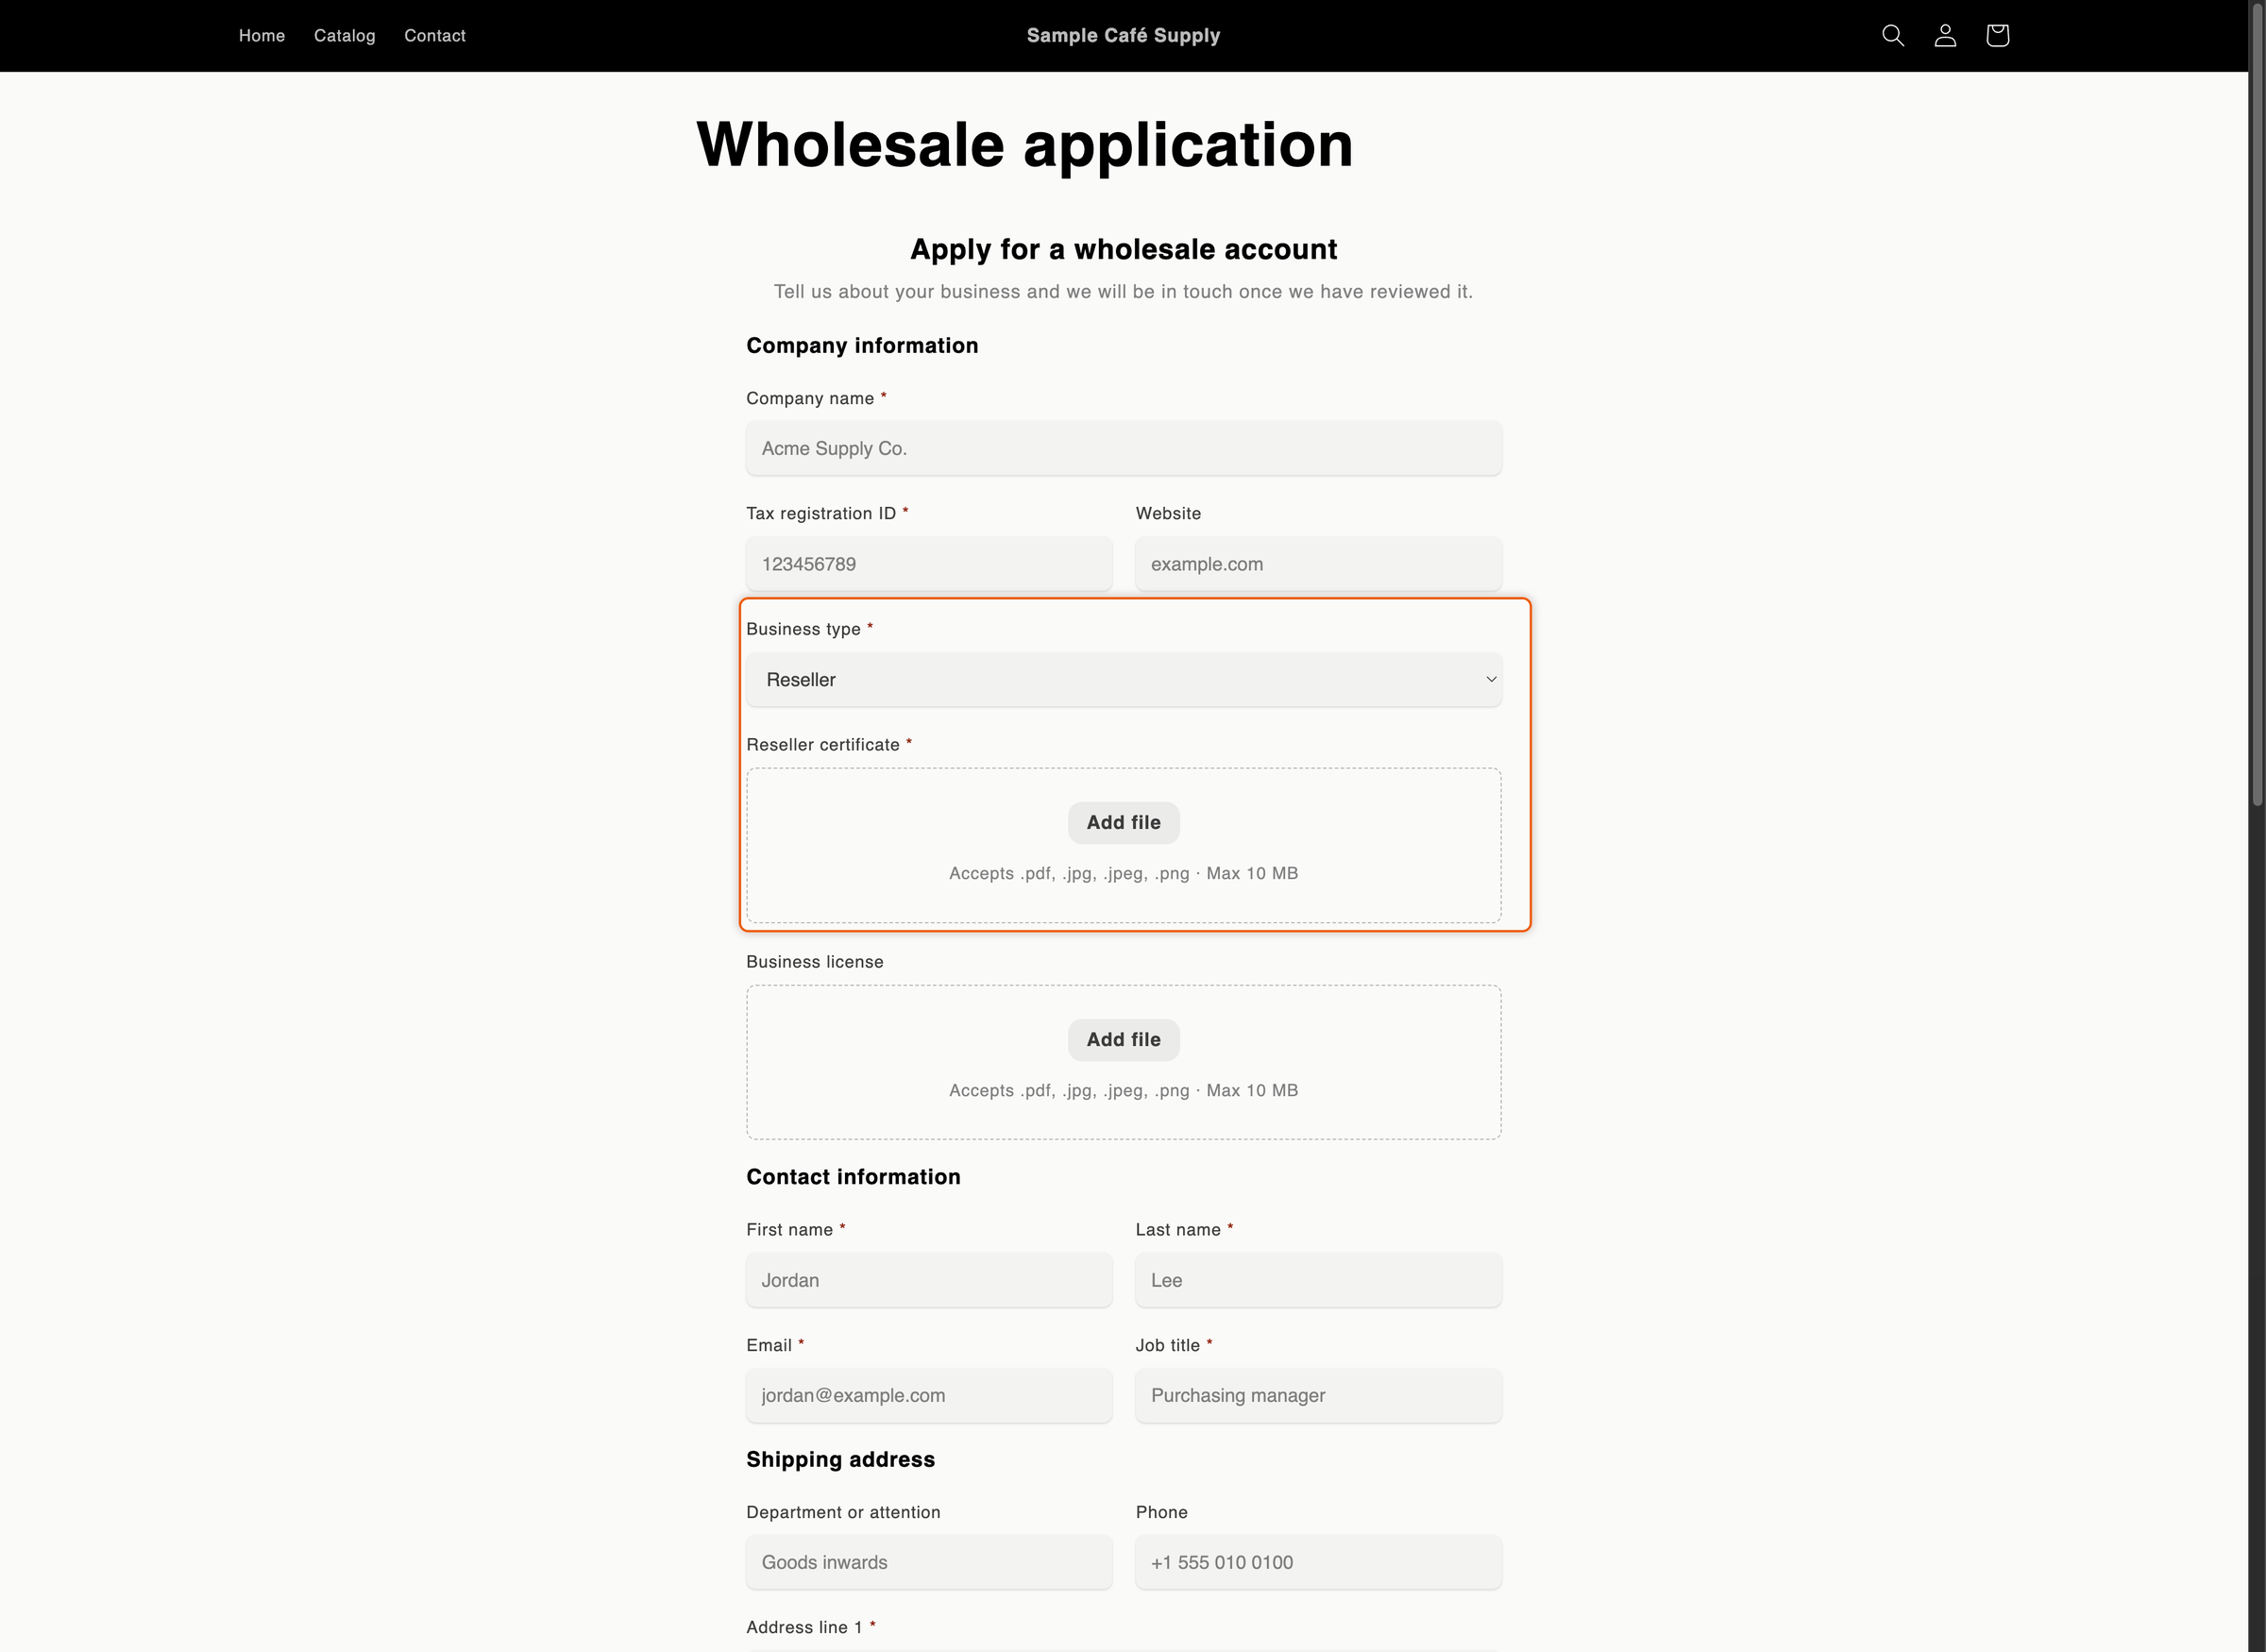
Click **Save** in the save bar. Open the form's page on your store and pick **Reseller** in **Business type**. The **Reseller certificate** upload appears, and **Submit application** asks for it if it is left empty. Buyers who pick **Café** or **Bakery** never see it.

<figure><img src="https://3844812229-files.gitbook.io/~/files/v0/b/gitbook-x-prod.appspot.com/o/spaces%2FRrf4pQPgjvb3GW7IN3Ci%2Fuploads%2Fgit-blob-05d07928007d5ea6e545c48d38ae8f573084d96f%2Fscreenshot-storefront-rules-reseller-certificate.png?alt=media" alt="The storefront form with Reseller picked as the business type and a Reseller certificate upload box shown below it."><figcaption><p>The upload only appears once the buyer says they are a reseller.</p></figcaption></figure>
{% endstep %}
{% endstepper %}

## Make a field required only sometimes

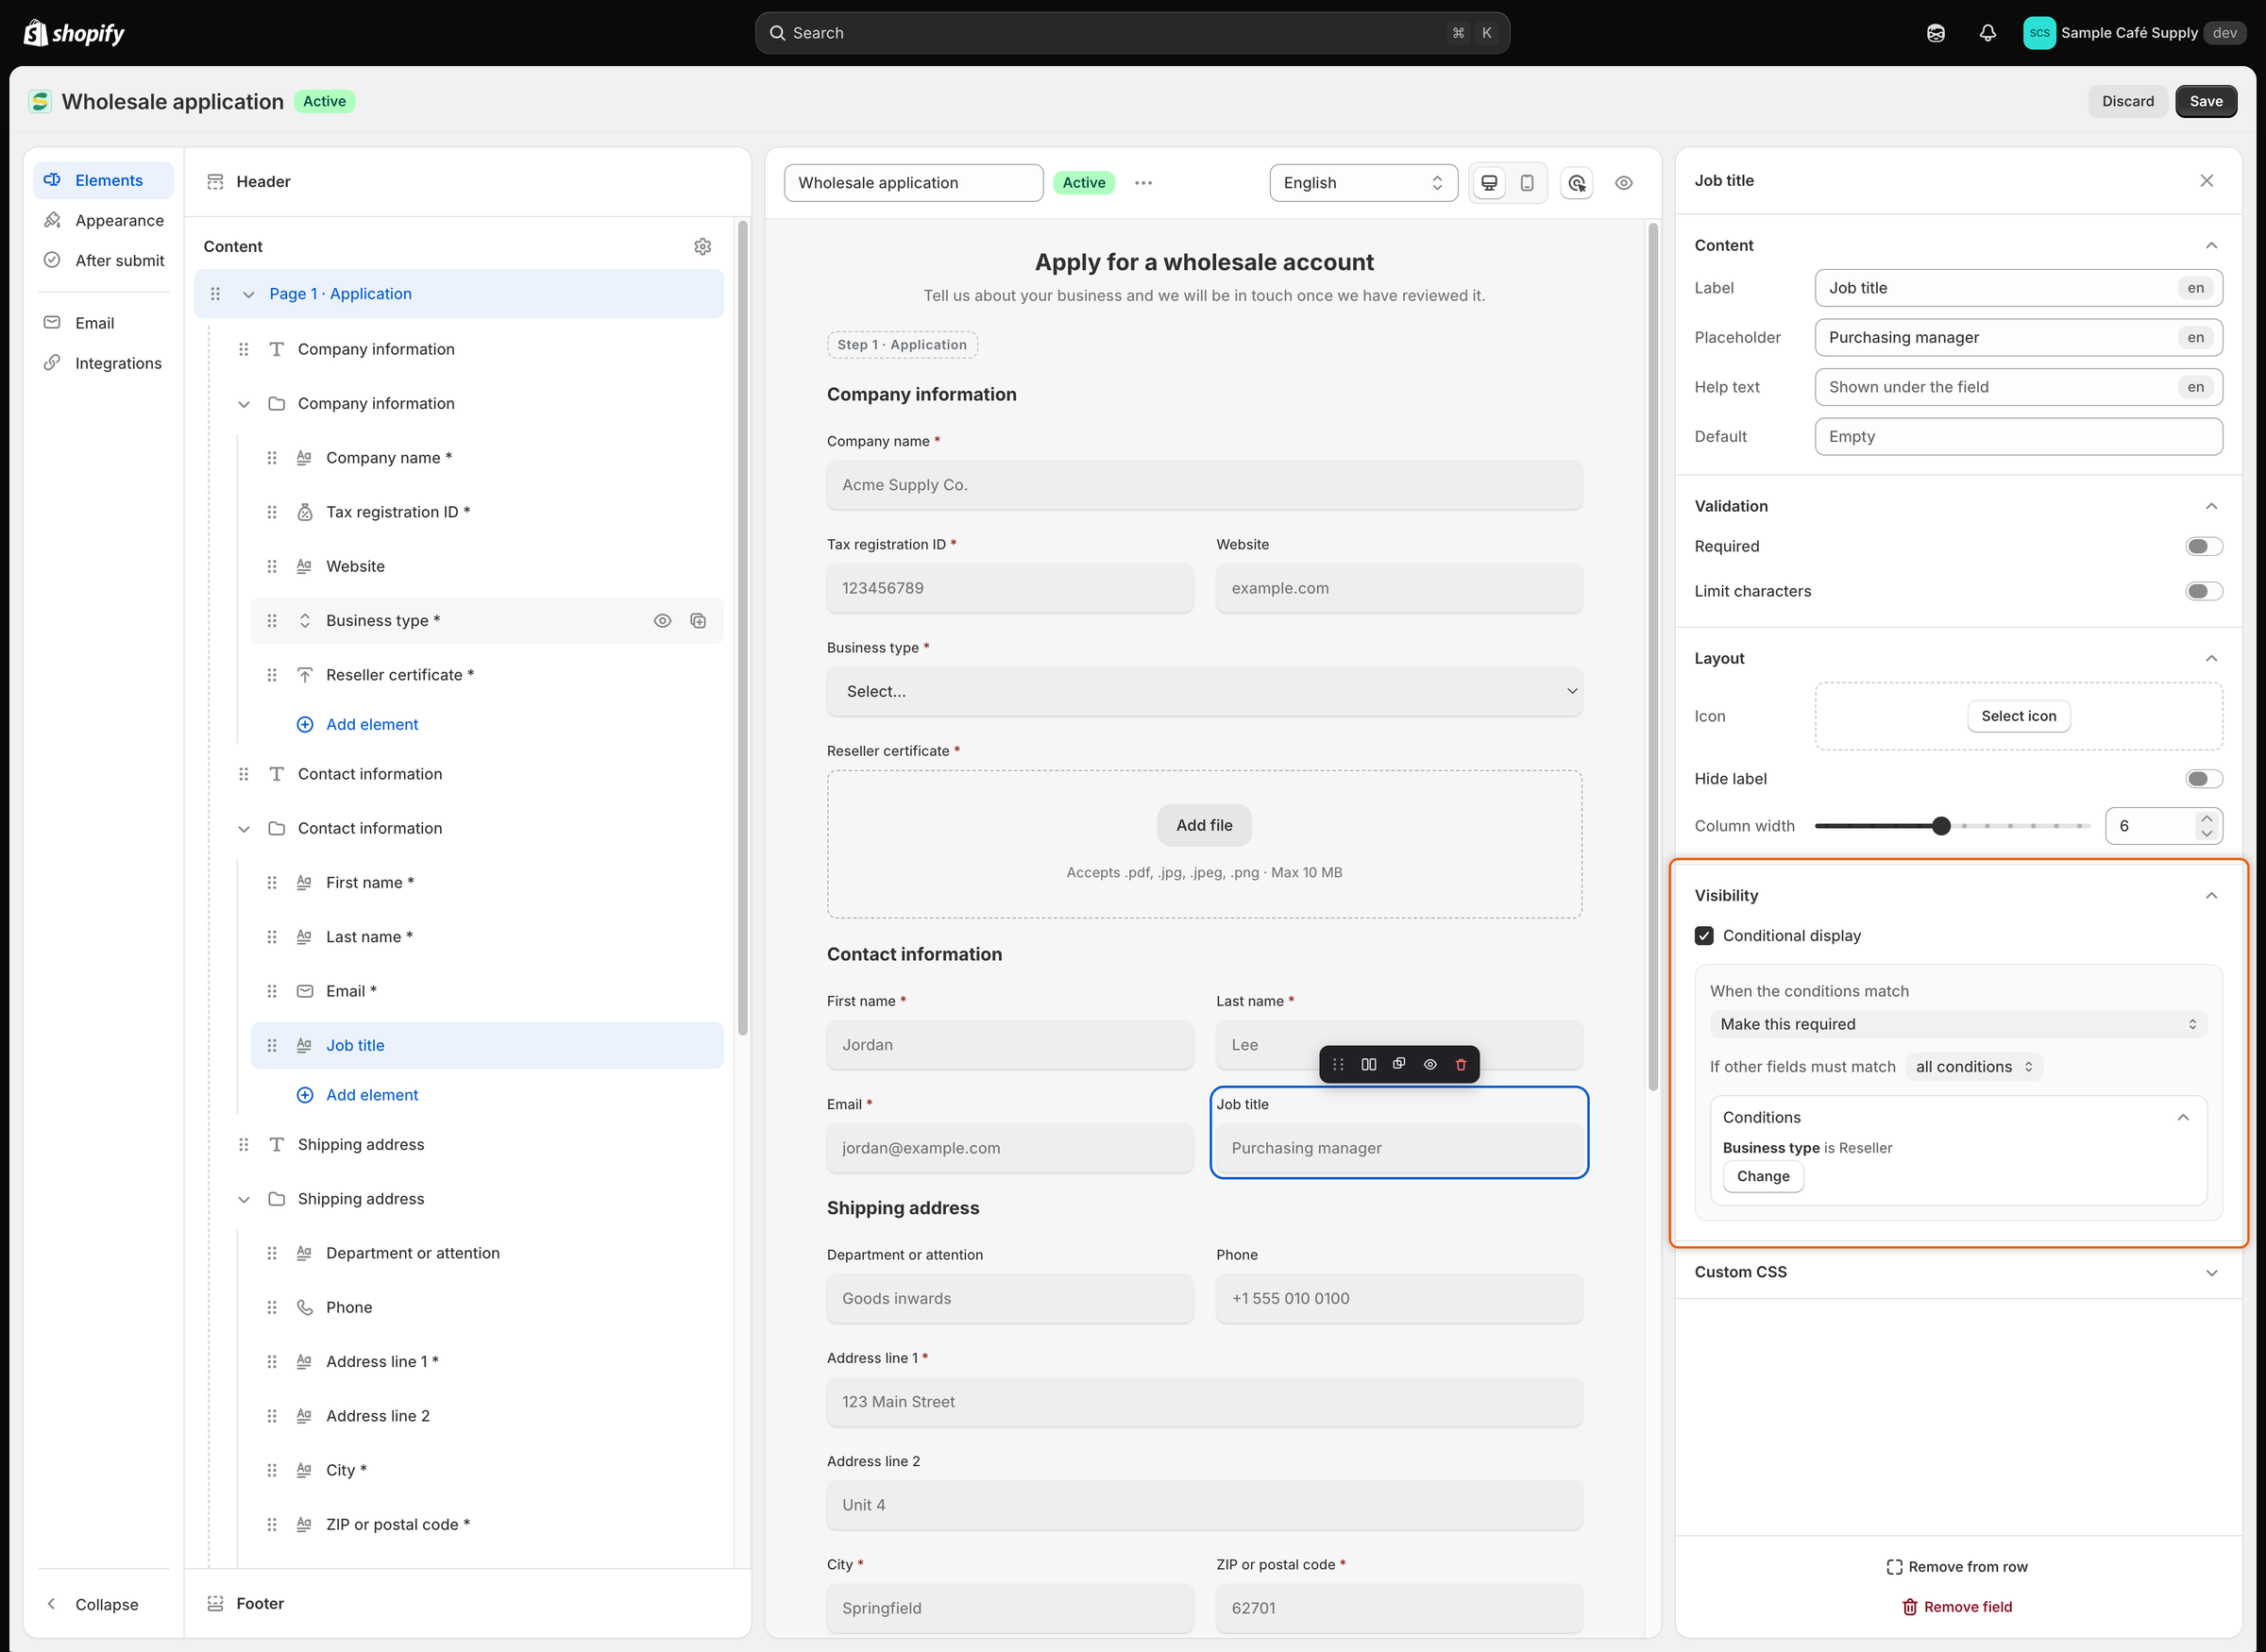
To make **Job title** required for resellers only, select **Job title** in the preview. Under **Visibility**, tick **Conditional display** and choose **Make this required**. Click **Add condition**, set **Business type** **is** **Reseller** and click **Done**. Then click **Save**.

For everyone else, **Job title** follows its own **Required** switch. **Make this optional** works the other way round: the field is required by its switch, and optional when the conditions match.

<figure><img src="https://3844812229-files.gitbook.io/~/files/v0/b/gitbook-x-prod.appspot.com/o/spaces%2FRrf4pQPgjvb3GW7IN3Ci%2Fuploads%2Fgit-blob-93d9a94b8a13a91d655702ece806dc27b7f308a6%2Fscreenshot-builder-rules-visibility-section.png?alt=media" alt="The Visibility section with Conditional display ticked, Make this required chosen and the condition Business type is Reseller listed."><figcaption><p>Each rule does one thing, and this one makes Job title required when the buyer is a reseller.</p></figcaption></figure>

## Show or hide a whole row or page

**A row.** Click the row's name in the Elements panel. Tick **Conditional display**, choose **Show** or **Hide**, and add conditions the same way. A row's rule can test fields above the row and the row's own fields.

The **Wholesale application** already has one: its **Billing address** row is hidden while the buyer ticks **Same as shipping address**. The tick box sits just above the row, outside it, so it stays on the form and the buyer can untick it.

**A page.** Click the page's name in the Elements panel. Under **Visibility**, tick **Conditional display**, choose **Show** or **Hide**, and add conditions. A page's rule can only test fields on earlier pages. A page that a rule hides is skipped, and its required fields aren't asked.

## Combine several conditions

In the **Conditions** window:

* **Add another condition** adds a condition to the same group. Once a group has two or more, a **Match** list appears at its top: **all conditions** means every condition in the group must be true, **any condition** means one is enough.
* **Add a condition group** starts a second group. **If other fields must match** then decides how the groups combine: **all conditions** needs every group to match, **any condition** needs only one.
* The bin icon (**Remove condition**) deletes a condition.

**Done** checks every condition. A condition with no field or no answer is flagged, for example **Condition 1: add an answer**.

The tests you can use depend on the field being tested:

| Field tested                                    | Tests                                                                                  | How you give the answer                                            |
| ----------------------------------------------- | -------------------------------------------------------------------------------------- | ------------------------------------------------------------------ |
| **Dropdown**, **Checkboxes**, **Radio buttons** | **is**, **is not**, **contains**, **does not contain**                                 | Pick a choice for **is** and **is not**. Type text for the others. |
| **Country**                                     | **is**, **is not**                                                                     | Pick a country.                                                    |
| **Number**                                      | **is**, **is not**                                                                     | Type the number.                                                   |
| **Checkbox** (a single tick box)                | **is**, **is not**                                                                     | **Ticked** or **Not ticked**.                                      |
| Any other field                                 | **is**, **is not**, **starts with**, **ends with**, **contains**, **does not contain** | Type the text.                                                     |

Tests ignore upper and lower case and spaces at either end. For **Checkboxes**, and for a **Dropdown** with **Allow multiple choices**, **is** matches when that choice is one of the buyer's picks.

## What happens when the buyer submits

The app applies the same rules again when the application arrives, so a buyer can't skip what your rules ask for:

* A field a rule hides is never required, and anything typed into it before it was hidden isn't saved.
* A field a rule makes required must be answered.
* A greyed-out field is never required.

If you remove a field that a rule tests, the condition shows **Deleted field** and is ignored. If you move the tested field below the field that has the rule, the **Conditions** window shows its name followed by **(later in the form)**. Open the rule and choose another field, or move the tested field back above.

## Next steps

* [Build your form](/sami-b2b-onboarding/application-forms/build-your-form.md) — add the fields your rules test.
* [Map answers to Shopify](/sami-b2b-onboarding/application-forms/map-answers-to-shopify.md) — save answers such as Business type on the Shopify company or customer.
* [Rules that decide applications](/sami-b2b-onboarding/automation/rules.md) — approve, flag or reject applications based on their answers.
* [Review an application](/sami-b2b-onboarding/reviewing-applications/review-an-application.md) — see a buyer's answers; fields your rules hid from them aren't listed.


---

# Agent Instructions
This documentation is published with GitBook. GitBook is the documentation platform designed so that both humans and AI agents can read, navigate, and reason over technical content effectively. Learn more at gitbook.com.

## Querying This Documentation
If you need additional information that is not directly available in this page, you can query the documentation dynamically by asking a question.

Perform an HTTP GET request on the current page URL with the `ask` query parameter, and the optional `goal` query parameter:

```
GET https://docs.samita.io/sami-b2b-onboarding/application-forms/field-rules.md?ask=<question>&goal=<endgoal>
```

`ask` is the immediate question: it should be specific, self-contained, and written in natural language.
`goal` is optional and describes the broader end goal you are ultimately trying to accomplish on behalf of the user. GitBook uses it to tailor the answer towards what is most useful for that goal.

The response will contain a direct answer to the question and relevant excerpts and sources from the documentation.

Use this mechanism when the answer is not explicitly present in the current page, you need clarification or additional context, or you want to retrieve related documentation sections.