> For the complete documentation index, see [llms.txt](https://docs.samita.io/llms.txt). Markdown versions of documentation pages are available by appending `.md` to page URLs; this page is available as [Markdown](https://docs.samita.io/sami-b2b-onboarding/integrations/address-autocomplete.md).
# Address autocomplete (Google Maps)
Show Google Maps address suggestions as buyers type, and fill in the city, state, postal code and country for them.
With address autocomplete, Sami B2B Onboarding shows Google's address suggestions as soon as a buyer starts typing their street. Picking a suggestion fills in the rest of that address for them. Buyers finish the form faster, and the company location the app creates in Shopify gets a clean address.
You add one Google Maps key for the store. Each form turns autocomplete on or off.
{% hint style="info" %}
Before you start, you need a Google Cloud account with billing set up. Google asks for it before its Maps APIs can be used.
{% endhint %}
## Create a browser key in Google Cloud
{% stepper %}
{% step %}
### Pick a project
Open the [Google Cloud console](https://console.cloud.google.com/apis/library) and create a project, or pick the one you want to use.
{% endstep %}
{% step %}
### Turn on the APIs
In **APIs & Services › Library**, search for and enable **Maps JavaScript API**, then **Places API**. The first loads the suggestions on your storefront. The second finds the addresses.
{% endstep %}
{% step %}
### Create the key
In **APIs & Services › Credentials**, click **Create credentials › API key**. Copy the key. It starts with `AIza`.
{% endstep %}
{% step %}
### Restrict the key to your store
Open the key's settings:
1. Under **Application restrictions**, choose **Websites** and add each domain your store is reached on, for example `https://example.com/*` and `https://your-store.myshopify.com/*`.
2. Under **API restrictions**, choose **Restrict key** and select **Maps JavaScript API** and **Places API**.
3. Click **Save**.
{% endstep %}
{% endstepper %}
{% hint style="warning" %}
The key is written into your storefront page, so anyone can read it there. The website restriction is what stops someone else from using it, and running up your Google bill. The app's panel reminds you: **This key is printed into the storefront page, so restrict it to your store's domain in the Google console.**
{% endhint %}
## Add the key and turn it on
{% stepper %}
{% step %}
### Open the Address autocomplete panel
Go to **Forms** and click **Edit** beside the form. In the rail on the left, click **Integrations**. Under **Connected apps**, click **Set up** on the **Address autocomplete** row.
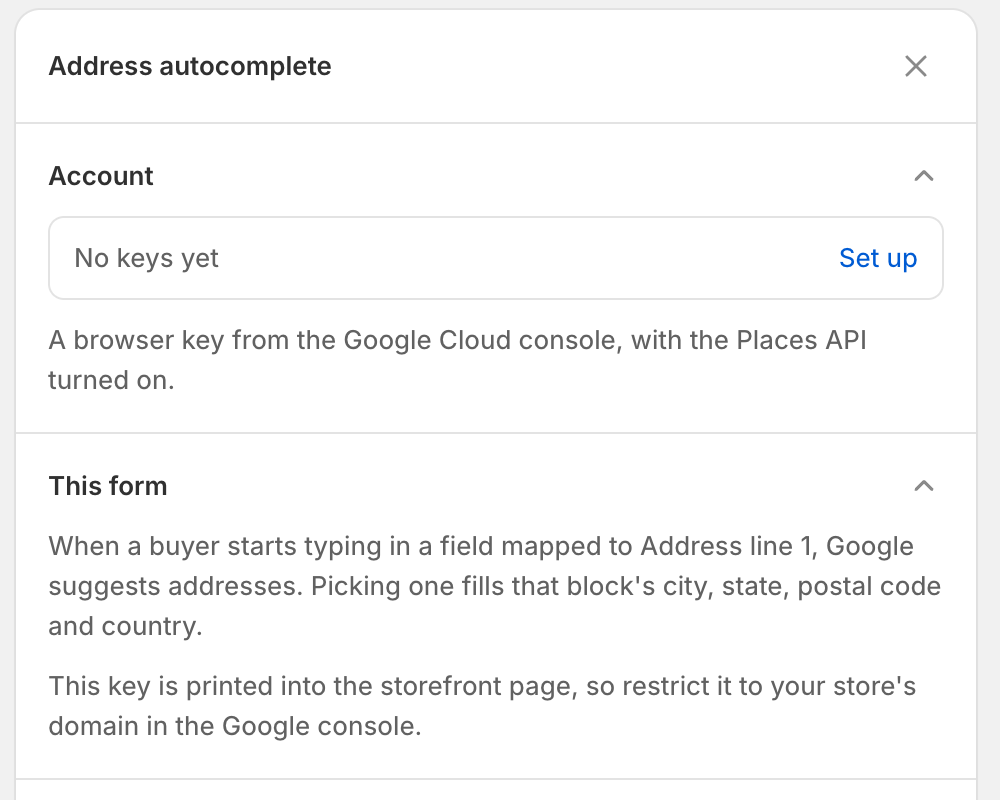
The **Address autocomplete** panel opens with two sections: **Account** and **This form**.
Click Set up to add your key; the panel explains which field gets suggestions and reminds you to restrict the key.
{% endstep %}
{% step %}
### Paste the key
Under **Account**, click **Set up**. In the **Address autocomplete** dialog, paste the key into **Maps API key** and click **Save**. You see **Keys saved**, and the **Account** row shows the key.
{% endstep %}
{% step %}
### Enable it
At the bottom of the panel, click **Enable**. The button changes to **Disable**, and the **Address autocomplete** row in **Connected apps** shows **Active**. If no key is saved yet, a banner reads **Add your Maps API key first.**
{% endstep %}
{% step %}
### Save the form
Click **Save** in the save bar. You see **Form saved**.
{% endstep %}
{% endstepper %}
## Which fields it fills
Suggestions appear in every field that's mapped to **Address line 1** in the form's **Shopify** panel. As the panel says, **When a buyer starts typing in a field mapped to Address line 1, Google suggests addresses. Picking one fills that block's city, state, postal code and country.**
When the buyer picks a suggestion, the app fills the fields of the same address that are mapped to:
| Mapped to | Filled with |
| --------------------- | --------------------------------- |
| **Address line 1** | The street number and street name |
| **City** | The city or town |
| **State / province** | The state or province |
| **ZIP / postal code** | The postal code |
| **Country** | The country |
* **Address line 2**, **Recipient** and **Phone** are left for the buyer to fill in.
* The shipping and billing addresses are kept apart. Picking a shipping address never changes the billing fields.
* The buyer can still change any box that was filled in.
* The suggestions are in the language of the store page.
The **Wholesale application** form the app creates already maps these fields for both addresses. If you build your own address questions, map them in **Company location**. See [Map answers to Shopify](/sami-b2b-onboarding/application-forms/map-answers-to-shopify.md).
## Check it on your storefront
{% stepper %}
{% step %}
### Open the form
Go to **Forms** and click **Copy link** beside the form. Open the link in a private browser window.
{% endstep %}
{% step %}
### Type an address
Under **Shipping address**, start typing in **Address line 1**, for example `123 Main Street`. Google's list of suggestions opens under the box.
{% endstep %}
{% step %}
### Pick a suggestion
Click an address in the list. **City**, **ZIP or postal code**, **Country** and **State or province** fill in for that address.
{% endstep %}
{% endstepper %}
If no suggestions appear:
| Check | What to do |
| --------------------------------------------------------------------------------------------- | -------------------------------------------------------------------------------------------------- |
| The **Address autocomplete** row shows **Active**, and the form is saved. | Click **Enable** in the panel, then **Save**. |
| The key's website restriction includes the domain you're testing on. | Your store answers on your own domain and on its `myshopify.com` domain. Add both in Google Cloud. |
| **Maps JavaScript API** and **Places API** are enabled, and billing is set up on the project. | Turn them on in **APIs & Services › Library**. |
| The field is mapped to **Address line 1**. | Map it in the **Shopify** panel, under **Company location**. |
## Turn it off
* **On one form**: open its **Address autocomplete** panel, click **Disable**, then **Save**.
* **On every form**: under **Account**, click **Change**, then **Remove keys**. The dialog warns **Every form in this store stops using Address autocomplete until you add keys again.** Click **Remove keys** to confirm.
## Next steps
* [Map answers to Shopify](/sami-b2b-onboarding/application-forms/map-answers-to-shopify.md) — map your address questions so they fill the company location.
* [Build your form](/sami-b2b-onboarding/application-forms/build-your-form.md) — add address fields to a form.
* [Captcha (reCAPTCHA, hCaptcha)](/sami-b2b-onboarding/integrations/captcha.md) — keep bots away from the same form.
---
# Agent Instructions
This documentation is published with GitBook. GitBook is the documentation platform designed so that both humans and AI agents can read, navigate, and reason over technical content effectively. Learn more at gitbook.com.
## Querying This Documentation
If you need additional information that is not directly available in this page, you can query the documentation dynamically by asking a question.
Perform an HTTP GET request on the current page URL with the `ask` query parameter, and the optional `goal` query parameter:
```
GET https://docs.samita.io/sami-b2b-onboarding/integrations/address-autocomplete.md?ask=&goal=
```
`ask` is the immediate question: it should be specific, self-contained, and written in natural language.
`goal` is optional and describes the broader end goal you are ultimately trying to accomplish on behalf of the user. GitBook uses it to tailor the answer towards what is most useful for that goal.
The response will contain a direct answer to the question and relevant excerpts and sources from the documentation.
Use this mechanism when the answer is not explicitly present in the current page, you need clarification or additional context, or you want to retrieve related documentation sections.